
10 Cozy Winter Soup Recipes to Warm Your Soul
Here’s the honest truth: I’ve made soup three times this week already, and I’m not even sorry about it. When January hits and the cold settles in like an unwelcome houseguest, soup becomes my love language. These 10 winter soup recipes have saved countless dinners at my house when I needed something warm, filling, and ready without the fuss.
From thick and creamy to light and brothy, each bowl delivers comfort without requiring culinary school skills. Most take under an hour, use ingredients I actually keep on hand, and taste even better as leftovers. Ready to find your new go-to?
What Are Winter Soup Recipes?
Ever wonder why we crave soup when it’s freezing outside? Winter soup recipes are those stick-to-your-ribs bowls that make you forget there’s a blizzard happening. They’re heartier than summer soups, packed with root vegetables, beans, and warming spices that heat you from the inside out.
My kids call them “hug bowls” because that’s exactly what they feel like. These aren’t light appetizers. They’re meals that satisfy and nourish, perfect for those nights when you need something filling without spending hours in the kitchen. Which one are you making first?
Why You’ll Love These Winter Soup Recipes
Budget-Friendly Without Sacrificing Flavor
Making soup at home costs pennies compared to restaurant prices or those overpriced cartons at the store. Most of these recipes use affordable staples like potatoes, carrots, beans, and broth. One pot feeds my family of four with plenty left for lunches the next day. That’s serious value.
Incredibly Flexible and Forgiving
Here’s what I love most: soup doesn’t judge. Out of carrots? Use what you have. Need more protein? Toss it in. These recipes are blueprints, not rigid rules. They adapt to your pantry, your preferences, and whatever vegetables are wilting in your cridge drawer.
Perfect for Meal Prep and Freezing
Sunday soup-making has become my ritual. I make a double batch, freeze half, and suddenly I have homemade comfort food ready for those chaotic weeknights. Most of these freeze beautifully for up to three months. Just like my popular slow cooker beef stew, the flavors actually improve after a day or two in the fridge.
This recipe hasn’t been personally tested and was created with AI guidance; we do our best to be accurate.
Let’s dive into these warming bowls that’ll get you through winter!
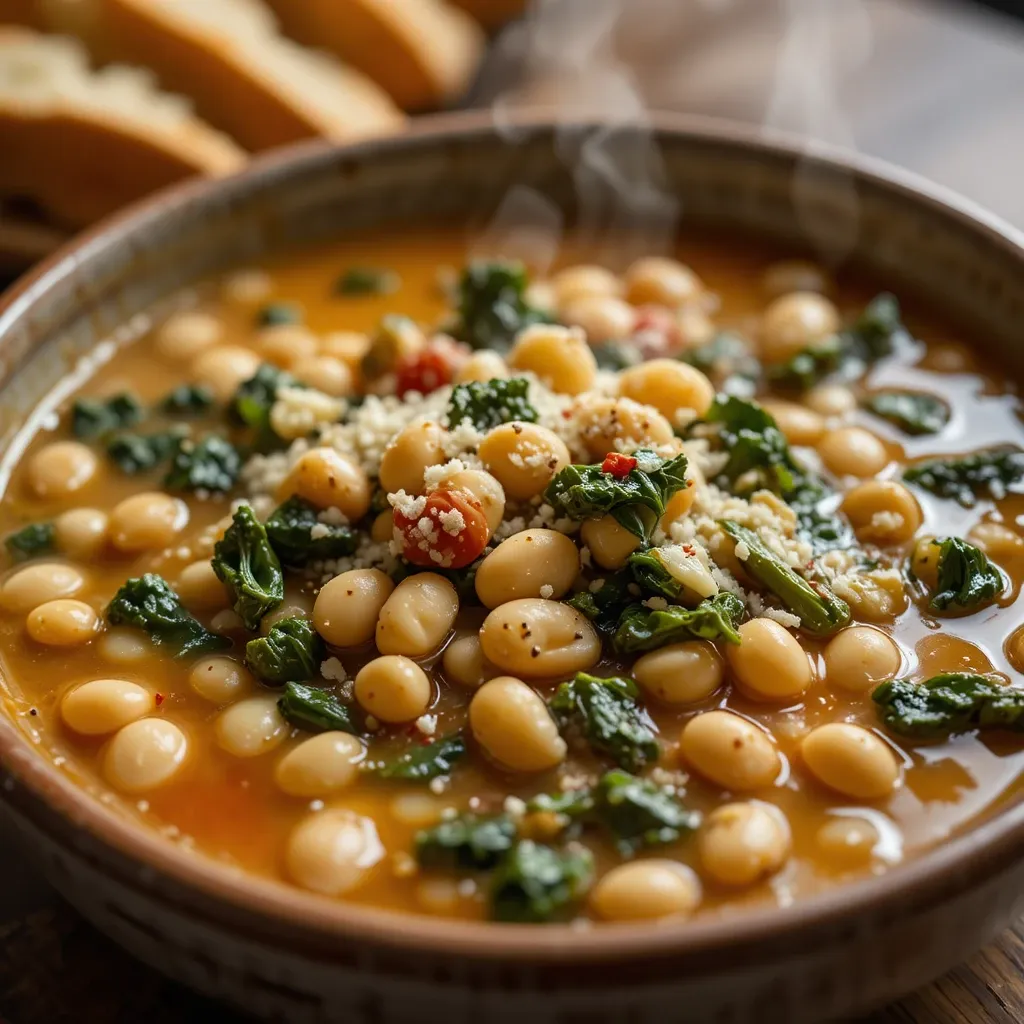
Recipe 1: Tuscan White Bean Soup with Kale
Quick Overview
This rustic Italian soup is hearty, healthy, and absolutely delicious. Creamy white beans, tender kale, and aromatic herbs create layers of flavor that’ll transport you straight to Tuscany.
- Preparation time: 10 minutes
- Cooking time: 35 minutes
- Total time: 45 minutes
- Servings: 6
Key Ingredients for Tuscan White Bean Soup with Kale
- 3 tablespoons olive oil
- 1 yellow onion, chopped
- 4 garlic cloves, sliced thin
- 1 teaspoon dried rosemary
- 1/2 teaspoon red pepper flakes
- 2 cans (15 oz each) cannellini beans, drained and rinsed
- 6 cups vegetable broth
- 1 can (14 oz) crushed tomatoes
- 4 cups chopped kale, stems removed
- 2 tablespoons lemon juice
- Salt and black pepper to taste
- Parmesan cheese for serving (optional)
Step-by-Step Instructions
Build Your Flavor Base
Heat olive oil in a large pot over medium heat. Add chopped onion and cook for about 5 minutes until it softens and becomes translucent. Toss in the sliced garlic, rosemary, and red pepper flakes. Stir constantly for about a minute until your kitchen smells amazing.
Add Beans and Tomatoes
Pour in the cannellini beans, vegetable broth, and crushed tomatoes. Stir everything together and bring to a gentle boil. Once boiling, reduce the heat to low and let it simmer uncovered for 20 minutes. This allows all those flavors to get friendly with each other.
Mash for Creaminess
Here’s my favorite trick: use a potato masher to crush about one-third of the beans directly in the pot. This creates a naturally creamy texture without adding any cream. The soup should be thick but still spoonable.
Finish with Greens
Add the chopped kale and let it wilt into the soup for about 5 minutes. Stir in the lemon juice just before serving. That brightness from the lemon makes everything pop. Taste and season with salt and pepper as needed.
What to Serve Tuscan White Bean Soup With
Crusty Italian bread is non-negotiable here. Use it to soak up every last drop. A simple arugula salad with balsamic vinaigrette cuts through the richness perfectly. For a complete Italian feast, serve alongside roasted vegetables or garlic bread.
Top Tips for Perfecting Tuscan White Bean Soup
Don’t skip mashing some of the beans. That’s what creates the perfect creamy-but-chunky texture. If you can find fresh rosemary, use about a tablespoon of chopped leaves instead of dried. The flavor is incredible.
Kale can be tough, so make sure you remove those thick stems before chopping. If kale isn’t your thing, spinach or Swiss chard work beautifully too. For extra depth, add a Parmesan rind while the soup simmers and remove it before serving.
The red pepper flakes add warmth without heat. If you like spice, double them. This soup thickens as it sits, so add more broth when reheating.
Storing and Reheating Tips
Store in an airtight container in the refrigerator for up to 5 days. This is one of those soups that tastes even better the next day. Reheat on the stovetop over medium heat, adding a splash of broth to thin if needed.
Freeze in portion-sized containers for up to 3 months. The beans and kale freeze perfectly. Thaw overnight in the fridge before reheating gently on the stove.
Recipe 2: Roasted Cauliflower and Garlic Soup

Quick Overview
Roasting the cauliflower transforms this humble vegetable into something spectacular. This soup is velvety, slightly nutty, and surprisingly elegant for how simple it is to make.
- Preparation time: 15 minutes
- Cooking time: 45 minutes
- Total time: 60 minutes
- Servings: 6
Key Ingredients for Roasted Cauliflower and Garlic Soup
- 1 large head cauliflower, cut into florets
- 8 garlic cloves, peeled
- 4 tablespoons olive oil, divided
- 1 onion, diced
- 5 cups vegetable broth
- 1/2 teaspoon ground cumin
- 1/4 teaspoon nutmeg
- 1/2 cup coconut milk or heavy cream
- Salt and pepper to taste
- Fresh chives for garnish
- Toasted pumpkin seeds for crunch
Step-by-Step Instructions
Roast the Cauliflower
Preheat your oven to 425°F. Spread cauliflower florets and whole garlic cloves on a large baking sheet. Drizzle with 3 tablespoons of olive oil and season generously with salt and pepper. Roast for 30-35 minutes, stirring halfway through, until the cauliflower is golden brown and caramelized at the edges. This step is crucial for developing deep flavor.
Sauté the Aromatics
While the cauliflower roasts, heat the remaining tablespoon of olive oil in a large pot over medium heat. Add diced onion and cook for 6-7 minutes until soft and lightly golden. The onion adds sweetness that balances the nutty cauliflower.
Blend Everything Together
Add the roasted cauliflower and garlic to the pot with the onions. Pour in the vegetable broth, cumin, and nutmeg. Bring to a simmer for 10 minutes. Use an immersion blender to puree until completely smooth and creamy. If you don’t have an immersion blender, carefully transfer to a regular blender in batches.
Add Cream and Season
Stir in the coconut milk or heavy cream. This adds richness and silkiness. Taste and adjust seasoning with salt and pepper. The soup should be thick and velvety. Serve hot with fresh chives and toasted pumpkin seeds for texture.
What to Serve Roasted Cauliflower and Garlic Soup With
This elegant soup pairs beautifully with a grilled cheese sandwich or warm sourdough toast. A crisp green salad with lemon vinaigrette provides a fresh contrast. For a light dinner, this soup is substantial enough on its own with good bread.
Top Tips for Perfecting Roasted Cauliflower and Garlic Soup
Don’t rush the roasting. Those golden-brown edges are where all the flavor lives. If your cauliflower isn’t caramelized, keep it in the oven a bit longer.
For dairy-free, use coconut milk. It adds a subtle sweetness that complements the roasted flavors. Cashew cream also works wonderfully.
The nutmeg might seem like an odd addition, but it adds warmth and complexity. Don’t skip it. If the soup is too thick, thin it with additional broth until you reach your desired consistency.
Save some roasted cauliflower florets before blending to use as a garnish. They add beautiful texture and visual appeal.
Storing and Reheating Tips
Refrigerate in an airtight container for up to 5 days. Reheat gently on the stovetop, stirring occasionally and adding broth if it’s thickened too much.
This soup freezes exceptionally well for up to 3 months. The smooth texture remains perfect after thawing. Reheat slowly on low heat, whisking occasionally to maintain creaminess.
Recipe 3: Spiced Carrot and Ginger Soup

Quick Overview
Bright, vibrant, and packed with warming spices, this carrot ginger soup is like sunshine in a bowl. It’s naturally sweet, incredibly smooth, and comes together quickly for busy weeknights.
- Preparation time: 10 minutes
- Cooking time: 30 minutes
- Total time: 40 minutes
- Servings: 6
Key Ingredients for Spiced Carrot and Ginger Soup
- 2 tablespoons coconut oil or butter
- 1 onion, chopped
- 3-inch piece fresh ginger, peeled and minced
- 2 lbs carrots, peeled and chopped
- 3 garlic cloves, minced
- 1 teaspoon ground coriander
- 1/2 teaspoon turmeric
- 5 cups vegetable broth
- 1 can (13.5 oz) coconut milk
- 2 tablespoons maple syrup
- Juice of 1 lime
- Salt and pepper to taste
- Fresh cilantro for garnish
Step-by-Step Instructions
Start with Aromatics
Melt coconut oil in a large pot over medium heat. Add chopped onion and cook for 5 minutes until softened. Add the minced ginger and garlic, stirring for another minute. Your kitchen will smell incredible at this point.
Add Carrots and Spices
Toss in the chopped carrots, coriander, and turmeric. Stir everything together for 2 minutes to toast the spices. This step unlocks their full flavor potential.
Simmer Until Tender
Pour in the vegetable broth and bring to a boil. Reduce heat and simmer uncovered for 20-25 minutes until the carrots are completely tender when pierced with a fork.
Blend and Finish
Use an immersion blender to puree the soup until silky smooth. Stir in coconut milk, maple syrup, and lime juice. The lime brightens everything beautifully. Season with salt and pepper. Garnish with fresh cilantro before serving.
What to Serve Spiced Carrot and Ginger Soup With
Serve with warm naan bread, pita, or crusty whole grain bread. A cucumber and tomato salad adds freshness. This soup also pairs wonderfully with roasted chickpeas or a simple quinoa salad for a complete meal.
Top Tips for Perfecting Spiced Carrot and Ginger Soup
Fresh ginger makes a huge difference here. Don’t substitute with ground ginger if you can avoid it. The fresh stuff has a bright, zingy quality that dried ginger can’t match.
The maple syrup balances the earthiness of the carrots and spices. Start with the suggested amount and adjust to taste. Some carrots are naturally sweeter than others.
For extra richness, reserve a tablespoon of coconut milk to drizzle on top before serving. A sprinkle of toasted coconut flakes adds wonderful texture and visual appeal.
This soup can easily be made in an Instant Pot. Sauté the aromatics, add everything except the coconut milk, lime, and maple syrup. Pressure cook for 8 minutes, then blend and stir in the finishing ingredients.
Storing and Reheating Tips
Store in the refrigerator for up to 5 days. The flavors continue to develop overnight, making leftovers even better. Reheat on the stovetop over medium heat, stirring occasionally.
Freeze for up to 4 months in freezer-safe containers. The smooth texture and bright color remain perfect after thawing. Reheat gently and add a fresh squeeze of lime before serving.
Recipe 4: Chicken and Wild Rice Soup

Quick Overview
This comforting soup is loaded with tender chicken, nutty wild rice, and vegetables in a creamy broth. It’s the kind of soup that makes you feel taken care of, perfect for cold winter nights.
- Preparation time: 15 minutes
- Cooking time: 45 minutes
- Total time: 60 minutes
- Servings: 6
Key Ingredients for Chicken and Wild Rice Soup
- 3 tablespoons butter
- 1 onion, diced
- 3 carrots, sliced
- 3 celery stalks, sliced
- 3 garlic cloves, minced
- 1/3 cup all-purpose flour
- 6 cups chicken broth
- 1 cup wild rice blend, uncooked
- 1 teaspoon dried thyme
- 2 bay leaves
- 1 lb boneless chicken breasts or thighs
- 1 cup heavy cream or half-and-half
- 2 cups fresh baby spinach
- Salt and pepper to taste
Step-by-Step Instructions
Create Your Base
Melt butter in a large pot over medium heat. Add onion, carrots, and celery. Cook for 7-8 minutes until vegetables soften. Add garlic and stir for another minute.
Make a Roux
Sprinkle flour over the vegetables and stir constantly for 2-3 minutes. This creates a roux that’ll thicken your soup beautifully. The mixture should look paste-like and smell slightly nutty.
Add Liquids and Rice
Gradually whisk in the chicken broth to avoid lumps. Add wild rice, thyme, and bay leaves. Nestle the chicken breasts into the pot. Bring to a boil, then reduce to a simmer. Cover and cook for 35-40 minutes until the rice is tender and chicken is cooked through.
Shred and Finish
Remove chicken from the pot and shred it with two forks. Return shredded chicken to the pot. Stir in heavy cream and spinach. Remove bay leaves. Cook for 2-3 more minutes until spinach wilts. Season with salt and pepper.
What to Serve Chicken and Wild Rice Soup With
Serve with warm biscuits, dinner rolls, or crusty French bread. A simple cucumber salad or coleslaw adds crunch and freshness. This hearty soup is filling enough to be a complete meal on its own.
Top Tips for Perfecting Chicken and Wild Rice Soup
Wild rice takes longer to cook than white rice, so don’t rush it. If your rice isn’t tender after 40 minutes, keep simmering with the lid on until it’s done.
Using chicken thighs instead of breasts keeps the meat more tender and adds richer flavor. Rotisserie chicken is a great shortcut. Just shred it and add it when you stir in the cream.
For a lighter version, use milk instead of heavy cream. The soup won’t be quite as rich, but it’s still delicious. Add cream slowly while stirring to prevent curdling.
The soup thickens significantly as it sits. When reheating, have extra chicken broth ready to thin it to your preferred consistency.
Storing and Reheating Tips
Refrigerate for up to 4 days in an airtight container. The rice will absorb liquid over time, so add broth when reheating. Heat gently on the stovetop over medium-low heat.
You can freeze this soup for up to 2 months, but note that the texture of the rice and cream may change slightly. Thaw overnight in the refrigerator and reheat slowly, stirring frequently.
Recipe 5: Moroccan Red Lentil Soup

Quick Overview
Fragrant with warm spices and bright with lemon, this red lentil soup is healthy, satisfying, and bursting with flavor. It’s naturally vegan and comes together in one pot.
- Preparation time: 10 minutes
- Cooking time: 30 minutes
- Total time: 40 minutes
- Servings: 6
Key Ingredients for Moroccan Red Lentil Soup
- 2 tablespoons olive oil
- 1 onion, diced
- 3 garlic cloves, minced
- 1 tablespoon fresh ginger, grated
- 2 teaspoons ground cumin
- 1 teaspoon ground coriander
- 1/2 teaspoon cinnamon
- 1/4 teaspoon cayenne pepper
- 1 1/2 cups red lentils, rinsed
- 1 can (14 oz) diced tomatoes
- 6 cups vegetable broth
- 1 can (13.5 oz) coconut milk
- Juice of 1 lemon
- Salt and pepper to taste
- Fresh cilantro and lemon wedges for serving
Step-by-Step Instructions
Toast Your Spices
Heat olive oil in a large pot over medium heat. Add diced onion and cook for 5 minutes until soft. Add garlic and ginger, cooking for 1 minute more. Toss in cumin, coriander, cinnamon, and cayenne. Stir for about 30 seconds until the spices are fragrant. This toasting step is essential for deep flavor.
Add Lentils and Liquids
Pour in the rinsed red lentils, diced tomatoes, and vegetable broth. Stir well and bring to a boil. Once boiling, reduce heat to medium-low and simmer uncovered for 20-25 minutes. The lentils will break down and create a naturally creamy texture.
Blend for Smoothness
For a smoother soup, use an immersion blender to partially blend the soup, leaving some texture. You can also leave it chunky if you prefer. Red lentils naturally become quite creamy, so blending is optional.
Finish with Coconut and Lemon
Stir in coconut milk and lemon juice. The coconut adds richness while the lemon brings brightness that balances all the warm spices. Taste and adjust seasoning. Serve hot with fresh cilantro and extra lemon wedges.
What to Serve Moroccan Red Lentil Soup With
Warm pita bread or naan is perfect for scooping. Serve alongside a cucumber and tomato salad, tabbouleh, or roasted vegetables. This soup is protein-rich and filling enough to be a complete meal with just bread.
Top Tips for Perfecting Moroccan Red Lentil Soup
Red lentils cook much faster than green or brown lentils and break down into a creamy consistency. Don’t substitute with other lentil varieties for this recipe or you’ll end up with a different texture.
The spice combination is what makes this soup special. Don’t skip the cinnamon. It adds warmth without making the soup sweet. Adjust the cayenne based on your heat preference.
Fresh ginger makes a noticeable difference. If you don’t have fresh, use 1 teaspoon of ground ginger instead.
This soup thickens as it sits. Add more broth when reheating to reach your desired consistency. The lemon juice should be added just before serving for the brightest flavor.
Storing and Reheating Tips
Store in an airtight container in the refrigerator for up to 6 days. This soup actually improves overnight as the flavors meld. Reheat on the stovetop, adding broth or water to thin as needed.
Freeze for up to 4 months. Red lentils freeze beautifully. Thaw overnight in the fridge and reheat gently. Add a fresh squeeze of lemon after reheating to brighten the flavors.
Recipe 6: Loaded Baked Potato Soup

Quick Overview
All the flavors of a loaded baked potato in creamy soup form. This indulgent bowl is thick, rich, and topped with all your favorite baked potato fixings.
- Preparation time: 15 minutes
- Cooking time: 35 minutes
- Total time: 50 minutes
- Servings: 6
Key Ingredients for Loaded Baked Potato Soup
- 4 tablespoons butter
- 1 onion, diced
- 3 garlic cloves, minced
- 1/3 cup all-purpose flour
- 4 cups chicken or vegetable broth
- 3 lbs russet potatoes, peeled and cubed
- 1 1/2 cups whole milk
- 1 cup heavy cream
- 1 1/2 cups shredded sharp cheddar cheese
- 1/2 cup sour cream
- Salt and pepper to taste
- Toppings: shredded cheddar, green onions, sour cream, turkey bacon bits (optional)
Step-by-Step Instructions
Build the Base
Melt butter in a large pot over medium heat. Add diced onion and cook for 6 minutes until soft and lightly golden. Add minced garlic and cook for 1 minute more. Sprinkle flour over the mixture and stir constantly for 2-3 minutes to create a roux.
Add Potatoes and Broth
Gradually whisk in the broth, making sure no lumps form. Add cubed potatoes and bring to a boil. Reduce heat to medium-low and simmer for 15-20 minutes until potatoes are fork-tender.
Mash for Texture
Using a potato masher, mash about half of the potatoes directly in the pot. This creates that perfect thick, creamy base while leaving some chunky pieces for texture. Don’t puree everything smooth.
Add Dairy and Cheese
Reduce heat to low. Slowly stir in milk, heavy cream, and shredded cheddar cheese. Stir constantly until the cheese melts completely. Remove from heat and stir in sour cream. Season generously with salt and pepper.
What to Serve Loaded Baked Potato Soup With
This rich soup pairs well with a crisp green salad, steamed broccoli, or roasted asparagus to balance the heaviness. Serve with crusty bread or garlic toast. It’s definitely filling enough to be a complete meal.
Top Tips for Perfecting Loaded Baked Potato Soup
Russet potatoes work best because they break down nicely and create natural creaminess. Waxy potatoes like red or Yukon gold won’t give you the same texture.
Use freshly shredded cheese for the smoothest results. Pre-shredded cheese contains anti-caking agents that can make the soup grainy.
Don’t let the soup boil after adding the dairy products or it may curdle. Keep it at a gentle simmer or lower.
For a lighter version, use milk instead of heavy cream and reduce the cheese. It won’t be quite as indulgent, but still delicious.
The soup will thicken considerably as it cools. Thin with additional broth or milk when reheating.
Storing and Reheating Tips
Refrigerate for up to 4 days. Reheat very gently on low heat, stirring frequently to prevent scorching. Add milk or broth to thin as needed.
This soup can be frozen for up to 2 months, though dairy-based soups sometimes separate slightly when thawed. Reheat slowly and whisk well to bring it back together.
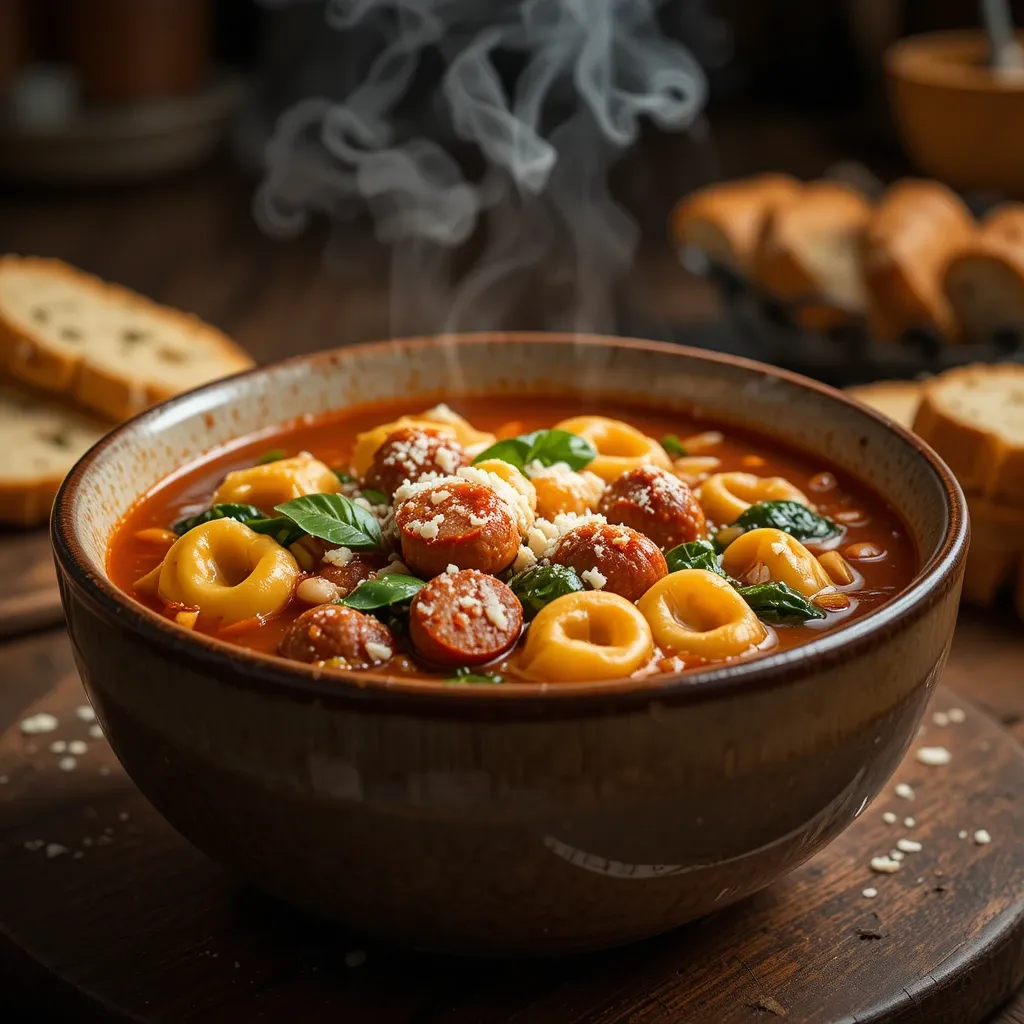
Recipe 7: Italian Sausage and Tortellini Soup
Quick Overview
Hearty Italian sausage, cheese-filled tortellini, and tender vegetables in a savory tomato broth. This soup is comfort food that feels special enough for company.
- Preparation time: 10 minutes
- Cooking time: 25 minutes
- Total time: 35 minutes
- Servings: 6
Key Ingredients for Italian Sausage and Tortellini Soup
- 1 lb Italian turkey or chicken sausage, casings removed
- 1 onion, diced
- 3 garlic cloves, minced
- 1 can (14 oz) diced tomatoes
- 6 cups chicken broth
- 1 can (15 oz) white beans, drained and rinsed
- 2 teaspoons Italian seasoning
- 9 oz fresh or frozen cheese tortellini
- 3 cups fresh spinach
- 1/2 cup heavy cream (optional)
- Salt and pepper to taste
- Parmesan cheese for serving
- Fresh basil for garnish
Step-by-Step Instructions
Brown the Sausage
Heat a large pot over medium-high heat. Add the sausage, breaking it up with a wooden spoon. Cook for 6-8 minutes until browned and cooked through. If there’s excess fat, drain most of it, leaving about a tablespoon.
Sauté Aromatics
Add diced onion to the pot with the sausage. Cook for 4-5 minutes until softened. Add minced garlic and Italian seasoning, stirring for 1 minute until fragrant.
Build the Soup
Pour in diced tomatoes, chicken broth, and white beans. Bring to a boil, then reduce to a simmer for 10 minutes to let flavors combine.
Add Tortellini and Greens
Add tortellini and cook according to package directions, usually 7-9 minutes if using fresh or 3-4 if frozen. During the last 2 minutes, stir in spinach until wilted. For extra richness, stir in heavy cream. Season with salt and pepper. Serve with grated Parmesan and fresh basil.
What to Serve Italian Sausage and Tortellini Soup With
Serve with garlic bread, focaccia, or crusty Italian bread for dipping. A simple Caesar salad or caprese salad complements the Italian flavors beautifully. This soup is substantial and doesn’t need much else.
Storing and Reheating Tips
Store for up to 4 days in the refrigerator. For best results, store the tortellini separately if possible, as they absorb liquid and can get mushy. Reheat gently on the stovetop.
You can freeze this soup for up to 3 months, but the tortellini texture will soften. For best results, freeze without the tortellini and pasta, then add freshly cooked tortellini when serving.
Recipe 8: Coconut Curry Butternut Squash Soup

Quick Overview
Sweet butternut squash meets bold curry flavors in this creamy, warming soup. It’s exotic yet comforting, and the coconut milk makes it naturally vegan and incredibly silky.
- Preparation time: 15 minutes
- Cooking time: 35 minutes
- Total time: 50 minutes
- Servings: 6
Key Ingredients for Coconut Curry Butternut Squash Soup
- 2 tablespoons coconut oil
- 1 onion, chopped
- 3 garlic cloves, minced
- 2 tablespoons fresh ginger, grated
- 2-3 tablespoons red curry paste
- 1 large butternut squash (about 3 lbs), peeled and cubed
- 4 cups vegetable broth
- 1 can (13.5 oz) coconut milk
- 1 tablespoon maple syrup
- Juice of 1 lime
- Salt to taste
- Fresh cilantro for garnish
- Toasted coconut flakes (optional)
Step-by-Step Instructions
Sauté Aromatics and Curry
Heat coconut oil in a large pot over medium heat. Add chopped onion and cook for 5 minutes. Add garlic and ginger, stirring for 1 minute. Add curry paste and cook for another minute, stirring constantly. The curry paste needs this moment to release its full flavor.
Add Squash and Broth
Add cubed butternut squash and vegetable broth. Bring to a boil, then reduce heat and simmer for 20-25 minutes until the squash is completely tender when pierced with a fork.
Blend Until Silky
Use an immersion blender to puree the soup until completely smooth. If using a regular blender, work in batches and be careful with hot liquid.
Finish with Coconut and Lime
Stir in coconut milk, maple syrup, and lime juice. The combination of sweet, savory, and citrus creates perfect balance. Taste and adjust seasoning with salt. Garnish with fresh cilantro and toasted coconut flakes if desired.
What to Serve Coconut Curry Butternut Squash Soup With
Serve with warm naan bread, garlic naan, or crusty bread. A cucumber salad with rice vinegar dressing provides a cooling contrast. This pairs beautifully with jasmine rice for a more filling meal, or spring rolls for an Asian-inspired dinner.
Top Tips for Perfecting Coconut Curry Butternut Squash Soup
The amount of curry paste you use depends on how spicy you like it and the brand you’re using. Start with 2 tablespoons and add more if desired. Thai red curry paste is spicier than Indian curry paste.
For easier prep, buy pre-cut butternut squash cubes. It saves significant time and effort.
Full-fat coconut milk creates the creamiest texture. Light coconut milk works but won’t be as rich.
Fresh ginger is essential here. The bright, zingy flavor can’t be replicated with ground ginger. If the soup is too thick, thin with additional broth.
Storing and Reheating Tips
Store in the refrigerator for up to 5 days. The flavors develop beautifully overnight. Reheat on the stovetop over medium heat, stirring occasionally.
This soup freezes exceptionally well for up to 3 months. The smooth texture and vibrant flavors remain perfect after thawing. Add a fresh squeeze of lime juice after reheating to brighten it up.
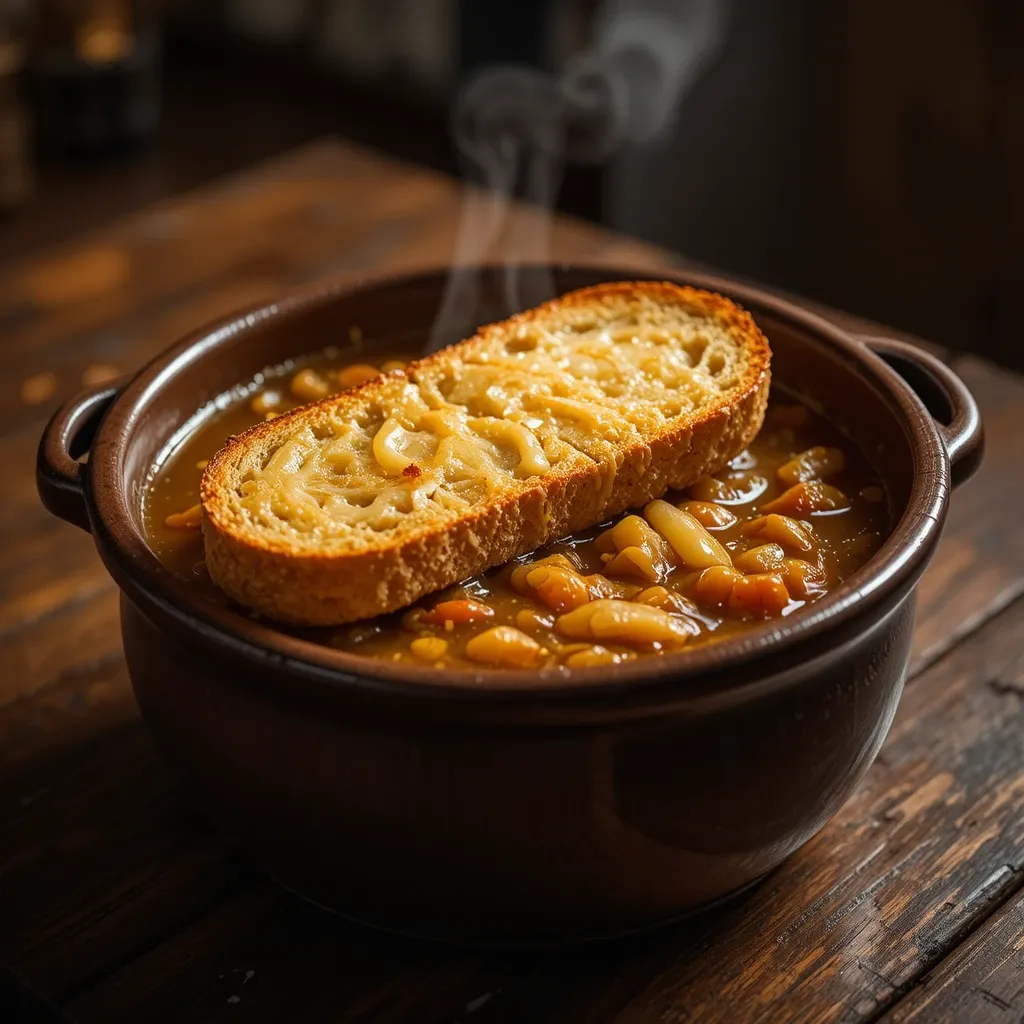
Recipe 9: Classic French Onion Soup
Quick Overview
Deeply caramelized onions in rich beef broth, topped with crusty bread and melted Gruyere cheese. This iconic soup takes time but delivers restaurant-quality results at home.
- Preparation time: 15 minutes
- Cooking time: 50 minutes
- Total time: 65 minutes
- Servings: 4
Key Ingredients for Classic French Onion Soup
- 3 tablespoons butter
- 4 large yellow onions, thinly sliced
- 1 teaspoon sugar
- 3 garlic cloves, minced
- 6 cups beef broth
- 2 bay leaves
- 1 teaspoon dried thyme
- Salt and pepper to taste
- 4 thick slices French bread, toasted
- 2 cups Gruyere cheese, shredded
Step-by-Step Instructions
Caramelize the Onions
This is the most important step, so don’t rush it. Melt butter in a large pot over medium heat. Add sliced onions and sugar. Cook, stirring frequently, for 35-40 minutes. The onions should turn deep golden brown and sweet. Lower the heat if they’re browning too quickly. This patience is what creates the incredible depth of flavor.
Build the Broth
Add minced garlic and cook for 1 minute. Add bay leaves and thyme. Bring to a boil, then simmer for 10 minutes. Remove bay leaves and season with salt and pepper.
Add Bread and Cheese
Preheat your broiler. Ladle soup into oven-safe bowls. Top each with a slice of toasted French bread and a generous amount of shredded Gruyere. Place bowls on a baking sheet and broil for 2-3 minutes until cheese is melted, bubbly, and golden brown. Watch carefully so it doesn’t burn.
Serve Immediately
Let the soup cool for a minute before serving. The cheese will be extremely hot. Breaking through that cheesy crust into the rich broth below is pure magic.
What to Serve Classic French Onion Soup With
This soup is rich and filling, so serve it with a light mixed green salad with vinaigrette. It makes an elegant starter for a dinner party or a satisfying lunch.
Top Tips for Perfecting Classic French Onion Soup
The secret is in properly caramelizing the onions. They should be deep brown, sweet, and practically melting. If they’re just translucent, keep cooking. Use yellow or sweet onions for the best flavor.
Gruyere cheese is traditional and melts beautifully. Swiss cheese or a combination of Gruyere and Parmesan works too. Don’t substitute with mozzarella or cheddar.
If you don’t have oven-safe bowls, you can toast the bread separately, top with cheese, melt it under the broiler, and float it on top of the soup.
For deeper flavor, use homemade beef stock or high-quality store-bought broth. The broth is the foundation, so quality matters.
Storing and Reheating Tips
Store the soup separately from the bread and cheese topping. Refrigerate soup for up to 4 days. Reheat on the stovetop and add fresh bread and cheese when serving.
The soup base freezes well for up to 3 months. Thaw and reheat, then add fresh bread and cheese. Don’t freeze the soup with the bread and cheese already on top.
Recipe 10: Mexican Street Corn Soup

Quick Overview
All the flavors of Mexican street corn transformed into a creamy, slightly spicy soup. It’s unique, incredibly flavorful, and feels like summer comfort in winter form.
- Preparation time: 10 minutes
- Cooking time: 25 minutes
- Total time: 35 minutes
- Servings: 6
Key Ingredients for Mexican Street Corn Soup
- 2 tablespoons butter
- 1 onion, diced
- 3 garlic cloves, minced
- 1 jalapeño, seeded and diced
- 5 cups corn kernels (fresh or frozen)
- 4 cups chicken or vegetable broth
- 1 cup heavy cream or coconut cream
- 1 teaspoon cumin
- 1 teaspoon smoked paprika
- Juice of 2 limes
- Salt and pepper to taste
- Toppings: crumbled cheese, chopped cilantro, diced avocado, lime wedges, chili powder
Step-by-Step Instructions
Char the Corn
If using fresh corn, char it first for maximum flavor. Heat a dry skillet over high heat and cook corn kernels for 5 minutes without stirring until some kernels get charred and golden. Set aside about 1 cup for topping. If using frozen corn, you can skip this step but the soup won’t have quite the same depth.
Sauté Vegetables
Melt butter in a large pot over medium heat. Add onion and cook for 5 minutes. Add garlic and jalapeño, cooking for another minute.
Simmer the Soup
Add most of the corn (reserving some for topping), chicken broth, cumin, and smoked paprika. Bring to a boil, then simmer for 15 minutes.
Blend and Finish
Use an immersion blender to partially blend the soup, leaving it chunky with texture. You want some whole corn kernels remaining. Stir in heavy cream and lime juice. Season with salt and pepper. Serve topped with reserved charred corn, crumbled cheese, cilantro, avocado, and a sprinkle of chili powder.
What to Serve Mexican Street Corn Soup With
Serve with warm tortilla chips, quesadillas, or cornbread. A simple black bean salad or Mexican rice makes this a complete meal. Fresh guacamole and chips on the side are always welcome.
Top Tips for Perfecting Mexican Street Corn Soup
Charring the corn is optional but highly recommended. It adds a smoky depth that makes this soup special. If you’re short on time, skip it.
Adjust the spice level by adding more or less jalapeño. Remove all the seeds for mild heat, keep some for medium, or leave them all in if you like it spicy.
Fresh corn tastes best, but frozen corn works perfectly and is more convenient in winter. For extra richness, use Mexican crema instead of heavy cream.
The lime juice is essential. Add it just before serving for the brightest flavor. Fresh cilantro and a squeeze of lime on top makes each bowl feel restaurant-quality.
Storing and Reheating Tips
Refrigerate for up to 4 days. The soup thickens as it sits. Reheat on the stovetop, adding broth to thin if needed. Add fresh toppings each time you serve.
Freeze for up to 3 months. The corn and cream freeze reasonably well. Thaw overnight and reheat gently. Add fresh lime juice and toppings after reheating for the best flavor.
Nutrition Information Table
| Recipe | Calories | Protein | Carbs | Fiber | Fat |
|---|---|---|---|---|---|
| Tuscan White Bean Soup | 280 | 14g | 38g | 9g | 8g |
| Roasted Cauliflower Soup | 220 | 6g | 18g | 5g | 15g |
| Carrot Ginger Soup | 245 | 4g | 32g | 6g | 13g |
| Chicken Wild Rice Soup | 380 | 28g | 35g | 4g | 16g |
| Moroccan Lentil Soup | 310 | 15g | 42g | 11g | 10g |
| Loaded Potato Soup | 420 | 12g | 38g | 4g | 24g |
| Sausage Tortellini Soup | 385 | 22g | 34g | 5g | 18g |
| Curry Butternut Squash | 265 | 5g | 36g | 6g | 13g |
| French Onion Soup | 340 | 16g | 28g | 3g | 18g |
| Street Corn Soup | 350 | 10g | 42g | 5g | 18g |
Nutritional values are approximate per serving. Actual values may vary based on specific ingredients used.
Frequently Asked Questions
How can I make these soups vegetarian or vegan?
Many of these recipes are already vegetarian or can easily be adapted. Swap chicken broth for vegetable broth in any recipe. Replace heavy cream with coconut cream, cashew cream, or oat cream. Skip cheese or use plant-based alternatives. The Tuscan white bean, carrot ginger, Moroccan lentil, and curry butternut squash soups are naturally vegan-friendly.
What’s the best way to thicken soup without flour?
Blend a portion of the soup and stir it back in for natural thickness. Mash some of the vegetables directly in the pot. Add a diced potato and let it cook down and dissolve. Stir in a handful of quick-cooking oats or white rice. Coconut cream adds both thickness and richness. Reduce the soup by simmering uncovered to evaporate excess liquid.
Can I double these recipes?
Absolutely! These soups are perfect for batch cooking. Just make sure your pot is large enough. Doubling soup recipes usually works perfectly without adjusting cooking times significantly. The main difference is that larger batches may take a few extra minutes to reach temperature.
How do I prevent cream-based soups from curdling?
Add cream at the end of cooking and keep the heat low. Never boil soup after adding cream. If reheating, do it very gently over low heat, stirring frequently. Let cream come to room temperature before adding it to hot soup. Adding a tablespoon of flour to cream before incorporating it can also help stabilize it.
What’s the best container for freezing soup?
Use freezer-safe containers or heavy-duty freezer bags. Leave about an inch of space at the top for expansion. Flat freezer bags save space and thaw faster. Label everything with the date and contents. Mason jars work but leave extra headspace and don’t tighten lids until frozen. Cool soup completely before freezing.
Why does my soup taste bland?
Under-seasoning is the most common issue. Salt enhances all other flavors, so add it gradually throughout cooking. Use quality broth as the base. Sauté aromatics properly to build flavor. Add acid at the end, like lemon juice or vinegar, to brighten everything. Fresh herbs make a huge difference. Don’t skip steps like roasting or caramelizing.
Can I use dried herbs instead of fresh?
Yes, but use less. The general rule is one teaspoon dried equals one tablespoon fresh. Add dried herbs early in cooking to allow time for their flavors to develop. Fresh herbs should be added near the end to preserve their brightness. Some herbs like thyme, rosemary, and bay leaf work great dried. Others like basil, cilantro, and parsley are best fresh.
How do I know when soup is done?
Vegetables should be tender when pierced with a fork but not mushy. Meat should be cooked through and easily shredded. Grains and legumes should be soft and fully cooked. Taste the broth and adjust seasoning. The flavors should be well-developed and balanced. Trust your taste buds!
Tips for Avoiding Common Soup-Making Mistakes
Underseasoning Throughout Cooking
The biggest mistake home cooks make is waiting until the end to season. Build flavor by seasoning in layers. Add salt when you sauté aromatics, again when you add vegetables, and adjust at the end. Taste frequently as you cook.
Cutting Vegetables Unevenly
When vegetables are different sizes, they cook at different rates. Some end up mushy while others stay hard. Take an extra minute to cut everything into uniform pieces. Your soup will cook more evenly and look more professional.
Using Low-Quality Broth
Broth is the foundation of most soups. Using watery, flavorless broth results in watery, flavorless soup. Invest in good quality stock or make your own. It makes an enormous difference in the final result.
Boiling Instead of Simmering
A rolling boil can make soup cloudy, break down vegetables too much, and cause dairy to curdle. Keep soup at a gentle simmer with just a few bubbles breaking the surface. This develops flavors gradually and keeps textures intact.
Skipping the Sauté Step
Taking time to properly brown meat and sauté aromatics builds foundational flavor. Don’t rush this step by dumping everything in at once. Those caramelized bits at the bottom of the pot add incredible depth.
Adding Dairy Too Early or at High Heat
Cream, milk, and cheese should be added at the end over low heat. High heat or extended cooking causes dairy to separate or curdle. Stir cream in gently off the heat when possible.
Not Accounting for Absorption
Pasta, rice, and grains continue absorbing liquid as they sit. If making soup ahead, either cook these separately and add when serving, or plan to add extra broth when reheating.
Forgetting the Finishing Touch
A squeeze of lemon, splash of vinegar, swirl of cream, or sprinkle of fresh herbs at the end transforms soup from good to spectacular. These final touches brighten flavors and add complexity.
Final Thoughts
Winter soup season is hands-down my favorite time of year in the kitchen. These 10 recipes have gotten me through countless cold evenings when I needed something warming, satisfying, and relatively easy. The best part? Each one brings something different to the table.
Some nights call for the creamy indulgence of loaded potato soup. Other times, I need the bright, healthy flavors of Moroccan lentil soup. When I want to feel fancy without the fuss, French onion soup delivers. The point is having options that work for different moods, dietary needs, and time constraints.
I’ve learned that good soup doesn’t require fancy techniques or hard-to-find ingredients. It just needs quality ingredients, proper seasoning, and a little patience. Most of these come together in under an hour, and many taste even better the next day.
The recipes I’ve shared are flexible templates. Swap vegetables, adjust spices, make them your own. I’ve included my tested ratios and techniques, but soup is forgiving. Trust your instincts and taste as you go.
Stock your freezer with these soups and you’ll have homemade comfort food ready whenever you need it. Future you will be grateful when a crazy day happens and dinner is just a reheat away.
Which soup are you most excited to try? Let me know in the comments if you make any of these. I’d love to hear which one becomes your go-to winter warmer!
Stay cozy out there, and may your soup pot always be full.
Pin this collection now so you have it ready when soup cravings hit!
All recipes in this post are original creations specifically developed for this collection. For more warming winter recipes, check out our comfort food category. Happy cooking!