
11 Perfect Thanksgiving Vegetable Sides Everyone Will Love
Picture this: golden roasted vegetables glistening with herb-infused butter, vibrant green beans almondine catching everyone’s eye, and creamy Brussels sprouts that even the pickiest eaters devour. These 12 thanksgiving vegetable sides transform your holiday table from ordinary to extraordinary.
Whether you’re hosting your first Thanksgiving or you’re a seasoned pro looking for fresh inspiration, these crowd-pleasing recipes bring color, nutrition, and incredible flavors that complement your turkey perfectly without stealing hours from your day.
What Are Thanksgiving Vegetable Sides?
Ever wondered why vegetable sides became Thanksgiving stars? These aren’t just afterthoughts pushed to the corner of your plate. Thanksgiving vegetable sides are the supporting cast that deserves a standing ovation—think of them as the backup singers who sometimes outshine the lead!
From your grandmother’s famous green bean casserole to modern twists on classic Brussels sprouts, these dishes honor tradition while embracing creativity. After all, they say the way to a man’s heart is through his stomach, and these vegetable sides prove that veggies can be just as crave-worthy as any comfort food. Ready to discover which ones will become your new holiday traditions?
Why You’ll Love These 12 Thanksgiving Vegetable Sides
The Perfect Balance for Your Holiday Table
These thanksgiving vegetable sides bring essential freshness and nutrition to balance out the rich, heavy dishes that typically dominate Thanksgiving dinner. Each recipe offers vibrant colors that make your spread Instagram-worthy while providing textures that range from crispy and caramelized to tender and buttery. You’ll love how these vegetables absorb incredible flavors from herbs, garlic
Budget-Friendly Without Sacrificing Flavor
Making these vegetable sides at home saves you serious money compared to ordering pre-made dishes from specialty stores. Fresh seasonal vegetables are affordable during fall, and most recipes use pantry staples you already have. You’ll spend less than $50 to make multiple vegetable sides that feed 10-12 people, compared to $15-20 per dish at catering services.
Customizable for Every Dietary Need
These recipes shine because they’re easily adaptable for various dietary restrictions. Most can be made vegan, gluten-free, or dairy-free with simple substitutions. If you loved our guide to healthy dinner sides, you’ll appreciate how these thanksgiving vegetable sides follow similar principles—maximum flavor with wholesome ingredients that everyone can enjoy.
Make your holiday memorable by trying at least three of these spectacular vegetable sides. Your guests will be asking for recipes before dessert even arrives!
How to Make 12 Thanksgiving Vegetable Sides
Quick Overview
These thanksgiving vegetable sides range from ultra-simple roasted options to slightly more elaborate gratins and casseroles. Most recipes take 15-20 minutes of active prep time and 25-45 minutes of cooking time. The beauty of these dishes? Many can be prepared ahead and reheated before serving, giving you precious time on Thanksgiving Day.
Time Breakdown:
- Total prep time: 15-30 minutes per recipe
- Cooking time: 25-45 minutes per recipe
- Make-ahead friendly: Yes, most recipes
- Skill level required: Beginner to intermediate
Key Ingredients for 11 Thanksgiving Vegetable Sides
For Classic Green Bean Casserole:
- 2 pounds fresh green beans, trimmed
- 1 can (10.5 oz) cream of mushroom soup
- 1 cup milk
- 2 cups French fried onions, divided
- 1 cup shredded cheddar cheese
- 1/2 teaspoon garlic powder
- Salt and pepper to taste
For Honey-Glazed Carrots:
- 2 pounds baby carrots or sliced regular carrots
- 3 tablespoons butter
- 3 tablespoons honey
- 2 tablespoons brown sugar
- 1 teaspoon fresh thyme leaves
- Pinch of salt
For Creamy Mashed Cauliflower:
- 2 large heads cauliflower, cut into florets
- 4 tablespoons butter
- 1/2 cup heavy cream or milk
- 3 cloves garlic, roasted
- 1/2 cup Parmesan cheese
- Salt and white pepper to taste
For Sweet Potato Casserole:
- 4 pounds sweet potatoes
- 1/2 cup butter, melted
- 1/2 cup milk
- 1/2 cup brown sugar
- 2 eggs
- 1 teaspoon vanilla extract
- 1 teaspoon cinnamon
For Pecan Topping:
- 1 cup chopped pecans
- 1/2 cup brown sugar
- 1/4 cup flour
- 1/4 cup melted butter
For Roasted Root Vegetables:
- 2 pounds mixed root vegetables (parsnips, turnips, beets, carrots)
- 4 tablespoons olive oil
- 2 tablespoons maple syrup
- 2 teaspoons fresh rosemary, chopped
- Salt and pepper to taste
For Creamed Spinach:
- 2 pounds fresh spinach
- 3 tablespoons butter
- 3 cloves garlic, minced
- 1 cup heavy cream
- 1/2 cup Parmesan cheese
- 1/4 teaspoon nutmeg
- Salt and pepper to taste
For Butternut Squash Gratin:
- 1 large butternut squash, peeled and thinly sliced
- 2 cups heavy cream
- 3 cloves garlic, minced
- 2 cups Gruyere cheese, shredded
- 1/2 cup breadcrumbs
- Fresh thyme sprigs
- Salt and pepper to taste
For Garlic Parmesan Roasted Broccoli:
- 2 pounds broccoli florets
- 4 tablespoons olive oil
- 4 cloves garlic, minced
- 1/2 cup Parmesan cheese, grated
- 1 teaspoon red pepper flakes
- Lemon zest from 1 lemon
For Maple Balsamic Brussels Sprouts:
- 2 pounds Brussels sprouts
- 3 tablespoons olive oil
- 2 tablespoons maple syrup
- 2 tablespoons balsamic vinegar
- 1/4 cup walnuts, chopped
- Salt and pepper to taste
For Corn Pudding:
- 4 cups corn kernels (fresh or frozen)
- 4 eggs
- 1 cup heavy cream
- 1/2 cup butter, melted
- 1/4 cup sugar
- 1/4 cup flour
- 1 teaspoon salt
For Asparagus with Lemon Butter:
- 2 pounds asparagus, trimmed
- 4 tablespoons butter
- Zest and juice of 1 lemon
- 3 cloves garlic, minced
- 1/4 cup Parmesan cheese
- Salt and pepper to taste
Step-by-Step Instructions
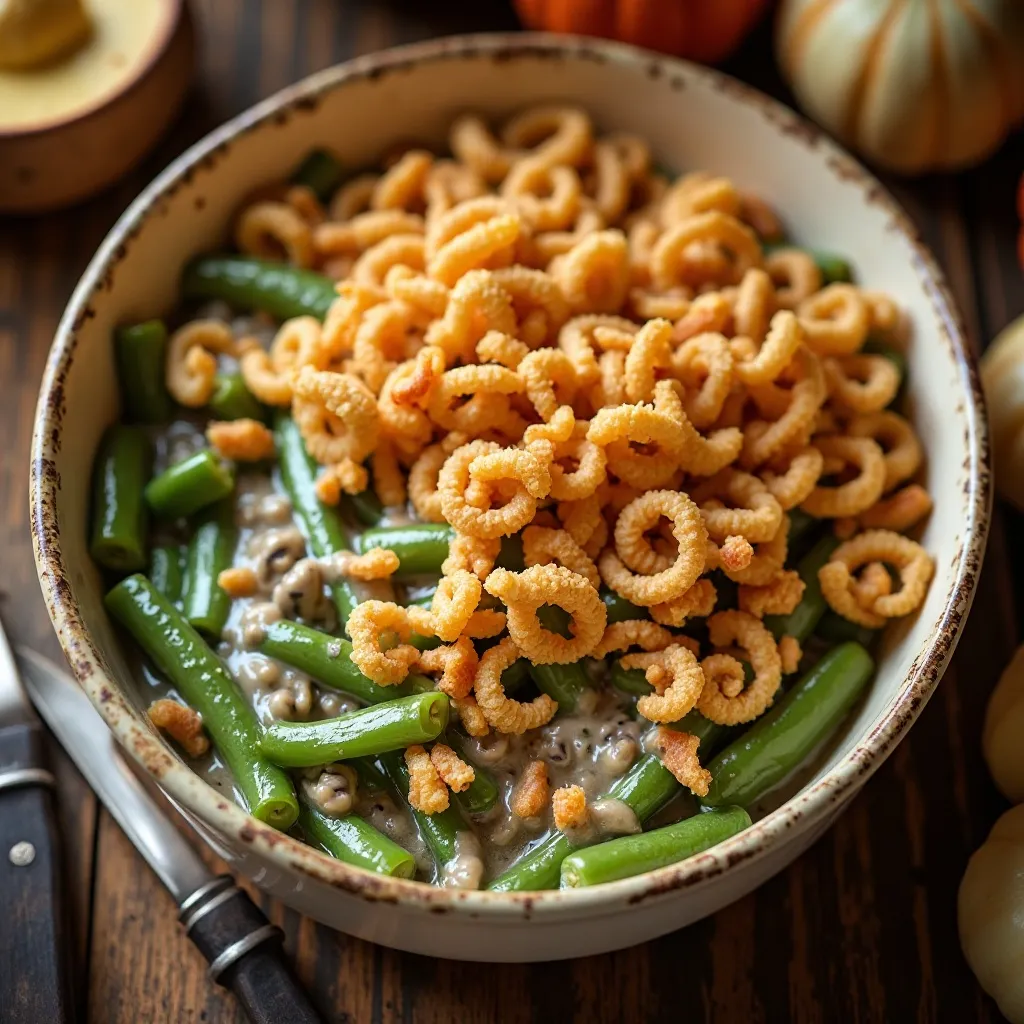
Recipe 1: How to Make Classic Green Bean Casserole
Step 1: Blanch the Green Beans
Bring a large pot of salted water to a rolling boil. Add the trimmed green beans and cook for 5 minutes until they’re bright green and tender-crisp. Immediately drain and plunge them into a bowl of ice water to stop the cooking process. This technique, called blanching, preserves the vibrant color and crisp texture. Drain well and set aside.
Step 2: Create the Creamy Base
Preheat your oven to 350°F. In a large mixing bowl, combine the cream of mushroom soup, milk, garlic powder, half of the French fried onions, and shredded cheddar cheese. Whisk until smooth and well combined. The mixture should be creamy but pourable. Taste and adjust seasoning with salt and pepper.
Step 3: Combine and Transfer
Add the blanched green beans to the creamy mixture and stir gently until all beans are evenly coated. Transfer everything to a greased 9×13-inch baking dish, spreading it out evenly. The beans should be mostly submerged in the sauce.
Step 4: Bake Until Bubbly
Place the casserole in the preheated oven and bake for 25 minutes. The edges should be bubbling and the casserole heated through completely. Remove from the oven and sprinkle the remaining French fried onions evenly over the top.
Step 5: Crisp the Topping
Return the dish to the oven and bake for an additional 5-10 minutes until the onions are golden brown and crispy. Let it rest for 5 minutes before serving to allow the sauce to thicken slightly.
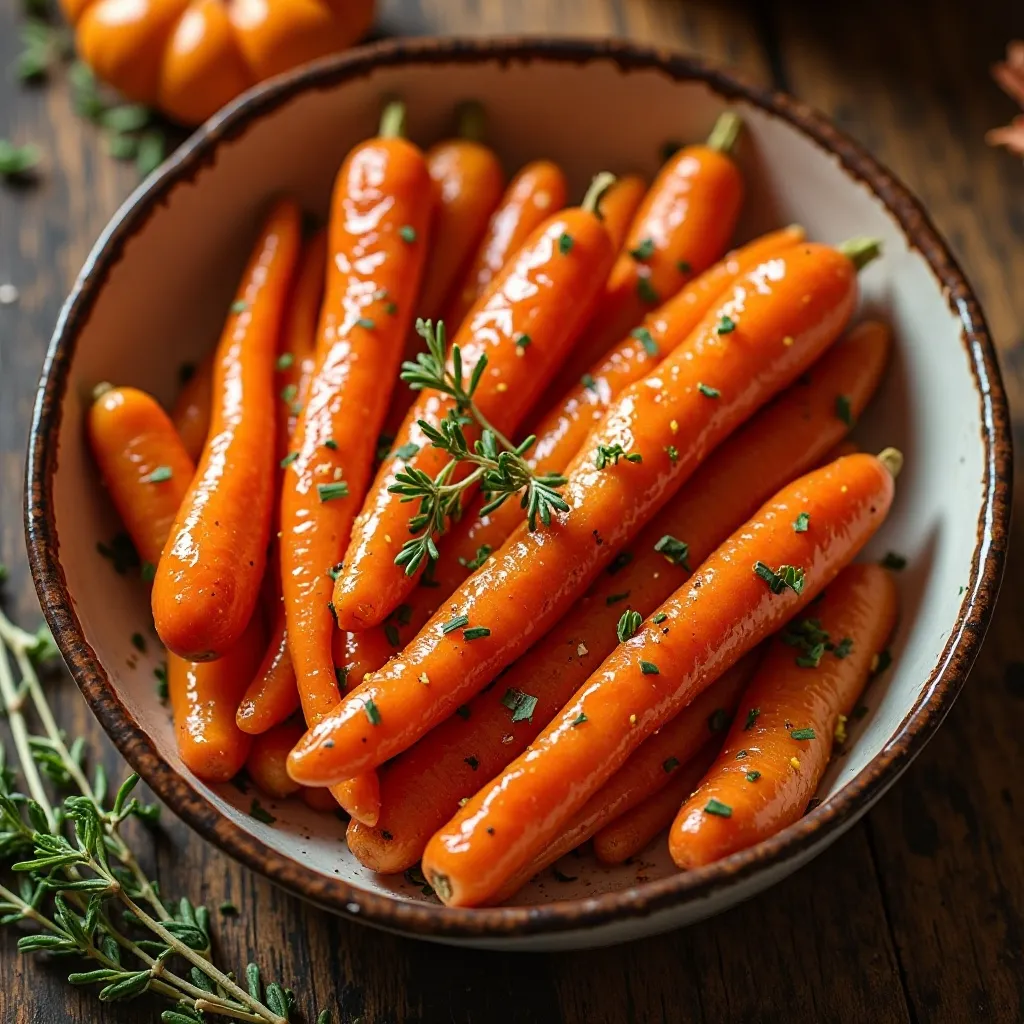
Recipe 2: How to Make Honey-Glazed Carrots
Step 1: Prepare the Carrots
If using baby carrots, rinse them thoroughly. For regular carrots, peel and slice them diagonally into 1/4-inch thick pieces. The diagonal cut creates more surface area for the glaze to cling to and looks more elegant on the plate.
Step 2: Parboil for Tenderness
Bring a large pot of salted water to a boil. Add the carrots and cook for 5-7 minutes until they’re just fork-tender but still have a slight bite. Don’t overcook them at this stage as they’ll continue cooking in the glaze. Drain well.
Step 3: Create the Honey Glaze
In a large skillet over medium heat, melt the butter completely. Add the honey, brown sugar, and fresh thyme leaves. Stir constantly until the sugar dissolves and the mixture becomes smooth and glossy, about 2-3 minutes. The glaze should smell sweet and buttery.
Step 4: Glaze the Carrots
Add the parboiled carrots to the skillet with the honey glaze. Toss gently to coat every piece. Continue cooking over medium heat for 8-10 minutes, stirring occasionally. The glaze will reduce and become thick and syrupy, coating the carrots beautifully.
Step 5: Finish and Serve
Season with a pinch of salt to balance the sweetness. The salt enhances the natural sweetness of the carrots and prevents the dish from being one-dimensional. Transfer to a serving dish and garnish with additional fresh thyme if desired.
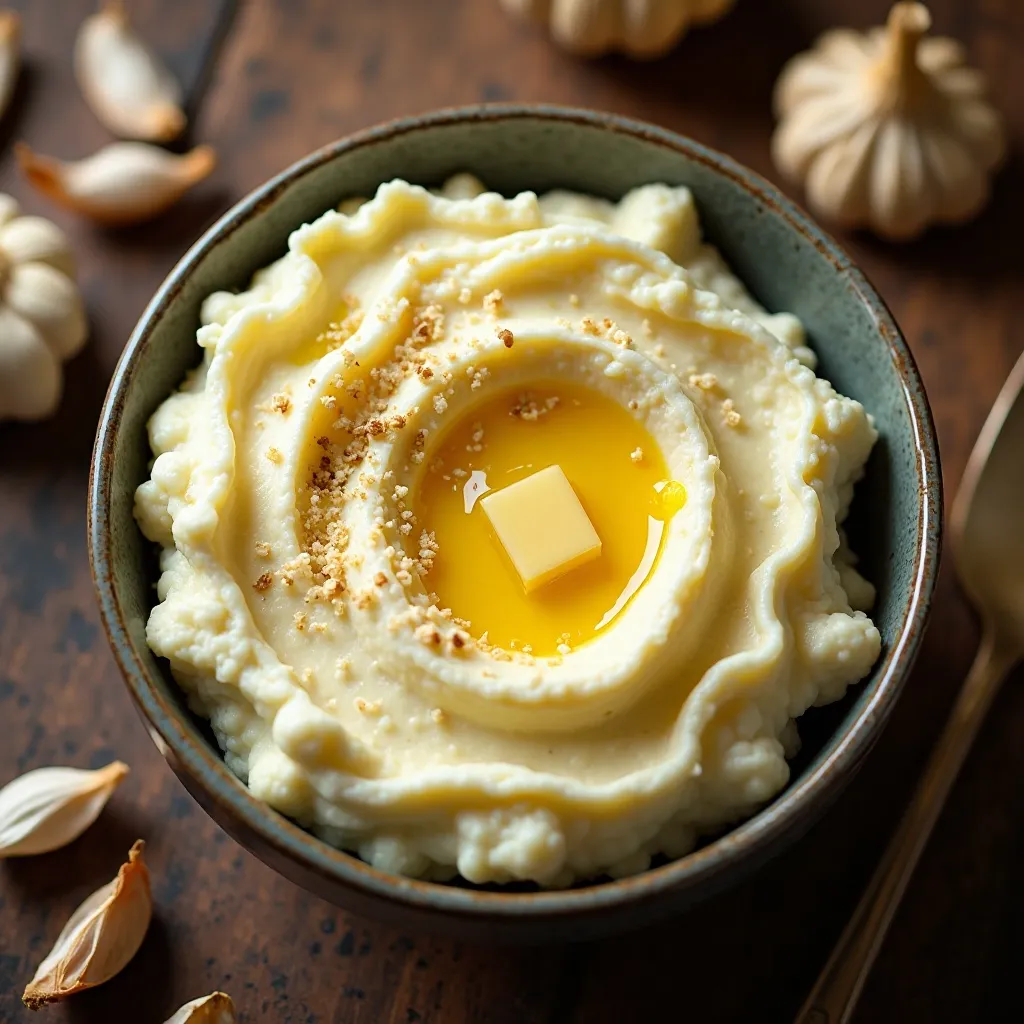
Recipe 3: How to Make Creamy Mashed Cauliflower
Step 1: Steam the Cauliflower
Cut the cauliflower into uniform florets for even cooking. Place them in a steamer basket over boiling water, cover, and steam for 12-15 minutes until very tender when pierced with a knife. Alternatively, you can boil them, but steaming prevents the cauliflower from absorbing excess water.
Step 2: Roast the Garlic
While the cauliflower steams, roast the garlic cloves. You can do this by wrapping them in foil with a drizzle of olive oil and roasting at 400°F for 15-20 minutes, or use pre-roasted garlic. Roasted garlic adds a sweet, mellow flavor that’s less harsh than raw garlic.
Step 3: Blend Until Smooth
Drain the cauliflower well and transfer to a food processor or blender. Add the butter, heavy cream, roasted garlic, and Parmesan cheese. Process for 2-3 minutes, stopping to scrape down the sides as needed. The mixture should be completely smooth and creamy, resembling traditional mashed potatoes.
Step 4: Adjust Consistency and Season
If the mixture is too thick, add more cream or milk, one tablespoon at a time, until you reach your desired consistency. Season with salt and white pepper to taste. White pepper is preferred because it doesn’t create black specks in the white cauliflower.
Step 5: Serve Warm
Transfer to a serving bowl and create a small well in the center. Add a pat of butter and sprinkle with additional Parmesan cheese. Serve immediately while hot and creamy.
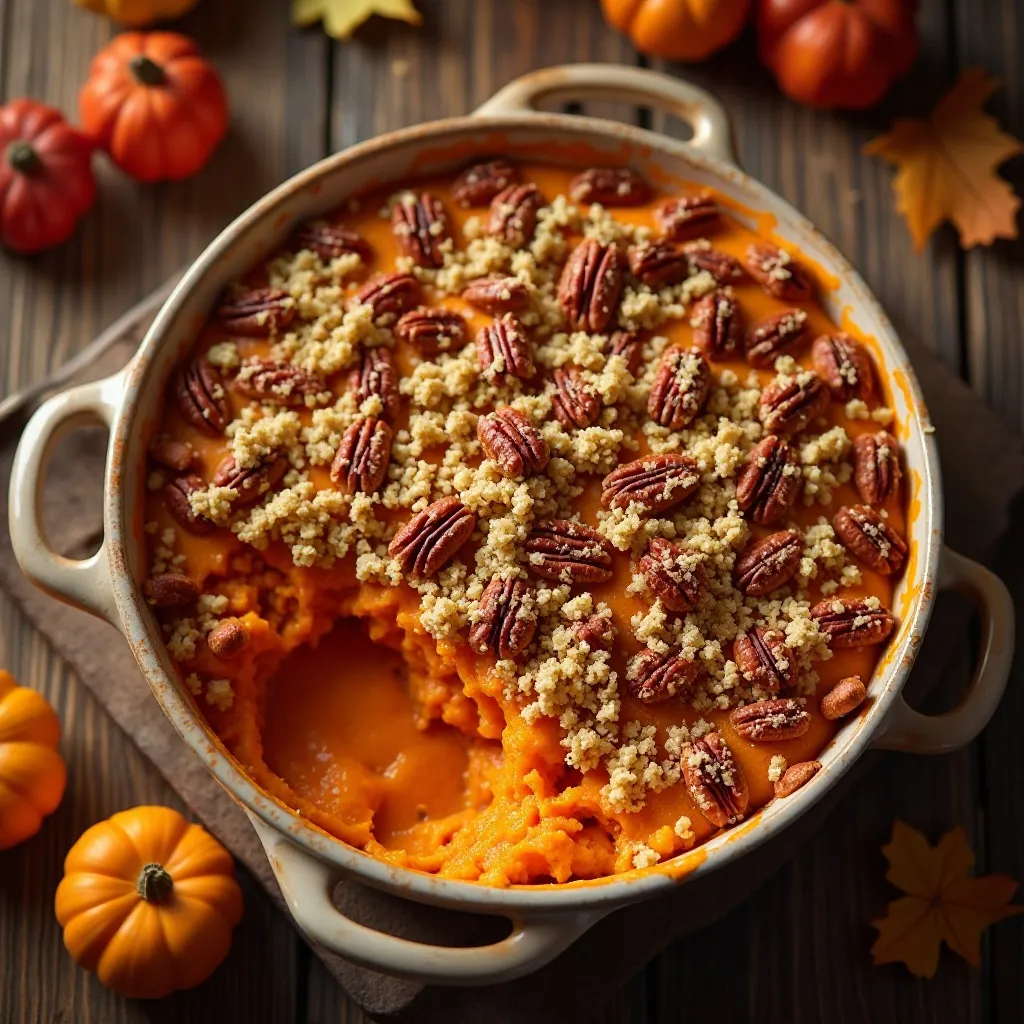
Recipe 4: How to Make Sweet Potato Casserole
Step 1: Cook the Sweet Potatoes
Peel and cube the sweet potatoes into 1-inch pieces. Place them in a large pot, cover with cold water, and add a pinch of salt. Bring to a boil over high heat, then reduce to a simmer. Cook for 15-20 minutes until the potatoes are fork-tender and easily mashable.
Step 2: Mash and Mix
Drain the sweet potatoes thoroughly and return them to the pot. Add the melted butter, milk, brown sugar, eggs, vanilla extract, and cinnamon. Use a potato masher or electric mixer to mash until smooth. For an extra-smooth texture, use an immersion blender. Taste and adjust sweetness if needed.
Step 3: Prepare the Casserole Dish
Preheat your oven to 350°F. Grease a 9×13-inch baking dish with butter or cooking spray. Pour the sweet potato mixture into the prepared dish and spread it evenly with a spatula. The mixture should be about 1-2 inches thick.
Step 4: Make the Pecan Topping
In a medium bowl, combine the chopped pecans, brown sugar, flour, and melted butter. Mix with a fork until the mixture resembles coarse crumbs. The butter should bind everything together but still maintain a crumbly texture.
Step 5: Top and Bake
Sprinkle the pecan topping evenly over the sweet potato mixture. Bake for 25-30 minutes until the topping is golden brown and the casserole is heated through. The edges should be slightly bubbling. Let it rest for 10 minutes before serving to allow the casserole to set.
Recipe 5: How to Make Roasted Root Vegetables
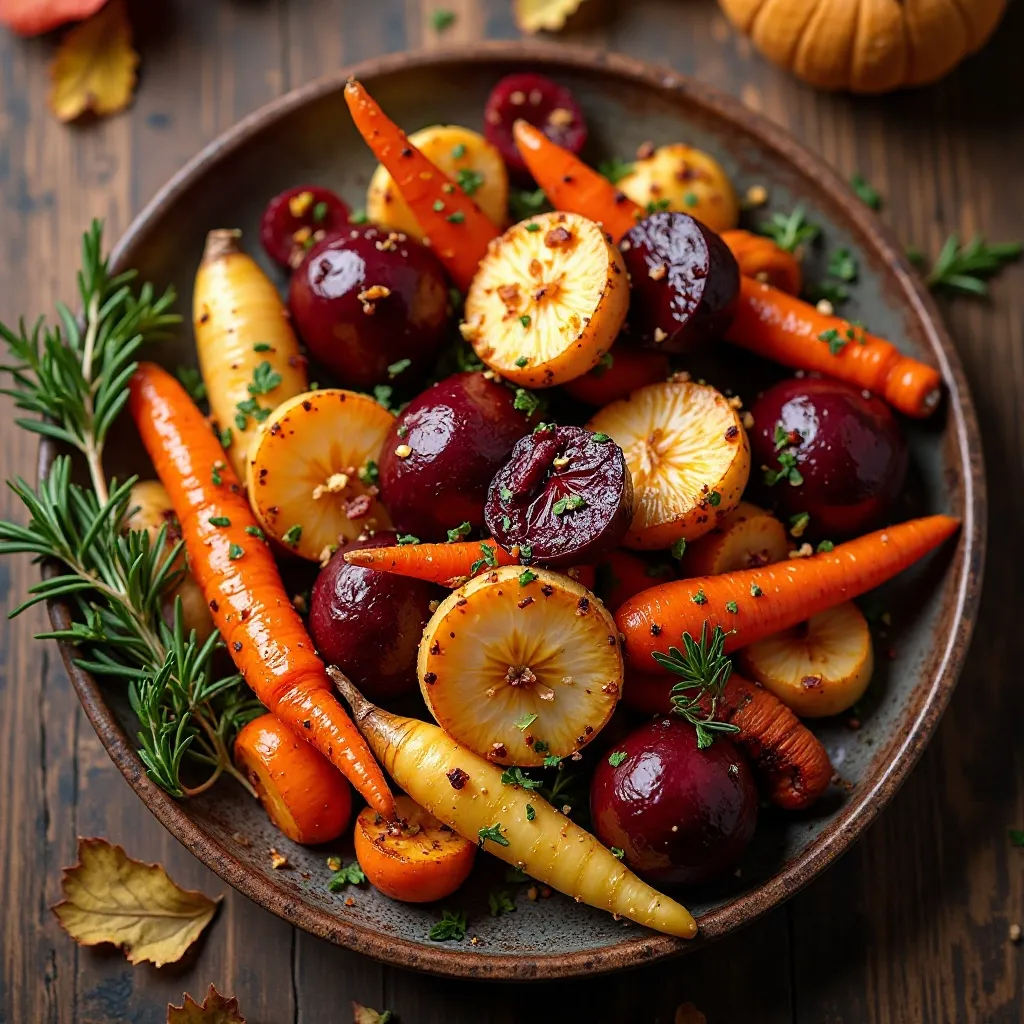
Step 1: Prep Your Vegetables
Peel all root vegetables and cut them into uniform 1-inch pieces. Consistency in size ensures even cooking. Try to make the harder vegetables like turnips slightly smaller than softer ones like beets so everything finishes cooking at the same time.
Step 2: Season and Toss
Place all cut vegetables in a large mixing bowl. Drizzle with olive oil and maple syrup, then add chopped rosemary, salt, and pepper. Toss everything together with your hands to ensure every piece is evenly coated. The maple syrup will caramelize during roasting, creating a beautiful glaze.
Step 3: Arrange on Baking Sheet
Preheat oven to 425°F. Line a large baking sheet with parchment paper for easy cleanup. Spread the vegetables in a single layer with space between each piece. Overcrowding causes steaming instead of roasting, preventing that desirable caramelization.
Step 4: Roast with Rotation
Roast for 35-45 minutes, stirring every 15 minutes to ensure even browning on all sides. The vegetables are done when they’re tender inside and caramelized on the outside. A fork should pierce them easily, and they should have golden-brown edges.
Step 5: Finish and Garnish
Remove from the oven and transfer to a serving platter. Drizzle with any remaining pan juices and garnish with fresh rosemary sprigs. Serve hot or at room temperature.
Recipe 6: How to Make Creamed Spinach
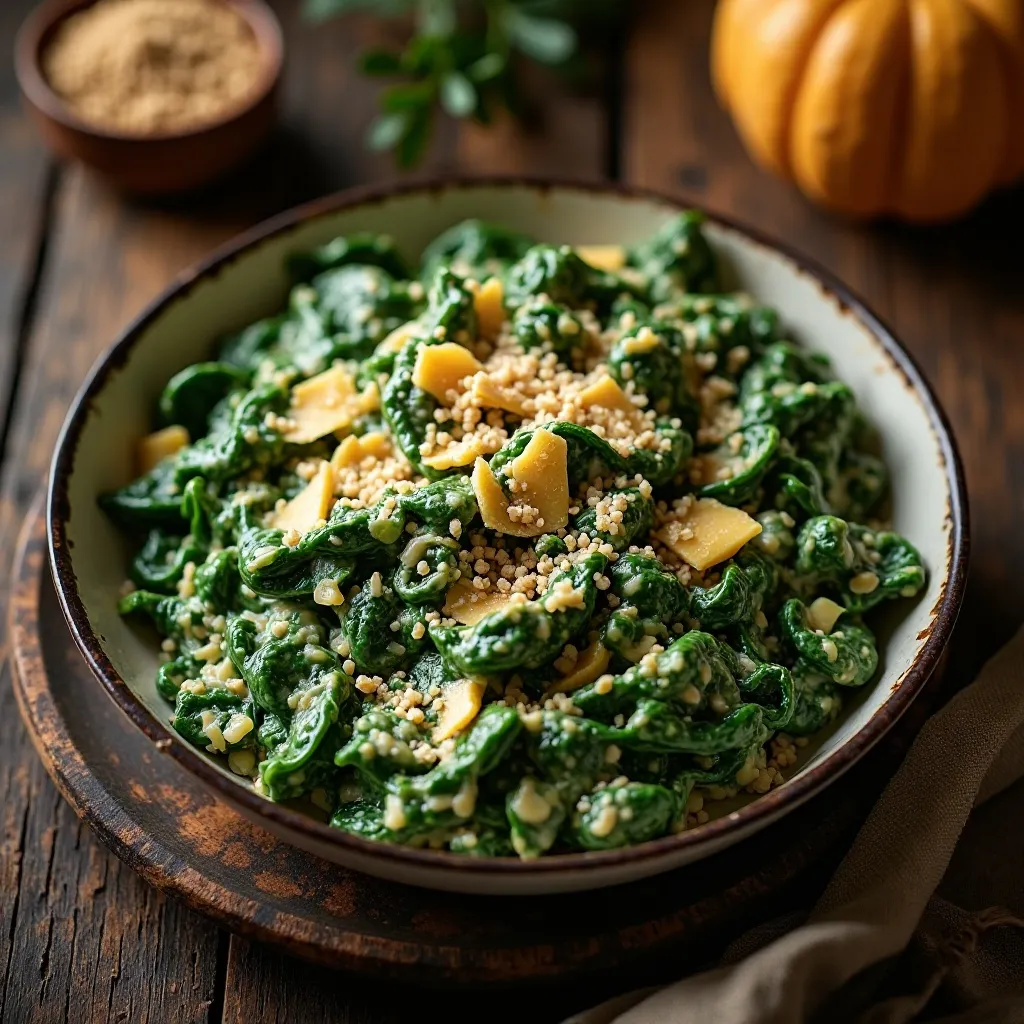
Step 1: Prepare the Spinach
If using fresh spinach, wash it thoroughly to remove any grit. Remove any thick stems. In a large pot over medium-high heat, wilt the spinach in batches with just the water clinging to the leaves, about 2-3 minutes per batch. Transfer wilted spinach to a colander.
Step 2: Remove Excess Water
Once the spinach is cool enough to handle, squeeze it firmly to remove as much liquid as possible. This step is crucial—excess water will make your creamed spinach watery and thin. Chop the spinach coarsely and set aside.
Step 3: Make the Cream Sauce
In the same pot, melt butter over medium heat. Add minced garlic and sauté for 1 minute until fragrant but not browned. Pour in the heavy cream and bring to a gentle simmer. Let it reduce for 3-4 minutes, stirring occasionally, until it thickens slightly.
Step 4: Combine and Season
Add the chopped spinach back to the pot along with Parmesan cheese and nutmeg. Stir to combine and cook for 2-3 minutes until everything is heated through and the cheese has melted. The nutmeg adds a subtle warmth that complements the spinach perfectly.
Step 5: Adjust and Serve
Taste and season with salt and pepper. If the mixture is too thick, thin it with a splash of cream or milk. If it’s too thin, simmer for a few more minutes. Transfer to a serving dish and serve hot.
Recipe 7: How to Make Butternut Squash Gratin
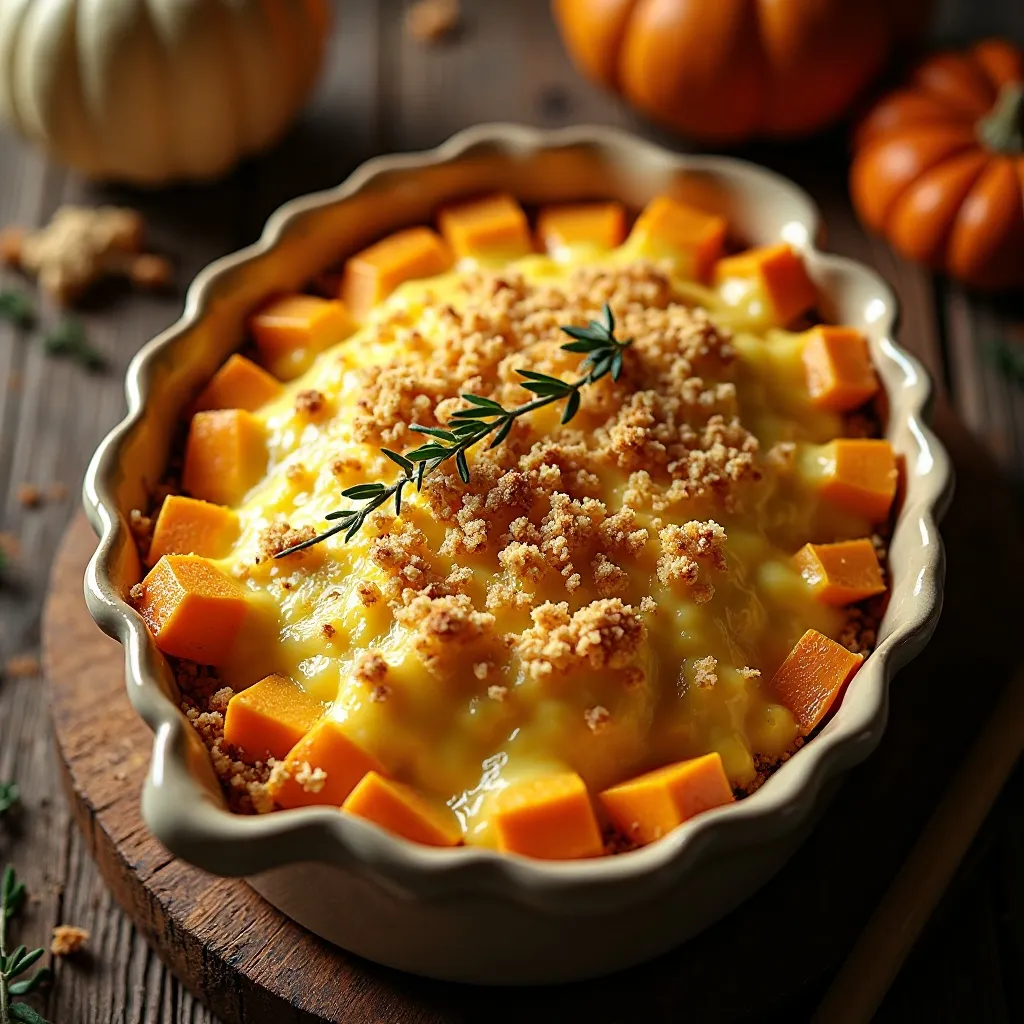
Step 1: Slice the Squash
Peel the butternut squash and cut it in half lengthwise. Scoop out the seeds with a spoon. Using a sharp knife or mandoline, slice the squash into 1/8-inch thick rounds. Uniform thickness is essential for even cooking and an attractive presentation.
Step 2: Prepare the Cream Mixture
In a medium saucepan, combine heavy cream, minced garlic, salt, pepper, and fresh thyme. Bring to a simmer over medium heat, then remove from heat and let it steep for 10 minutes. This infuses the cream with aromatic flavors.
Step 3: Layer the Gratin
Preheat oven to 375°F. Butter a 9×13-inch baking dish generously. Arrange a layer of squash slices, slightly overlapping like roof shingles. Sprinkle with a handful of Gruyere cheese, then drizzle with some of the cream mixture. Repeat layers until all squash is used, ending with cheese on top.
Step 4: Top and Cover
Mix breadcrumbs with a little melted butter and sprinkle over the top layer of cheese. Cover the dish tightly with aluminum foil. This prevents the top from browning too quickly while the squash cooks through.
Step 5: Bake to Golden Perfection
Bake covered for 45 minutes. Remove the foil and continue baking for 15-20 minutes until the top is golden brown and bubbling, and the squash is tender when pierced. Let rest for 10 minutes before serving to allow the gratin to set.
Recipe 8: How to Make Garlic Parmesan Roasted Broccoli
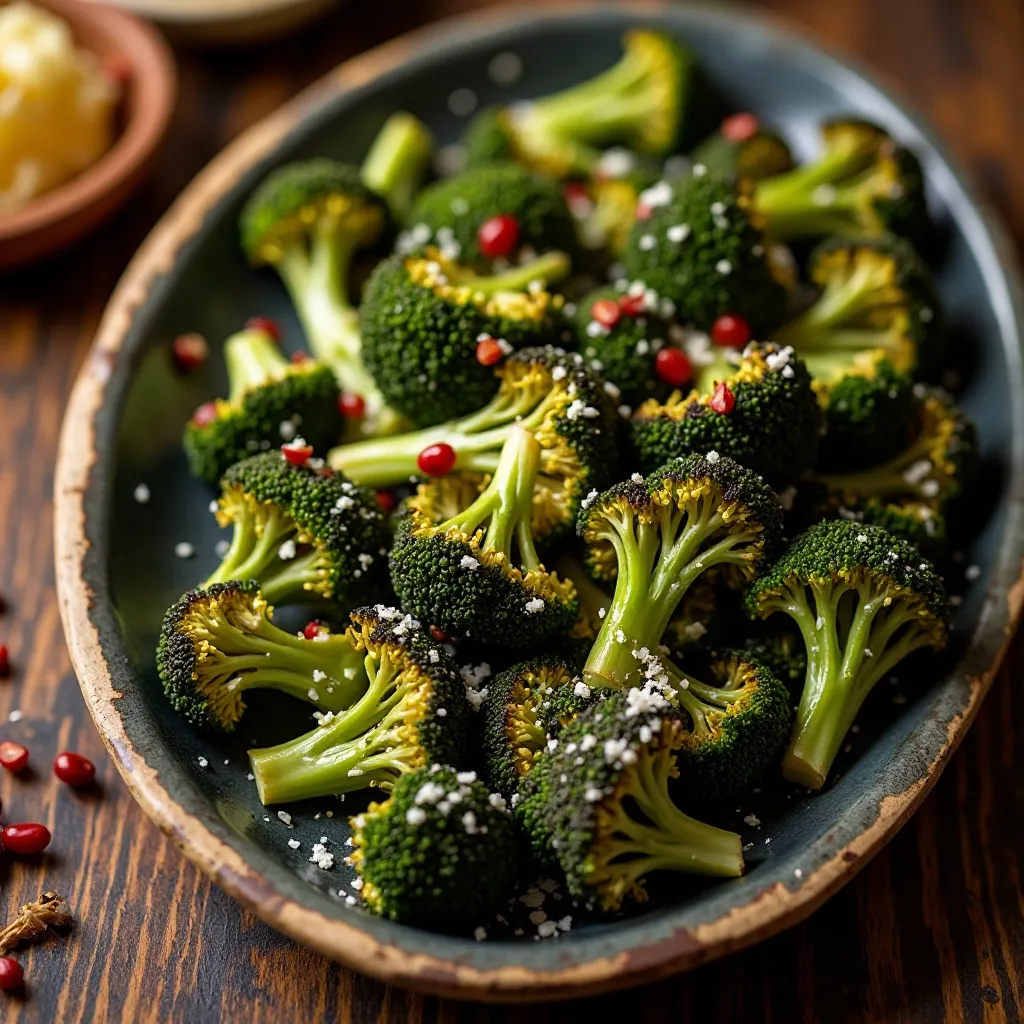
Step 1: Prep the Broccoli
Cut broccoli into medium-sized florets, keeping some stem attached for better texture. Make sure pieces are relatively uniform in size. Place florets in a large mixing bowl.
Step 2: Season Generously
Add olive oil, minced garlic, red pepper flakes, salt, and pepper to the broccoli. Toss thoroughly with your hands to ensure every floret is coated with oil and seasonings. The oil helps the broccoli caramelize and prevents it from drying out.
Step 3: Roast at High Heat
Preheat oven to 425°F. Spread broccoli in a single layer on a large baking sheet lined with parchment paper. Make sure there’s space between florets for air circulation. Roast for 20-25 minutes, tossing once halfway through, until florets are tender and edges are crispy and browned.
Step 4: Add Cheese and Lemon
Remove from oven and immediately sprinkle with Parmesan cheese and lemon zest. Toss gently while everything is still hot so the cheese melts slightly and adheres to the broccoli.
Step 5: Serve Fresh
Transfer to a serving platter and squeeze fresh lemon juice over the top. The acid from the lemon brightens the entire dish and cuts through the richness of the cheese. Serve immediately while the broccoli is still crispy.
Recipe 9: How to Make Maple Balsamic Brussels Sprouts
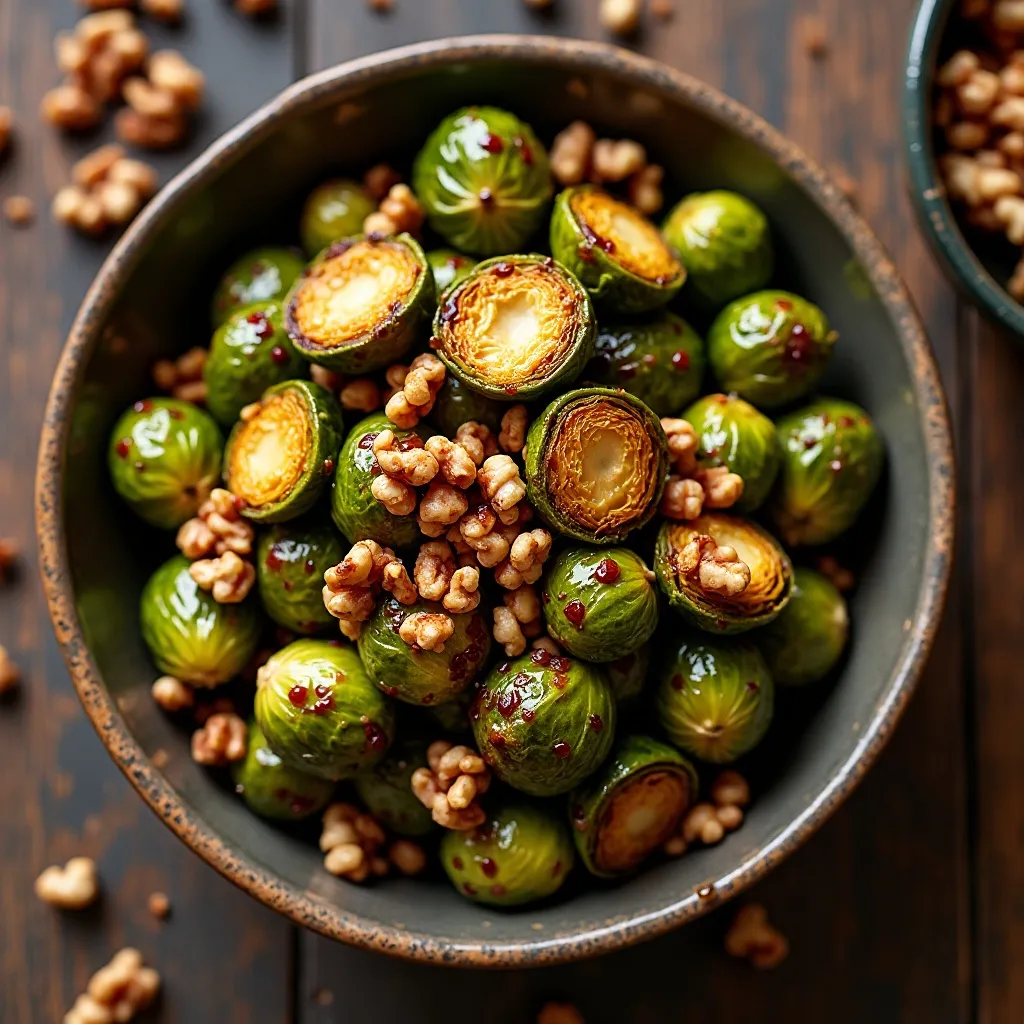
Step 1: Prepare Brussels Sprouts
Trim and halve Brussels sprouts, removing any damaged outer leaves. Place them in a bowl and toss with olive oil, salt, and pepper until evenly coated.
Step 2: Roast for Caramelization
Preheat oven to 400°F. Spread Brussels sprouts cut-side down on a baking sheet in a single layer. Roast for 25-30 minutes until tender inside and caramelized on the cut sides.
Step 3: Create the Glaze
While Brussels sprouts roast, combine maple syrup and balsamic vinegar in a small saucepan. Bring to a simmer over medium heat and cook for 5-7 minutes until reduced by half and syrupy. The glaze should coat the back of a spoon.
Step 4: Toast the Walnuts
In a dry skillet over medium heat, toast the chopped walnuts for 3-4 minutes, stirring frequently, until fragrant and lightly browned. Watch carefully as they can burn quickly.
Step 5: Combine and Serve
Remove Brussels sprouts from oven and drizzle with the maple balsamic glaze. Toss to coat, then sprinkle with toasted walnuts. Serve warm or at room temperature.
Recipe 10: How to Make Corn Pudding

Step 1: Mix Wet Ingredients
Preheat oven to 350°F and butter a 9×13-inch baking dish. In a large bowl, whisk together eggs, heavy cream, melted butter, and sugar until well combined and smooth.
Step 2: Add Dry Ingredients
Whisk in flour and salt until no lumps remain. The batter should be smooth and pourable, similar to pancake batter.
Step 3: Fold in Corn
Gently fold the corn kernels into the batter, distributing them evenly. If using frozen corn, make sure it’s thawed and drained well to prevent excess moisture.
Step 4: Bake Until Set
Pour the mixture into the prepared baking dish. Bake for 45-50 minutes until the center is set and the top is golden brown. A knife inserted in the center should come out mostly clean with just a few moist crumbs.
Step 5: Rest and Serve
Let the corn pudding rest for 10-15 minutes before serving. This allows it to firm up slightly and makes serving easier. Serve warm as a sweet and savory side dish.
Recipe 11: How to Make Asparagus with Lemon Butter
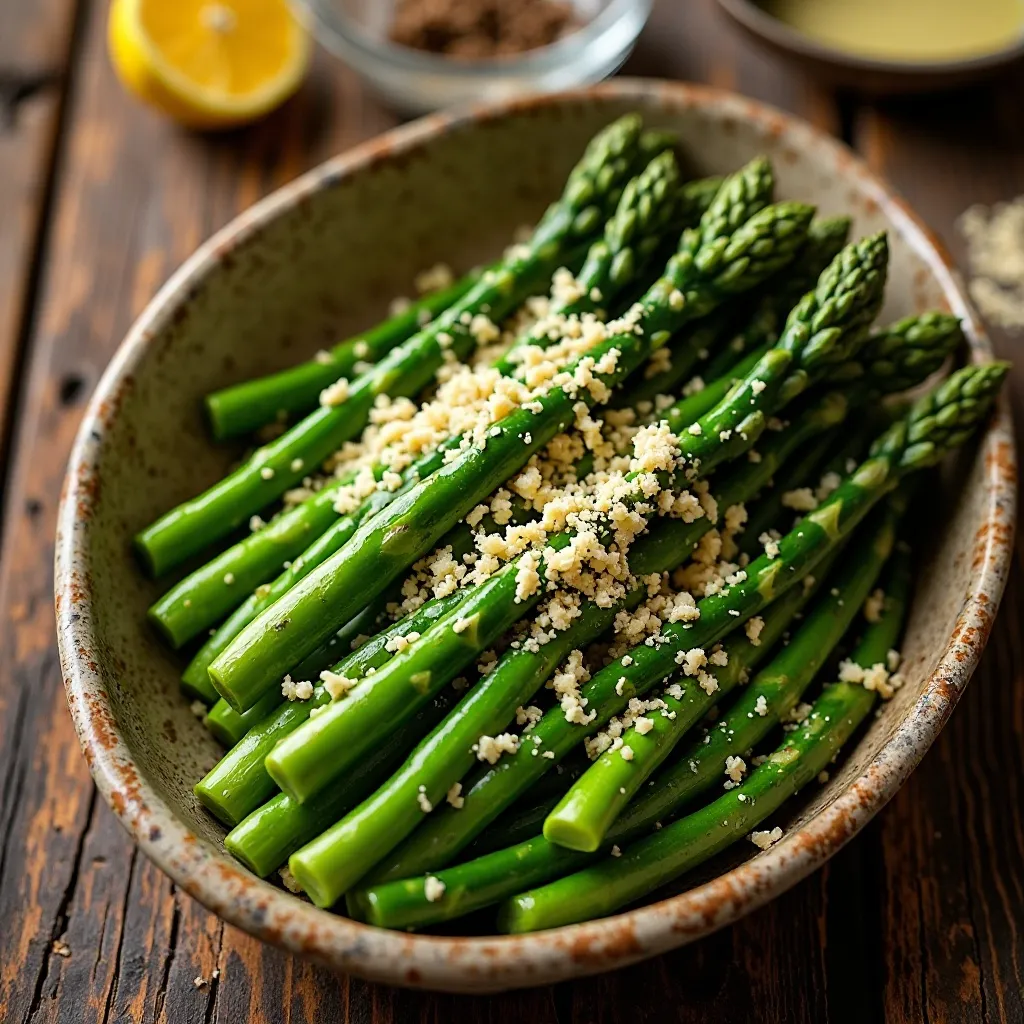
Step 1: Trim the Asparagus
Hold each asparagus spear at both ends and bend gently—it will naturally snap where the tender part begins. Discard the woody ends. Alternatively, trim about 1-2 inches from the bottom.
Step 2: Blanch Quickly
Bring a large pot of salted water to a boil. Add asparagus and cook for 2-3 minutes for thin spears or 4-5 minutes for thick spears. The asparagus should be bright green and tender-crisp. Drain immediately.
Step 3: Make Lemon Butter Sauce
In a large skillet over medium heat, melt butter completely. Add minced garlic and sauté for 1 minute. Add lemon juice and lemon zest, stirring to combine. The butter should foam slightly and smell fragrant.
Step 4: Toss Asparagus in Sauce
Add the blanched asparagus to the skillet with the lemon butter. Toss gently to coat every spear. Cook for 1-2 minutes just to heat through and allow the asparagus to absorb the flavors.
Step 5: Finish and Plate
Transfer to a serving platter and sprinkle with grated Parmesan cheese. Season with salt and pepper to taste. Serve immediately while hot.
What to Serve Thanksgiving Vegetable Sides With
These 12 thanksgiving vegetable sides pair beautifully with traditional holiday main courses. Serve them alongside:
Classic Turkey: The star of the show deserves equally impressive sides. These vegetable dishes provide freshness and color that balance the richness of roasted turkey and gravy.
Honey-Glazed Ham: The sweet and savory flavors of these vegetable sides complement ham perfectly, especially the maple-glazed Brussels sprouts and honey-glazed carrots.
Prime Rib or Beef Tenderloin: If you’re serving beef instead of turkey, the creamed spinach and butternut squash gratin are particularly elegant pairings.
Herb-Roasted Chicken: For smaller gatherings, these sides work beautifully with a simpler roasted chicken main course.
Complementary Carbohydrate Sides: Pair these vegetables with mashed potatoes, stuffing, dinner rolls, and cranberry sauce for a complete Thanksgiving spread.
Wine Pairings: Serve with Pinot Noir, Chardonnay, or Riesling. The wine’s acidity cuts through the richness of the vegetable sides while complementing their natural sweetness.
Gravy and Sauces: Keep turkey gravy, cranberry sauce, and extra butter nearby so guests can customize their plates.
Top Tips for Perfecting 12 Thanksgiving Vegetable Sides
Choose Fresh, Seasonal Vegetables
Visit your local farmer’s market for the freshest seasonal produce. Fresh vegetables have better flavor and texture than older ones sitting in storage. Look for firm Brussels sprouts, bright green beans, and sweet potatoes without soft spots.
Prep Ahead When Possible
Most vegetable sides can be partially prepped the day before. Wash and trim vegetables, make casseroles up to the baking step, and prepare glazes in advance. Store everything covered in the refrigerator and bring to room temperature before cooking.
Don’t Overcook Your Vegetables
One of the biggest mistakes is overcooking vegetables until they’re mushy. Aim for tender-crisp textures that still have some bite. Remember that vegetables continue cooking slightly after you remove them from heat.
Season Generously at Every Step
Don’t wait until the end to season. Salt vegetables before roasting to draw out moisture and concentrate flavors. Taste and adjust seasoning throughout the cooking process.
Use High-Quality Butter and Cheese
Since these recipes rely on simple ingredients, quality matters. European-style butter has higher fat content and richer flavor. Real Parmesan cheese tastes vastly better than pre-grated versions.
Master Your Oven Temperature
Roasting at high heat (400-425°F) creates caramelization and crispy edges. Lower temperatures (350°F) work better for casseroles and gratins that need to cook evenly without burning.
Don’t Crowd the Pan
When roasting vegetables, give them space on the baking sheet. Overcrowding creates steam instead of caramelization, resulting in soggy vegetables. Use two pans if necessary.
Add Acid for Balance
A splash of vinegar, lemon juice, or wine brightens vegetable dishes and prevents them from tasting flat. Acid balances sweetness and richness beautifully.
Consider Texture Variety
Include a mix of textures on your table—something crispy (roasted Brussels sprouts), something creamy (mashed cauliflower), and something tender (glazed carrots). This variety keeps the meal interesting.
Garnish for Visual Appeal
Fresh herbs, toasted nuts or a drizzle of glaze added just before serving makes dishes look restaurant-quality. People eat with their eyes first.
Test Your Timing
Make these recipes at least once before Thanksgiving so you know exactly how long each takes. Note any adjustments needed for your specific oven and equipment.
Keep It Warm
If your oven is occupied with turkey, keep finished vegetable sides warm in a slow cooker on the lowest setting or cover with foil and place in a warm spot.
Storing and Reheating Tips
Refrigerator Storage:
Store leftover thanksgiving vegetable sides in airtight containers in the refrigerator. Most will keep well for 3-5 days. Let everything cool to room temperature before refrigerating to prevent condensation and sogginess.
Roasted vegetables maintain their quality for 3-4 days. Casseroles like green bean casserole and sweet potato casserole last 4-5 days. Creamy dishes like mashed cauliflower and creamed spinach are best consumed within 3 days.
Freezer Storage:
Most casseroles freeze exceptionally well. Sweet potato casserole, green bean casserole, and corn pudding can be frozen for up to 3 months. Wrap tightly in plastic wrap, then aluminum foil to prevent freezer burn.
Avoid freezing: Roasted vegetables with crispy textures (they become soggy), creamed spinach (the cream separates), and dishes with high cream content.
Reheating in the Oven:
For best results, reheat casseroles in a 350°F oven for 20-25 minutes until heated through. Cover with foil to prevent the top from over-browning. Remove foil for the last 5 minutes if you want to crisp up the top.
Reheating on the Stovetop:
Glazed vegetables like carrots and Brussels sprouts reheat beautifully in a skillet over medium heat. Add a splash of water or broth and toss frequently until heated through, about 5-7 minutes.
Creamy sides like mashed cauliflower can be reheated in a saucepan over low heat. Add extra cream or butter to restore the creamy consistency.
Microwave Reheating:
While not ideal, the microwave works for quick reheating. Use 50% power and heat in 1-minute intervals, stirring between each, until heated through. Add moisture (water, broth, or cream) to prevent drying out.
Refreshing Leftovers:
Give roasted vegetables new life by tossing them into omelets, grain bowls, or pasta dishes. Mashed cauliflower makes an excellent topping for shepherd’s pie. Sweet potato casserole can be spread on toast for a unique breakfast treat.
Food Safety Reminder:
Never leave vegetable sides at room temperature for more than 2 hours. Get leftovers into the refrigerator promptly to prevent bacterial growth.
Frequently Asked Questions
Can I make thanksgiving vegetable sides ahead of time?
Absolutely! Most of these recipes are make-ahead friendly. Casseroles like green bean casserole and sweet potato casserole can be assembled completely the day before, covered, and refrigerated. Simply add 10-15 extra minutes to the baking time if cooking from cold. Roasted vegetables can be prepped and stored in the refrigerator, then roasted fresh before serving. Glazes and sauces can be made 2-3 days ahead and reheated when needed.
What are the healthiest thanksgiving vegetable sides?
The healthiest options include roasted Brussels sprouts, garlic Parmesan broccoli, asparagus with lemon butter, and roasted root vegetables. These dishes rely on simple preparation methods with minimal added fats. Mashed cauliflower offers a lower-carb alternative to traditional mashed potatoes while still being creamy and satisfying. Steam or roast vegetables instead of frying, and use olive oil instead of butter when possible.
How do I keep vegetable sides from getting soggy?
The key to avoiding soggy vegetables is proper moisture management. Always dry vegetables thoroughly after washing. When roasting, don’t overcrowd the pan—give vegetables space so steam can escape. For casseroles, avoid adding too much liquid. If using frozen vegetables, thaw and drain them completely before cooking. Finally, serve vegetable sides immediately after cooking for the best texture.
Can I substitute ingredients in these recipes?
Yes! Most recipes are quite flexible. Use vegetable broth instead of chicken broth for vegetarian options. Swap heavy cream for half-and-half or coconut milk for dairy-free versions. Use maple syrup instead of honey for vegan dishes. Gluten-free breadcrumbs work perfectly in casseroles and gratins.
How many vegetable sides should I serve for Thanksgiving?
Plan for 3-5 different vegetable sides for a traditional Thanksgiving dinner, depending on your guest count. This provides variety while ensuring everyone finds something they love. For 8-10 guests, three sides work well. For larger gatherings of 15-20 people, offer 4-5 options. Consider dietary restrictions and preferences when selecting which recipes to make.
What vegetables are traditional for Thanksgiving?
Traditional thanksgiving vegetables include green beans, Brussels sprouts, sweet potatoes, carrots, corn, and squash. These vegetables are at their peak during fall harvest and have become staples of American Thanksgiving celebrations. Modern tables often include broccoli, asparagus, and cauliflower as well, reflecting evolving tastes and dietary preferences.
How do I prevent green bean casserole from being watery?
Make sure to blanch and thoroughly drain the green beans before mixing with the sauce. Squeeze out excess moisture if needed. Don’t use too much milk in the cream mixture—start with less and add more if needed. Let the casserole rest for 5-10 minutes after baking, which allows the sauce to thicken as it cools slightly.
Can these vegetable sides be made vegetarian or vegan?
Most recipes can easily be adapted! Replace butter with olive oil or vegan butter. Use coconut cream or cashew cream instead of dairy cream. Swap Parmesan for nutritional yeast for a cheesy flavor. For green bean casserole, make a homemade mushroom cream sauce with plant-based milk.
Why are my roasted vegetables burning on the edges?
Your oven temperature might be too high, or the vegetables are too close to the heating element. Try roasting on a middle rack at 400-425°F instead of the top rack. Make sure vegetables are evenly coated with oil, as dry spots burn faster. Cut vegetables into uniform sizes so they cook evenly. Stir vegetables halfway through cooking time.
How do I reheat vegetable sides without drying them out?
Add moisture when reheating—a splash of broth, water, or cream works wonders. Cover dishes with foil when reheating in the oven to trap steam. For stovetop reheating, use medium-low heat and add liquid as needed. Microwave at 50% power in short intervals, stirring frequently. Don’t overheat, as this causes vegetables to dry out and become rubbery.
Nutritional Information
Here’s approximate nutritional information per serving for each recipe (serving size: about 1 cup or 1/12 of recipe):
| Recipe | Calories | Protein | Carbs | Fat | Fiber |
|---|---|---|---|---|---|
| Classic Green Bean Casserole | 180 | 5g | 16g | 11g | 3g |
| Honey-Glazed Carrots | 120 | 1g | 22g | 4g | 3g |
| Creamy Mashed Cauliflower | 140 | 5g | 8g | 11g | 3g |
| Sweet Potato Casserole | 285 | 4g | 42g | 12g | 4g |
| Roasted Root Vegetables | 130 | 2g | 18g | 6g | 4g |
| Creamed Spinach | 165 | 5g | 6g | 14g | 2g |
| Butternut Squash Gratin | 245 | 9g | 18g | 16g | 3g |
| Garlic Parmesan Roasted Broccoli | 95 | 5g | 8g | 6g | 3g |
| Maple Balsamic Brussels Sprouts | 125 | 4g | 14g | 7g | 4g |
| Corn Pudding | 220 | 6g | 25g | 11g | 2g |
| Asparagus with Lemon Butter | 85 | 3g | 5g | 7g | 2g |
Note: Nutritional values are approximate and may vary based on specific ingredients and portion sizes used.
Expert Tips for Thanksgiving Day Success
Create a Cooking Timeline
Start planning three days before Thanksgiving. Two days before, shop for all ingredients. One day before, prep vegetables, make casseroles, and prepare glazes. On Thanksgiving morning, focus on dishes that must be made fresh, then reheat prepared items. This timeline reduces stress significantly.
Coordinate Oven Space Efficiently
Map out your oven schedule since you’ll be competing for space with the turkey. Cook casseroles that need 350°F while the turkey rests. Use the broiler for quick crisping while other dishes warm. Consider using a toaster oven or air fryer for smaller batches of roasted vegetables.
Delegate to Guests
If guests offer to bring something, assign them a vegetable side! Provide the recipe or let them choose from your list. This lightens your workload and makes guests feel included in the meal preparation.
Invest in Good Storage Containers
Quality glass or BPA-free plastic containers with tight-fitting lids keep prepped vegetables fresh and prevent refrigerator odors from affecting flavors. Label containers with contents and prep dates.
Double Recipes for Large Gatherings
Most of these recipes serve 8-10 people. For larger groups, it’s better to double the recipe rather than trying to scale up by 1.5x. This ensures consistent results and easier measurement conversions.
Balance Your Menu
Choose vegetable sides with different cooking methods, textures, and flavor profiles. Include at least one roasted dish, one creamy dish, and one fresh/crisp option. This variety keeps your menu interesting and appealing.
Consider Dietary Restrictions
Always have at least two vegetable sides that accommodate common dietary needs like vegetarian, vegan, or gluten-free. Label dishes at your buffet so guests with allergies can easily identify safe options.
Use Quality Bakeware
Heavy-duty baking sheets prevent warping and ensure even heat distribution. Glass or ceramic casserole dishes retain heat beautifully, keeping food warm longer. Non-stick or well-seasoned pans make cleanup easier.
Don’t Skip the Taste Test
Always taste your dishes before serving and adjust seasonings. Foods served at room temperature or reheated often need more salt and acidity than you’d expect. Keep extra salt, pepper, and lemon juice nearby.
Garnish Just Before Serving
Add fresh herbs, nuts, or cheese right before bringing dishes to the table. This ensures toppings stay crispy and vibrant rather than soggy or wilted.
Bonus: Leftover Transformation Ideas
Turkey and Vegetable Pot Pie
Combine leftover turkey with any roasted vegetables in a creamy sauce. Top with puff pastry and bake until golden for a completely new meal.
Harvest Grain Bowl
Layer quinoa or farro with roasted root vegetables, Brussels sprouts, and a fried egg. Drizzle with tahini dressing for a nutritious lunch.
Thanksgiving Frittata
Whisk eggs with leftover mashed cauliflower or sweet potato casserole. Add chopped vegetables and cheese, then bake for an easy breakfast.
Vegetable Soup
Combine any leftover vegetables with turkey or vegetable broth. Add beans or lentils for protein. Simmer until flavors meld for a comforting soup.
Stuffed Sweet Potatoes
Bake fresh sweet potatoes and stuff them with reheated vegetable sides like creamed spinach or green bean casserole for a loaded, satisfying meal.
Buddha Bowls
Create colorful buddha bowls with grains, leftover roasted vegetables, a protein source, and your favorite sauce. Perfect for meal prep!
Final Thoughts
These 12 thanksgiving vegetable sides transform your holiday table from ordinary to extraordinary. Each recipe brings something special—whether it’s the caramelized sweetness of honey-glazed carrots
The beauty of these dishes lies in their versatility. Make them exactly as written for traditional results, or customize them to match your family’s preferences and dietary needs. Most importantly, these recipes are designed to minimize stress while maximizing flavor.
Don’t wait until Thanksgiving to try these recipes. Practice your favorites during Sunday dinners or casual gatherings. By the time the holiday arrives, you’ll be a confident cook ready to impress everyone at your table.
Remember, Thanksgiving is about gratitude, togetherness, and creating memories with loved ones. These vegetable sides are more than just food—they’re part of the traditions and stories you’ll share for years to come.
Which of these 12 thanksgiving vegetable sides will you try first? Let us know in the comments, and don’t forget to share your beautiful Thanksgiving table photos with us on social media!
Happy cooking, and have a wonderful Thanksgiving!
Pin this post for later and share it with friends planning their Thanksgiving menus! Follow us for more holiday recipes, cooking tips, and family-friendly meal ideas that make every occasion special.