
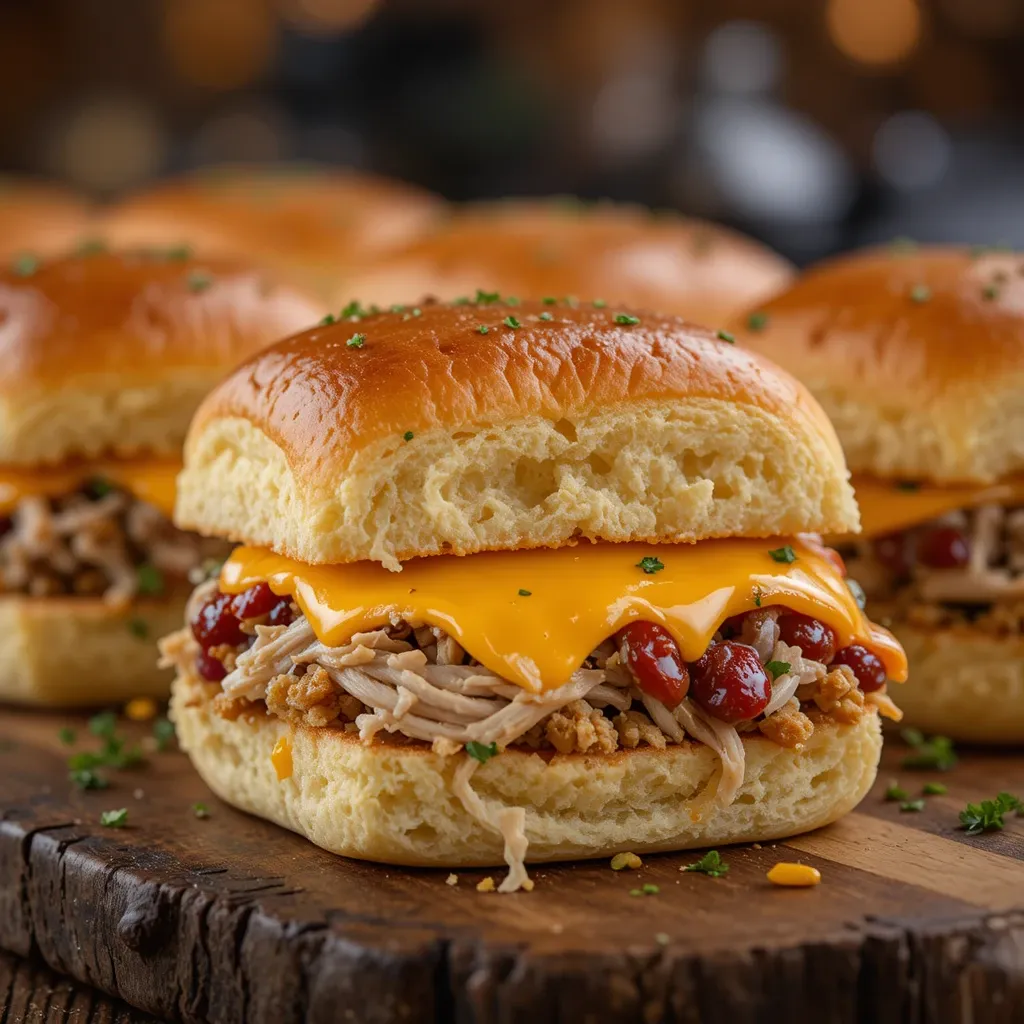
The BEST Thanksgiving Turkey Sliders Ready in 20 Minutes
There’s something magical about transforming Thanksgiving leftovers into bite-sized perfection. These Thanksgiving turkey sliders are tender, juicy, and absolutely irresistible. I still remember the first time I made these after a holiday feast—my family devoured them faster than the original turkey dinner!
Here’s a fun fact: sliders originated in the American Midwest in the early 1900s, but adding Thanksgiving flavors takes them to a whole new level. This dish is incredibly simple, ready in just 20 minutes, and perfect for feeding hungry family members who can’t stop snacking.
If you loved my cranberry sauce meatballs, you’re going to obsess over these sliders. Get ready to turn your leftovers into everyone’s new favorite comfort food!
What are Thanksgiving Turkey Sliders?
Ever wonder why we call them “sliders”? Legend says they got their name because they’re so delicious they just “slide” right down! These mini sandwiches pack all your favorite Thanksgiving flavors—tender turkey, cranberry sauce, stuffing, and melted cheese—into one heavenly bite.
You know the classic saying, “the way to a man’s heart is through his stomach”? Well, these sliders are your secret weapon! Trust me, once you make these, you’ll never look at holiday leftovers the same way again.
Why You’ll Love This Thanksgiving Turkey Sliders Recipe
Transforms Leftovers into Something Special
The best part about Thanksgiving turkey sliders? They take all those containers of leftovers sitting in your fridge and turn them into something your family will actually get excited about. The combination of moist turkey, tangy cranberry sauce, savory stuffing, and gooey melted cheese creates layers of flavor that somehow taste even better than the original meal.
Budget-Friendly and Waste-Free
Making these sliders at home means you’re getting maximum value from your holiday cooking. Instead of spending money on lunch out or ordering takeout, you’re creating restaurant-quality mini sandwiches using ingredients you already have. No waste, no extra grocery runs, just pure deliciousness that saves you money and reduces food waste.
Customizable Toppings and Flavors
What I love most is how versatile these are. swap Swiss for cheddar, drizzle with gravy, or pile on extra cranberry sauce—the possibilities are endless. They remind me of my popular leftover turkey pot pie recipe, but these come together in a fraction of the time. Whether you’re feeding kids, hosting guests, or just treating yourself, these sliders deliver comfort food perfection every single time. Go ahead and make them your own—I promise you won’t regret it!
How to Make Thanksgiving Turkey Sliders
Quick Overview
These Thanksgiving turkey sliders are unbelievably easy to make and absolutely delicious.
What makes them special is the buttery garlic topping that gets brushed over Hawaiian rolls, creating a golden, crispy exterior while keeping the inside soft and packed with flavor.
The combination of tender turkey, tangy cranberry sauce, and melted cheese creates the perfect sweet and savory balance.
Time Breakdown:
- Prep Time: 10 minutes
- Cook Time: 15-20 minutes
- Total Time: 25-30 minutes
- Serves: 12 sliders
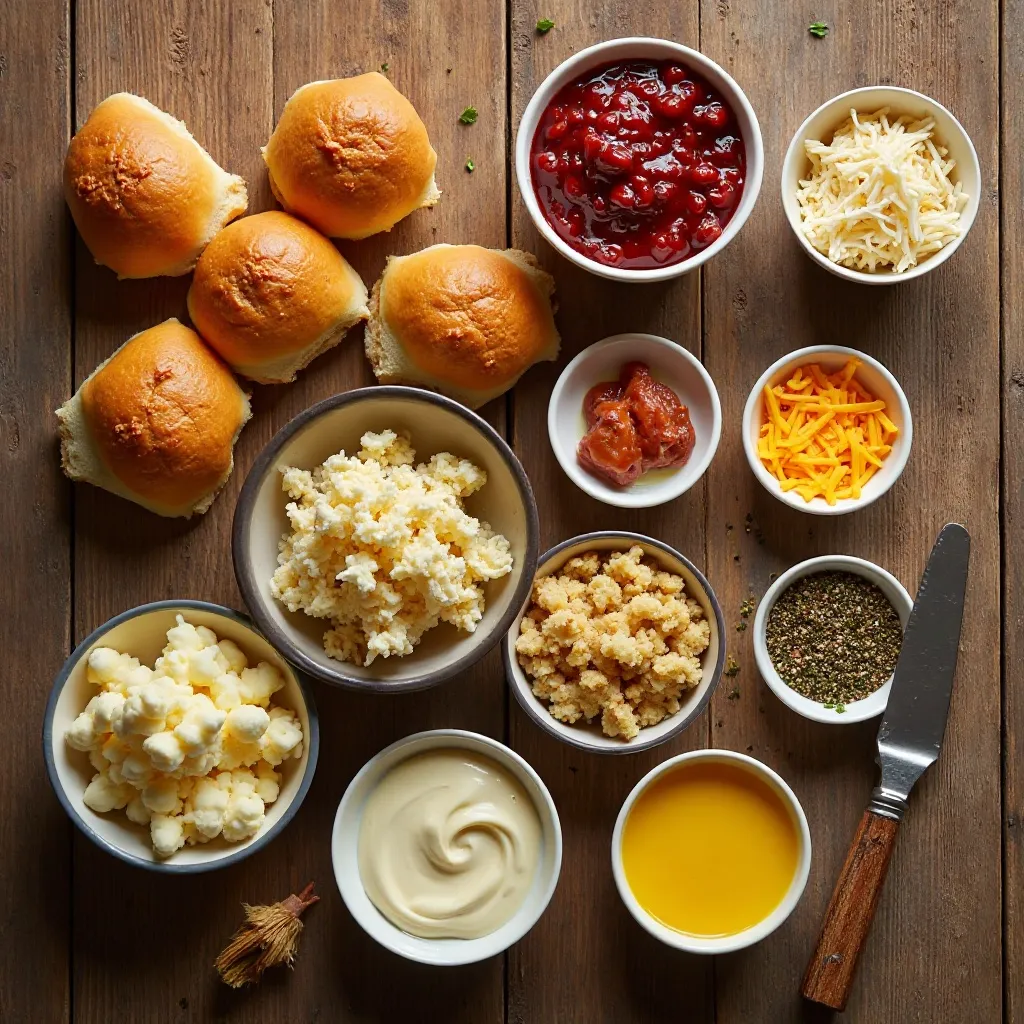
Key Ingredients for Thanksgiving Turkey Sliders
Created with AI guidance, this recipe hasn’t been cooked in our kitchen; we strive to guide you accurately.
![Ingredients laid out on counter]
Here’s everything you need to create these amazing sliders:
For the Sliders:
- 12 Hawaiian sweet rolls (1 package, connected)
- 3 cups leftover Thanksgiving turkey, shredded or sliced
- 1 cup cranberry sauce
- 1½ cups shredded cheese (Swiss, provolone, or cheddar)
- 1 cup leftover stuffing (optional but amazing)
- ½ cup mayonnaise
- 2 tablespoons Dijon mustard
For the Butter Topping:
- ½ cup butter, melted
- 2 cloves garlic, minced
- 1 tablespoon fresh parsley, chopped
- 1 teaspoon poppy seeds (optional)
- ½ teaspoon onion powder
- ¼ teaspoon black pepper
Optional Add-ins:
- Caramelized onions
- Fresh spinach or arugula
- Turkey gravy for dipping
Step-by-Step Instructions
Prepare Your Baking Dish
Preheat your oven to 350°F (175°C). Spray a 9×13-inch baking dish with non-stick cooking spray or line it with parchment paper for easy cleanup. This prevents the bottom rolls from sticking and makes serving so much easier.
Slice the Rolls
Without separating the individual rolls, use a sharp serrated knife to slice the entire sheet of Hawaiian rolls horizontally in half. Keep the rolls connected—this is key to making sliders instead of individual sandwiches. Place the bottom half in your prepared baking dish.
Create the Spread
In a small bowl, mix together the mayonnaise and Dijon mustard until well combined. This creamy, tangy spread adds moisture and flavor to every bite. Spread this mixture evenly over the bottom layer of rolls, making sure to get it all the way to the edges.
Layer the Turkey
Distribute the shredded or sliced turkey evenly over the bottom rolls. Make sure you cover the entire surface so every slider gets plenty of meat. If your turkey seems dry, this is the perfect time to drizzle a little turkey gravy over it to add moisture.
Add the Cranberry Sauce
Spread the cranberry sauce over the turkey layer. I like to use whole berry cranberry sauce for extra texture, but jellied works beautifully too. The sweet-tart flavor is what makes these sliders taste like Thanksgiving in every bite.
Add Stuffing (Optional)
If you’re using leftover stuffing, crumble it evenly over the cranberry layer. This adds amazing texture and another layer of holiday flavor. Don’t pack it down too much—you want the sliders to close properly.
Add the Cheese
Sprinkle the shredded cheese evenly over everything. The cheese acts as a delicious glue that holds all those layers together. Swiss and provolone melt beautifully, but sharp cheddar adds a nice tangy kick.
Top with Remaining Rolls
Carefully place the top half of the rolls over all your fillings. Press down gently but firmly to compress everything together. This helps the sliders hold their shape when you cut them later.
Make the Butter Topping
In a small bowl, combine the melted butter, minced garlic, chopped parsley, poppy seeds, onion powder, and black pepper. Mix well so the garlic and herbs are evenly distributed. This butter mixture is what transforms ordinary sliders into something extraordinary.
Brush with Butter
Using a pastry brush, generously brush the butter mixture all over the top of the rolls. Make sure you get into all the cracks and crevices between each roll. Don’t be shy with the butter—this is what creates that golden, crispy, flavorful top.
Cover and Bake
Cover the baking dish tightly with aluminum foil. Bake in your preheated oven for 15 minutes. This allows the cheese to melt and all the flavors to meld together while keeping the tops from browning too quickly.
Uncover and Finish Baking
Remove the foil and bake for an additional 5-10 minutes, or until the tops are golden brown and the cheese is completely melted and bubbly. Keep an eye on them during this final stage—you want them golden, not burned.
Cool and Slice
Remove from the oven and let the sliders rest for 2-3 minutes. This brief cooling period makes them easier to cut and prevents all that melted cheese from sliding out. Use a sharp knife to cut along the lines of the individual rolls, creating 12 perfect sliders.
Serve and Enjoy
Transfer to a serving platter and watch them disappear! Serve immediately while they’re still warm and the cheese is gooey. I like to put out a small bowl of extra cranberry sauce and warm turkey gravy for dipping.
What to Serve Thanksgiving Turkey Sliders With
These sliders are pretty much a complete meal on their own, but here are some fantastic pairings:
Sides that Complement:
- Sweet potato fries or regular french fries for that perfect salty crunch
- A fresh green salad with cranberry vinaigrette to balance the richness
- Creamy coleslaw for added texture and freshness
- Mac and cheese (because why not double down on comfort food?)
For Game Day or Parties:
- Serve alongside other finger foods like spinach artichoke dip, buffalo wings, or loaded nachos
- Set up a slider bar with different toppings so guests can customize their own
Top Tips for Perfecting Thanksgiving Turkey Sliders
Don’t Skip the Butter Topping
I cannot stress this enough—that garlic butter topping is what takes these from good to absolutely incredible. It creates a golden, crispy exterior while adding tons of flavor. If you’re watching calories, you can reduce the butter to ⅓ cup, but I promise the full amount is worth it.
Use Quality Rolls
Hawaiian sweet rolls are my top choice because their subtle sweetness pairs perfectly with the savory fillings. If you can’t find them, brioche rolls work wonderfully too. Avoid using regular dinner rolls—they don’t have the same soft, slightly sweet quality that makes these special.
Layer Strategically
The order of your layers matters! Always start with the mayo-mustard spread directly on the bread to create a moisture barrier. This prevents soggy bottom rolls. Place wet ingredients like cranberry sauce in the middle, away from the bread, and let the turkey and cheese act as protective layers.
Don’t Overstuff
While it’s tempting to pile on all your leftovers, overstuffing makes the sliders difficult to eat and prevents them from heating through properly. Aim for about ¼ cup of turkey per slider, and keep other ingredients proportional.
Warm Your Ingredients
If your leftovers are cold from the fridge, let them come to room temperature before assembling, or give the turkey a quick warm-up in the microwave. Cold ingredients require longer baking time and can result in overcooked, dried-out rolls.
Cover During Initial Baking
That foil cover during the first part of baking is crucial. It traps steam, which melts the cheese perfectly and heats everything through without drying out the tops. Removing it at the end gives you that gorgeous golden-brown finish.
Storing and Reheating Tips
Refrigerator Storage
Store leftover sliders in an airtight container in the refrigerator for up to 3 days. I like to separate layers with parchment paper to prevent them from sticking together. Make sure they’ve cooled completely before storing to prevent condensation, which makes them soggy.
Freezing Instructions
These sliders freeze surprisingly well! Wrap individual sliders tightly in plastic wrap, then place them in a freezer-safe bag or container. They’ll keep for up to 2 months. Label them with the date so you remember when you made them. To prevent freezer burn, squeeze out as much air as possible from the bag.
Reheating from Refrigerator
For best results, reheat refrigerated sliders in the oven. Preheat to 325°F, wrap sliders loosely in foil, and warm for 10-15 minutes until heated through. You can also microwave individual sliders for 30-45 seconds, but they won’t have that crispy top. For a crispier result, reheat in an air fryer at 350°F for 5-7 minutes.
Reheating from Frozen
Thaw frozen sliders in the refrigerator overnight, then reheat using the oven method above. If you’re in a hurry, you can reheat from frozen—just add an extra 10-15 minutes to the baking time and check that they’re heated through to the center.
Make-Ahead Tips
You can assemble these sliders completely (minus the butter topping) and refrigerate them overnight. When you’re ready to bake, add the butter topping and follow the original baking instructions, adding 5 extra minutes since they’re starting cold. This is perfect for busy holiday weekends when you want something quick but impressive.
Common Mistakes to Avoid
Using Stale Bread
Stale or day-old rolls might seem like a good use of leftovers, but they’ll dry out even more during baking. Always use fresh Hawaiian rolls for the best texture. If your rolls are slightly stale, brush them with a bit of extra butter before adding fillings.
Forgetting to Preheat the Oven
Starting with a properly preheated oven ensures even cooking. If you put sliders in a cold oven, the bottoms may overcook while the cheese is still solid, and you won’t get that perfect golden top.
Cutting the Rolls Apart
Keep those rolls connected! Cutting them into individual pieces before assembling makes the whole process messier and they won’t hold together as well. The connected sheet is what makes these “sliders” instead of just small sandwiches.
Skipping the Mayo-Mustard Layer
That spread isn’t optional—it’s essential. It adds flavor, moisture, and creates a protective barrier against soggy bread. Without it, the cranberry sauce and turkey juices will make your bottom rolls unpleasantly mushy.
Not Pressing Down
After placing the top layer of rolls, press down firmly. This compresses all the layers together and ensures everything heats evenly. Loose, fluffy sliders will have fillings falling out and won’t hold together when cut.
Baking Uncovered the Entire Time
If you skip the foil cover, your tops will brown too quickly before the cheese melts and the filling heats through. You’ll end up with burnt tops and cold centers—not the delicious result you’re after.
Frequently Asked Questions
Can I make these sliders without leftovers?
Absolutely! Use rotisserie chicken or deli turkey sliced thick. For cranberry sauce, grab a can from the grocery store (the jellied or whole berry kind both work). You can skip the stuffing or buy prepared stuffing mix. These sliders are so good, they’re worth making even when it’s not Thanksgiving!
What’s the best cheese for turkey sliders?
Swiss cheese is my personal favorite because it melts beautifully and has a mild, slightly nutty flavor that doesn’t overpower the other ingredients. Provolone is another excellent choice with a bit more tang. Sharp cheddar adds a nice bite, while Monterey Jack gives you creaminess. Honestly, you can’t go wrong—use what you have or what your family prefers!
Can I add gravy to these sliders?
Yes, but be careful! Too much gravy will make them soggy. I recommend serving warm gravy on the side for dipping rather than adding it during assembly. If you really want gravy inside, drizzle just 2-3 tablespoons over the turkey layer and proceed carefully.
How do I keep the bottoms from getting soggy?
The mayo-mustard spread is your first line of defense—it creates a moisture barrier. Also, make sure your turkey isn’t too wet or swimming in juices. Pat it dry with paper towels if needed. Finally, don’t let assembled sliders sit too long before baking. Get them in the oven within 15-20 minutes of assembly.
Can I make these in advance for a party?
Yes! Assemble the sliders completely (without the butter topping), cover tightly with plastic wrap, and refrigerate for up to 24 hours. When you’re ready to bake, add the butter topping and bake according to instructions, adding 5 extra minutes to account for the cold start.
What if I don’t have Hawaiian rolls?
Brioche rolls are the closest substitute—they’re soft, slightly sweet, and buttery. Potato rolls also work well. In a pinch, regular dinner rolls will do, though you’ll miss some of that signature sweetness. Just make sure whatever you use, keep the rolls connected as a sheet.
Are these sliders kid-friendly?
Absolutely! Kids love these because they’re the perfect size for little hands. If your kids are picky, you can skip the mustard in the spread and go lighter on the cranberry sauce. Some kids prefer these with just turkey and cheese, which is totally fine—customize to your family’s tastes!
Can I use turkey breast instead of dark meat?
Of course! Turkey breast works perfectly. It’s leaner and milder than dark meat. If you’re using all breast meat and it seems dry, add a little extra mayo to the spread or drizzle with a bit of gravy before adding the cheese.
How many sliders should I plan per person?
For a main meal, plan on 2-3 sliders per adult and 1-2 for children. As an appetizer or party food, figure 2 sliders per person since people will be eating other things too. The recipe makes 12 sliders, so it’s perfect for 4-6 people as a main course.
Can I make a vegetarian version?
Sure! Substitute the turkey with a plant-based turkey alternative, add extra stuffing, or use roasted vegetables like butternut squash and mushrooms. Keep all the other layers the same, and you’ll have a delicious meat-free version that still tastes like Thanksgiving.
Nutritional Information
| Nutrient | Per Slider (1/12 recipe) |
|---|---|
| Calories | 285 |
| Total Fat | 14g |
| Saturated Fat | 7g |
| Cholesterol | 55mg |
| Sodium | 420mg |
| Total Carbohydrates | 24g |
| Dietary Fiber | 1g |
| Sugars | 8g |
| Protein | 16g |
Note: Nutritional information is approximate and will vary based on specific ingredients used and portion sizes.
Final Thoughts
These Thanksgiving turkey sliders have become a tradition in my house the day after every big holiday meal. There’s something so satisfying about transforming leftovers into something everyone gets genuinely excited about.
The crispy, buttery tops, the gooey melted cheese, the sweet-tart cranberry sauce, and tender turkey all come together in perfect harmony.
What I love most is how forgiving this recipe is. Forgot to buy Swiss cheese? Use cheddar. No stuffing left? Skip it. Turkey a little dry? Add extra mayo or a drizzle of gravy. These sliders adapt to whatever you have on hand.
They’re perfect for casual family dinners, game day gatherings, holiday parties, or even meal prep for the week. Make a double batch if you’re feeding a crowd—they disappear fast!
So next time you’re staring at containers of Thanksgiving leftovers, remember this recipe. Your family will thank you, your taste buds will celebrate, and you’ll wonder why you ever heated up plain turkey in the microwave.
Give these Thanksgiving turkey sliders a try and let me know what you think in the comments below! What’s your favorite way to use up holiday leftovers?