
Thanksgiving Turkey Cheese Ball – 30 Minute to Holiday Magic
Picture this: your guests arriving for Thanksgiving dinner, and there on your appetizer table sits an adorable turkey made entirely of cheese and crackers. Their faces light up, phones come out for photos, and before you know it, everyone’s diving in.
That’s the magic of a Thanksgiving turkey cheese ball! This creamy, flavor-packed appetizer combines cream cheese, sharp cheddar, and savory seasonings shaped into an irresistible turkey that’s almost too cute to eat. It’s become my go-to conversation starter at every holiday gathering, and honestly,
it’s easier to make than my classic pumpkin cheesecake bars. Whether you’re hosting a crowd or bringing a dish to share, this adorable turkey will steal the show while keeping your prep time under 30 minutes.
What is a Thanksgiving Turkey Cheese Ball?
Ever wonder why we turn perfectly good cheese into poultry shapes? Because it’s absolutely delightful, that’s why! A Thanksgiving turkey cheese ball is essentially a savory cheese mixture shaped like a turkey and decorated with crackers, pretzels, and vegetables to create adorable turkey features.
You know the saying, “the way to a man’s heart is through his stomach”? Well, the way to everyone’s heart at Thanksgiving is definitely through a cheese ball shaped like a turkey. It’s part appetizer, part centerpiece, and entirely irresistible. Go ahead and give this festive treat a try – your guests will be talking about it long after the dishes are cleared!
Why You’ll Love This Thanksgiving Turkey Cheese Ball
It’s the Perfect Make-Ahead Appetizer
Let me tell you why this has become my Thanksgiving lifesaver. While your oven is occupied with the actual turkey, this little guy is chilling in the fridge, getting even more flavorful. The cheese mixture needs time to firm up anyway, so making it the day before isn’t just convenient – it actually improves the taste as all those seasonings meld together beautifully.
Budget-Friendly Holiday Showstopper
Forget spending $30 on a fancy charcuterie board from the store. This Thanksgiving turkey cheese ball costs maybe $10 to make and looks like you spent hours on it. I’m talking cream cheese, shredded cheddar, some basic pantry spices, and whatever crackers and veggies you have on hand for decoration. It’s similar to my crowd-pleasing sausage cheese balls, but with that extra holiday wow factor.
How to Make a Thanksgiving Turkey Cheese Ball
Quick Overview
This Thanksgiving turkey cheese ball is surprisingly simple to create! You’ll mix a flavorful cheese base, shape it into a turkey body, and decorate it with festive flair. The result is a creamy, savory appetizer with a stunning presentation.
Time Breakdown:
- Prep Time: 20 minutes
- Chill Time: 2-4 hours (or overnight)
- Decorating Time: 10 minutes
- Total Time: 2.5-4.5 hours
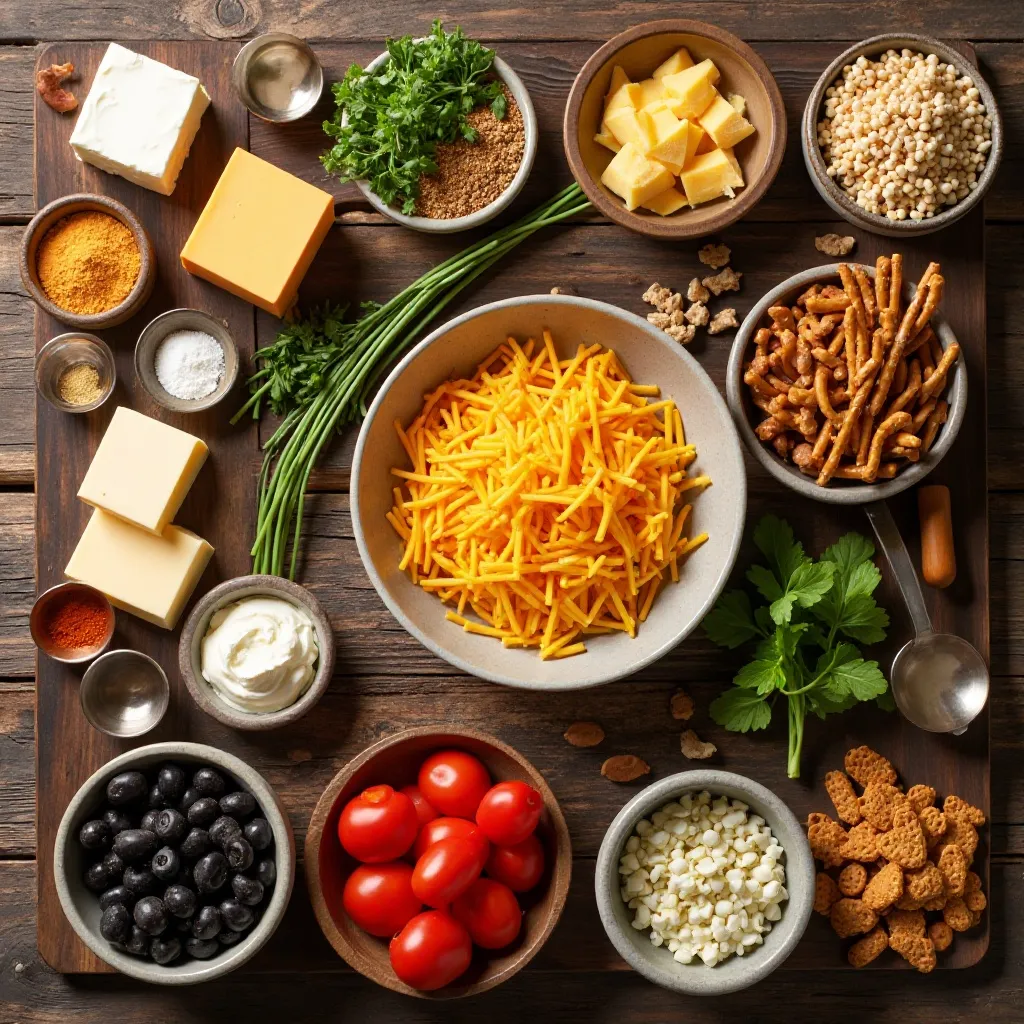
Key Ingredients for Thanksgiving Turkey Cheese Ball
![Ingredients laid out for turkey cheese ball]
For the Cheese Mixture:
- 16 oz cream cheese, softened to room temperature
- 2 cups sharp cheddar cheese, finely shredded
- 1/4 cup sour cream
- 2 tablespoons fresh chives, finely chopped
- 1 teaspoon Worcestershire sauce
- 1/2 teaspoon garlic powder
- 1/4 teaspoon onion powder
- Salt and black pepper to taste
For Decoration:
- 1 cup pecans or almonds, finely chopped (for coating)
- 1 small bell pepper (orange or red)
- 1 black olive
- Pretzel sticks
- Assorted crackers (Ritz, wheat thins, butter crackers)
- Fresh herbs for garnish
Step-by-Step Instructions
Step 1: Prepare Your Cheese Base
Start by letting your cream cheese sit at room temperature for about 30 minutes. This is crucial – cold cream cheese won’t mix smoothly. In a large mixing bowl, combine the softened cream cheese, shredded cheddar cheese, and sour cream. Use a hand mixer or sturdy spatula to beat everything together until completely smooth and creamy, about 2-3 minutes.
Step 2: Add the Flavor Boosters
Fresh chives, Worcestershire sauce, garlic powder, and onion powder. Mix thoroughly until all ingredients are evenly distributed throughout the cheese mixture. Taste it now – this is your chance to adjust seasonings! Want more zing? Add a pinch of cayenne. Need more depth? A dash more Worcestershire does the trick.
Step 3: Shape the Turkey Body
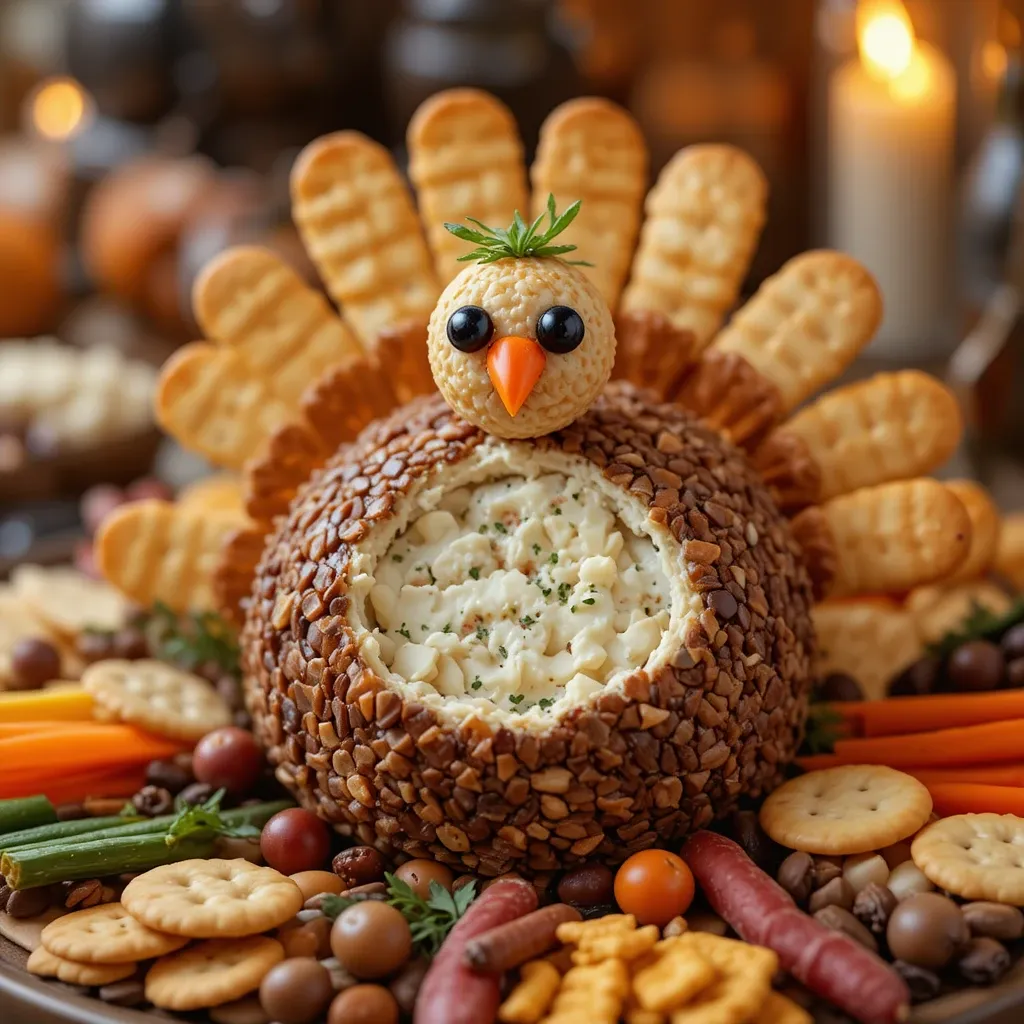
Here’s where it gets fun. Lay out a large piece of plastic wrap on your counter. Scoop the cheese mixture onto the center and use the plastic wrap to shape it into an oval ball, slightly taller on one end (this becomes the turkey’s body). For the head, reserve about 1/4 cup of the mixture and shape it into a smaller ball. Wrap both tightly in plastic wrap and refrigerate for at least 2 hours, or overnight for best results.
Step 4: Coat with Nuts
Once your cheese balls are firm, spread your chopped pecans or almonds on a large plate. Unwrap the larger cheese ball and gently roll it in the nuts, pressing lightly so they stick. The nuts should cover the entire surface, creating a “feathered” texture. Do the same with the smaller ball for the head. Place the larger ball on your serving platter with the wider end as the base.
Step 5: Attach the Head
Use a pretzel stick to secure the head to the body. Simply insert the pretzel stick into the top of the body ball, leaving about an inch exposed, then carefully press the head ball onto the exposed pretzel. This creates your turkey’s neck and head structure.
Step 6: Create the Tail Feathers
This is my favorite part! Take 5-7 crackers (Ritz or butter crackers work beautifully) and insert them into the back of the turkey body at an angle, fanning them out to create a gorgeous tail. Alternate different cracker types for visual interest. You can also use pretzel crisps or even Belgian endive leaves for a fancier look.
Step 7: Add the Turkey Features
Cut a small triangle from your bell pepper for the beak and press it gently into the head. Slice a black olive in half and use two pieces for eyes. For the turkey’s wattle (that red thing under the beak), cut a small wavy piece from the bell pepper and position it below the beak. Use tiny herb sprigs to add extra detail if desired.
Step 8: Final Touches
Surround your turkey with an assortment of crackers, veggie sticks, and maybe some grapes or cherry tomatoes for color. I like to add a few sprigs of fresh rosemary or thyme around the base to give it that harvest table vibe.
What to Serve Your Thanksgiving Turkey Cheese Ball With
The beauty of this appetizer is its versatility! Here are my tried-and-true pairings:
Crackers Galore: Butter crackers, wheat thins, water crackers, and multigrain crisps offer different textures and flavors. I always put out at least three varieties.
Fresh Vegetables: Celery sticks, carrot coins, bell pepper strips, and cucumber slices provide a lighter option for spreading. The crunch contrast is perfect.
Bread Options: Thin baguette slices, toasted pita chips, or even crostini work wonderfully. I sometimes include pumpernickel rounds for color variation.
Fruit Additions: Apple slices and pear wedges add a sweet element that cuts through the rich cheese beautifully. Just toss them with a little lemon juice to prevent browning.
Beverages: This pairs perfectly with a crisp white wine like Sauvignon Blanc, sparkling cider, or even a light beer. For non-alcoholic options, try cranberry spritzers or apple cider.

Top Tips for Perfecting Your Thanksgiving Turkey Cheese Ball
Use Room Temperature Ingredients
Cannot stress this enough! Cold cream cheese equals lumpy cheese balls. Let your cream cheese and sour cream sit out for 30-45 minutes before mixing. Room temperature ingredients blend smoothly and create that silky texture we’re after.
Don’t Skip the Chill Time
I know you’re excited to decorate, but patience pays off here. A properly chilled cheese ball holds its shape during decorating and serving. If it’s too soft, your turkey will droop, and those crackers won’t stay in place. Overnight chilling is honestly ideal.
Toast Your Nuts for Extra Flavor
Here’s a game-changer: toast your pecans or almonds in a dry skillet for 3-4 minutes before chopping. The nutty aroma intensifies, and it adds another flavor dimension to your cheese ball. Just let them cool completely before coating.
Customize the Flavor Profile
This base recipe is endlessly adaptable. Add crumbled blue cheese for tang, diced jalapeños for heat, or sun-dried tomatoes for sweetness. I’ve made versions with everything bagel seasoning, ranch seasoning, and even pumpkin spice (that one was an experiment – stick with savory).
Prep Your Decorations in Advance
Cut all your peppers, slice your olives, and arrange your crackers before you unwrap your chilled cheese ball. Working quickly keeps the cheese from getting too soft and losing its shape.
Keep It Cold Until Serving
Take your turkey out of the fridge about 10 minutes before guests arrive – just enough time to take the chill off for easier spreading. Any longer and it gets too soft. If your party runs long, pop it back in the fridge for 15 minutes to firm up.
Storing and Reheating Tips
Refrigerator Storage
Store your undecorated cheese ball wrapped tightly in plastic wrap for up to 5 days. If you’ve already decorated it, cover loosely with plastic wrap, being careful not to disturb the features. It’ll stay fresh for 2-3 days decorated.
The cheese mixture actually tastes better after a day or two as the flavors develop and meld together. I always make mine at least 24 hours ahead.
Freezing Instructions
Yes, you can freeze it! Wrap the undecorated cheese ball in plastic wrap, then again in aluminum foil. Freeze for up to 2 months. Thaw overnight in the refrigerator, then decorate before serving.
I don’t recommend freezing after decorating – those veggies and crackers don’t hold up well. Freeze just the cheese portion.
Serving Leftovers
If you somehow have leftover cheese ball (rare at my house!), scrape off the decorations and store the cheese mixture in an airtight container. Use it within 3 days as a spread for sandwiches, a baked potato topping, or stirred into scrambled eggs. It’s also fantastic melted over roasted vegetables.
Tips for Avoiding Common Mistakes
Mistake #1: Using Pre-Shredded Cheese
Those bags of pre-shredded cheese contain anti-caking agents that prevent smooth mixing. Shred a block of sharp cheddar yourself – it takes two minutes and makes a huge difference in texture and flavor.
Mistake #2: Over-Mixing the Cheese
Mix just until combined. Over-mixing incorporates too much air, making your cheese ball fluffy instead of dense and creamy. You want it smooth but still rich and compact.
Mistake #3: Decorating Too Early
Wait until just before serving to add crackers and veggies. Crackers get soggy sitting against moist cheese, and cut veggies oxidize and lose their vibrant color. The cheese ball can be coated with nuts ahead of time, but save the final decorations for showtime.
Mistake #4: Making the Ball Too Large
A cheese ball bigger than a softball becomes unwieldy and hard to shape properly. If you need more, make two smaller turkeys instead. Plus, two turkeys on your table? Even cuter.
Mistake #5: Skipping the Taste Test
Always taste your mixture before shaping! Cheese can vary in saltiness, and you might need more seasoning than you think. This is your only chance to adjust – you can’t fix it once it’s decorated.
Mistake #6: Using Wet Hands
When shaping your cheese balls, keep your hands dry or lightly dust them with a bit of the chopped nuts. Wet hands make the cheese sticky and hard to work with.
Frequently Asked Questions
Can I make this Thanksgiving turkey cheese ball ahead of time?
Absolutely! In fact, I recommend it. Make the cheese mixture and shape it up to 3 days in advance. Keep it wrapped in the fridge until the day you’re serving, then add your decorations. The flavors actually improve with time.
What can I use instead of pecans for coating?
So many options! Try crushed walnuts, sliced almonds, everything bagel seasoning, fresh herbs like parsley or dill, or even crushed pretzels. Each gives a different texture and flavor profile.
How do I keep my turkey from falling apart?
The key is proper chilling. Your cheese mixture needs to be firm before decorating. If it’s too soft, pop it back in the fridge for 30 minutes. Also, use sturdy crackers for the tail feathers and don’t make the head too heavy.
What cheese works best for this recipe?
Sharp cheddar is my go-to because it provides great flavor without being overpowering. But feel free to experiment with smoked gouda, pepper jack for heat, or even gruyere for something sophisticated. Just avoid super soft cheeses that won’t hold their shape.
How long can the cheese ball sit out at room temperature?
For food safety, don’t leave it out longer than 2 hours. If your party runs longer, refrigerate it midway through and bring it back out. Better safe than sorry with dairy products!
My cheese ball is too soft. How do I fix it?
Add more shredded cheese, a few tablespoons at a time, until it firms up. Or pop it in the freezer for 15-20 minutes to speed up the chilling process. If it’s still too soft, your cream cheese might have been too warm to start.
Can I make mini turkey cheese balls instead?
What a cute idea! Make individual serving-size turkeys for a buffet table. Shape small balls (about 2 tablespoons each), coat with nuts, and decorate with smaller features. They’re perfect for portion control.
Nutrition Information
| Nutrient | Per Serving (2 tablespoons) |
|---|---|
| Calories | 145 |
| Total Fat | 13g |
| Saturated Fat | 6g |
| Cholesterol | 32mg |
| Sodium | 195mg |
| Total Carbohydrates | 2g |
| Protein | 5g |
| Calcium | 95mg |
| Vitamin A | 8% DV |
Note: Nutrition facts are approximate and based on the cheese ball only, not including crackers or vegetables served alongside.
Final Thoughts
This Thanksgiving turkey cheese ball has become such a beloved tradition in my home. There’s something magical about watching guests’ faces light up when they see this adorable creation on the appetizer table.
It’s the perfect combination of fun and delicious, impressive yet approachable. You don’t need fancy skills or hours of time – just good ingredients, a little creativity, and the willingness to have some fun in the kitchen.
Whether this is your first time making a cheese ball or you’re a seasoned pro, I hope this recipe brings as much joy to your Thanksgiving table as it does to mine. The laughter, the photos, the empty platter at the end of the night – that’s what the holidays are all about.
So go ahead, embrace the whimsy, and create your own turkey masterpiece. Your guests are going to love it, and you’re going to love how easy it is. Happy Thanksgiving, and happy cheese ball making!
Don’t forget to save this recipe and share your turkey creations with me! I love seeing how everyone decorates theirs differently.