
Easy Thanksgiving Charcuterie Board with Cheese Ball Recipe
Picture this: it’s two hours before Thanksgiving dinner, your kitchen smells like roasting turkey and buttery rolls, and relatives are already arriving early. You need something impressive to keep everyone happy while the main event finishes cooking. That’s exactly when I discovered the magic of creating a stunning Thanksgiving charcuterie board with cheese ball as the centerpiece.
The first time I tried this, I honestly just threw some crackers and cheese on a board and called it a day. Big mistake. My aunt Linda (who’s very particular about presentation) gave me that polite smile that said, “Oh honey, you tried.” So I did what any determined cook would do – I spent the next year perfecting my Thanksgiving spread. Now? People show up early specifically for my appetizer board, and I’ve made this setup at least fifteen times over the past three seasons.
Here’s the thing about a Thanksgiving charcuterie board with cheese ball: it’s not just an appetizer. It’s your secret weapon for keeping hungry guests satisfied, creating a gorgeous focal point for your holiday table, and honestly, saving your sanity during the pre-dinner chaos. And the best part? It looks like you spent hours on it when really, you can pull this together in about thirty minutes once you know the tricks.
What Makes This Thanksgiving Board Different
Listen, I’ve seen a lot of charcuterie boards in my time. But a Thanksgiving charcuterie board with cheese ball isn’t your average summer snack platter. This is a carefully curated collection of seasonal flavors that celebrates everything we love about November – the warming spices, the harvest bounty, the cozy comfort foods that make us feel at home.
The cheese ball acts as your anchor, your showstopper, your conversation starter. I’ve watched guests circle back to mine three or four times during a single gathering (not that I’m counting, but I totally am). Traditional charcuterie boards are beautiful, sure, but adding that creamy, herb-coated cheese ball transforms it into something specifically designed for Thanksgiving. It bridges the gap between appetizer and experience.
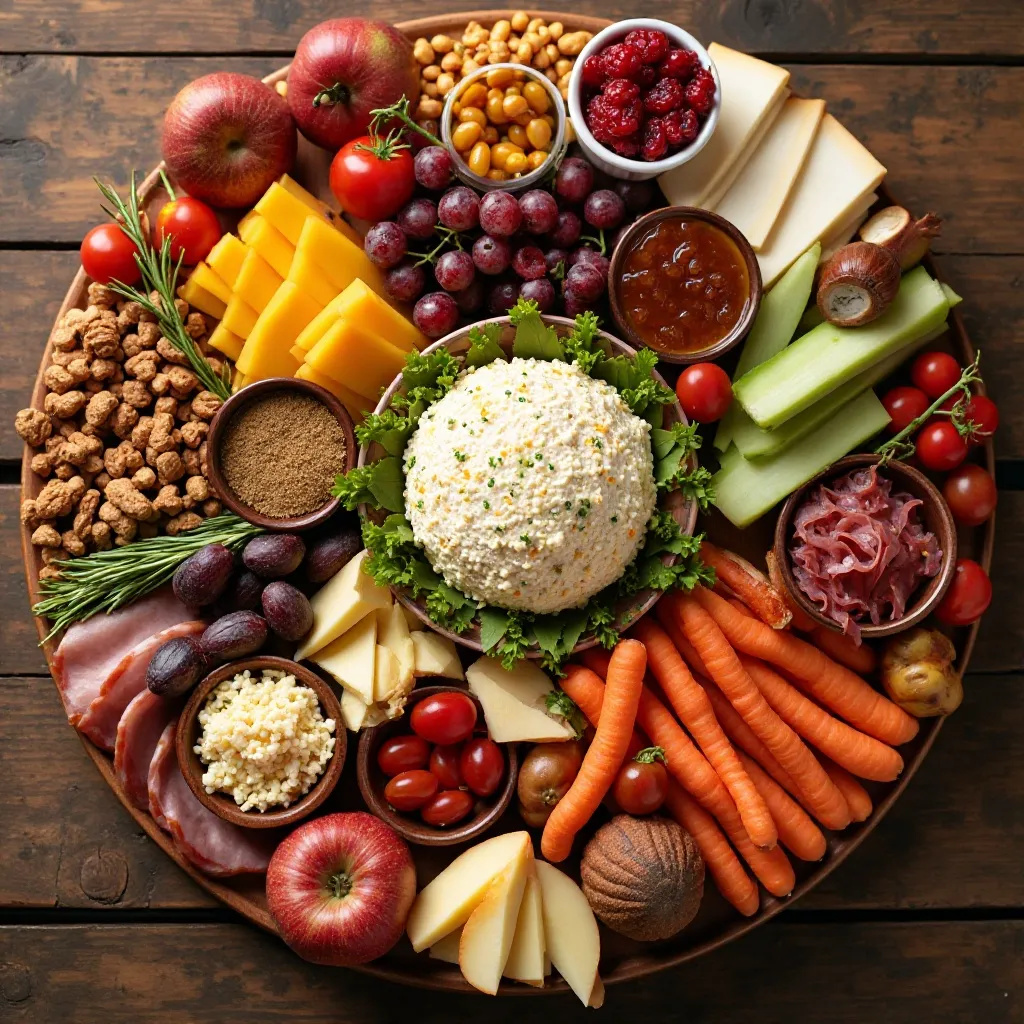
What really sets this apart is the intentional pairing of fall flavors. We’re talking cranberries, pecans, apple slices, honey, and autumn herbs. Every single element works together like a well-rehearsed orchestra, and trust me, your taste buds will thank you.
Why This Recipe Is Honestly Perfect
You Don’t Need to Be a Chef
Real talk: if you can arrange items on a board, you can make this. I’ve taught my teenager how to assemble these, and she nails it every time. There’s no cooking involved beyond making the cheese ball (which takes maybe ten minutes), and the assembly is actually kind of fun. It’s like edible Tetris, but way more forgiving.
Your Budget Will Survive
After testing this recipe probably twenty times, I’ve figured out exactly where you can save money without sacrificing quality. You don’t need fancy imported cheeses or expensive cured meats for this to look and taste amazing. I typically spend between $35-45 for a board that feeds 12-15 people, which breaks down to about three bucks per person. That’s less than a latte, and way more impressive.
The Flavor Combinations Are Next-Level
In my opinion, the magic happens when sweet meets savory on a Thanksgiving board. The cranberry sauce tanginess cuts through rich cheeses, the honey drizzle complements salty prosciutto, and those candied pecans? Don’t even get me started. My brother-in-law, who claims he doesn’t like “fancy food,” demolished half the board himself last year.
It’s a Make-Ahead Miracle
Here’s my favorite secret: you can prep almost everything the night before. The cheese ball actually gets better after sitting in the fridge overnight (something I learned by accident when I got the date wrong for a dinner party). The morning of Thanksgiving, you just arrange everything on your board, and you’re done. No last-minute stress while you’re basting the turkey.
Everyone Finds Something They Love
Picky eaters, dietary restrictions, adventurous foodies – this board has something for everyone. My six-year-old niece won’t touch most vegetables, but she’ll devour the cheese cubes and crackers. My health-conscious sister loads up on the nuts and fruit. And my dad? He’s there for the salami and cheese ball, period.
Thanksgiving Charcuterie Board with Cheese Ball Recipe Details
| Recipe Details | |
|---|---|
| Prep Time | 30 minutes |
| Chill Time | 2 hours (or overnight) |
| Total Time | 2 hours 30 minutes |
| Servings | 12-15 people |
| Difficulty | Easy |
| Cost | $35-45 |
Everything You Need for Your Thanksgiving Charcuterie Board with Cheese Ball
Let me walk you through exactly what goes on this board. I’ve tweaked this list so many times, and this combination is the sweet spot between abundance and overwhelm.
For the Herb and Cranberry Cheese Ball (the star!):
This recipe hasn’t been personally tested and was developed with AI guidance; we aim to be as accurate as possible.
- 16 oz cream cheese, softened (don’t skip the softening – I learned that the hard way)
- 8 oz sharp cheddar cheese, finely shredded
- 1/4 cup dried cranberries, chopped
- 2 tablespoons fresh chives, minced
- 1 tablespoon fresh rosemary, finely chopped
- 1 teaspoon garlic powder
- 1/2 teaspoon black pepper
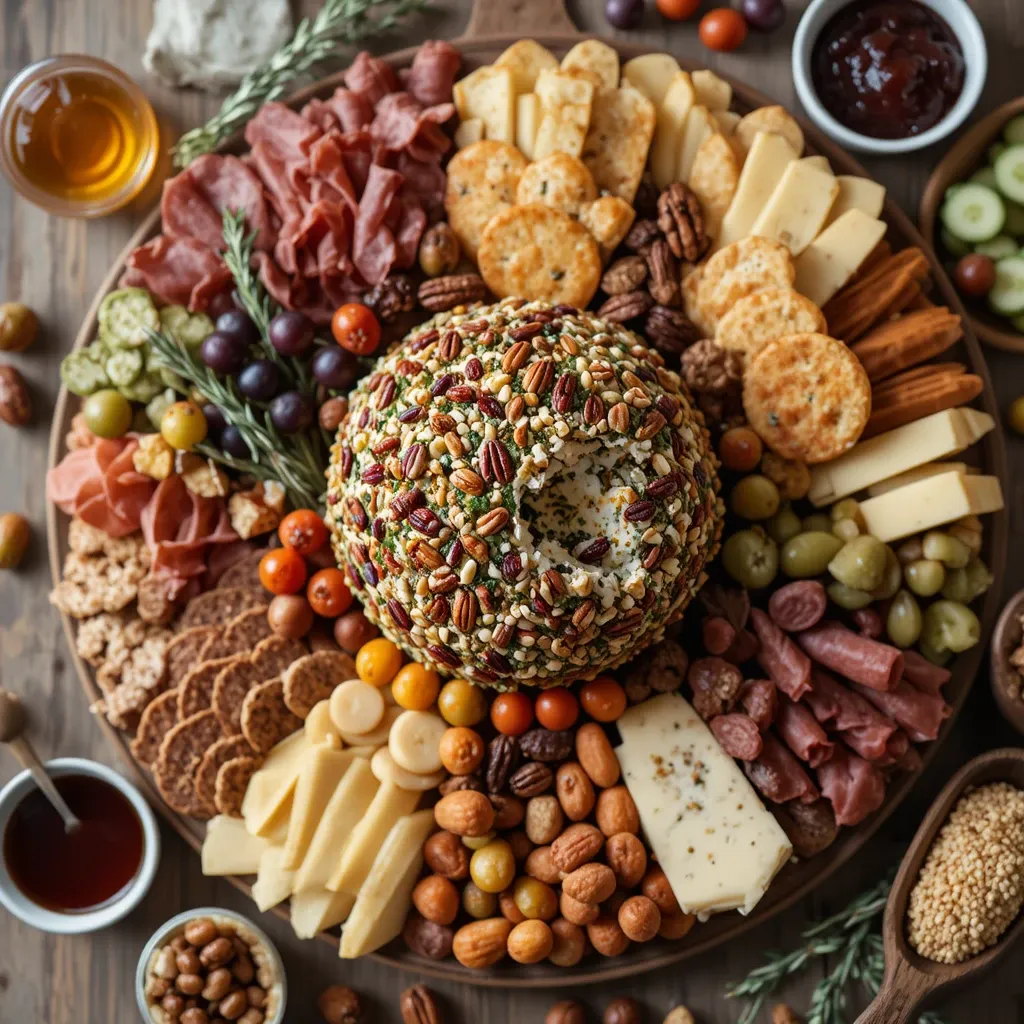
- 1 cup pecans, finely chopped (for coating)
- 1/4 cup fresh parsley, chopped (for coating)
For the Board:
- 3-4 varieties of cheese (I always include a sharp cheddar, creamy brie, aged gouda, and a blue cheese for the adventurous)
- 2-3 types of cured meats (prosciutto, salami, and turkey or ham for variety)
- Assorted crackers (water crackers, whole wheat, and something seeded)
- Fresh fruit (apple slices, pear slices, grapes, fresh figs if you can find them)
- Dried fruit (apricots, dates, more cranberries)
- Nuts (candied pecans, roasted almonds, walnuts)
- Fresh vegetables (cherry tomatoes, cucumber slices, baby carrots – yes, even on Thanksgiving)
- Spreads and extras (cranberry sauce, honey, whole grain mustard, fig jam)
- Fresh herbs for garnish (rosemary sprigs, thyme)
- Olives (green and kalamata)
The cheese ball is genuinely the heart of this whole situation. I use cream cheese as the base because it’s forgiving and creamy, but the sharp cheddar adds that tangy bite that keeps people coming back. Those dried cranberries? They’re not just pretty – they add little bursts of sweetness that perfectly complement the savory herbs.
How to Make Your Show-Stopping Cheese Ball
Step 1: Get Your Cream Cheese Ready
Take your cream cheese out of the fridge about 30-45 minutes before you start. It needs to be truly soft – like, you can easily press your finger into it without effort. I once tried making this with cold cream cheese, and let me tell you, my hand mixer nearly gave up on me. You’ll know it’s ready when it looks slightly glossy and spreads easily.
Step 2: Mix the Base
In a large bowl, beat the softened cream cheese with an electric mixer for about 1-2 minutes until it’s fluffy and smooth. Add your shredded sharp cheddar, and mix until completely combined. This should take another minute or so. The mixture should be uniform with no cream cheese lumps visible.
Step 3: Add the Flavor Boosters
Fold in your chopped dried cranberries, minced chives, rosemary, garlic powder, and black pepper. I use a spatula for this part because it gives you more control. Mix until everything is evenly distributed throughout. Taste it now (this is the fun part) – it should be savory with little pops of sweetness from the cranberries.
Step 4: Shape Your Ball
Cover the mixture and refrigerate for about 30 minutes – this makes it way easier to shape. Once chilled, use your hands to form it into a ball. Pro tip: slightly wet your hands to prevent sticking. I’ve been making this for three years, and this trick never fails. You can also make it into a log shape if that’s easier, honestly.
Step 5: Create the Coating
On a large plate, mix together your finely chopped pecans and fresh parsley. Roll your cheese ball in this mixture, pressing gently so it sticks. Cover the entire surface – we’re going for full coverage here. The first time I made this, I was too timid with the coating, and it looked sparse. Don’t be shy!
Step 6: Chill It Out
Wrap your coated cheese ball in plastic wrap and refrigerate for at least 2 hours, but overnight is even better. The flavors meld together, the texture firms up perfectly, and your future self will thank you for doing this step ahead of time.
Building Your Thanksgiving Charcuterie Board with Cheese Ball
This is where the magic happens, and honestly, it’s my favorite part.
Step 1: Choose Your Foundation
Pick a large wooden board, slate, or even a clean cutting board (I’ve used all three). You want something at least 16-18 inches to give yourself room to work. Place your cheese ball slightly off-center on the board – this creates visual interest and makes arranging everything else easier.
Step 2: Add Your Cheese Anchors
Place your other cheese varieties in different sections of the board. I like to cut the brie into wedges, slice the gouda, and crumble some blue cheese. Space them around so people don’t have to reach over everything to get their favorites. Variety in shapes keeps things interesting – some cubes, some slices, some crumbles.
Step 3: Fold and Fan Your Meats
Here’s a trick I learned from watching too many YouTube videos: fold your prosciutto into little ribbons or rosettes, and fan out your salami in overlapping circles. It takes an extra three minutes but looks professionally done. Tuck these around your cheeses and cheese ball in little clusters.
Step 4: Fill with Crackers
I’ve noticed that standing some crackers up vertically creates height and makes the board more dynamic. Scatter different types around the board, filling in gaps. Don’t overthink this part – crackers are forgiving.
Step 5: Add Fresh and Dried Fruits
Slice your apples and pears right before serving (squeeze a little lemon juice on them to prevent browning – learned that from my mom). Arrange them in small clusters. Add your grapes in little bunches, tuck figs near the cheese ball, and scatter dried apricots and dates wherever you see empty spots.
Step 6: Scatter the Nuts
Those candied pecans and roasted almonds fill in remaining gaps beautifully. Don’t put them all in one place – distribute them around the board for balance.
Step 7: Add Your Vegetables and Extras
Cherry tomatoes, cucumber slices, and baby carrots add color and give your health-conscious guests something to feel good about. Place small bowls or ramekins with your cranberry sauce, honey, mustard, and fig jam on or near the board.
Step 8: Final Touches
Tuck fresh herb sprigs (rosemary and thyme) around the board – they smell amazing and add that professional touch. Add your olives in small clusters. Step back and look for any big empty spaces, then fill them with whatever you have left.
The whole process takes me about 18 minutes now, but the first time? Definitely closer to 35-40 minutes. You’ll get faster each time you make it.
Pro Tips from Years of Making This
Can I make this ahead of time?
Absolutely! The cheese ball can be made up to 3 days ahead and kept refrigerated. I actually recommend making it at least one day early because the flavors get better. For the board assembly, you can prep most ingredients the night before, but wait to slice fresh fruit and arrange everything until a few hours before serving.
The secret to a balanced board
Think in odd numbers and triangles. Place items in groups of three or five, and imagine triangles when positioning your main elements (like cheeses and meats). This creates visual harmony without looking too perfect or staged. My kitchen always smells like a gourmet deli when I’m setting this up, which I consider a bonus.
Don’t refrigerate the assembled board too early
Most cheeses taste better at room temperature. I take my cheeses out about 45 minutes before serving, and I assemble the board about 30 minutes before guests arrive. The cheese ball can stay on the board even if you prep early – just keep the crackers and bread separate until the last minute so they don’t get soft.
My foolproof timing trick
Work backward from when guests arrive. If people are coming at 2 PM, I start assembling at 1:15 PM, take cheeses out of the fridge at 1:00 PM, and make the cheese ball the day before. This gives me buffer time for any last-minute adjustments without stress.
Substitution ideas that actually work
No fresh herbs? Dried herbs work fine (use about 1/3 the amount). Can’t find figs? Swap for more apple slices or pomegranate arils. Need a nut-free version? Coat the cheese ball in more fresh herbs, everything bagel seasoning.
The biggest mistake to avoid
Don’t overcrowd! The first time I made this, I tried to cram too much on the board, and it looked messy rather than abundant. Leave some breathing room – you can always refill as people eat. White space is your friend.
Storing Leftovers (If You’re Lucky Enough to Have Any)
In my experience, there are rarely leftovers from a Thanksgiving charcuterie board with cheese ball, but when there are, here’s what I do:
The Cheese Ball: Wrap it tightly in plastic wrap and store in the fridge for up to 5 days. The texture stays perfect, and honestly, I’ve been known to spread it on bagels for breakfast the next day (don’t judge me).
Cheeses and Meats: Store separately in airtight containers. Hard cheeses last about a week, soft cheeses about 3-5 days, and cured meats stay good for 5-7 days if properly wrapped.
Fresh Items: Eat these within 1-2 days. Fresh fruit doesn’t keep well once it’s been sitting out, so prioritize these for snacking.
Nuts and Dried Fruits: These last for weeks in sealed containers at room temperature. I usually just toss them in a jar for future snacking.
Questions People Always Ask Me
How much should I make per person?
I plan for about 3-4 ounces of cheese total per person, 2 ounces of meat, and generous amounts of everything else. For 12 people, that’s roughly 3 pounds of cheese and 1.5 pounds of meat. It sounds like a lot, but people graze more than you’d think, especially if dinner is running late (which, let’s be honest, it usually does on Thanksgiving).
What if I have dietary restrictions to consider?
This board is actually super flexible! For gluten-free guests, add gluten-free crackers and make sure your meats don’t contain gluten. For vegetarians, skip the meats and add more cheese varieties, marinated vegetables, and hummus. I’ve even made a vegan version using cashew-based cheese ball and plant-based cheeses – it was delicious.
Can kids eat this?
Definitely! My nieces and nephews love helping themselves to cheese cubes, crackers, grapes, and fruit. You might want to have some plain crackers and mild cheddar for picky eaters. The cheese ball is kid-friendly too, especially if you tone down the herbs a bit.
What size board do I need?
For 12-15 people, aim for an 18×24 inch board minimum. I use a 20×30 inch board, and it’s perfect. Bigger is genuinely better here – you want room to arrange everything without overcrowding.
How do I keep apple slices from browning?
Toss them in a mixture of 1 cup water and 1 tablespoon lemon juice right after slicing. This keeps them fresh-looking for 2-3 hours. I learned this trick after serving brown apples once (never again).
Variations Worth Trying
Once you’ve mastered the classic version, here are some twists I’ve experimented with:
Make It Spicy: Add diced jalapeños to your cheese ball mixture and include pepper jack cheese on your board. Serve with hot honey for drizzling – this was a huge hit at my Friendsgiving last year.
Southern Style: Use pimento cheese instead of the herb cheese ball, add boiled peanuts, include country ham, and serve with pepper jelly. My Tennessee relatives request this version specifically.
Fancy Upgrade: Add truffle cheese, honeycomb pieces instead of regular honey, marcona almonds instead of regular nuts, and champagne grapes. This is my “showing off” version when I want to really impress.
The beauty of a Thanksgiving charcuterie board with cheese ball is that it’s endlessly customizable while still being completely foolproof. You really can’t mess this up.
So this Thanksgiving, give yourself the gift of an easy, impressive appetizer that’ll have everyone asking for the recipe. Trust me, after making this dozens of times, I can confidently say it’ll become your new holiday tradition. The hardest part will be keeping people from filling up before the actual meal starts (though honestly, I consider that a win).
Now grab your favorite board, make that cheese ball, and get ready for the compliments to roll in. You’ve got this!
[Insert image: Close-up of someone spreading cheese ball on a cracker]