
20 Super Bowl Party Food Ideas Everyone Will Love
Game day is coming, and your kitchen is about to become the real MVP! Whether you’re hosting a houseful of hungry fans or bringing a dish to share, these crowd-pleasing recipes will have everyone cheering.
From gooey dips to crispy wings, we’ve gathered twenty fantastic ideas that are easy to make and even easier to devour. Get ready to create a spread that’s just as exciting as the big game itself!
What Are Super Bowl Party Food Ideas?
Ever wonder why game day food tastes so much better than regular weeknight dinners? Maybe it’s the excitement in the air, or perhaps it’s because these recipes are designed for sharing, snacking, and celebrating together. Super Bowl party food ideas are all about finger foods, shareable bites, and dishes that let you munch while you watch without missing a single play.
After all, they say the way to anyone’s heart is through their stomach, and these recipes prove it! Ready to become the hosting hero of your friend group? Let’s dive in!
This recipe was generated entirely by AI and has not been prepared in our kitchen. We care about keeping our readers informed, and many report good results from other recipes on our site
Why You’ll Love These Super Bowl Party Food Ideas
First, let’s talk about variety. These twenty recipes cover everything from classic dips to creative twists on game day favorites. You’ll find something for everyone, whether they love spicy buffalo flavors, cheesy goodness, or sweet treats to finish the meal.
Second, making these recipes at home saves you serious money compared to ordering catering or buying pre-made party platters. Plus, homemade food always tastes better and lets you control exactly what goes into each dish. Your guests will definitely notice the difference!
Third, these recipes are loaded with flavors that make every bite memorable. We’re talking creamy cheese, crispy textures, zesty seasonings, and that perfect balance of savory and satisfying. Many of these ideas can be prepped ahead, so you’ll actually get to enjoy the game instead of being stuck in the kitchen. If you love easy entertaining, you’ll also want to check out our collection of weeknight dinner recipes for more inspiration!
Recipe 1: Classic Buffalo Chicken Dip

This creamy, tangy dip is a game day essential that disappears faster than you can say “touchdown!”
Quick Overview
This beloved dip combines tender shredded chicken with cream cheese, hot sauce, and melted cheddar for the ultimate party starter. It takes just 30 minutes from start to finish and serves 8-10 people perfectly.
- Prep Time: 10 minutes
- Cook Time: 20 minutes
- Total Time: 30 minutes
- Servings: 8-10
Key Ingredients for Classic Buffalo Chicken Dip
- 2 cups cooked chicken, shredded
- 8 oz cream cheese, softened
- ½ cup buffalo sauce
- ½ cup ranch dressing
- 1½ cups shredded cheddar cheese
- ¼ cup blue cheese crumbles
- 2 green onions, sliced
- Tortilla chips for serving
Step-by-Step Instructions
Step 1: Preheat your oven to 350°F. Take out a medium-sized baking dish and set it aside.
Step 2: In a large mixing bowl, combine the softened cream cheese, buffalo sauce, and ranch dressing. Mix until smooth and well blended.
Step 3: Fold in the shredded chicken and one cup of the cheddar cheese. Stir until everything is evenly coated with the creamy mixture.
Step 4: Transfer the mixture to your baking dish and spread it out evenly. Sprinkle the remaining cheddar cheese and blue cheese crumbles on top.
Step 5: Bake for 20 minutes until the dip is bubbling around the edges and the cheese on top is melted and slightly golden.
Step 6: Remove from the oven and garnish with sliced green onions. Serve immediately with tortilla chips.
What to Serve Buffalo Chicken Dip With
Pair this dip with sturdy tortilla chips, celery sticks, carrot sticks, or even toasted baguette slices. For a complete spread, serve alongside a fresh veggie tray with ranch and some crispy potato wedges.
Top Tips for Perfecting Buffalo Chicken Dip
Use rotisserie chicken to save time and add extra flavor. Make sure your cream cheese is fully softened before mixing to avoid lumps. Adjust the buffalo sauce amount based on your heat preference. You can make this dip up to 24 hours ahead and refrigerate it, then just pop it in the oven before guests arrive.
Storing and Reheating Tips
Store leftover dip in an airtight container in the refrigerator for up to 3 days. Reheat in the oven at 350°F for 10-15 minutes until warmed through, or microwave in 30-second intervals, stirring between each.
Recipe 2: Loaded Potato Skins
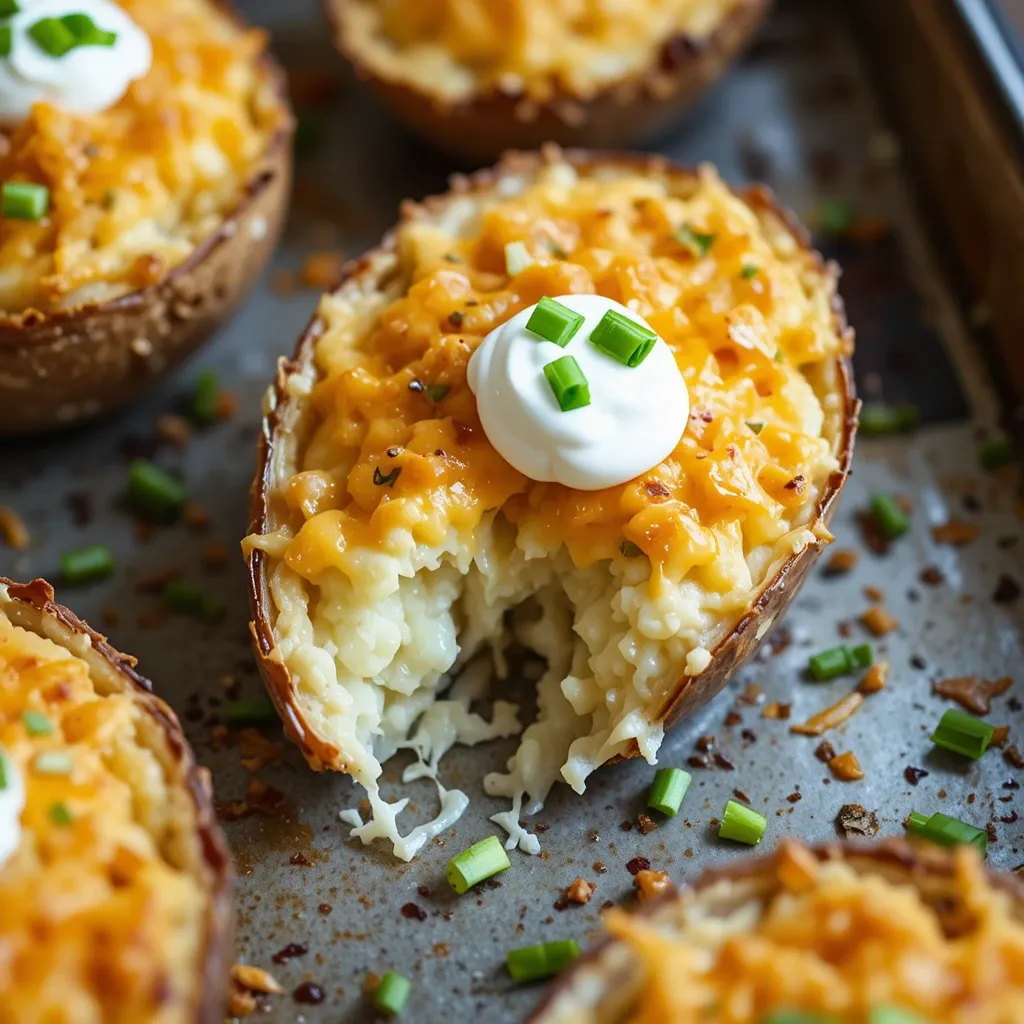
Crispy potato shells filled with melted cheese, and all your favorite toppings make these irresistible.
Quick Overview
These crispy, cheesy bites are loaded with flavor and perfect for sharing. They take about 50 minutes total and can feed 6-8 hungry fans.
- Prep Time: 15 minutes
- Cook Time: 35 minutes
- Total Time: 50 minutes
- Servings: 6-8
Key Ingredients for Loaded Potato Skins
- 6 medium russet potatoes
- 3 tablespoons olive oil
- 1 teaspoon salt
- ½ teaspoon black pepper
- 1½ cups shredded cheddar cheese
- ½ cup sour cream
- 3 green onions, chopped
Step-by-Step Instructions
Step 1: Preheat your oven to 400°F. Scrub the potatoes clean and poke each one several times with a fork.
Step 2: Bake the potatoes directly on the oven rack for 45-50 minutes until tender. Let them cool for 10 minutes.
Step 3: Cut each potato in half lengthwise and scoop out most of the flesh, leaving about ¼ inch attached to the skin. Save the scooped potato for another use like mashed potatoes.
Step 4: Brush both sides of the potato skins with olive oil and season with salt and pepper. Place them skin-side down on a baking sheet.
Step 5: Bake for 10 minutes until the edges start to crisp up.
Step 6: Remove from oven and fill each potato skin with shredded cheese. Return to oven for 5 more minutes until cheese melts.
Step 7: Top with a dollop of sour cream and sprinkle with green onions before serving.
What to Serve Loaded Potato Skins With
These pair wonderfully with additional sour cream, guacamole, or a spicy ranch dip. Serve alongside buffalo wings or sliders for a complete game day menu.
Top Tips for Perfecting Loaded Potato Skins
Choose potatoes that are similar in size for even cooking. Don’t scoop out too much potato or the skins will fall apart. For extra crispy skins, brush them with oil and bake them twice before adding toppings. You can prepare the potato shells a day ahead and store them in the fridge.
Storing and Reheating Tips
Store cooked potato skins in an airtight container for up to 2 days. Reheat in a 375°F oven for 8-10 minutes until crispy and heated through. Avoid microwaving as it makes them soggy.
Recipe 3: Seven Layer Dip
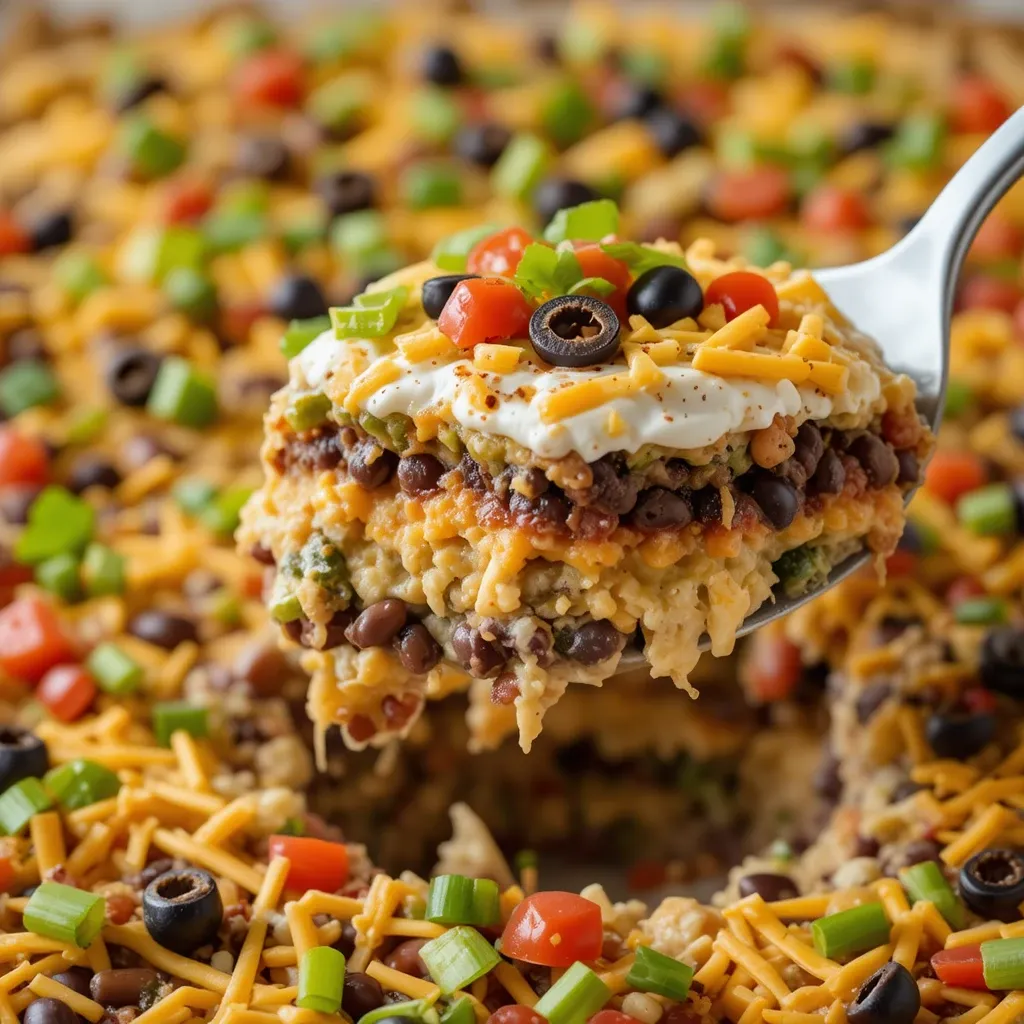
A colorful, crowd-pleasing dip with layers of beans, guacamole, cheese, and fresh toppings.
Quick Overview
This no-cook wonder features beautiful layers of flavor and takes just 15 minutes to assemble. It serves 10-12 people and looks as impressive as it tastes.
- Prep Time: 15 minutes
- Cook Time: 0 minutes
- Total Time: 15 minutes
- Servings: 10-12
Key Ingredients for Seven Layer Dip
- 1 can (16 oz) refried beans
- 1 cup sour cream
- 1 packet taco seasoning
- 2 cups guacamole
- 1 cup salsa
- 2 cups shredded Mexican cheese blend
- 1 cup diced tomatoes
- ½ cup sliced black olives
- ¼ cup chopped cilantro
- 2 green onions, sliced
Step-by-Step Instructions
Step 1: Spread the refried beans evenly across the bottom of a 9×13 inch dish or large serving platter.
Step 2: In a small bowl, mix the sour cream with the taco seasoning. Spread this mixture over the bean layer.
Step 3: Carefully spread the guacamole over the sour cream layer, trying not to mix the layers.
Step 4: Spoon the salsa evenly over the guacamole layer.
Step 5: Sprinkle the shredded cheese generously over the salsa.
Step 6: Top with diced tomatoes, sliced olives, chopped cilantro, and green onions in that order.
Step 7: Cover and refrigerate for at least 30 minutes before serving to let the flavors meld together. Serve with tortilla chips.
What to Serve Seven Layer Dip With
Serve with sturdy tortilla chips, pita chips, or even sliced bell peppers for a healthier option. This dip pairs perfectly with Mexican-inspired dishes like mini tacos or quesadilla bites.
Top Tips for Perfecting Seven Layer Dip
Make your own guacamole for the best flavor and freshness. Drain the tomatoes and olives well to prevent a watery dip. Use a clear glass dish to show off those beautiful layers. You can customize the layers based on preferences, like adding jalapeños for heat or swapping in black beans.
Storing and Reheating Tips
This dip is best served fresh but can be stored covered in the refrigerator for up to 24 hours. The guacamole may brown slightly, so add a squeeze of lime juice on top before covering. This dip is served cold, so no reheating needed.
Recipe 5: Classic Beef Chili
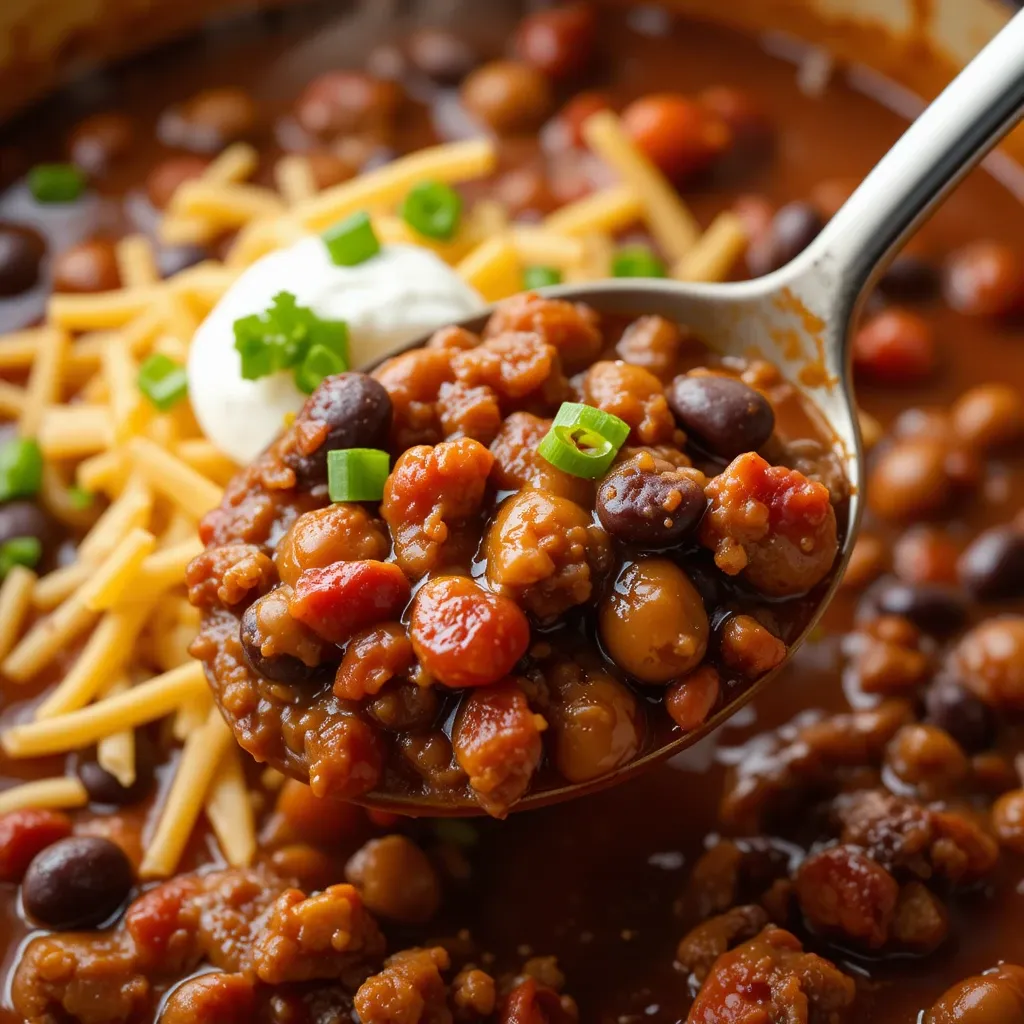
Hearty, warming chili loaded with beef, beans, and spices is perfect for feeding a crowd.
Quick Overview
This comforting one-pot meal is packed with flavor and feeds 8-10 people easily. It takes about an hour but tastes even better the next day.
- Prep Time: 15 minutes
- Cook Time: 45 minutes
- Total Time: 1 hour
- Servings: 8-10
Key Ingredients for Classic Beef Chili
- 2 pounds ground beef
- 1 large onion, diced
- 1 green bell pepper, diced
- 4 cloves garlic, minced
- 2 cans (15 oz each) kidney beans, drained
- 1 can (15 oz) black beans, drained
- 2 cans (15 oz each) crushed tomatoes
- 1 can (6 oz) tomato paste
- 2 cups beef broth
- 3 tablespoons chili powder
- 1 tablespoon cumin
- 1 teaspoon paprika
- 1 teaspoon salt
- ½ teaspoon black pepper
- Toppings: shredded cheese, sour cream, green onions, cilantro
Step-by-Step Instructions
Step 1: In a large pot or Dutch oven over medium-high heat, brown the ground beef, breaking it up with a wooden spoon. This should take about 6-8 minutes.
Step 2: Drain excess fat, leaving about one tablespoon in the pot. Add the diced onion and bell pepper, cooking for 5 minutes until softened.
Step 3: Add the minced garlic and cook for another minute until fragrant.
Step 4: Stir in the chili powder, cumin, paprika, salt, and pepper. Cook for 1 minute to toast the spices.
Step 5: Add the crushed tomatoes, tomato paste, beef broth, kidney beans, and black beans. Stir everything together well.
Step 6: Bring the mixture to a boil, then reduce heat to low. Cover and simmer for 30-40 minutes, stirring occasionally.
Step 7: Taste and adjust seasonings as needed. Serve hot with your choice of toppings.
What to Serve Classic Beef Chili With
Serve with cornbread, tortilla chips, crackers, or over rice. Set up a toppings bar with shredded cheese, sour cream, green onions, cilantro, jalapeños, and avocado slices so everyone can customize their bowl.
Top Tips for Perfecting Classic Beef Chili
For deeper flavor, let the chili simmer longer, up to 2 hours on low heat. Brown the meat in batches if your pot is crowded to get better browning. Adjust the heat level by adding diced jalapeños or a pinch of cayenne pepper. Make this chili a day ahead for even better flavor as it gives the spices time to develop.
Storing and Reheating Tips
Chili stores beautifully in the refrigerator for up to 4 days or in the freezer for up to 3 months. Reheat on the stovetop over medium heat, stirring occasionally and adding a splash of broth if it’s too thick. You can also microwave individual portions for 2-3 minutes.
Recipe 6: Crispy Baked Chicken Wings

Perfectly seasoned wings that are crispy on the outside and juicy inside without any frying.
Quick Overview
These oven-baked wings are healthier than fried but just as delicious. They take 50 minutes and serve 6-8 people.
- Prep Time: 10 minutes
- Cook Time: 40 minutes
- Total Time: 50 minutes
- Servings: 6-8
Key Ingredients for Crispy Baked Chicken Wings
- 3 pounds chicken wings, separated into drumettes and flats
- 2 tablespoons baking powder
- 1 teaspoon salt
- 1 teaspoon garlic powder
- ½ teaspoon black pepper
- Your choice of sauce (buffalo, BBQ, honey garlic, etc.)
Step-by-Step Instructions
Step 1: Preheat your oven to 425°F. Line a large baking sheet with aluminum foil and place a wire rack on top.
Step 2: Pat the chicken wings completely dry with paper towels. This is crucial for crispy skin.
Step 3: In a large bowl, mix together the baking powder, salt, garlic powder, and black pepper.
Step 4: Add the wings to the bowl and toss until every piece is evenly coated with the seasoning mixture.
Step 5: Arrange the wings on the wire rack in a single layer, making sure they don’t touch each other.
Step 6: Bake for 40-45 minutes, flipping halfway through, until the wings are golden brown and crispy.
Step 7: Toss the hot wings in your sauce of choice or serve the sauce on the side for dipping.
What to Serve Crispy Baked Chicken Wings With
Serve with celery sticks, carrot sticks, ranch dressing, and blue cheese dressing. Add some crispy french fries or sweet potato fries on the side for a complete meal.
Top Tips for Perfecting Crispy Baked Chicken Wings
The baking powder is the secret to extra crispy skin, so don’t skip it. Make sure the wings are completely dry before seasoning. Don’t overcrowd the pan, or the wings will steam instead of crisp up. You can prep the seasoned wings ahead and refrigerate them uncovered for up to 8 hours for even crispier results.
Storing and Reheating Tips
Store cooked wings in an airtight container in the refrigerator for up to 3 days. Reheat in a 400°F oven for 10-12 minutes to restore crispiness. Avoid microwaving as it makes them soggy.
Recipe 7: Cheesy Beef Sliders
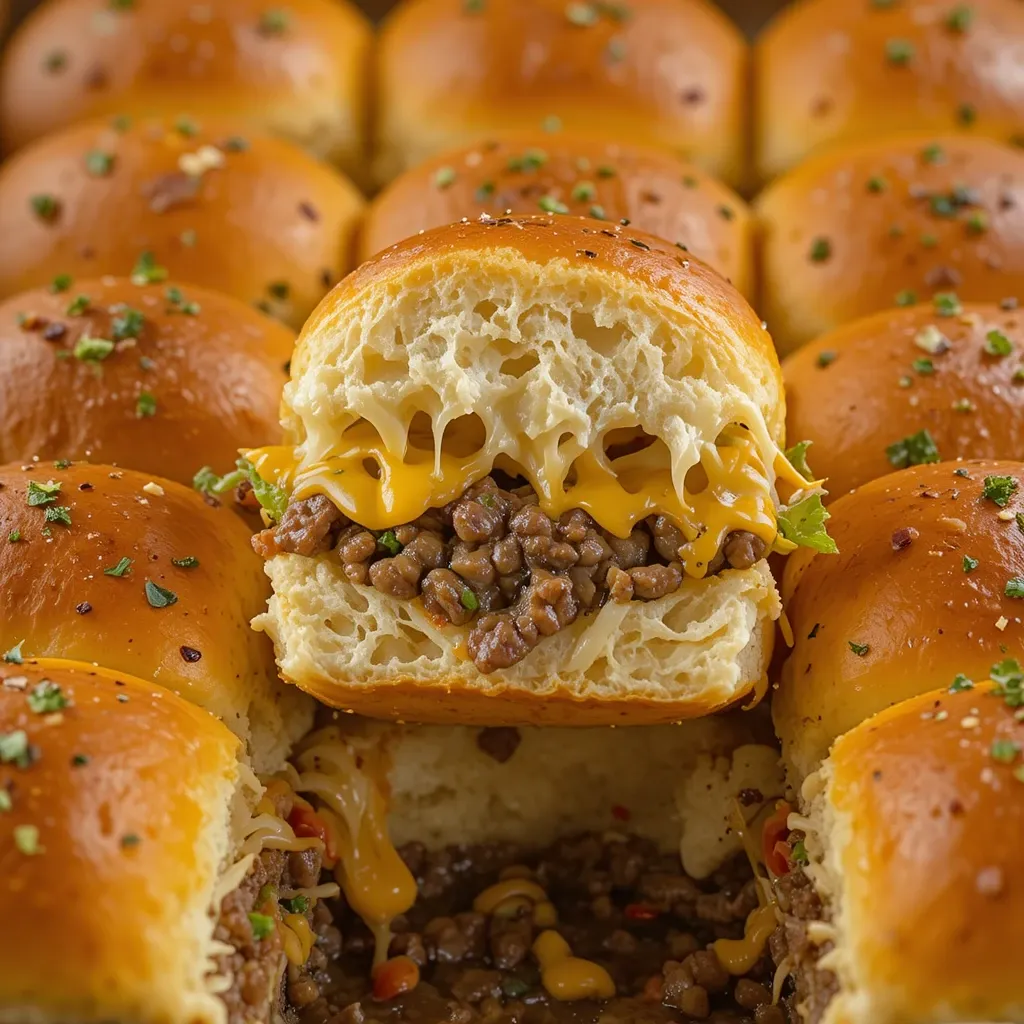
Mini burgers loaded with cheese and special sauce make the perfect handheld party food.
Quick Overview
These bite-sized burgers are easy to assemble and bake together in one pan. They take 35 minutes and make 12 sliders.
- Prep Time: 15 minutes
- Cook Time: 20 minutes
- Total Time: 35 minutes
- Servings: 12 sliders
Key Ingredients for Cheesy Beef Sliders
- 12 slider buns or Hawaiian rolls
- 1 pound ground beef
- ½ teaspoon salt
- ¼ teaspoon black pepper
- 1 teaspoon Worcestershire sauce
- 12 slices cheddar cheese
- 3 tablespoons butter, melted
- 1 teaspoon garlic powder
- 1 teaspoon dried parsley
- ¼ cup special sauce or thousand island dressing
- Lettuce and tomato for serving
Step-by-Step Instructions
Step 1: Preheat your oven to 350°F. Spray a 9×13 inch baking dish with cooking spray.
Step 2: Season the ground beef with salt, pepper, and Worcestershire sauce. Form into 12 small patties.
Step 3: Cook the patties in a skillet over medium-high heat for 2-3 minutes per side until browned. Set aside.
Step 4: Slice the slider buns in half horizontally, keeping the top and bottom halves together as one sheet. Place the bottom half in the prepared baking dish.
Step 5: Place a slice of cheese on each bottom bun, then add a beef patty, then another slice of cheese if desired.
Step 6: Spread special sauce on the underside of the top buns, then place them over the burgers.
Step 7: Mix melted butter with garlic powder and parsley. Brush this mixture over the tops of the buns.
Step 8: Cover with foil and bake for 15 minutes. Remove foil and bake for 5 more minutes until tops are golden.
Step 9: Cut into individual sliders and serve with lettuce and tomato on the side.
What to Serve Cheesy Beef Sliders With
Serve with crispy fries, potato salad, coleslaw, or pickle spears. These sliders are also great with chips and dip on the side.
Top Tips for Perfecting Cheesy Beef Sliders
Don’t skip the garlic butter topping, it adds amazing flavor. pickles, or caramelized onions. Keep the patties small so they fit perfectly on slider buns. These can be assembled several hours ahead and refrigerated, then just bake before serving.
Storing and Reheating Tips
Store assembled sliders in an airtight container for up to 2 days. Reheat wrapped in foil at 325°F for 12-15 minutes until warmed through.
Recipe 8: Spinach Artichoke Dip
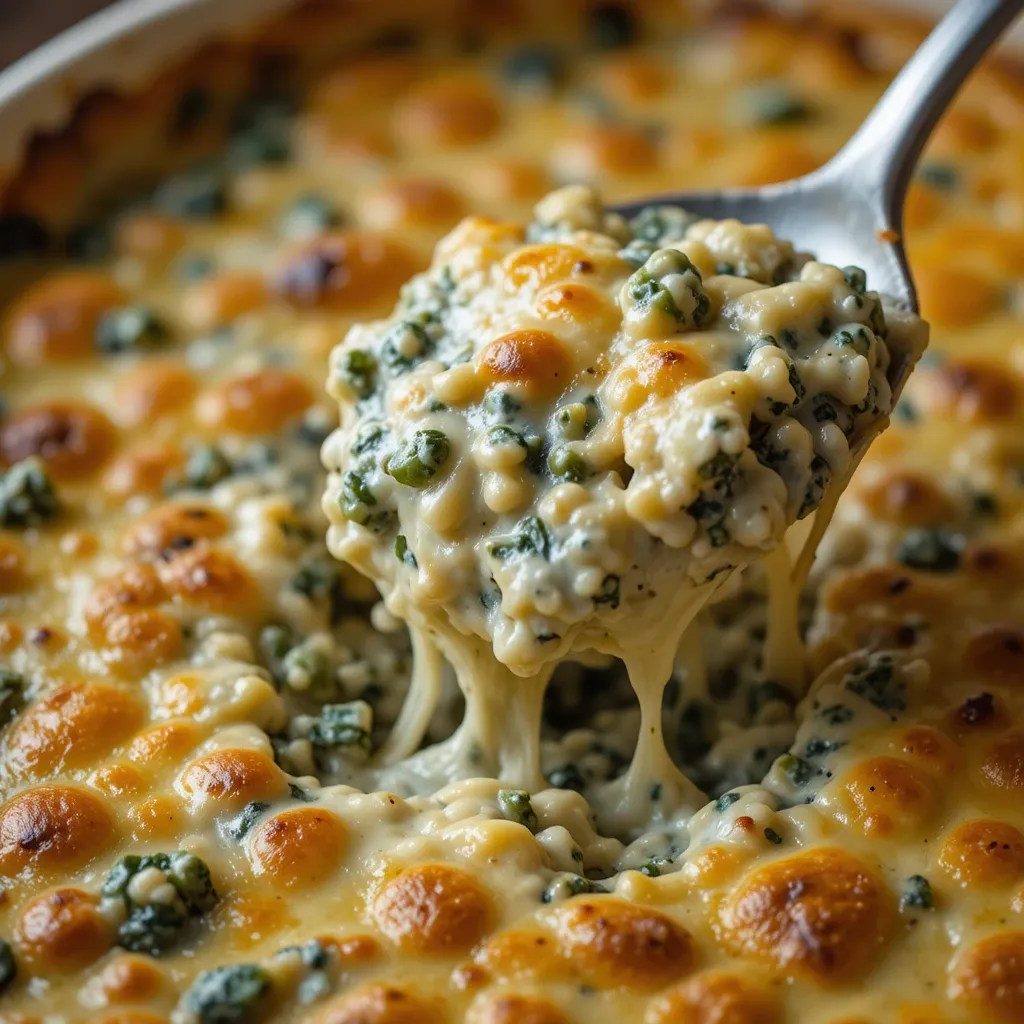
A creamy, cheesy vegetable dip that’s always a party favorite.
Quick Overview
This restaurant-quality dip is surprisingly easy to make at home. It takes 30 minutes and serves 8-10 people.
- Prep Time: 10 minutes
- Cook Time: 20 minutes
- Total Time: 30 minutes
- Servings: 8-10
Key Ingredients for Spinach Artichoke Dip
- 1 package (10 oz) frozen chopped spinach, thawed and squeezed dry
- 1 can (14 oz) artichoke hearts, drained and chopped
- 8 oz cream cheese, softened
- ½ cup sour cream
- ½ cup mayonnaise
- 2 cloves garlic, minced
- 1 cup shredded mozzarella cheese
- ½ cup grated Parmesan cheese
- ¼ teaspoon salt
- ¼ teaspoon black pepper
Step-by-Step Instructions
Step 1: Preheat your oven to 375°F.
Step 2: Make sure to squeeze as much liquid as possible from the thawed spinach using a clean kitchen towel or paper towels.
Step 3: In a large mixing bowl, beat the cream cheese until smooth and fluffy.
Step 4: Add the sour cream, mayonnaise, and minced garlic. Mix until well combined.
Step 5: Fold in the spinach, chopped artichokes, ¾ cup of mozzarella cheese, and ¼ cup of Parmesan cheese. Season with salt and pepper.
Step 6: Transfer the mixture to a baking dish and spread evenly. Top with the remaining mozzarella and Parmesan cheese.
Step 7: Bake for 20-25 minutes until the dip is bubbling and the top is golden brown.
Step 8: Let cool for 5 minutes before serving with your choice of dippers.
What to Serve Spinach Artichoke Dip With
Serve with toasted baguette slices, pita chips, tortilla chips, or fresh vegetables like bell peppers and cucumber slices. This dip also pairs wonderfully with crackers or breadsticks.
Top Tips for Perfecting Spinach Artichoke Dip
Thoroughly squeeze out all water from the spinach or your dip will be watery. Use full-fat cream cheese and sour cream for the richest, creamiest texture. Fresh garlic tastes much better than garlic powder in this recipe. You can make this dip up to 24 hours ahead and refrigerate it unbaked, then just pop it in the oven when guests arrive.
Storing and Reheating Tips
Store leftover dip covered in the refrigerator for up to 3 days. Reheat in a 350°F oven for 15 minutes or in the microwave in 30-second intervals, stirring between each.
Recipe 9: BBQ Meatballs
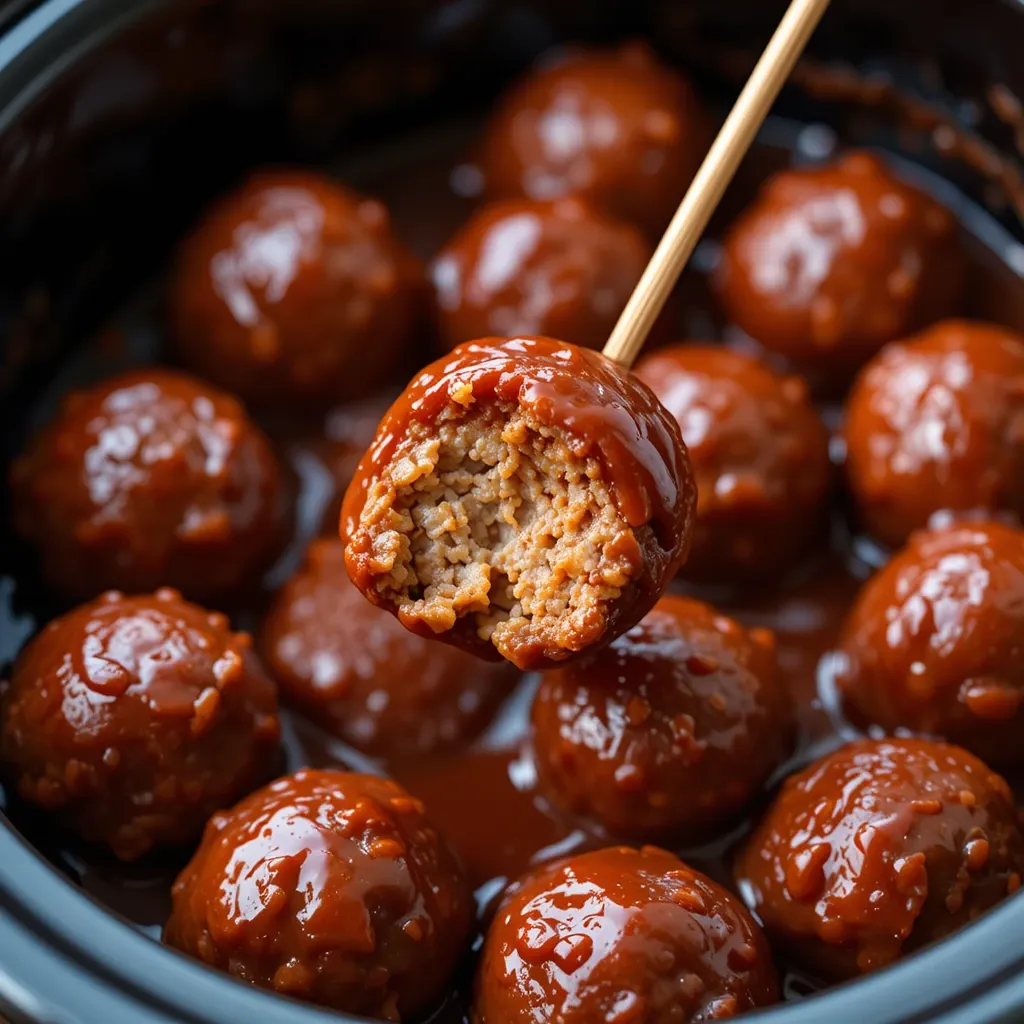
Sweet and tangy meatballs in barbecue sauce that can be made in a slow cooker.
Quick Overview
These easy meatballs cook themselves in the slow cooker while you prep other dishes. They serve 10-12 and take just 10 minutes of hands-on time.
- Prep Time: 10 minutes
- Cook Time: 3 hours (slow cooker)
- Total Time: 3 hours 10 minutes
- Servings: 10-12
Key Ingredients for BBQ Meatballs
- 2 pounds frozen meatballs (or homemade)
- 2 cups barbecue sauce
- ½ cup grape jelly or honey
- 2 tablespoons soy sauce
- 1 teaspoon garlic powder
- Toothpicks for serving
Step-by-Step Instructions
Step 1: Place the frozen meatballs in your slow cooker.
Step 2: In a medium bowl, whisk together the barbecue sauce, grape jelly, soy sauce, and garlic powder until smooth.
Step 3: Pour the sauce mixture over the meatballs and stir gently to coat them evenly.
Step 4: Cover and cook on low for 3-4 hours or on high for 1.5-2 hours, stirring occasionally.
Step 5: Once the meatballs are heated through and the sauce is thick and glossy, switch to the warm setting.
Step 6: Serve directly from the slow cooker with toothpicks for easy serving.
What to Serve BBQ Meatballs With
Serve over rice as a main dish, or keep them as appetizers with toothpicks. They pair well with coleslaw, cornbread, or dinner rolls.
Top Tips for Perfecting BBQ Meatballs
The grape jelly adds a subtle sweetness that balances the tangy barbecue sauce perfectly. If you prefer less sweetness, use only 2 tablespoons of jelly. You can make your own meatballs for even better flavor, or use store-bought to save time. Keep these warm in the slow cooker during your party so guests can help themselves.
Storing and Reheating Tips
Store leftover meatballs with sauce in an airtight container for up to 4 days. Reheat on the stovetop over medium heat until warmed through, adding a splash of water if the sauce is too thick.
Recipe 10: Loaded Nachos
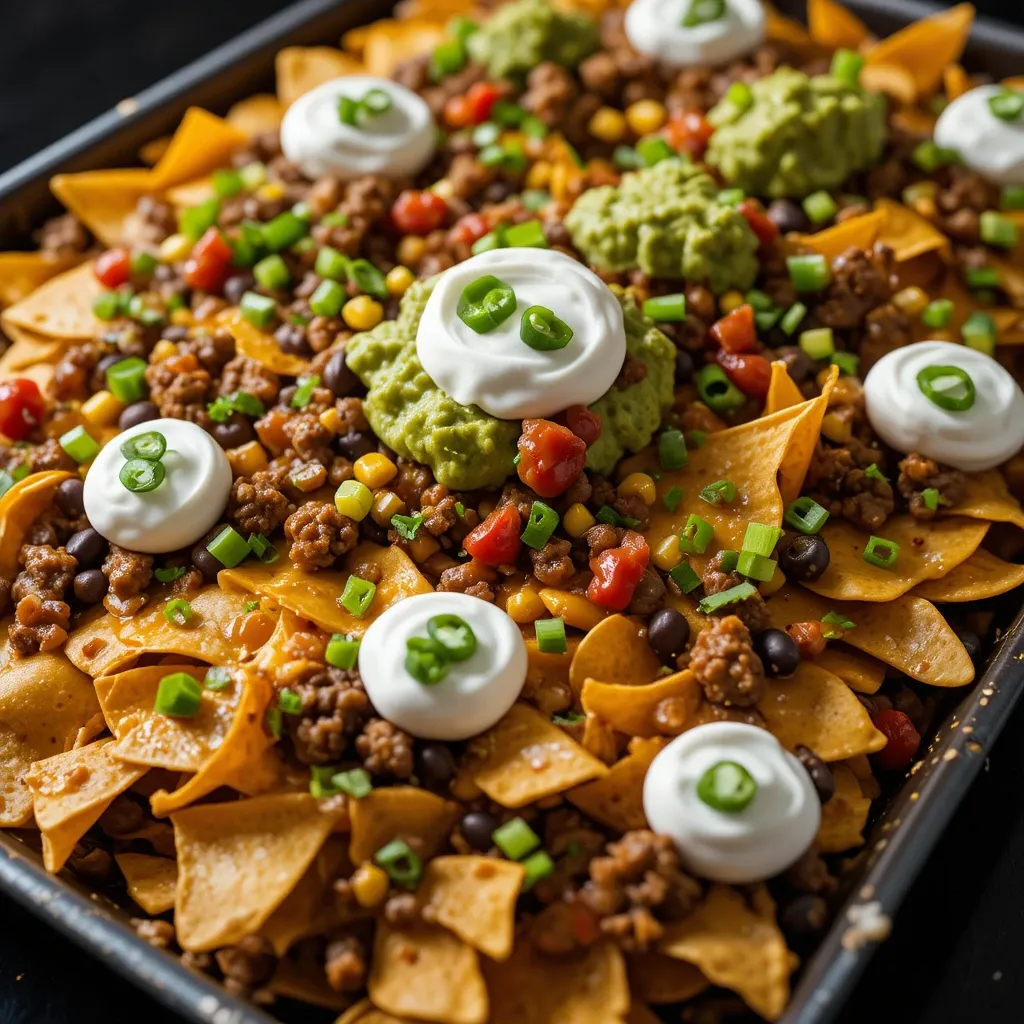
A mountain of crispy chips piled high with cheese, meat, and all your favorite toppings.
Quick Overview
These customizable nachos are perfect for sharing and take just 25 minutes to prepare. They serve 6-8 people.
- Prep Time: 10 minutes
- Cook Time: 15 minutes
- Total Time: 25 minutes
- Servings: 6-8
Key Ingredients for Loaded Nachos
- 1 large bag tortilla chips
- 1 pound ground beef or ground turkey
- 1 packet taco seasoning
- 3 cups shredded Mexican cheese blend
- 1 can black beans, drained and rinsed
- 1 cup corn kernels
- 1 jalapeño, sliced
- ½ cup sour cream
- ½ cup salsa
- ½ cup guacamole
- ¼ cup chopped cilantro
- 2 green onions, sliced
Step-by-Step Instructions
Step 1: Preheat your oven to 400°F. Line a large baking sheet with parchment paper.
Step 2: Brown the ground meat in a skillet over medium-high heat, breaking it up as it cooks. Drain any excess fat.
Step 3: Add the taco seasoning and prepare according to package directions, usually with ¼ cup water. Simmer until thickened.
Step 4: Spread half the tortilla chips on the prepared baking sheet. Top with half the cheese, then half the seasoned meat, beans, and corn.
Step 5: Add another layer of chips, then the remaining cheese, meat, beans, and corn. This double-layer method ensures every chip gets toppings.
Step 6: Scatter jalapeño slices over the top if using.
Step 7: Bake for 10-12 minutes until the cheese is fully melted and bubbly.
Step 8: Remove from oven and immediately top with dollops of sour cream, salsa, and guacamole. Sprinkle with cilantro and green onions.
What to Serve Loaded Nachos With
These are a meal on their own, but you can serve them with extra salsa, queso, or a side of Mexican rice. Margaritas or cold beer complement nachos perfectly.
Top Tips for Perfecting Loaded Nachos
Layer the ingredients to ensure every chip has toppings. Use restaurant-style thick chips for better structural support. Warm your beans before adding them so they don’t cool down the dish. Customize with your favorite toppings like olives, tomatoes, or different types of cheese.
Storing and Reheating Tips
Nachos are best served immediately, but you can store components separately. Keep leftover meat, beans, and cheese in containers for up to 3 days and build fresh nachos when ready to eat.
Recipe 11: Homemade Soft Pretzels
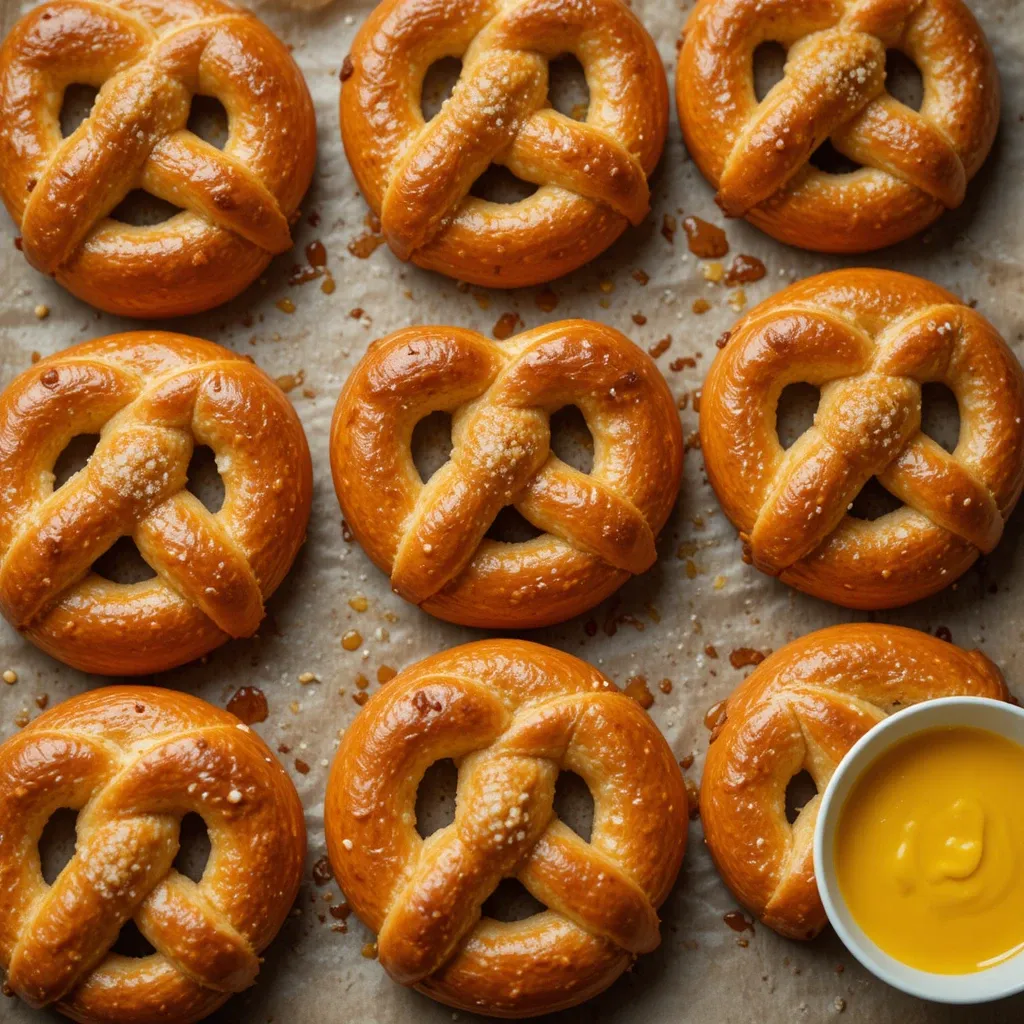
Warm, buttery pretzels with coarse salt are perfect for dipping and sharing.
Quick Overview
These bakery-style pretzels are easier to make than you’d think. They take 90 minutes and make 12 pretzels.
- Prep Time: 60 minutes (including rise time)
- Cook Time: 30 minutes
- Total Time: 1 hour 30 minutes
- Servings: 12 pretzels
Key Ingredients for Homemade Soft Pretzels
- 4 cups all-purpose flour
- 1 tablespoon sugar
- 2 teaspoons salt
- 1 packet instant yeast
- 1½ cups warm water
- 4 tablespoons butter, melted
- ⅓ cup baking soda (for boiling)
- Coarse salt for topping
- Cheese sauce or mustard for serving
Step-by-Step Instructions
Step 1: In a large bowl, mix the flour, sugar, salt, and yeast together.
Step 2: Add the warm water and 2 tablespoons of melted butter. Mix until a dough forms.
Step 3: Knead the dough on a floured surface for 5 minutes until smooth and elastic. Place in a greased bowl, cover, and let rise for 30 minutes.
Step 4: Preheat your oven to 425°F. Bring a large pot of water to a boil and add the baking soda.
Step 5: Divide the dough into 12 equal pieces. Roll each piece into a rope about 20 inches long.
Step 6: Shape each rope into a pretzel by forming a U-shape, crossing the ends, and pressing them onto the bottom of the U.
Step 7: Carefully drop each pretzel into the boiling water for 30 seconds, then remove with a slotted spoon and place on a parchment-lined baking sheet.
Step 8: Brush with remaining melted butter and sprinkle with coarse salt.
Step 9: Bake for 12-15 minutes until deep golden brown.
What to Serve Homemade Soft Pretzels With
Serve warm with cheese sauce, mustard, honey mustard, or cinnamon sugar for a sweet twist. These are perfect with cold drinks or alongside other game day snacks.
Storing and Reheating Tips
Store pretzels in an airtight container at room temperature for 2 days or refrigerate for up to 5 days. Reheat in a 350°F oven for 5 minutes to restore softness. You can also freeze baked pretzels for up to 2 months.
Recipe 12: Mini Tacos

Bite-sized tacos filled with seasoned meat and fresh toppings are easy to eat while watching the game.
Quick Overview
These adorable mini tacos let guests customize their own bites. They take 30 minutes and make about 24 mini tacos.
- Prep Time: 15 minutes
- Cook Time: 15 minutes
- Total Time: 30 minutes
- Servings: 24 mini tacos
Key Ingredients for Mini Tacos
- 24 small flour or corn tortillas (street taco size)
- 1 pound ground beef or chicken
- 2 tablespoons taco seasoning
- 1 cup shredded lettuce
- 1 cup diced tomatoes
- 1 cup shredded cheese
- ½ cup sour cream
- ¼ cup chopped cilantro
- Lime wedges for serving
Step-by-Step Instructions
Step 1: Cook the ground meat in a large skillet over medium-high heat until browned and crumbled.
Step 2: Drain any excess fat and add the taco seasoning with ¼ cup water. Simmer for 5 minutes until thickened.
Step 3: Warm the tortillas by wrapping them in damp paper towels and microwaving for 30 seconds, or warming them in a dry skillet.
Step 4: Set up a taco bar with the seasoned meat and all the toppings in separate bowls.
Step 5: Let guests build their own mini tacos by adding a spoonful of meat and their choice of toppings to each tortilla.
Step 6: Serve immediately with lime wedges on the side.
What to Serve Mini Tacos With
Serve with Mexican rice, refried beans, chips and salsa, or a simple side salad. These pair perfectly with margaritas or Mexican beer.
Top Tips for Perfecting Mini Tacos
Set up a DIY taco bar so guests can customize their own. Keep tortillas warm in a covered basket or tortilla warmer. Add extra toppings like jalapeños, hot sauce, guacamole, or pickled onions for variety. You can prep all the components ahead and just assemble when guests arrive.
Storing and Reheating Tips
Store taco components separately in airtight containers for up to 3 days. The meat reheats well in the microwave or on the stovetop. Always store toppings separately from tortillas to prevent sogginess.
Recipe 13: Crispy Mozzarella Sticks
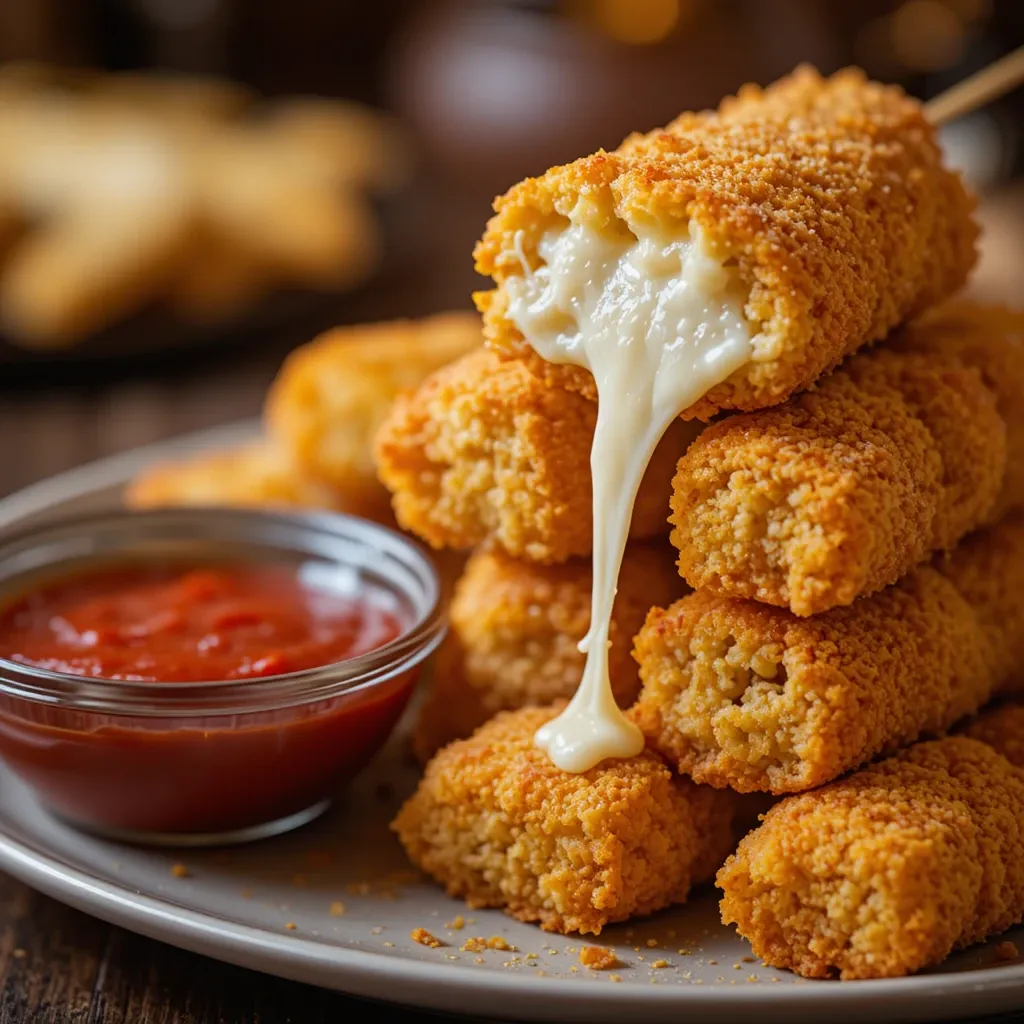
Golden, crunchy sticks filled with melted mozzarella are always a hit with kids and adults alike.
Quick Overview
These homemade cheese sticks are better than restaurant versions. They take 45 minutes including freezing time and make 16 sticks.
- Prep Time: 20 minutes
- Cook Time: 10 minutes
- Freeze Time: 15 minutes
- Total Time: 45 minutes
- Servings: 16 sticks
Key Ingredients for Crispy Mozzarella Sticks
- 16 mozzarella string cheese sticks
- 1 cup all-purpose flour
- 3 eggs, beaten
- 2 cups Italian breadcrumbs
- 1 teaspoon Italian seasoning
- ½ teaspoon garlic powder
- Oil for frying
- Marinara sauce for serving
Step-by-Step Instructions
Step 1: Set up three shallow bowls for breading. Put flour in the first bowl, beaten eggs in the second, and mix breadcrumbs with Italian seasoning and garlic powder in the third.
Step 2: Take each cheese stick and coat it in flour, shaking off excess. Dip it in the egg, letting excess drip off, then roll it in the breadcrumb mixture until fully coated.
Step 3: For extra crispiness, dip the breaded sticks back in the egg and coat with breadcrumbs again for a double layer.
Step 4: Place the breaded cheese sticks on a baking sheet and freeze for at least 15 minutes. This prevents the cheese from oozing out during cooking.
Step 5: Heat oil in a deep pan or fryer to 350°F.
Step 6: Fry the frozen cheese sticks in batches for 1-2 minutes until golden brown on all sides. Don’t overcrowd the pan.
Step 7: Remove with a slotted spoon and drain on paper towels. Serve immediately with warm marinara sauce.
What to Serve Crispy Mozzarella Sticks With
Serve with marinara sauce, ranch dressing, or garlic aioli for dipping. These pair well with a simple salad or other fried appetizers.
Top Tips for Perfecting Crispy Mozzarella Sticks
Freezing is crucial to prevent cheese leakage, so don’t skip this step. Double breading creates an extra thick, crispy coating. Make sure your oil is at the right temperature; too hot and the coating burns before the cheese melts, too cool and they get greasy. You can freeze the breaded sticks for up to 2 weeks before frying.
Storing and Reheating Tips
Store cooked mozzarella sticks in an airtight container for up to 2 days. Reheat in a 375°F oven for 5-7 minutes to restore crispiness. Avoid microwaving as it makes them rubbery.
Recipe 14: Sweet and Spicy Chicken Skewers

Tender chicken pieces glazed with a sticky sweet and spicy sauce, perfect for easy eating.
Quick Overview
These flavorful skewers are grilled or baked to perfection. They take 40 minutes (plus marinating time) and make 12 skewers.
- Prep Time: 20 minutes (plus 30 minutes marinating)
- Cook Time: 20 minutes
- Total Time: 40 minutes
- Servings: 12 skewers
Key Ingredients for Sweet and Spicy Chicken Skewers
- 2 pounds chicken breast, cut into 1-inch cubes
- ¼ cup honey
- 3 tablespoons soy sauce
- 2 tablespoons olive oil
- 1 tablespoon lime juice
- 2 teaspoons chili powder
- 1 teaspoon garlic powder
- ½ teaspoon red pepper flakes
- 12 wooden skewers, soaked in water
Step-by-Step Instructions
Step 1: In a large bowl, whisk together honey, soy sauce, olive oil, lime juice, chili powder, garlic powder, and red pepper flakes.
Step 2: Add the chicken cubes and toss to coat evenly. Cover and refrigerate for at least 30 minutes, or up to 4 hours.
Step 3: If using wooden skewers, soak them in water for 30 minutes to prevent burning.
Step 4: Thread the marinated chicken onto the skewers, leaving a small space between each piece.
Step 5: Preheat your grill to medium-high heat or preheat the oven to 425°F.
Step 6: If grilling, cook the skewers for 8-10 minutes, turning occasionally, until the chicken is cooked through and slightly charred.
Step 7: If baking, place skewers on a lined baking sheet and bake for 18-20 minutes, flipping halfway through.
Step 8: Let rest for 3 minutes before serving.
What to Serve Sweet and Spicy Chicken Skewers With
Serve with peanut dipping sauce, cucumber salad, or over rice. These also pair well with grilled vegetables and fresh lime wedges.
Top Tips for Perfecting Sweet and Spicy Chicken Skewers
Marinate the chicken for at least 30 minutes for maximum flavor. Cut chicken pieces uniformly so they cook evenly. Don’t pack the chicken too tightly on skewers; leave space for even cooking. Adjust the spice level by adding more or less red pepper flakes.
Storing and Reheating Tips
Store cooked skewers in an airtight container for up to 3 days. Reheat in a 350°F oven for 8-10 minutes or briefly on the grill. You can also serve these cold as part of a salad.
Recipe 16: Guacamole and Chips
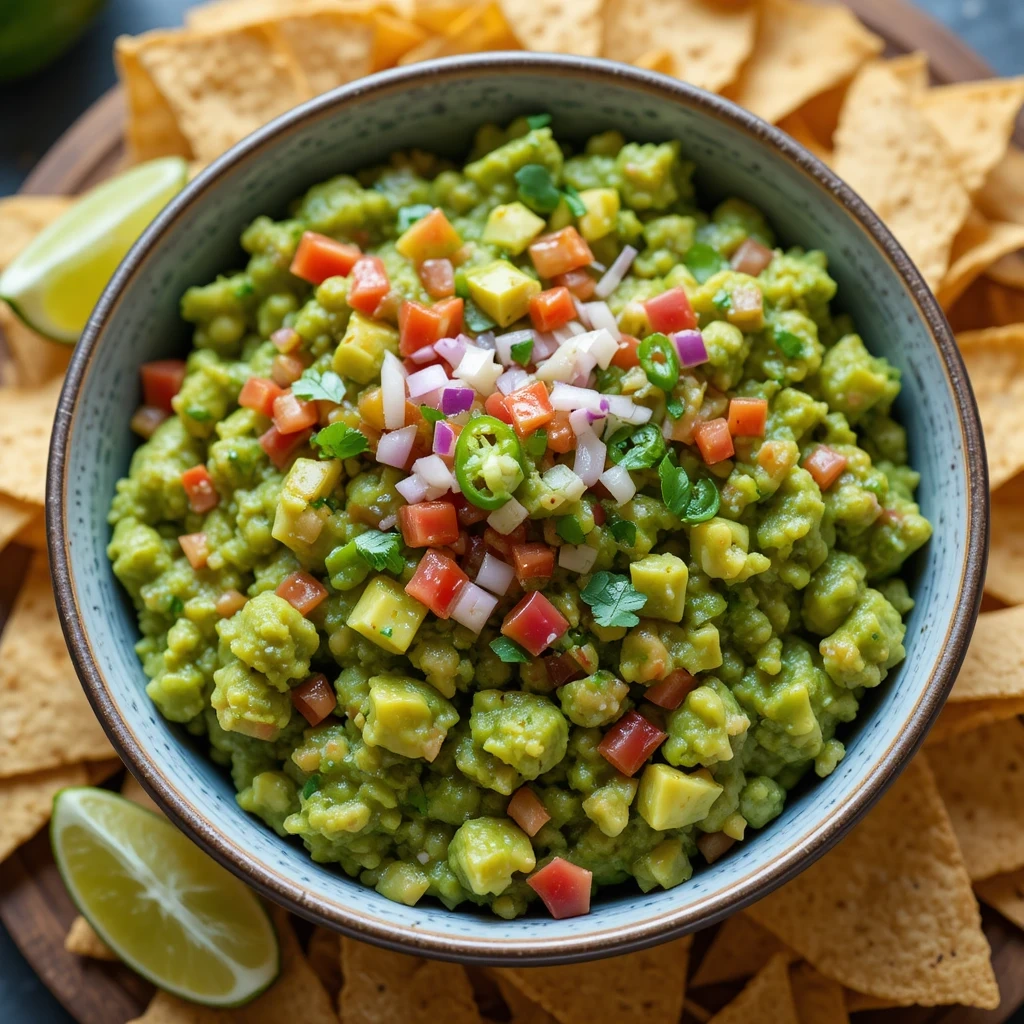
Fresh, chunky guacamole made from ripe avocados is a healthy and delicious party staple.
Quick Overview
This simple guacamole comes together in just 10 minutes and serves 6-8 people. It’s best made fresh but holds well for a few hours.
- Prep Time: 10 minutes
- Cook Time: 0 minutes
- Total Time: 10 minutes
- Servings: 6-8
Key Ingredients for Guacamole and Chips
- 4 ripe avocados
- 1 lime, juiced
- ½ small red onion, finely diced
- 1 jalapeño, seeded and minced
- 1 medium tomato, diced
- ¼ cup chopped cilantro
- 1 clove garlic, minced
- ½ teaspoon salt
- ¼ teaspoon cumin
- Tortilla chips for serving
Step-by-Step Instructions
Step 1: Cut the avocados in half, remove the pits, and scoop the flesh into a medium bowl.
Step 2: Add the lime juice immediately to prevent browning and mash the avocados with a fork to your desired consistency. Some people like it smooth while others prefer it chunky.
Step 3: Add the diced onion, minced jalapeño, diced tomato, chopped cilantro, and minced garlic to the bowl.
Step 4: Season with salt and cumin. Stir everything together gently until well combined.
Step 5: Taste and adjust seasonings as needed. Add more lime juice, salt, or jalapeño to suit your preference.
Step 6: Transfer to a serving bowl and serve immediately with tortilla chips.
What to Serve Guacamole and Chips With
Serve alongside salsa, queso, and other Mexican-inspired dishes. Guacamole is also delicious as a topping for tacos, nachos, or burgers.
Top Tips for Perfecting Guacamole and Chips
Use ripe but not overripe avocados for the best texture and flavor. Add lime juice right away to slow browning. To store guacamole, press plastic wrap directly onto the surface to prevent air exposure. Make it spicier by leaving some jalapeño seeds or adding hot sauce.
Storing and Reheating Tips
Store guacamole in an airtight container with plastic wrap pressed directly on the surface for up to 24 hours. While some browning is natural, a squeeze of lime juice helps prevent it. Stir before serving. This dip is not reheated.
Recipe 17: Baked Mac and Cheese Bites
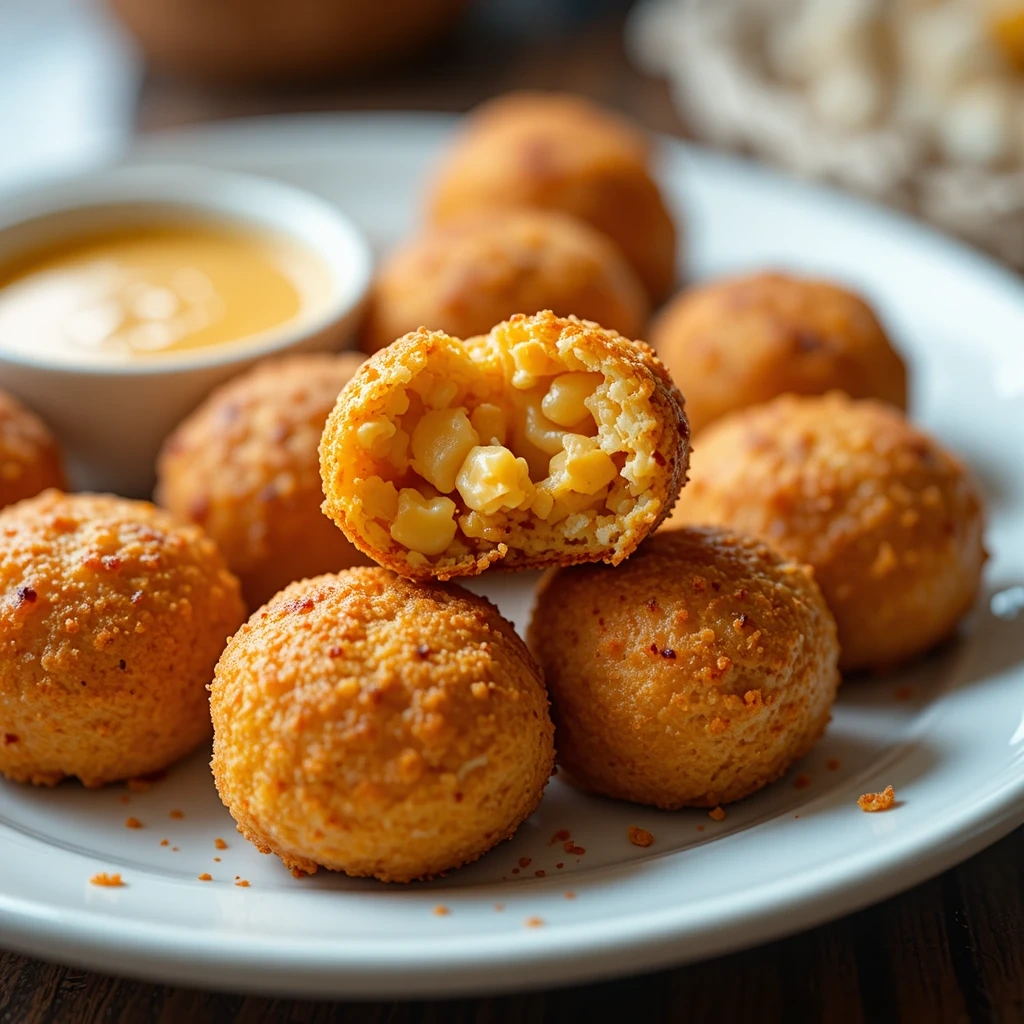
Creamy mac and cheese formed into bite-sized balls, breaded, and baked until golden.
Quick Overview
These crispy, cheesy bites are a fun twist on classic mac and cheese. They take about an hour including chilling time and make 24 bites.
- Prep Time: 30 minutes (including chill time)
- Cook Time: 25 minutes
- Total Time: 55 minutes
- Servings: 24 bites
Key Ingredients for Baked Mac and Cheese Bites
- 2 cups cooked elbow macaroni
- 2 cups shredded cheddar cheese
- 4 oz cream cheese, softened
- ¼ cup milk
- 1 cup all-purpose flour
- 2 eggs, beaten
- 2 cups panko breadcrumbs
- 1 teaspoon garlic powder
- Cooking spray
Step-by-Step Instructions
Step 1: In a large bowl, mix the cooked macaroni, cheddar cheese, cream cheese, and milk until the cheeses are melted and everything is combined. You may need to microwave it briefly.
Step 2: Spread the mixture in a greased 8×8 inch pan and refrigerate for at least 20 minutes until firm.
Step 3: Preheat your oven to 400°F. Line a baking sheet with parchment paper and spray with cooking spray.
Step 4: Once chilled, use a small cookie scoop or spoon to form the mac and cheese into balls about 1.5 inches in diameter.
Step 5: Set up your breading station with flour in one bowl, beaten eggs in another, and panko mixed with garlic powder in a third bowl.
Step 6: Roll each ball in flour, then egg, then panko, pressing gently to help the breadcrumbs stick.
Step 7: Place the breaded balls on the prepared baking sheet and spray the tops lightly with cooking spray.
Step 8: Bake for 20-25 minutes, flipping halfway through, until golden brown and crispy all over.
What to Serve Baked Mac and Cheese Bites With
Serve these with ranch dressing, marinara sauce, or spicy mayo for dipping. They’re great alongside other finger foods or as part of a kids’ meal.
Top Tips for Perfecting Baked Mac and Cheese Bites
Make sure the mac and cheese mixture is well chilled before forming balls or they’ll fall apart. Use panko breadcrumbs instead of regular breadcrumbs for extra crispiness. These can be frozen after breading and baked directly from frozen, adding 5 extra minutes to baking time.
Storing and Reheating Tips
Store cooked bites in an airtight container for up to 3 days. Reheat in a 375°F oven for 8-10 minutes to restore crispiness. They can also be frozen for up to 2 months.
Recipe 18: Caprese Skewers
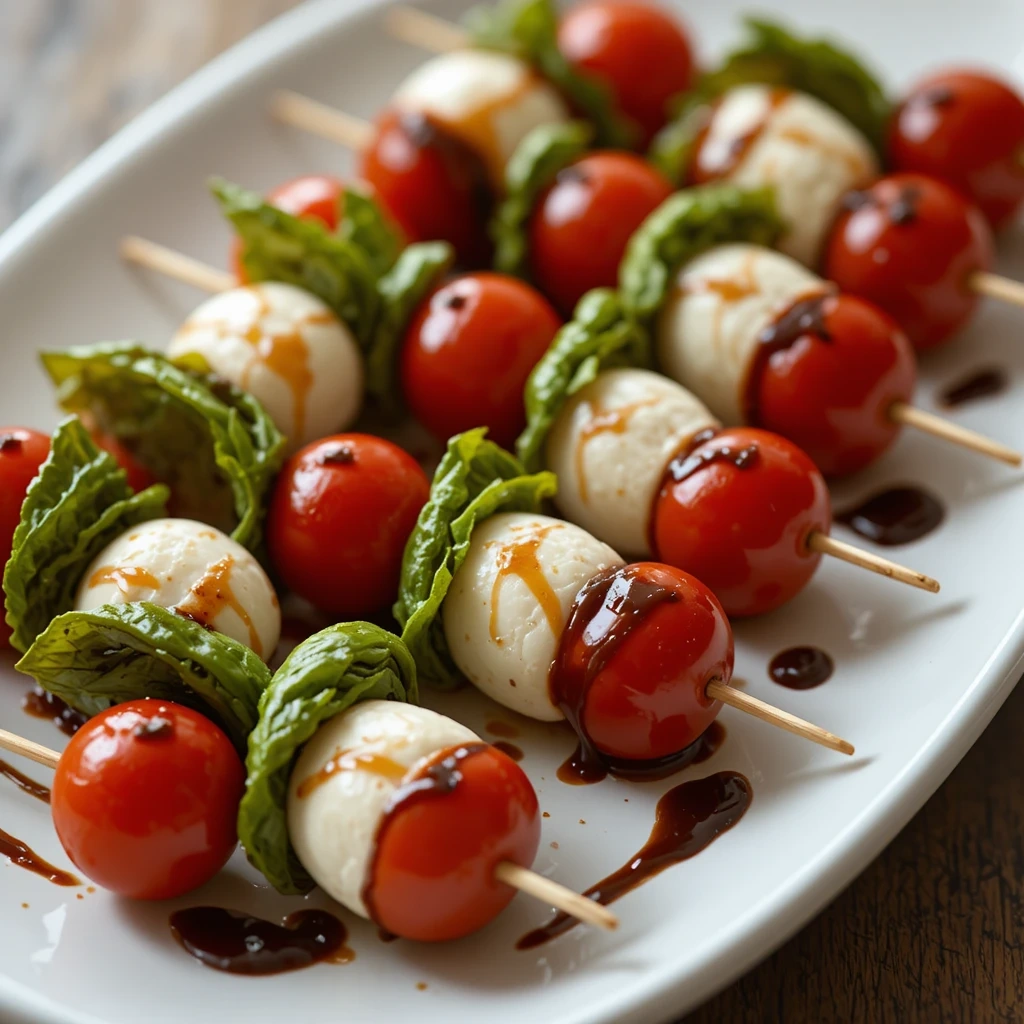
Fresh mozzarella, tomatoes, and basil drizzled with balsamic glaze make an elegant yet simple appetizer.
Quick Overview
These no-cook skewers are healthy, colorful, and take just 15 minutes to assemble. They make about 20 skewers.
- Prep Time: 15 minutes
- Cook Time: 0 minutes
- Total Time: 15 minutes
- Servings: 20 skewers
Key Ingredients for Caprese Skewers
- 20 cherry tomatoes
- 20 small fresh mozzarella balls (bocconcini)
- 20 fresh basil leaves
- 3 tablespoons balsamic glaze
- 2 tablespoons olive oil
- Salt and pepper to taste
- 20 small skewers or toothpicks
Step-by-Step Instructions
Step 1: Thread one cherry tomato onto each skewer.
Step 2: Fold a basil leaf and add it to the skewer.
Step 3: Add one mozzarella ball to complete the skewer.
Step 4: Arrange all the skewers on a serving platter.
Step 5: Drizzle with olive oil and balsamic glaze.
Step 6: Season lightly with salt and freshly ground black pepper just before serving.
What to Serve Caprese Skewers With
These pair beautifully with crusty bread, prosciutto-wrapped breadsticks, or as part of an Italian-inspired appetizer spread.
Top Tips for Perfecting Caprese Skewers
Use the freshest ingredients possible since there’s nowhere to hide in this simple recipe. Look for ripe but firm tomatoes and high-quality fresh mozzarella. Don’t add salt until just before serving or the tomatoes will release water. These can be assembled a few hours ahead and refrigerated, but add the glaze and seasonings right before serving.
Storing and Reheating Tips
These are best served fresh and don’t store well once assembled. If you need to prep ahead, keep components separate and assemble within 2 hours of serving. No reheating needed.
Recipe 19: Chocolate Brownie Bites
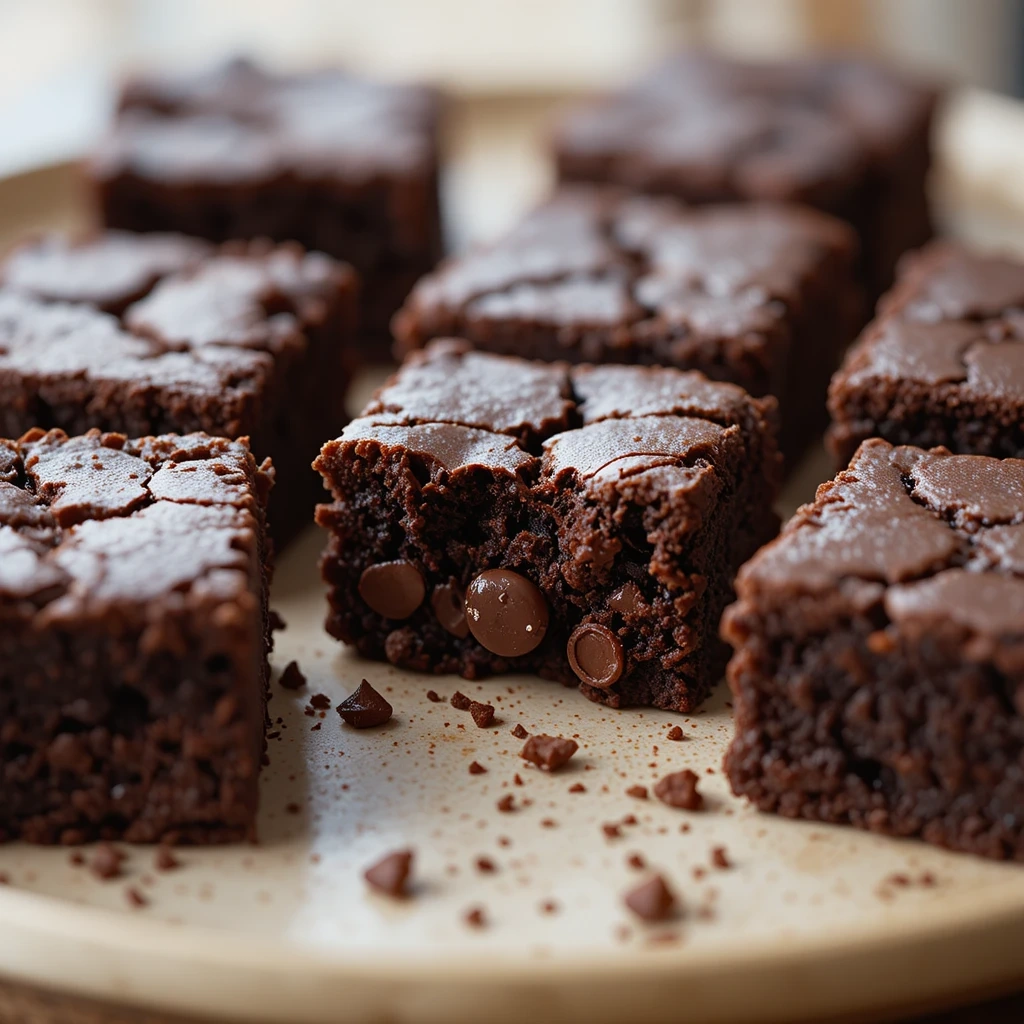
Rich, fudgy brownies cut into bite-sized squares are the perfect sweet ending to your game day spread.
Quick Overview
These decadent brownies are easy to make and impossible to resist. They take 45 minutes and make about 36 bite-sized pieces.
- Prep Time: 15 minutes
- Cook Time: 30 minutes
- Total Time: 45 minutes
- Servings: 36 bites
Key Ingredients for Chocolate Brownie Bites
- ½ cup butter, melted
- 1 cup sugar
- 2 large eggs
- 1 teaspoon vanilla extract
- ⅓ cup cocoa powder
- ½ cup all-purpose flour
- ¼ teaspoon salt
- ¼ teaspoon baking powder
- ½ cup chocolate chips (optional)
Step-by-Step Instructions
Step 1: Preheat your oven to 350°F. Line a 9×9 inch baking pan with parchment paper, leaving overhang on the sides for easy removal.
Step 2: In a large bowl, whisk together the melted butter and sugar until combined.
Step 3: Add the eggs and vanilla extract, whisking until smooth and glossy.
Step 4: Sift in the cocoa powder, flour, salt, and baking powder. Gently fold with a spatula until just combined. Don’t overmix or the brownies will be tough.
Step 5: Fold in chocolate chips if using.
Step 6: Pour the batter into the prepared pan and spread evenly.
Step 7: Bake for 25-30 minutes. The brownies are done when a toothpick inserted in the center comes out with a few moist crumbs but not wet batter.
Step 8: Let cool completely in the pan before lifting out using the parchment overhang. Cut into small squares.
What to Serve Chocolate Brownie Bites With
Serve these with vanilla ice cream, whipped cream, or a dusting of powdered sugar. They’re also delicious with fresh berries or a cold glass of milk.
Top Tips for Perfecting Chocolate Brownie Bites
Don’t overbake or the brownies will be dry. They should look slightly underdone in the center when you remove them from the oven. Use good quality cocoa powder for the best chocolate flavor. Let them cool completely before cutting for cleaner edges. A plastic knife cuts through brownies without dragging.
Storing and Reheating Tips
Store brownies in an airtight container at room temperature for up to 4 days or in the refrigerator for up to a week. They can also be frozen for up to 3 months. Brownies are delicious at room temperature or slightly warmed in the microwave for 10 seconds.
Recipe 20: Vegetable Spring Rolls with Peanut Sauce
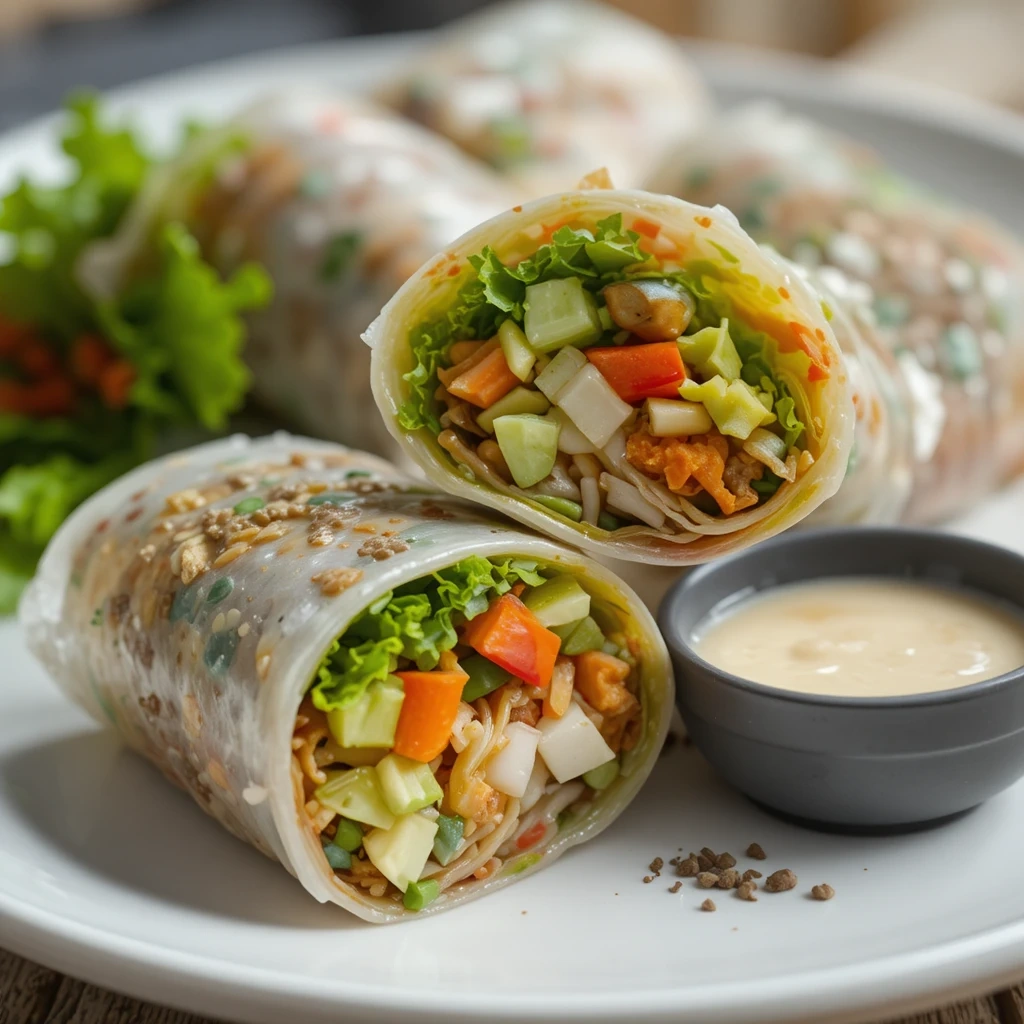
Light, crispy spring rolls filled with fresh vegetables and served with a creamy peanut dipping sauce.
Quick Overview
These healthy appetizers are refreshing and easy to customize. They take 30 minutes and make 12 rolls.
- Prep Time: 25 minutes
- Cook Time: 5 minutes
- Total Time: 30 minutes
- Servings: 12 rolls
Key Ingredients for Vegetable Spring Rolls
For the rolls:
- 12 rice paper wrappers
- 2 cups shredded lettuce
- 1 large carrot, julienned
- 1 cucumber, julienned
- 1 red bell pepper, thinly sliced
- ½ cup fresh cilantro leaves
- ½ cup fresh mint leaves
- 4 oz rice noodles, cooked and cooled
For the peanut sauce:
- ⅓ cup smooth peanut butter
- 2 tablespoons soy sauce
- 1 tablespoon honey
- 1 tablespoon lime juice
- 1 teaspoon sesame oil
- 2-3 tablespoons warm water to thin
Step-by-Step Instructions
Step 1: Prepare all your vegetables and herbs and arrange them in separate bowls for easy assembly.
Step 2: Cook the rice noodles according to package directions, drain, and rinse with cold water.
Step 3: Fill a large shallow dish with warm water.
Step 4: Dip one rice paper wrapper in the water for about 10 seconds until it just begins to soften.
Step 5: Place the softened wrapper on a damp cutting board or plate.
Step 6: On the bottom third of the wrapper, layer some lettuce, carrot, cucumber, bell pepper, a few herb leaves, and a small amount of noodles.
Step 7: Fold the bottom of the wrapper over the filling, fold in the sides, then roll tightly from bottom to top.
Step 8: Place the completed roll seam-side down on a plate and cover with a damp towel. Repeat with remaining wrappers.
Step 9: For the peanut sauce, whisk together all sauce ingredients in a bowl, adding warm water until you reach your desired consistency.
Step 10: Serve the spring rolls immediately with peanut sauce for dipping.
What to Serve Vegetable Spring Rolls With
Serve these with sweet chili sauce in addition to peanut sauce for variety. They pair well with Asian-inspired dishes like dumplings or edamame.
Top Tips for Perfecting Vegetable Spring Rolls
Don’t oversoak the rice paper or it will tear. The wrapper continues to soften as you work with it. Don’t overfill the rolls or they’ll be hard to close. Keep completed rolls covered with a damp towel so they don’t dry out. These are best made within a few hours of serving.
Storing and Reheating Tips
Spring rolls are best eaten fresh but can be stored in an airtight container separated by damp paper towels for up to 6 hours. Store the peanut sauce separately. These are not reheated.
Frequently Asked Questions
What are the best Super Bowl party food ideas for a crowd?
The best options are dishes that can be made ahead, served at room temperature, and eaten with your hands. Buffalo chicken dip, loaded nachos, wings, sliders, and seven layer dip are always crowd-pleasers because they’re easy to share and don’t require utensils.
How far in advance can I prepare Super Bowl party food?
Many dishes can be prepped 24 hours ahead. Dips can be assembled and refrigerated unbaked. Meatballs can simmer in the slow cooker for hours. Wings can be seasoned and refrigerated overnight. Brownies and pretzels taste great the next day. Fresh items like guacamole and spring rolls should be made within a few hours of serving.
What are some healthy Super Bowl party food options?
Try caprese skewers, vegetable spring rolls, baked chicken wings instead of fried, seven layer dip with extra veggies, or a fresh veggie platter with hummus. You can also make lighter versions of classics by baking instead of frying and using Greek yogurt in place of sour cream.
How much food should I prepare for a Super Bowl party?
Plan for 6-8 different appetizers if that’s your whole menu, with about 4-5 pieces per person per appetizer. If you’re also serving a main dish like chili, reduce appetizers to 3-4 options. Always prepare more than you think you’ll need since people tend to eat more during game day festivities.
Can I make Super Bowl party food without spending a lot of money?
Absolutely! Focus on budget-friendly options like homemade dips, meatballs made with ground beef, homemade pretzels, and nachos. Buying ingredients in bulk and making everything from scratch saves significantly compared to store-bought party platters. Chili and mac and cheese bites are especially economical.
What are kid-friendly Super Bowl party food ideas?
mac and cheese bites, mozzarella sticks, mini tacos, soft pretzels, loaded potato skins, and brownie bites. These are familiar flavors without too much spice. Set up a toppings bar for tacos or nachos so kids can customize their own plates.
How do I keep party food warm during the game?
Use slow cookers for dips, meatballs, and chili. Warming trays work well for wings and sliders. Keep items in the oven on the lowest setting (around 200°F). Cover dishes with foil to retain moisture. For cold items, use ice baths or keep refrigerated until serving time.
What drinks pair well with Super Bowl party food?
Beer, sodas, lemonade, and iced tea are classic choices. For adults, consider margaritas with Mexican-inspired dishes, or a signature punch. Always have plenty of water available. Create a drink station so guests can help themselves throughout the game.
Nutrition Information (Per Serving – Average Across Recipes)
| Nutrient | Amount |
|---|---|
| Calories | 220-350 |
| Protein | 12-18g |
| Carbohydrates | 20-35g |
| Fat | 10-18g |
| Fiber | 2-4g |
| Sodium | 400-650mg |
Note: Nutrition values vary significantly between recipes. Lighter options like vegetable spring rolls and caprese skewers have fewer calories, while richer items like buffalo chicken dip and brownies have more.
Tips for Avoiding Common Mistakes
Planning Ahead: Don’t try to make everything on game day. Choose 2-3 recipes that can be made ahead and 2-3 that come together quickly. This prevents kitchen stress when guests arrive.
Temperature Control: Keep hot foods hot and cold foods cold. Use slow cookers, warming trays, and chafing dishes for hot items. Set up coolers or use ice baths for cold dips and fresh items.
Portion Sizes: Cut everything into bite-sized pieces. Game day food should be easy to eat while standing or sitting on the couch. Nobody wants to deal with a knife and fork during the big game.
Dietary Restrictions: Always ask guests about allergies or dietary needs ahead of time. Label dishes that contain common allergens like nuts, and try to include at least one vegetarian option.
Presentation: Don’t underestimate the power of presentation. Use colorful serving platters, garnish with fresh herbs, and arrange food attractively. People eat with their eyes first!
Traffic Flow: Set up your food table away from the TV viewing area to avoid blocking the screen. Create a logical flow from plates to food to drinks to napkins.
Pacing: Don’t put out all the food at once. Start with lighter appetizers like vegetable skewers and dips, then bring out heartier items like sliders and wings during halftime.
Backup Plans: Have extra napkins, plates, and utensils on hand. Keep backup snacks like chips and pretzels in case you run out of homemade items. It’s better to have too much than too little.
Final Thoughts
Game day is about more than just the football. It’s about gathering with friends and family, cheering for your team, and enjoying delicious food together. These twenty recipes give you everything you need to create an unforgettable Super Bowl party spread that’ll have your guests talking long after the final whistle blows.
The beauty of these recipes is their flexibility. Mix and match based on your guest list, dietary needs, and personal preferences. Make it casual with chips and dips, or go all out with a full spread of wings, sliders, and desserts. The most important thing is creating an atmosphere where everyone feels welcome and well-fed.
Remember to prep as much as possible ahead of time so you can actually enjoy the game instead of being stuck in the kitchen. Set up stations where guests can help themselves, and don’t stress about making everything perfect. The best parties are the ones where everyone’s relaxed and having fun.
So grab your shopping list, fire up that oven, and get ready to host the best Super Bowl party your friends have ever attended. These recipes are guaranteed to make you the MVP of game day hosting. Now get out there and create some delicious memories