
10 Spring Appetizers That’ll Steal the Show at Any Party
Spring has a magical way of making everything feel fresh, bright, and full of possibility — and that goes double for the food on your table! Whether you’re hosting an outdoor brunch, packing a picnic, or just looking for fun after-school snacks for the kids, spring appetizers are the perfect way to usher in the season.
Did you know that the word ‘appetizer’ comes from the Latin ‘appetere,’ meaning ‘to desire more’? And trust us — once you set these colorful, crunchy, and creamy little bites on the table, everyone will definitely want more! From our beloved Caprese Skewers to the crowd-favorite Cucumber Bites, this collection has something for every age and every occasion.
These 10 spring appetizer recipes are light, vibrant, and incredibly simple to make. Most take under 30 minutes! They’re perfect for little helpers in the kitchen, and they look so pretty that guests will think you spent hours on them. If you loved our popular 10 Easy Holiday Appetizers post, you are going to absolutely adore this fresh spring lineup.
Grab your favorite platter, call the kids over, and let’s celebrate spring one delicious bite at a time!
What Are Spring Appetizers?
So, what exactly makes an appetizer a ‘spring’ appetizer? Great question! Spring appetizers are light, fresh, colorful starters made with seasonal ingredients like peas, radishes, strawberries, asparagus, cucumbers, and fresh herbs. They’re the kind of food that looks like a garden exploded on your plate — in the best possible way!
As the old saying goes, ‘the way to a man’s heart is through his stomach’ — and honestly, the way to everyone’s heart in spring is through a gorgeous platter of fresh, zingy bites that taste like sunshine. Whether you call them starters, snacks, or just ‘things I eat before dinner,’ these recipes are guaranteed to spark joy.
Now, enough talking — let’s get cooking! These recipes are waiting for you, and spring doesn’t last forever.
Why You’ll Love These Spring Appetizers
They’re Bursting With Fresh, Seasonal Flavors
Spring produce is at its peak right now — sweet peas, crisp cucumbers, tender asparagus, and juicy strawberries. These appetizers let those natural flavors shine without a lot of fuss. Every bite is a little celebration of the season.
Budget-Friendly and Wallet-Happy
Making appetizers at home instead of buying them pre-made saves you a surprising amount of money. Fresh vegetables, cream cheese, and a few pantry staples are all you need. You can feed a crowd of 10 for the cost of one restaurant appetizer platter.
Kid-Approved and Family-Friendly
These recipes are designed with little hands and picky eaters in mind. No complicated ingredients, no strange flavors — just yummy, colorful bites that kids love to eat AND help make. Think of how proud your little one will be presenting a platter they assembled themselves!
Perfect for Every Spring Occasion
From Easter brunches and Eid gatherings to Mother’s Day parties and school picnics, these appetizers fit every spring celebration. They’re easy to transport, easy to scale up, and they look absolutely stunning on any table.
If you love these, also check out our Summer Snacks for Kids post — equally fun and delicious!
The 10 Spring Appetizers — Recipes with Ingredients & Steps
1. Cucumber Cream Cheese Bites
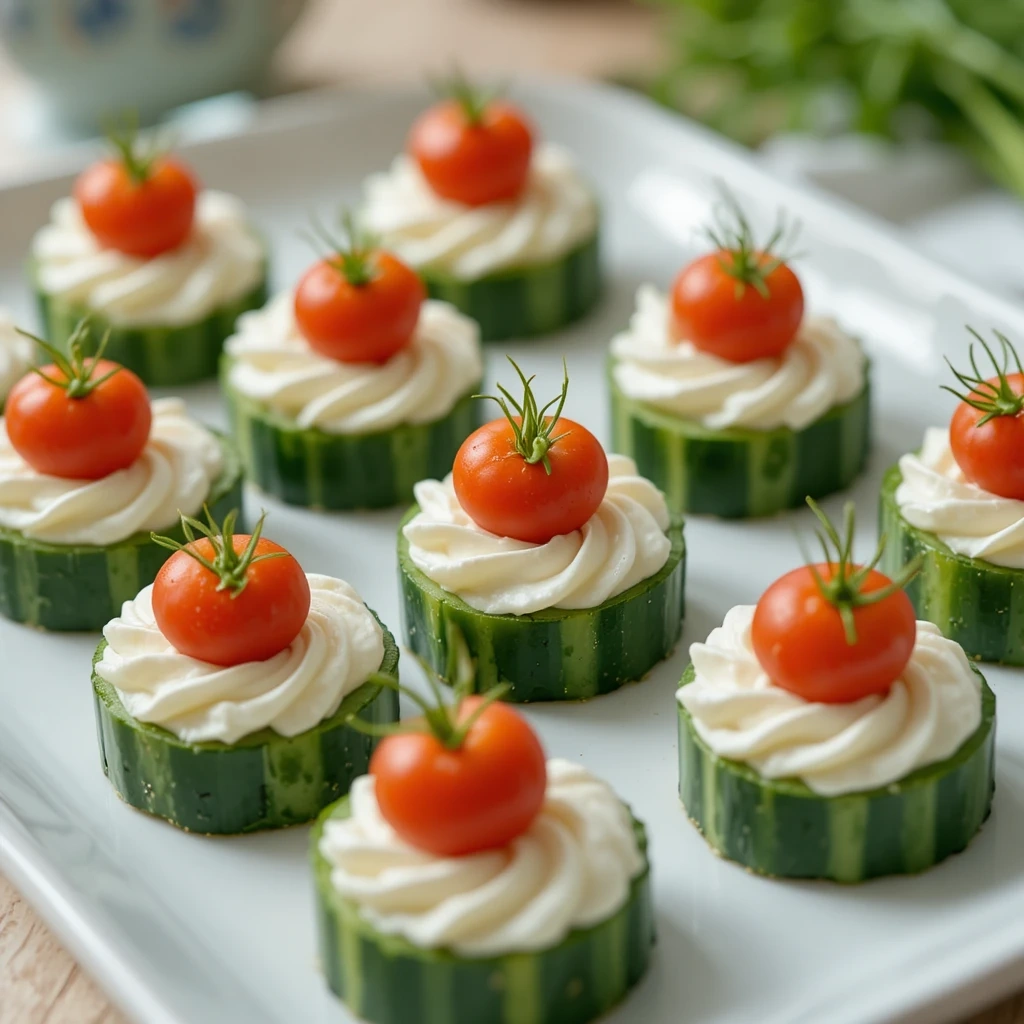
Quick Overview
These elegant little bites are crunchy, creamy, and refreshing all at once. They require zero cooking, take about 10 minutes to make, and look absolutely gorgeous on any spring table. Kids love them because they’re fun to assemble!
Prep Time: 10 minutes | Cook Time: 0 minutes | Total Time: 10 minutes | Servings: 24 bites
Key Ingredients
- 2 large English cucumbers, sliced into 1/2-inch rounds
- 8 oz (225g) cream cheese, softened to room temperature
- 2 tablespoons fresh dill, finely chopped
- 1 tablespoon fresh chives, finely chopped
- 1 teaspoon lemon zest
- 1/4 teaspoon garlic powder
- Salt and black pepper to taste
- Cherry tomatoes, halved, for garnish
- Fresh dill sprigs for topping
Step-by-Step Instructions
- Wash and dry the cucumbers. Slice into 1/2-inch rounds and arrange on a large platter or baking sheet lined with paper towels. Pat the top of each slice dry — this prevents the topping from sliding off.
- In a medium mixing bowl, combine the softened cream cheese, fresh dill, chives, lemon zest, garlic powder, salt, and pepper. Mix well using a fork or hand mixer until light and fluffy.
- Transfer the cream cheese mixture to a piping bag fitted with a star tip, or simply use a small spoon or zip-lock bag with a corner snipped off.
- Pipe or spoon a generous dollop of the cream cheese mixture onto each cucumber round.
- Top each bite with a small cherry tomato half and a tiny sprig of fresh dill for a beautiful finish.
- Arrange on a serving platter and refrigerate for up to 2 hours before serving.
💡 Tip: Add a tiny pinch of smoked paprika on top for a pop of color and subtle warmth!
| Estimated Nutrition Per Serving | |
| Calories | 65 kcal |
| Protein | 2g |
| Carbohydrates | 3g |
| Fat | 5g |
| Fiber | 0.5g |
| Sodium | 85mg |
| * Values are approximate and may vary based on ingredients used. | |
2. Strawberry Basil Bruschetta
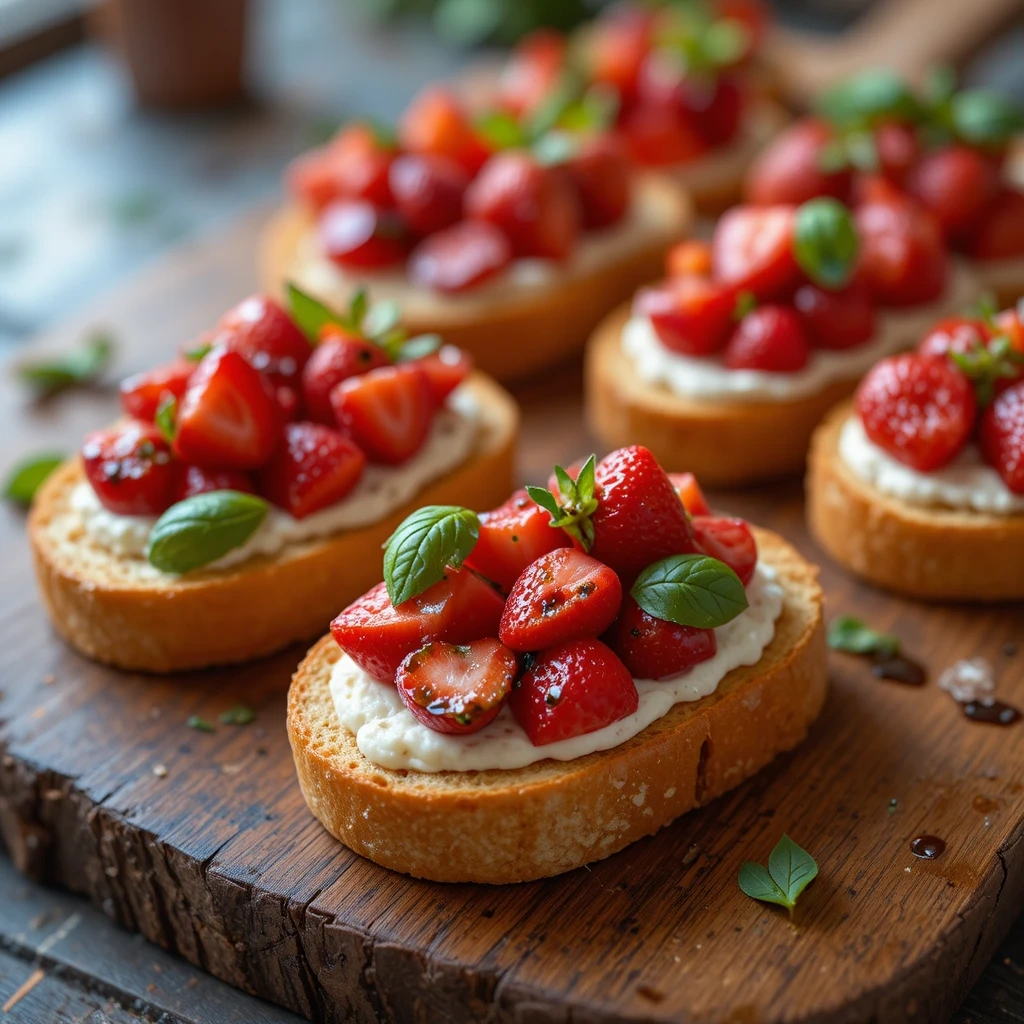
Quick Overview
Sweet, savory, and absolutely stunning — this twist on classic bruschetta uses fresh strawberries and basil for a springtime upgrade. It’s a conversation starter on any table, and the kids will love the sweet fruity topping!
Prep Time: 15 minutes | Cook Time: 8 minutes | Total Time: 23 minutes | Servings: 16 pieces
Key Ingredients
- 1 French baguette, sliced into 1/2-inch rounds
- 2 tablespoons olive oil for brushing
- 1.5 cups fresh strawberries, finely diced
- 1/4 cup fresh basil leaves, chiffonade (thinly sliced)
- 2 tablespoons honey
- 1 tablespoon balsamic glaze
- 4 oz (115g) ricotta cheese or cream cheese
- Pinch of salt
Step-by-Step Instructions
- Preheat your oven to 400°F (200°C). Arrange baguette slices on a baking sheet in a single layer.
- Brush each slice lightly with olive oil on both sides. Toast in the oven for 6–8 minutes, flipping halfway, until golden and crisp. Remove and let cool slightly.
- In a bowl, gently toss diced strawberries with honey, a pinch of salt, and half of the basil. Let macerate for 5 minutes — this draws out the strawberry juices beautifully.
- Spread a thin layer of ricotta or cream cheese on each toasted baguette slice.
- Spoon the strawberry mixture generously over the cheese layer.
- Drizzle with balsamic glaze, add remaining fresh basil on top, and serve immediately.
💡 Tip: Assemble just before serving so the bread stays crispy!
| Estimated Nutrition Per Serving | |
| Calories | 90 kcal |
| Protein | 2.5g |
| Carbohydrates | 14g |
| Fat | 3g |
| Fiber | 1g |
| Sodium | 95mg |
| * Values are approximate and may vary based on ingredients used. | |
3. Spring Pea & Mint Crostini
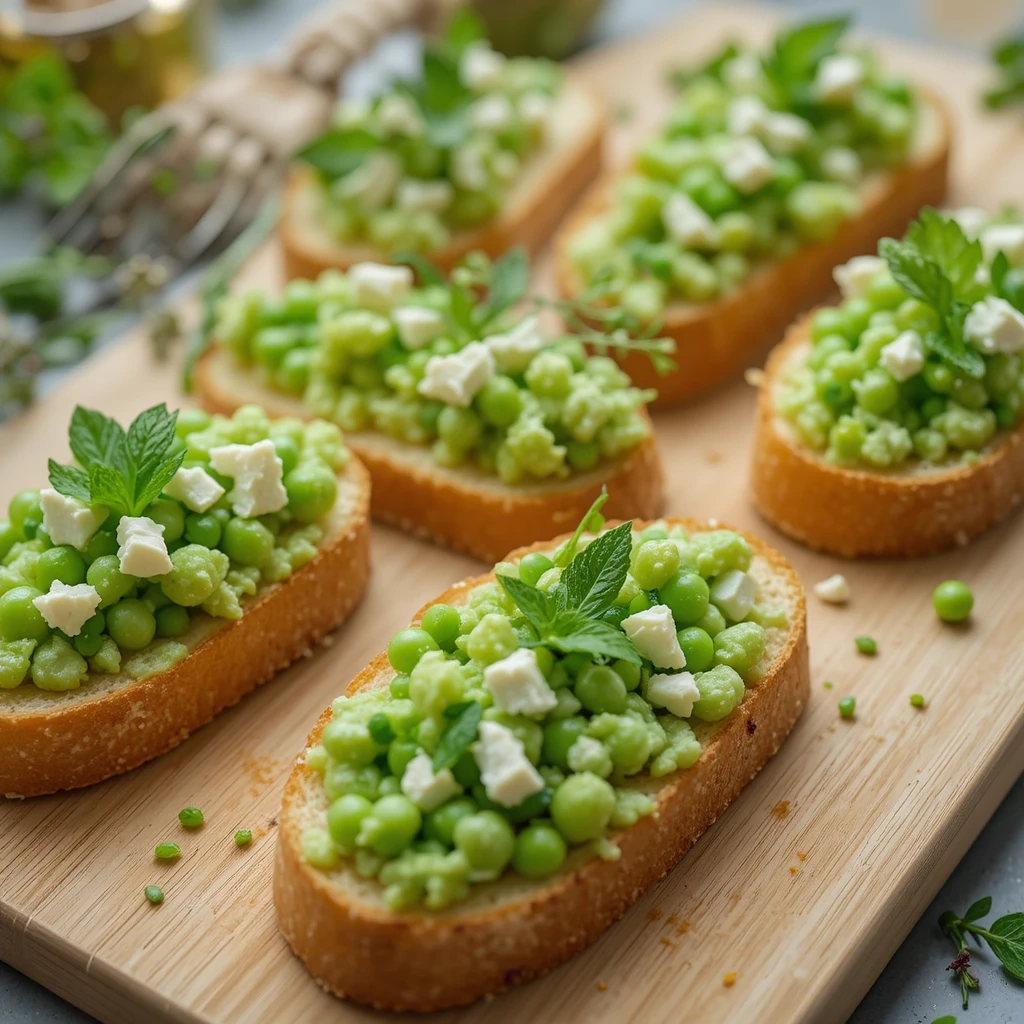
Quick Overview
Vibrant green, creamy, and packed with fresh flavor — these pea crostini scream spring! The mint and lemon add brightness that kids and adults both adore. Ready in about 20 minutes from start to finish.
Prep Time: 10 minutes | Cook Time: 10 minutes | Total Time: 20 minutes | Servings: 18 pieces
Key Ingredients
- 1 baguette, sliced thin
- 2 cups fresh or frozen peas, thawed
- 1/4 cup fresh mint leaves
- 2 tablespoons cream cheese or labneh
- Juice of 1 lemon
- 1 clove garlic
- 2 tablespoons olive oil + extra for brushing
- Salt and pepper to taste
- Crumbled feta cheese and micro greens for garnish
Step-by-Step Instructions
- Preheat oven to 375°F (190°C). Brush baguette slices with olive oil and toast for 8–10 minutes until golden.
- Blanch fresh peas in boiling salted water for 2 minutes, then transfer to ice water to preserve their bright green color. (Skip this step if using thawed frozen peas.)
- In a food processor, combine peas, mint, cream cheese, lemon juice, garlic, olive oil, salt, and pepper. Pulse until you get a thick, slightly chunky spread.
- Taste and adjust seasoning. The spread should be bright, fresh, and slightly lemony.
- Spread generously onto each toasted crostini. Top with crumbled feta and micro greens.
- Arrange on a platter and serve right away, or refrigerate the pea spread for up to 2 days and assemble just before serving.
💡 Tip: Let kids help spread the pea mixture — it’s a great way to get them involved and curious about vegetables!
| Estimated Nutrition Per Serving | |
| Calories | 80 kcal |
| Protein | 3g |
| Carbohydrates | 12g |
| Fat | 2.5g |
| Fiber | 2g |
| Sodium | 110mg |
| * Values are approximate and may vary based on ingredients used. | |
4. Caprese Skewers with Balsamic Glaze

Quick Overview
These bite-sized skewers are classic, elegant, and completely no-cook. Red, white, and green — they look like little works of art. Perfect for Easter, Eid, or any spring gathering. Kids love assembling them!
Prep Time: 15 minutes | Cook Time: 0 minutes | Total Time: 15 minutes | Servings: 24 skewers
Key Ingredients
- 1 pint cherry tomatoes (red and yellow for color)
- 8 oz (225g) fresh mozzarella balls (ciliegine)
- Fresh basil leaves
- 3 tablespoons balsamic glaze
- 2 tablespoons extra virgin olive oil
- Salt, black pepper, and dried oregano
- 24 small bamboo skewers or toothpicks
Step-by-Step Instructions
- Wash and dry all tomatoes and basil leaves. Drain and pat dry the mozzarella balls.
- Thread each skewer: start with a tomato, fold a basil leaf and thread it on, then add a mozzarella ball, and finish with another cherry tomato.
- Arrange all skewers beautifully on a serving platter.
- Drizzle olive oil over all the skewers, followed by the balsamic glaze.
- Season with a sprinkle of salt, cracked black pepper, and dried oregano.
- Serve immediately or refrigerate for up to 3 hours before serving.
💡 Tip: Use a mix of red and yellow cherry tomatoes for the most stunning color contrast!
| Estimated Nutrition Per Serving | |
| Calories | 70 kcal |
| Protein | 4g |
| Carbohydrates | 3g |
| Fat | 5g |
| Fiber | 0.5g |
| Sodium | 90mg |
| * Values are approximate and may vary based on ingredients used. | |
5. Asparagus Wrapped in Puff Pastry
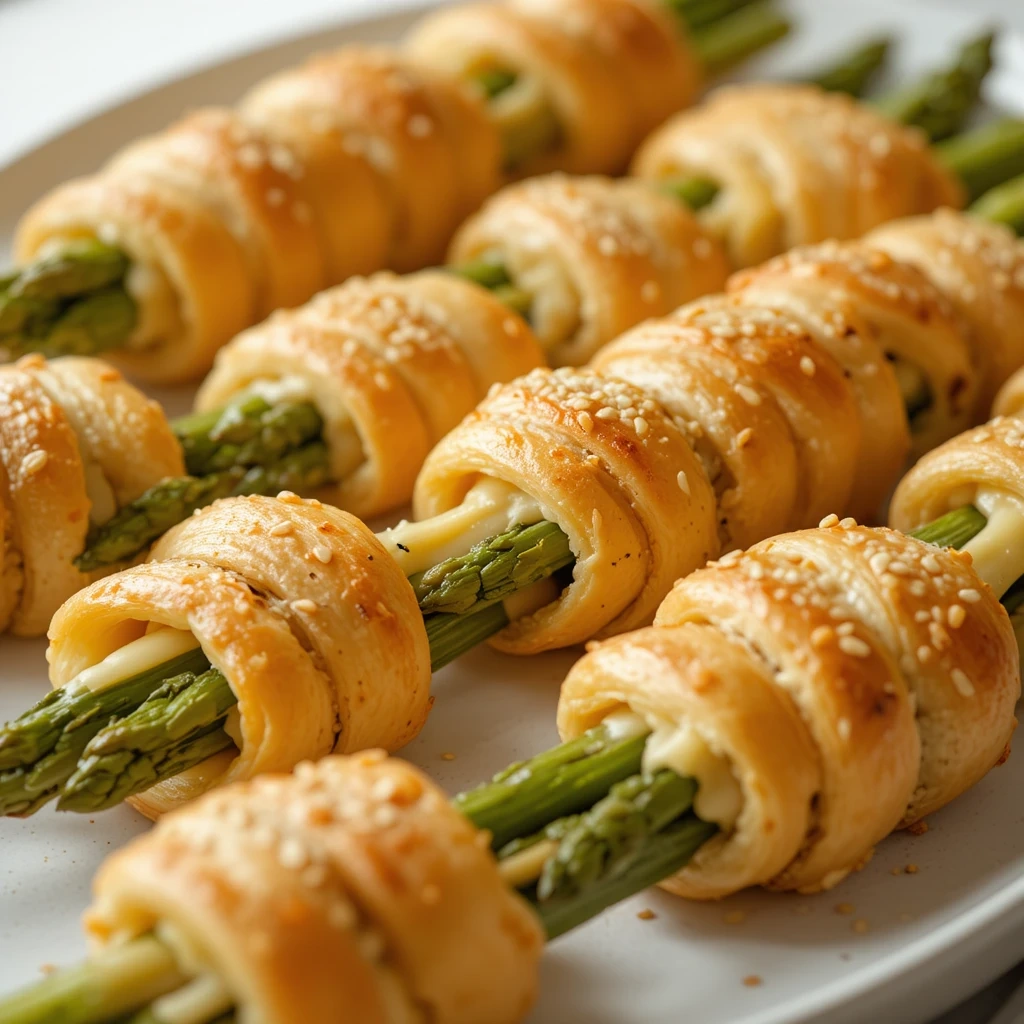
Quick Overview
Flaky, golden puff pastry hugging tender asparagus spears — these little bundles are the definition of impressive-yet-easy. They’re warm, savory, and absolutely irresistible. Prep takes 15 minutes; the oven does the rest!
Prep Time: 15 minutes | Cook Time: 18 minutes | Total Time: 33 minutes | Servings: 20 pieces
Key Ingredients
- 1 sheet puff pastry, thawed
- 20 fresh asparagus spears, woody ends trimmed
- 1 egg, beaten (for egg wash)
- 2 tablespoons Dijon mustard or cream cheese
- 1/2 cup shredded Parmesan or mozzarella cheese
- 1/2 teaspoon garlic powder
- Salt, black pepper, and sesame seeds (optional)
Step-by-Step Instructions
- Preheat oven to 400°F (200°C). Line a baking sheet with parchment paper.
- Unroll the puff pastry on a lightly floured surface. Spread a thin layer of Dijon mustard or cream cheese over the entire sheet.
- Sprinkle shredded cheese evenly over the mustard layer, followed by garlic powder, salt, and pepper.
- Cut the pastry into long, thin strips about 1/2-inch wide using a sharp knife or pizza cutter.
- Starting at the bottom of each asparagus spear, wrap a pastry strip in a spiral upward, overlapping slightly as you go.
- Place wrapped asparagus on the prepared baking sheet. Brush with egg wash and sprinkle sesame seeds if using.
- Bake for 16–18 minutes until the pastry is golden and puffed. Serve warm!
💡 Tip: Work quickly with cold puff pastry — warm pastry becomes sticky and hard to manage. If it softens too much, pop it in the fridge for 10 minutes.
| Estimated Nutrition Per Serving | |
| Calories | 110 kcal |
| Protein | 3.5g |
| Carbohydrates | 10g |
| Fat | 6.5g |
| Fiber | 1g |
| Sodium | 130mg |
| * Values are approximate and may vary based on ingredients used. | |
6. Rainbow Veggie Spring Rolls with Peanut Dipping Sauce

Quick Overview
These fresh, no-cook spring rolls are a feast for the eyes and the stomach! Packed with crunchy colorful veggies and wrapped in delicate rice paper, they’re light, healthy, and incredibly fun for kids to help roll. The peanut dipping sauce ties everything together perfectly.
Prep Time: 25 minutes | Cook Time: 0 minutes | Total Time: 25 minutes | Servings: 12 rolls
Key Ingredients — For the Rolls
- 12 rice paper wrappers (8.5-inch size)
- 1 cup shredded purple cabbage
- 1 large carrot, julienned or shredded
- 1 yellow bell pepper, thinly sliced
- 1 cucumber, julienned
- 1 cup baby spinach or butter lettuce leaves
- 1/2 cup fresh mint leaves
- 2 oz (60g) rice vermicelli noodles, cooked and cooled
Key Ingredients — For the Peanut Sauce
- 3 tablespoons natural peanut butter (smooth)
- 2 tablespoons soy sauce (low-sodium)
- 1 tablespoon honey or maple syrup
- 1 tablespoon lime juice
- 1 teaspoon sesame oil
- 2–3 tablespoons warm water to thin
- 1 small garlic clove, minced
Step-by-Step Instructions
- Prepare all vegetables and set them up in separate bowls for easy assembly — this is a great job for the kids!
- Make the peanut sauce: Whisk together all sauce ingredients in a small bowl. Add water gradually until you reach a smooth, pourable consistency. Taste and adjust.
- Fill a wide, shallow bowl or plate with warm water. Dip one rice paper wrapper for 10–15 seconds until just softened (it firms up more as you work).
- Lay the softened wrapper flat on a clean work surface. In the center lower third, layer a leaf of lettuce, a small handful of noodles, and then colorful vegetables.
- Fold the bottom of the wrapper up over the filling. Fold in both sides, then roll tightly upward. The wrapper will stick to itself naturally.
- Slice each roll in half diagonally and arrange cut-side-up on a platter to show off the beautiful rainbow interior.
- Serve immediately alongside the peanut dipping sauce. If making ahead, cover with a damp paper towel and plastic wrap.
💡 Tip: Lay out the veggie station and let each family member customize their own spring roll — it turns dinner prep into a fun activity!
| Estimated Nutrition Per Serving | |
| Calories | 95 kcal |
| Protein | 3g |
| Carbohydrates | 16g |
| Fat | 2.5g |
| Fiber | 2g |
| Sodium | 150mg |
| * Values are approximate and may vary based on ingredients used. | |
7. Mini Quiche Cups with Peas & Cheese

Quick Overview
These adorable little quiche cups are warm, cheesy, and packed with protein. Made in a muffin tin, they’re perfectly portioned for parties and kids absolutely love them. Make a big batch — they disappear fast!
Prep Time: 15 minutes | Cook Time: 22 minutes | Total Time: 37 minutes | Servings: 12 mini quiches
Key Ingredients
- 1 sheet refrigerated pie crust or shortcrust pastry
- 4 large eggs
- 1/2 cup whole milk or heavy cream
- 1/2 cup frozen peas, thawed
- 1/2 cup shredded cheddar or Swiss cheese
- 1/4 cup finely diced red bell pepper
- 2 green onions, thinly sliced
- Salt, pepper, and a pinch of nutmeg
- Non-stick cooking spray
Step-by-Step Instructions
- Preheat oven to 375°F (190°C). Spray a standard 12-cup muffin tin generously with cooking spray.
- Unroll the pie crust on a lightly floured surface. Use a round cookie cutter or glass (about 3.5-inch diameter) to cut out 12 circles.
- Gently press each pastry circle into the muffin cups, pressing up the sides.
- In a mixing bowl, whisk together eggs, milk, salt, pepper, and nutmeg until combined.
- Divide the peas, bell pepper, and green onions evenly among the pastry cups. Sprinkle half the cheese over the fillings.
- Pour the egg mixture carefully into each cup, filling to about 3/4 full. Top with remaining cheese.
- Bake for 20–22 minutes until the eggs are set and the tops are lightly golden. Let cool in the pan for 5 minutes before removing.
💡 Tip: Run a butter knife around the edges after baking for easy removal without breaking the crust.
| Estimated Nutrition Per Serving | |
| Calories | 145 kcal |
| Protein | 6g |
| Carbohydrates | 11g |
| Fat | 8.5g |
| Fiber | 1g |
| Sodium | 175mg |
| * Values are approximate and may vary based on ingredients used. | |
8. Deviled Eggs with Paprika & Chives
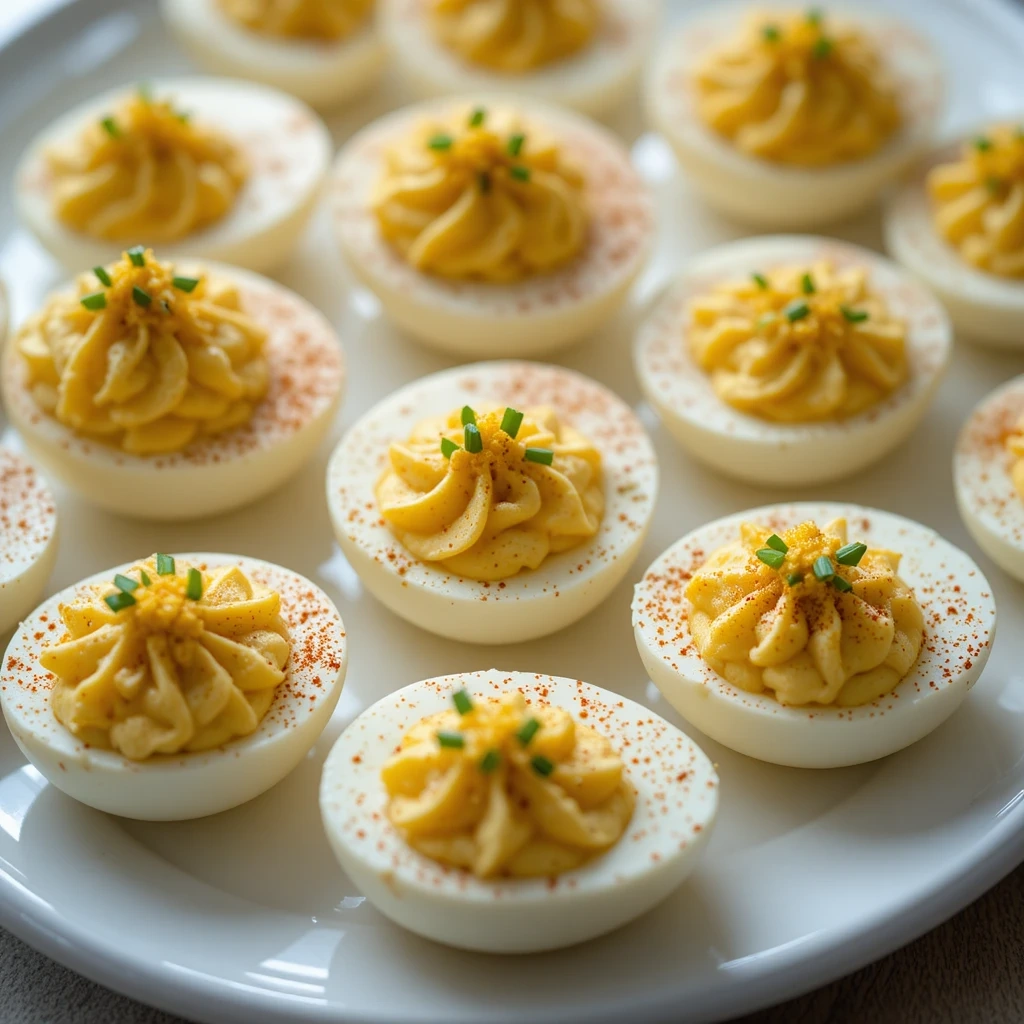
Quick Overview
A springtime classic that never goes out of style! Creamy, tangy deviled eggs are always the first thing to disappear at any gathering. They’re simple, economical, and can be prepped the night before — a total entertainer’s dream.
Prep Time: 20 minutes | Cook Time: 12 minutes | Total Time: 32 minutes | Servings: 24 halves
Key Ingredients
- 12 large eggs
- 3 tablespoons mayonnaise (or Greek yogurt for lighter option)
- 1 tablespoon Dijon mustard
- 1 tablespoon apple cider vinegar or lemon juice
- Salt and white pepper to taste
- Sweet paprika for garnish
- Fresh chives, finely chopped
- Optional: pickle relish for a tangy kick
Step-by-Step Instructions
- Place eggs in a single layer in a pot. Cover with cold water by 1 inch. Bring to a boil over medium-high heat, then cover, remove from heat, and let sit for 12 minutes.
- Transfer eggs immediately to a bowl of ice water. Let sit for 15 minutes, then peel carefully.
- Slice each egg in half lengthwise. Pop the yolks into a mixing bowl and place the whites on a serving platter.
- Mash the yolks with a fork until fine. Add mayonnaise, Dijon, vinegar, salt, and pepper. Mix until smooth and creamy. For extra smoothness, use a hand mixer.
- Transfer the yolk mixture to a piping bag (or zip-lock bag with corner snipped). Pipe filling generously into each egg white.
- Dust lightly with sweet paprika and top with fresh chives. Refrigerate until ready to serve.
💡 Tip: Use older eggs (7+ days old) for easier peeling — fresh eggs are notoriously hard to peel!
| Estimated Nutrition Per Serving | |
| Calories | 80 kcal |
| Protein | 5g |
| Carbohydrates | 1g |
| Fat | 6g |
| Fiber | 0g |
| Sodium | 95mg |
| * Values are approximate and may vary based on ingredients used. | |
9. Watermelon Feta Mint Skewers

Quick Overview
Sweet, salty, refreshing, and absolutely gorgeous — these watermelon skewers are the ultimate no-cook spring/summer appetizer. They take literally 10 minutes and taste like a spa treatment for your taste buds!
Prep Time: 10 minutes | Cook Time: 0 minutes | Total Time: 10 minutes | Servings: 20 skewers
Key Ingredients
- Half a small seedless watermelon
- 4 oz (115g) feta cheese block, cubed
- Fresh mint leaves
- 2 tablespoons honey
- 1 tablespoon lime juice
- Pinch of Tajin or chili-lime seasoning (optional, for adventurous eaters)
- 20 small skewers
Step-by-Step Instructions
- Cut watermelon into uniform 1-inch cubes. Remove rind. Pat dry with paper towels so the honey drizzle sticks better.
- Cut feta into similar-sized cubes (about 3/4-inch).
- Thread each skewer: watermelon cube, mint leaf (folded), feta cube. Repeat the pattern for larger skewers if desired.
- Arrange on a platter. Whisk together honey and lime juice and drizzle over all the skewers.
- Sprinkle with Tajin if using. Serve immediately or chill for up to 1 hour.
💡 Tip: Keep these chilled right until serving — warm watermelon loses its magic!
| Estimated Nutrition Per Serving | |
| Calories | 55 kcal |
| Protein | 1.5g |
| Carbohydrates | 9g |
| Fat | 2g |
| Fiber | 0.5g |
| Sodium | 75mg |
| * Values are approximate and may vary based on ingredients used. | |
10. Stuffed Mini Sweet Peppers
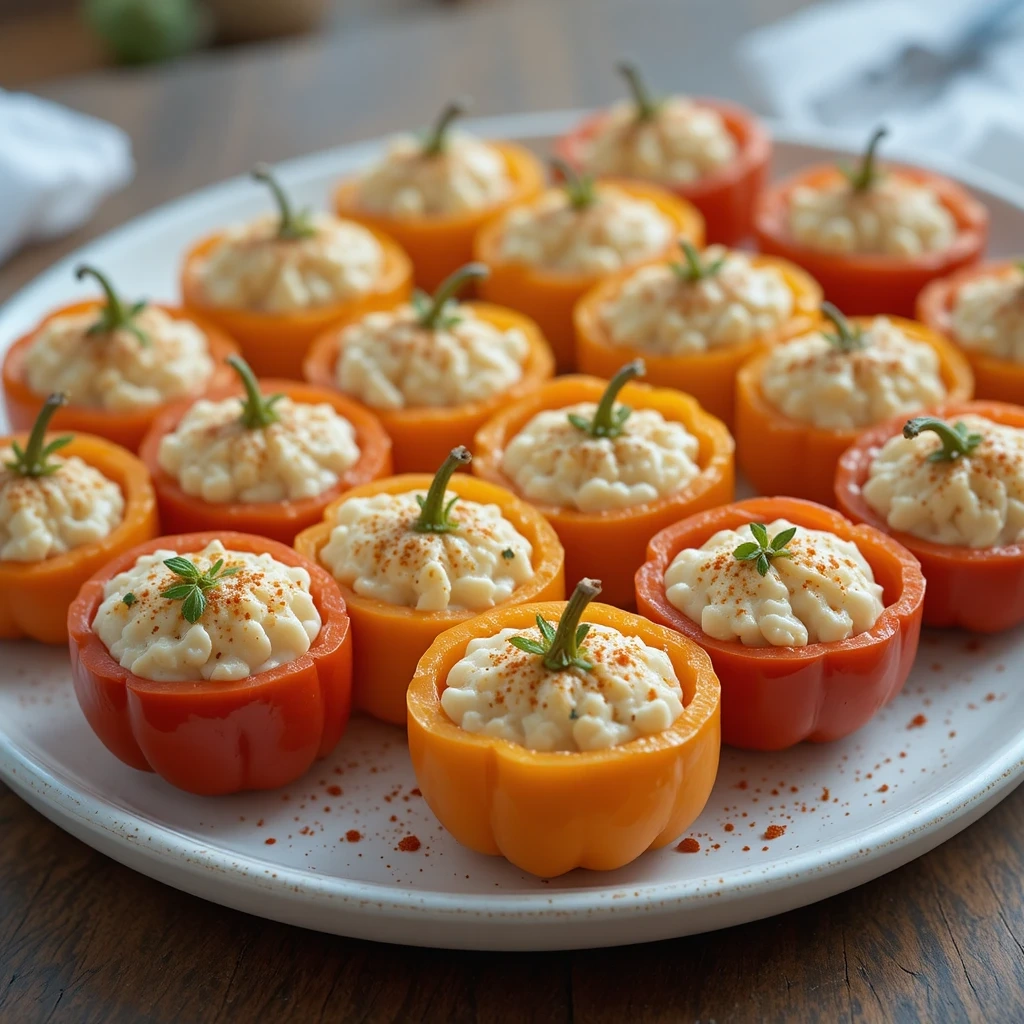
Quick Overview
These adorable little pepper boats stuffed with a creamy herb filling are the perfect finger food for any age. They’re colorful, satisfying, and can be customized endlessly. Kids love the sweet crunch of the peppers with the cool, creamy filling.
Prep Time: 20 minutes | Cook Time: 0 minutes (or 10 minutes if baking) | Total Time: 20 minutes | Servings: 24 pieces
Key Ingredients
- 12 mini sweet peppers, halved and seeded
- 8 oz (225g) cream cheese, softened
- 1/4 cup shredded cheddar cheese
- 2 tablespoons finely chopped chives or green onions
- 1 tablespoon fresh parsley
- 1/2 teaspoon garlic powder
- 1/2 teaspoon onion powder
- Salt and pepper to taste
- Paprika for garnish
Step-by-Step Instructions
- Wash peppers, slice in half lengthwise, and remove all seeds and membranes. Pat dry inside and out.
- In a mixing bowl, beat softened cream cheese until smooth. Add shredded cheddar, chives, parsley, garlic powder, onion powder, salt, and pepper. Mix until well combined.
- Taste the filling and adjust seasoning. It should be rich, herby, and slightly savory.
- Using a small spoon or piping bag, fill each pepper half generously with the cream cheese mixture.
- Arrange on a platter and dust lightly with paprika for color.
- Serve immediately, or refrigerate uncovered for up to 4 hours. For a warm version, bake at 375°F for 8–10 minutes until the cheese is bubbly.
💡 Tip: Add finely diced jalapeño to half the filling for a ‘mild vs. spicy’ platter — adults love the option!
| Estimated Nutrition Per Serving | |
| Calories | 85 kcal |
| Protein | 2.5g |
| Carbohydrates | 4g |
| Fat | 6.5g |
| Fiber | 1g |
| Sodium | 100mg |
| * Values are approximate and may vary based on ingredients used. | |
What to Serve These Spring Appetizers With
These appetizers are wonderfully versatile starters. Here are some ideas for building a complete spring menu around them:
- Fresh Lemonade or Mint Tea — Light, refreshing drinks that complement the bright flavors perfectly.
- Spring Greens Salad — A simple arugula or mixed greens salad with lemon vinaigrette pairs beautifully.
- Tomato Basil Soup — Serve in small cups alongside the bruschetta for an elegant pairing.
- Grilled Chicken Skewers — Turn your appetizer spread into a full meal with protein-packed mains.
- Sparkling Water with Fruit — Cucumber water or berry-infused sparkling water elevates the whole experience.
- Cheese & Crackers Board — Add a charcuterie-style board with seasonal jams and crackers alongside the appetizers.
Top Tips for Perfecting Your Spring Appetizers
Use the Freshest Produce You Can Find
Spring appetizers live and die by the quality of their ingredients. Visit your local farmers market if you can — peak-season vegetables and herbs taste incomparably better than anything out of season.
Prep Ahead Strategically
Most components can be prepped 1–2 days in advance. Make fillings and sauces ahead of time, but assemble right before serving for the freshest look and texture. The pea spread, cream cheese fillings, and peanut sauce all store beautifully in the fridge.
Color is Everything
Spring is all about vibrancy! Don’t shy away from mixing red, yellow, purple, and green ingredients together. The more color, the more impressive your platter looks — and the more nutrients you’re packing in.
Involve the Kids
Recipes like the caprese skewers, spring rolls, and stuffed peppers are perfect for little hands. Assign age-appropriate tasks: toddlers can thread tomatoes, older kids can spread fillings, and teens can handle the knife work with supervision.
Temperature Matters
Keep cold appetizers cold (use a tray over ice if it’s warm outside) and serve warm ones straight from the oven. Nothing disappoints more than a soggy puff pastry or a melted caprese skewer.
Taste and Season as You Go
Always taste your fillings and spreads before assembling. Adjust salt, acidity (lemon juice), or sweetness (honey) until it’s perfectly balanced. Trust your palate!
Tips for Avoiding Common Baking Mistakes
For the recipes that involve baking (asparagus puff pastry and mini quiche cups), here are some critical tips:
Don’t Skip the Egg Wash
Egg wash is what gives puff pastry its gorgeous golden shine. Brush it gently — too heavy and it can cause the pastry to steam rather than crisp.
Don’t Open the Oven Too Early
Opening the oven door in the first half of baking causes temperature drops that can make puff pastry collapse. Set a timer and resist the urge to peek until at least halfway through.
Make Sure Pastry is Cold Before Baking
Puff pastry needs cold butter pockets to create steam and flaky layers. If your pastry gets warm and soft while you’re assembling, refrigerate it for 15 minutes before baking.
Don’t Overfill the Quiche Cups
Fill quiche cups only 3/4 full. Overfilled cups bubble over and stick — making removal a frustrating mess. Leave a little room for the egg to puff up.
Let Baked Items Cool Slightly Before Removing
Both the asparagus rolls and mini quiches need 5 minutes of rest in the pan after baking. This allows the structure to set and prevents crumbling or sticking.
Storing and Reheating Tips
No-Cook Appetizers (Cucumber Bites, Caprese Skewers, Watermelon Skewers)
Store covered with plastic wrap in the refrigerator. Best consumed within 24 hours as vegetables release moisture over time. Do not freeze these.
Spreads & Dips (Pea Spread, Cream Cheese Filling, Peanut Sauce)
Store in airtight containers in the fridge for up to 3–4 days. Give them a quick stir before using. These actually develop better flavor on day 2!
Baked Items (Asparagus Rolls, Mini Quiche Cups)
Store cooled baked items in an airtight container in the fridge for up to 3 days. To reheat, place in a 350°F (175°C) oven for 8–10 minutes to restore crispness. Avoid microwaving puff pastry — it makes it soggy.
Freezing Baked Items
Mini quiche cups and asparagus rolls can be frozen for up to 1 month. Freeze on a baking sheet first until solid, then transfer to freezer bags. Reheat directly from frozen at 375°F for 15–18 minutes.
Spring Rolls
Fresh spring rolls are best eaten within a few hours of making. Store separately wrapped in damp paper towels in the fridge for up to 1 day. Do not freeze.
Frequently Asked Questions
What are the best spring appetizers to make ahead?
The deviled eggs, cream cheese fillings for cucumber bites and stuffed peppers, and the pea spread can all be made 1–2 days ahead. The mini quiche cups can also be baked a day ahead and reheated. Assemble most appetizers just before serving for best results.
Can I make these spring appetizers for a crowd?
Absolutely! All of these recipes scale up beautifully. Simply multiply the ingredient quantities by how many servings you need. The spring rolls and caprese skewers are especially easy to make in large batches. Use multiple platters for visual impact.
Are these spring appetizers good for Easter or Eid?
Yes! All 10 recipes are completely halal and free from any forbidden ingredients. They’re elegant yet family-friendly — perfect for Easter brunch, Eid gatherings, Mother’s Day parties, or any springtime celebration.
What spring vegetables work best for appetizers?
The best spring vegetables for appetizers include asparagus, peas, radishes, cucumber, spring onions, baby spinach, artichoke hearts, and snap peas. They’re at peak flavor and nutritional value during spring months.
How far in advance can I prep spring appetizers?
Most fillings and spreads can be prepped 1–2 days ahead. Hard boiled eggs for deviled eggs can be cooked up to a week ahead. However, most assembled appetizers should be made no more than 2–4 hours before serving.
How do I keep cucumber bites and spring rolls from getting soggy?
For cucumber bites, pat the cucumber slices completely dry before topping. Store assembled bites uncovered in the fridge. For spring rolls, wrap individually in a damp paper towel and store in a sealed container. Avoid making them more than a few hours in advance.
Can kids help make these spring appetizers?
These recipes are some of the most kid-friendly in existence! Children can thread caprese skewers, pipe cream cheese fillings, roll spring rolls, and dust paprika on deviled eggs. Cooking together builds confidence, fine motor skills, and an adventurous palate.
What can I substitute for cream cheese?
Great substitutes include labneh (strained yogurt), ricotta cheese, hummus, or a dairy-free cream cheese alternative. Each gives a slightly different flavor profile — ricotta is milder and lighter, labneh is tangier, and hummus adds a nutty, earthy note.
How do I stop puff pastry from burning on the bottom?
Place your baking sheet on the middle oven rack, not the bottom. You can also use a double baking sheet (stacking two together) to buffer the heat from the bottom. Parchment paper also helps prevent burning.
Are these appetizers freezer-friendly?
The mini quiche cups and asparagus puff pastry rolls freeze well for up to 1 month. Fresh appetizers like cucumber bites, caprese skewers, and spring rolls are NOT suitable for freezing as the vegetables become watery and the textures suffer significantly.
A Final Word From Our Kitchen to Yours
Spring is one of the most joyful seasons in the kitchen — bright colors, fresh flavors, and the pure happiness of cooking with people you love. Whether you’re making just one of these recipes or preparing the whole spread for a big celebration, we hope these spring appetizers bring as much joy to your table as they do to ours.
Don’t forget to tag us when you make these — we absolutely love seeing your beautiful creations! And if you’re hungry for more seasonal inspiration, check out our Spring Dinners and Easy Family Snacks collections.