
15 Minute Salmon Wrapped Sushi Recipe
Imagine biting into silky, buttery salmon that melts in your mouth, wrapped around perfectly seasoned sushi rice with a hint of wasabi heat dancing on your tongue. This salmon wrapped sushi recipe transforms your kitchen into a high-end sushi bar without the hefty price tag or years of training required.
Here’s a fun fact: salmon wasn’t traditionally used in Japanese sushi until the 1980s when Norwegian salmon was introduced to Japan! Now it’s one of the most beloved sushi ingredients worldwide. What makes this dish truly special is its incredible simplicity – you can create restaurant-quality rolls in just 15 minutes with ingredients from your local grocery store.
Table of Contents
Unlike our popular California roll recipe that requires multiple components, this salmon wrapped sushi focuses on letting the star ingredient shine. The creamy texture of fresh salmon paired with sticky sushi rice creates a harmonious bite that’s both elegant and satisfying. Whether you’re hosting a dinner party or treating yourself to a luxurious lunch, this recipe delivers impressive results every single time.
What is Salmon Wrapped Sushi?
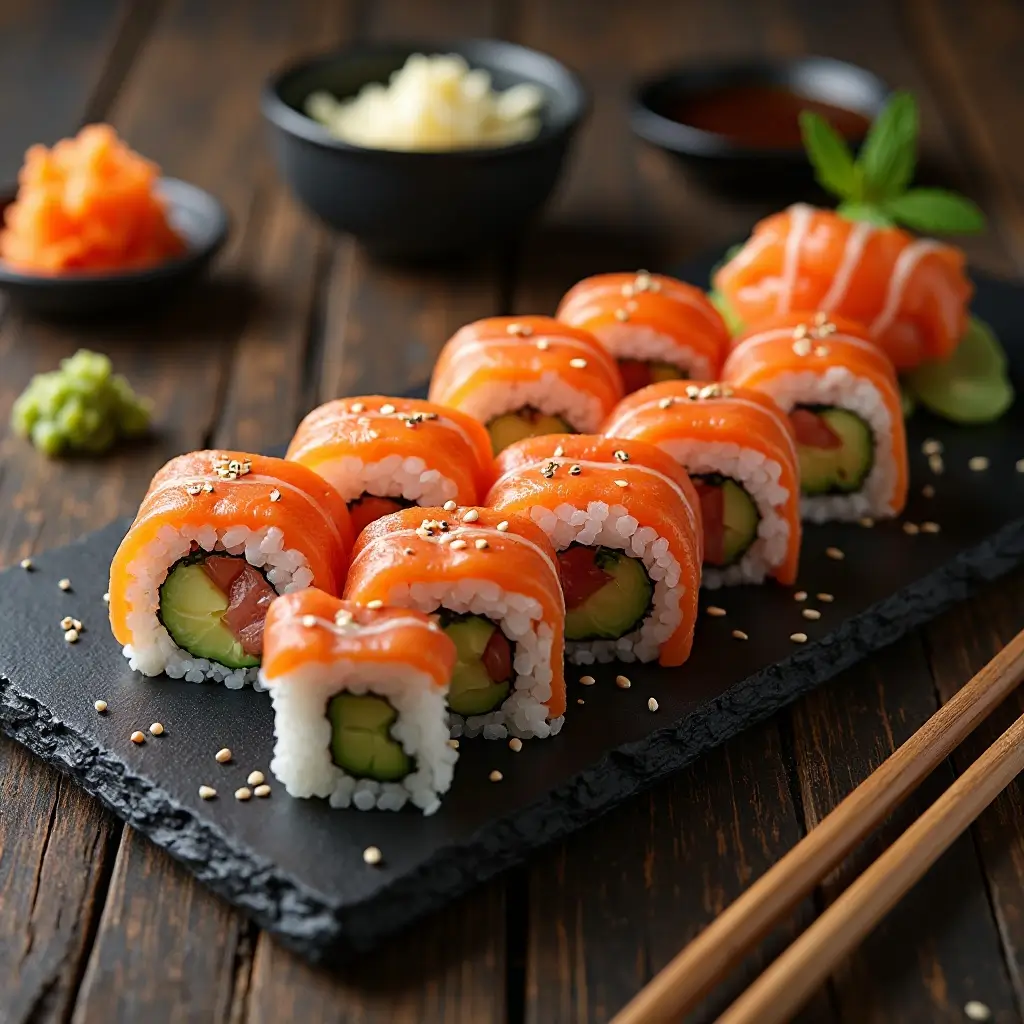
Ever wondered why we call it “salmon wrapped sushi” when technically the salmon is doing the wrapping? It’s like calling a burrito a “tortilla wrapped filling” – technically correct but charmingly backwards! This delightful inside-out approach to sushi puts the gorgeous orange salmon on the outside, creating Instagram-worthy rolls that taste even better than they look.
The Japanese would call this “sake maki” but we prefer our playful name because it perfectly describes what you see. As they say, the way to a person’s heart is through their stomach, and these beautiful rolls are guaranteed to steal hearts at first bite. Ready to become your kitchen’s sushi master?
Why You’ll Love This Salmon Wrapped Sushi
Fresh, Restaurant-Quality Flavor at Home
The star of this dish is undoubtedly the buttery, melt-in-your-mouth salmon that wraps around each roll like a silky ribbon. When you bite into these rolls, you’ll experience layers of flavor – the clean taste of fresh fish, the subtle sweetness of sushi rice, and a gentle kick from wasabi that awakens your palate.
Budget-Friendly Luxury
Making salmon wrapped sushi at home costs a fraction of what you’d pay at a sushi restaurant. A single order of similar rolls can cost $15-20 at restaurants, but this recipe serves four people for under $12. You’ll get more rolls, better quality control, and the satisfaction of creating something beautiful with your own hands.
Simple Ingredients, Spectacular Results
Unlike our elaborate dragon roll recipe that requires multiple sauces and garnishes, this salmon wrapped sushi celebrates simplicity. The magic happens when high-quality salmon meets perfectly seasoned rice with just a touch of wasabi and cucumber for crunch. Each ingredient plays its part without overwhelming the delicate balance.
Ready to impress your family and friends with homemade sushi that rivals your favorite Japanese restaurant? Let’s roll into this delicious adventure!
How to Make Salmon Wrapped Sushi
Quick Overview
This salmon wrapped sushi recipe delivers restaurant-quality results in just 15 minutes of active preparation time. The secret lies in using sashimi-grade salmon and properly seasoned sushi rice that sticks together perfectly. What makes this recipe incredibly satisfying is the contrast between the silky salmon exterior and the firm, slightly sweet rice interior.
Preparation Details:
- Prep Time: 15 minutes
- Cook Time: 0 minutes (if rice is pre-made)
- Total Time: 15 minutes
- Serves: 4 people (24 pieces)
- Difficulty Level: Beginner-friendly
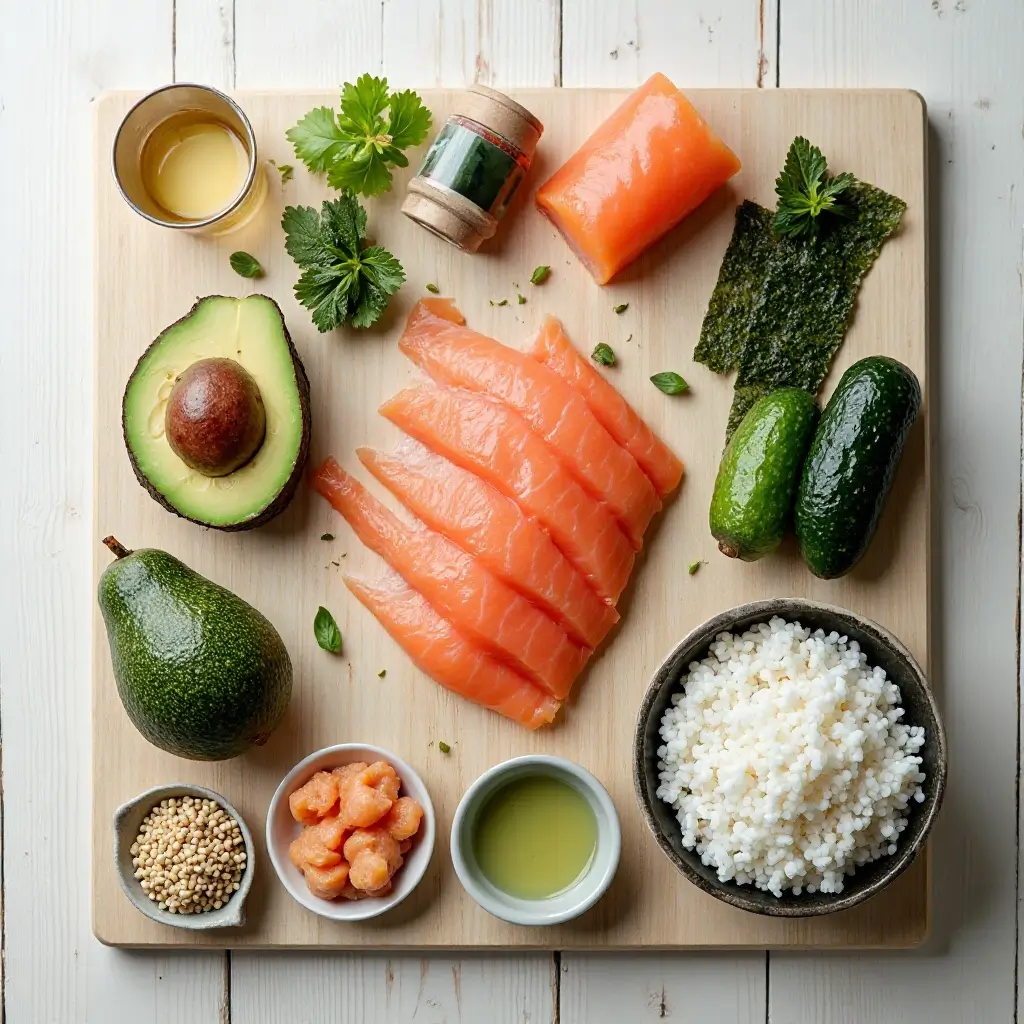
Key Ingredients for Salmon Wrapped Sushi
For the Rolls:
- 1 lb sashimi-grade salmon fillet, skin removed
- 2 cups cooked sushi rice, cooled to room temperature
- 2 tablespoons rice vinegar
- 1 tablespoon sugar
- 1 teaspoon salt
- 1/2 cucumber, julienned
- 2 tablespoons wasabi paste
- 1 avocado, sliced thin
- 4 sheets nori (seaweed), cut in half
For Serving:
- Soy sauce
- Pickled ginger
- Additional wasabi
- Sesame seeds for garnish
Step-by-Step Instructions
Step 1: Prepare the Sushi Rice Mix rice vinegar, sugar, and salt in a small bowl until dissolved. Gently fold this mixture into your cooled sushi rice using a wooden spoon. The rice should be sticky but not mushy, with individual grains visible.
Step 2: Prepare the Salmon Using a sharp knife, slice the salmon fillet into thin, even pieces about 1/8 inch thick. Each slice should be large enough to wrap around your sushi roll. Pat the salmon dry with paper towels and keep chilled until ready to use.
Step 3: Set Up Your Rolling Station Cover your bamboo sushi mat with plastic wrap to prevent sticking. Have all ingredients within easy reach – rice, salmon slices, cucumber, avocado, and wasabi paste.
Step 4: Form the Rice Base With wet hands, take about 1/4 cup of seasoned rice and form it into a small log shape, roughly 3 inches long and 1 inch thick. The rice should hold together but not be packed too tightly.
Step 5: Add the Filling Create a small indentation in the rice log and add a thin line of wasabi paste, 2-3 cucumber sticks, and 1-2 thin avocado slices. Gently press the fillings into the rice.
Step 6: Wrap with Salmon Lay a slice of salmon over the rice log, wrapping it around completely. The salmon should overlap slightly on the bottom. Gently press to help it adhere to the rice.
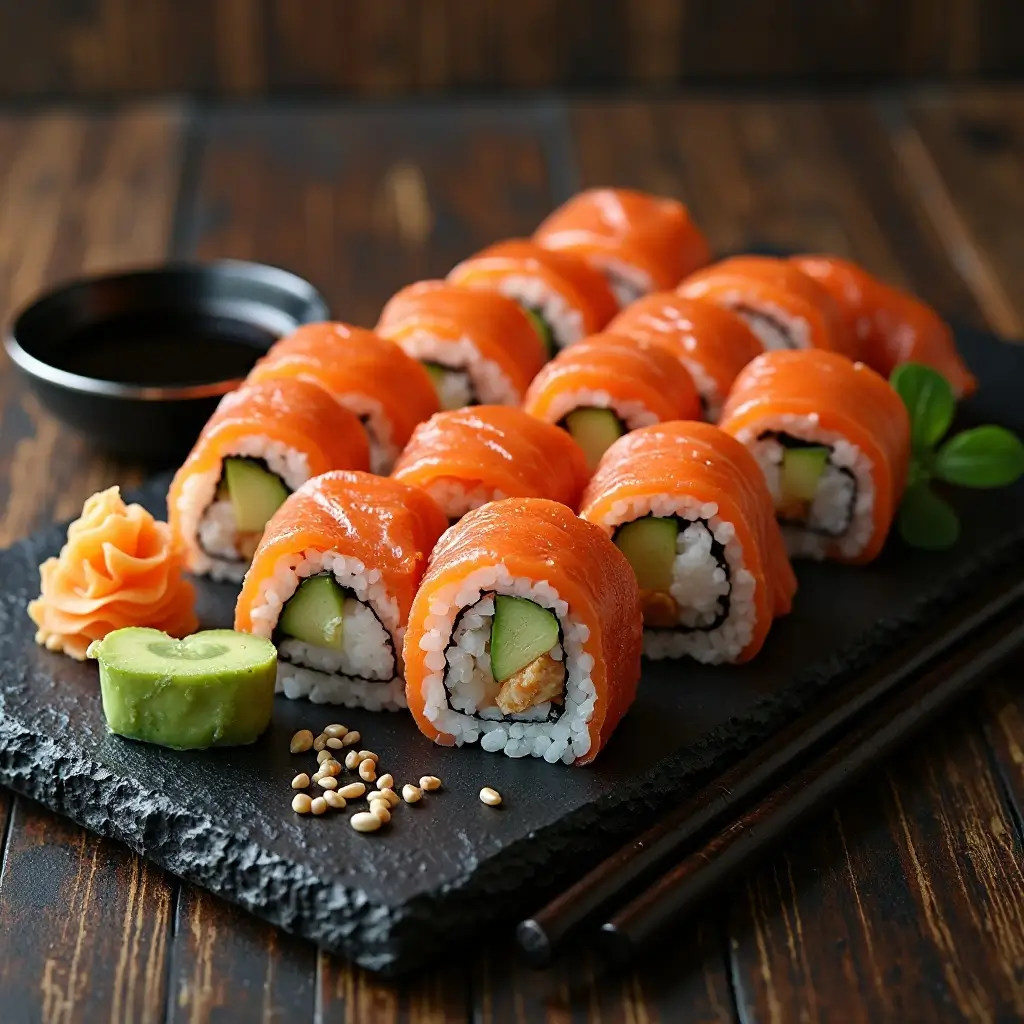
Step 7: Final Assembly Place the wrapped roll seam-side down and gently press to ensure the salmon stays in place. Repeat with remaining ingredients to make 8 rolls total.
Step 8: Slice and Serve Using a sharp, wet knife, slice each roll into 3 pieces, cleaning the blade between cuts. Arrange on a platter and garnish with sesame seeds.
What to Serve Salmon Wrapped Sushi With
These elegant rolls pair beautifully with traditional Japanese accompaniments. Serve alongside miso soup for a warming contrast to the cool sushi, and add a crisp cucumber salad dressed with rice vinegar for textural variety. Green tea or sake complement the delicate fish flavors perfectly.
For a more substantial meal, consider adding gyoza (pan-fried dumplings) or a simple seaweed salad. The umami-rich flavors enhance the salmon without competing with its starring role. Fresh edamame sprinkled with sea salt makes an excellent appetizer that prepares the palate for the main attraction.
Top Tips for Perfecting Salmon Wrapped Sushi
Choose the Right Salmon
Always buy sashimi-grade salmon from a reputable fishmonger. The salmon should smell like the ocean, not “fishy,” and have a bright orange-pink color with firm texture. If you’re unsure about quality, ask your fishmonger when the salmon arrived – fresher is always better.
Master the Rice Texture
Sushi rice should be sticky enough to hold together but not mushy. If your rice is too dry, sprinkle with a little water and mix gently. Too wet? Let it sit uncovered for 10 minutes to allow excess moisture to evaporate.
Keep Your Knife Sharp and Clean
A dull knife will tear the delicate salmon and squish your rolls. Clean your knife with a damp towel between cuts and keep it slightly wet to prevent sticking. Make confident, swift cuts rather than sawing motions.
Temperature Matters
Serve the sushi immediately after assembly while the rice is at room temperature and the salmon is cool. This temperature contrast enhances the dining experience and prevents the salmon from becoming warm and losing its silky texture.
Storing and Reheating Tips
Fresh sushi is best enjoyed immediately, but you can store salmon wrapped sushi in the refrigerator for up to 24 hours. Wrap individual pieces in plastic wrap to prevent the rice from drying out and the salmon from absorbing other flavors.
Place wrapped sushi in an airtight container and refrigerate at 40°F or below. Never leave sushi at room temperature for more than 2 hours due to food safety concerns with raw fish.
Unfortunately, salmon wrapped sushi doesn’t freeze well – the texture of both the salmon and rice becomes unpleasant after thawing. For best results, only make what you plan to eat within a day. When ready to serve refrigerated sushi, let it sit at room temperature for 10 minutes to take the chill off before enjoying.
Frequently Asked Questions
Can I use cooked salmon instead of raw?
Yes! Lightly seared or smoked salmon works beautifully in this recipe. Just ensure the salmon is cooled completely before wrapping around the rice.
What if I can’t find sashimi-grade salmon?
Look for salmon labeled as “sushi-grade” or “sashimi-grade” at your grocery store’s fish counter. Whole Foods, Wegmans, and many Asian markets carry high-quality options.
How do I know if my salmon is fresh enough for sushi?
Fresh sashimi-grade salmon should have a bright color, firm texture, and smell like clean ocean water. Avoid salmon that looks dull, feels slimy, or has any strong odors.
Can I make this recipe ahead of time?
While best served fresh, you can prepare components separately up to 4 hours ahead. Assemble the rolls just before serving for optimal texture and food safety.
What’s the difference between sushi rice and regular rice?
Sushi rice is short-grain rice that becomes sticky when cooked and seasoned with rice vinegar, sugar, and salt. Regular long-grain rice won’t hold together properly for sushi making.
Is it safe to eat raw salmon?
When purchasing sashimi-grade salmon from reputable sources and following proper food safety guidelines, raw salmon is safe to consume. Always buy from trusted fishmongers and use within 24 hours.
Nutritional Information
| Nutrient | Per 3-piece serving |
|---|---|
| Calories | 285 |
| Protein | 22g |
| Carbs | 28g |
| Fat | 9g |
| Omega-3 | 1.8g |
| Sodium | 380mg |
| Fiber | 2g |
Pro Chef Secrets for Perfect Results
The key to restaurant-quality salmon wrapped sushi lies in the details professional chefs never share. First, lightly salt your salmon slices 10 minutes before assembly – this draws out excess moisture and intensifies the flavor. Second, use a rice cooker specifically designed for sushi rice if you make this recipe regularly.
Many home cooks overlook the importance of hand temperature when working with sushi rice. Keep a bowl of warm water nearby and dip your hands frequently – this prevents sticking and helps you work more efficiently. Professional sushi chefs also recommend making a small test roll first to perfect your technique before using all your ingredients.
Finally, invest in a proper yanagiba knife (sushi knife) if you plan to make sushi regularly. The single-bevel edge creates cleaner cuts that don’t compress the delicate ingredients, resulting in more beautiful presentations that rival high-end sushi bars.
Ready to create restaurant-quality salmon wrapped sushi in your own kitchen? This recipe proves that impressive doesn’t have to mean complicated. Save this recipe and surprise your family with a homemade sushi night they’ll never forget!