
15 Picnic Food Ideas – Full Recipes
Picture this: sunshine warming your face, a soft breeze rustling through the trees, and a basket overflowing with delicious homemade treats. There’s something magical about enjoying food outdoors that makes everything taste better!
Did you know that the word “picnic” comes from the French word “pique-nique,” dating back to the 17th century? These 15 picnic food ideas are not just easy to prepare—they’re designed to travel well, stay fresh, and delight everyone from toddlers to grandparents.
Whether you’re heading to the park, beach, or your own backyard, these recipes will transform your outdoor meal into a memorable celebration. Let’s dive into these crowd-pleasing dishes that pack perfectly and taste absolutely wonderful
This recipe was created by AI and has not been personally tested by us. Our site is built for our readers, and feedback from those who tried other recipes here has been positive.
Recipe 1: Classic Chicken Salad Sandwiches
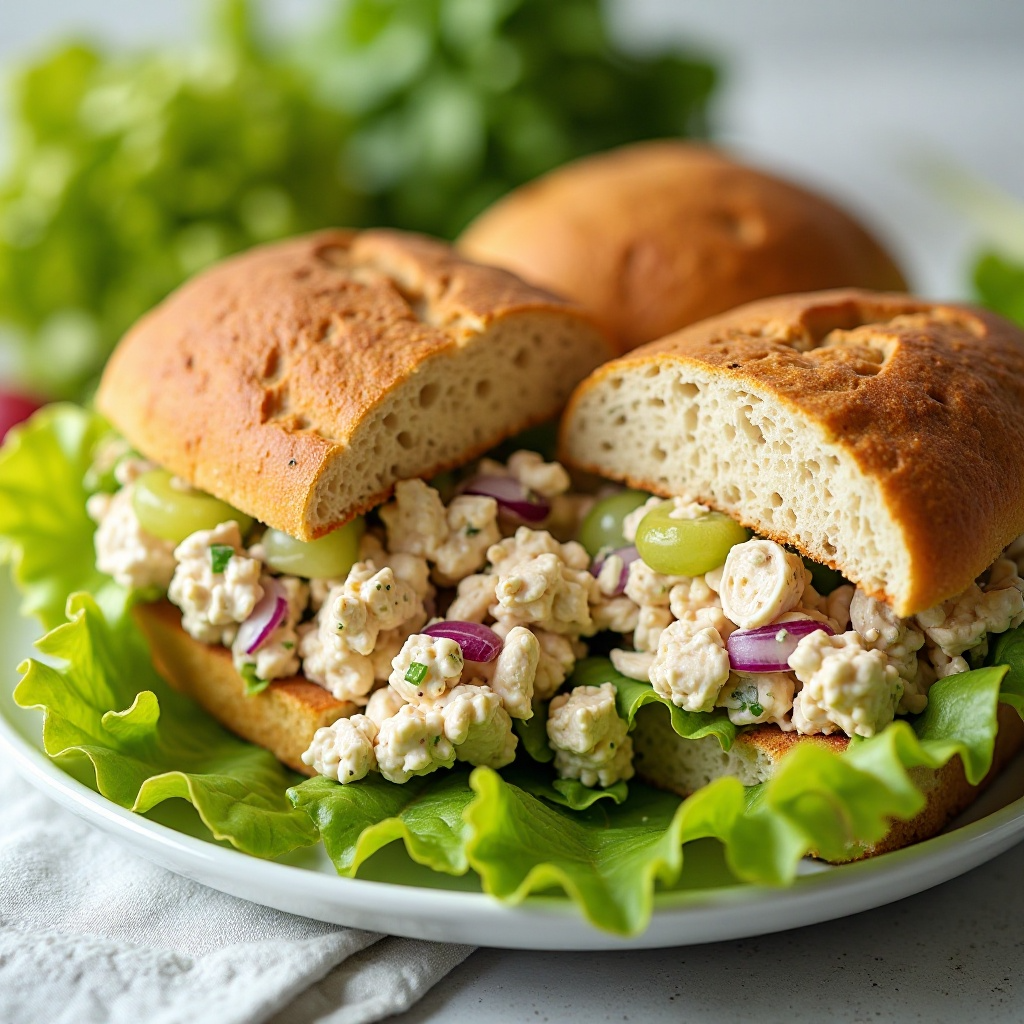
What Are Classic Chicken Salad Sandwiches?
Ever wonder why chicken salad sandwiches are the star of every picnic basket? Maybe it’s because they’re creamy, satisfying, and downright irresistible! This beloved combination has been winning hearts for generations. As the saying goes, “the way to a man’s heart is through his stomach,” and these sandwiches prove it true for the whole family. Ready to create sandwich perfection?
Why You’ll Love These Chicken Salad Sandwiches
These sandwiches deliver that perfect balance of creamy, crunchy, and savory that keeps everyone coming back for seconds. Making chicken salad at home costs a fraction of what you’d pay at a deli, and you control every ingredient. The combination of tender chicken, crisp celery, sweet grapes, and tangy dressing creates an explosion of textures and flavors. If you loved our pulled chicken sliders, you’ll adore this lighter, refreshing take. Get ready to become the picnic hero!
How to Make Classic Chicken Salad Sandwiches
Quick Overview
This recipe comes together in just 15 minutes once your chicken is cooked. It’s wonderfully simple, incredibly delicious, and features a creamy dressing that perfectly coats every bite. The addition of grapes adds a surprising pop of sweetness that elevates this classic to new heights.
Prep Time: 15 minutes Cook Time: 0 minutes (using pre-cooked chicken) Total Time: 15 minutes Servings: 6 sandwiches
Key Ingredients for Chicken Salad Sandwiches
- 3 cups cooked chicken breast, diced
- 1/2 cup mayonnaise
- 2 tablespoons Greek yogurt
- 1 cup celery, finely chopped
- 1/2 cup red grapes, halved
- 1/4 cup red onion, finely diced
- 2 tablespoons fresh lemon juice
- 1 teaspoon Dijon mustard
- Salt and black pepper to taste
- 12 slices whole wheat bread
- Lettuce leaves for serving
Step-by-Step Instructions
Step 1: Prepare the Dressing In a large mixing bowl, combine the mayonnaise, Greek yogurt, lemon juice, and Dijon mustard. Whisk these ingredients together until smooth and creamy. The Greek yogurt adds tanginess while keeping the mixture light.
Step 2: Add the Chicken Add your diced cooked chicken to the bowl. Make sure the pieces are bite-sized for easy eating. Gently fold the chicken into the dressing mixture until evenly coated.
Step 3: Mix in Vegetables and Fruit Add the chopped celery, halved grapes, and diced red onion. These ingredients add crunch and sweetness. Fold everything together gently, being careful not to mash the grapes.
Step 4: Season and Chill Season your chicken salad with salt and black pepper to taste. Cover the bowl and refrigerate for at least 30 minutes. This allows the flavors to meld beautifully.
Step 5: Assemble Sandwiches When ready to pack your picnic, place lettuce leaves on bread slices. Add a generous scoop of chicken salad and top with another slice of bread. Cut diagonally for that classic look.
What to Serve Chicken Salad Sandwiches With
These sandwiches pair beautifully with crunchy potato chips, fresh fruit cups, or veggie sticks with ranch dip. A refreshing lemonade or iced tea complements the creamy filling perfectly. Consider adding pickle spears on the side for an extra tangy crunch.
Top Tips for Perfecting Chicken Salad Sandwiches
Use rotisserie chicken to save time—it’s already seasoned and juicy. For a lighter version, replace half the mayonnaise with additional Greek yogurt. Toast your bread lightly before assembling if you prefer extra crunch. Don’t add too much dressing; you want coating, not drowning. Always chill your chicken salad before serving—it tastes best cold.
Storing and Reheating Tips
Store the chicken salad separately from bread in an airtight container in the refrigerator for up to 3 days. Don’t assemble sandwiches until just before serving to prevent soggy bread. The chicken salad itself freezes poorly due to the mayonnaise and fresh vegetables, so enjoy it fresh!
Recipe 2: Mini Caprese Skewers
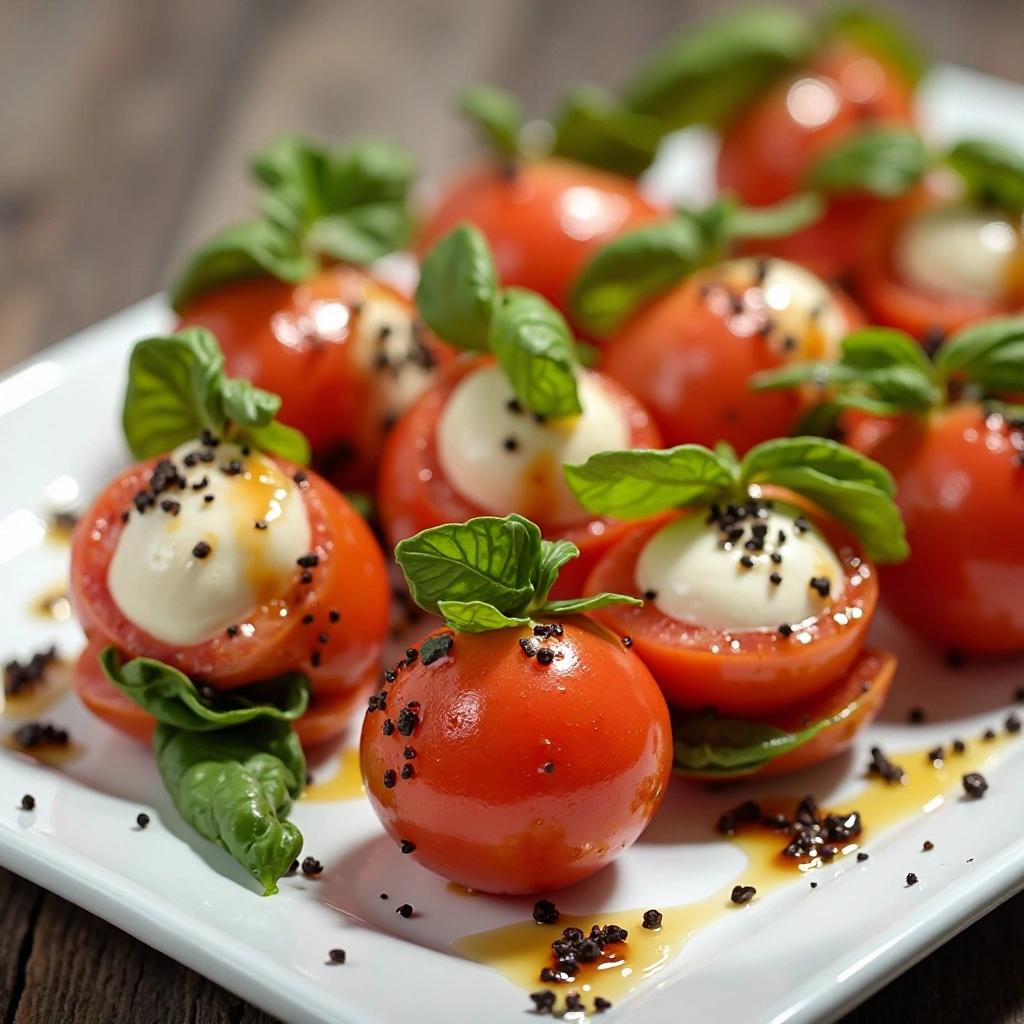
What Are Mini Caprese Skewers?
These bite-sized beauties are like tiny flavor bombs on a stick! Why settle for ordinary when you can have extraordinary? Caprese skewers bring Italian elegance to your picnic with minimal effort. They’re fresh, colorful, and utterly delightful. Trust us, these little skewers will disappear faster than you can say “delizioso!”
Why You’ll Love These Mini Caprese Skewers
These skewers are visual stunners that taste as good as they look. The combination of juicy tomatoes, creamy mozzarella, and fragrant basil drizzled with balsamic creates pure magic. Making them at home costs pennies compared to buying pre-made appetizers. Each skewer delivers that perfect balance of fresh, creamy, and tangy. If you enjoyed our Greek salad cups, you’ll love this Italian twist. Let’s create something Instagram-worthy and delicious!
How to Make Mini Caprese Skewers
Quick Overview
Assembly takes just 10 minutes for a whole platter. These no-cook skewers are perfect for hot days when you don’t want to turn on the oven. The fresh ingredients shine through, creating a light and refreshing appetizer that appeals to all ages.
Prep Time: 10 minutes Cook Time: 0 minutes Total Time: 10 minutes Servings: 24 skewers
Key Ingredients for Mini Caprese Skewers
- 24 cherry tomatoes
- 24 small fresh mozzarella balls (ciliegine)
- 24 fresh basil leaves
- 1/4 cup balsamic glaze
- 2 tablespoons extra virgin olive oil
- 1/4 teaspoon sea salt
- Freshly ground black pepper
- 24 small wooden skewers or toothpicks
Step-by-Step Instructions
Step 1: Prepare Ingredients Rinse cherry tomatoes and pat them completely dry with paper towels. Remove fresh mozzarella balls from their brine and drain well. Wash basil leaves gently and pat dry.
Step 2: Assemble the Skewers Thread one cherry tomato onto a skewer, followed by a folded basil leaf, then a mozzarella ball. The folding technique keeps the basil secure and looks beautiful.
Step 3: Arrange on Platter Place assembled skewers on a serving platter in neat rows. This makes them easy to grab and looks professionally presented.
Step 4: Season and Drizzle Drizzle the olive oil over all the skewers first, then add the balsamic glaze in a decorative pattern. Sprinkle with sea salt and freshly ground black pepper.
Step 5: Chill Until Serving Cover the platter with plastic wrap and refrigerate for 30 minutes to 2 hours. This allows the flavors to meld while keeping everything fresh and cool.
What to Serve Mini Caprese Skewers With
These skewers pair wonderfully with crusty Italian bread, prosciutto-wrapped melon, or a charcuterie board. Serve alongside sparkling water with lemon or a fruity iced tea. They also complement pasta salads beautifully.
Top Tips for Perfecting Mini Caprese Skewers
Choose tomatoes and mozzarella balls that are similar in size for uniform presentation. Use high-quality balsamic glaze—it makes a noticeable difference. If fresh basil isn’t available, small mint leaves work surprisingly well. Thread ingredients tightly to prevent sliding. Make these no more than 4 hours ahead to maintain freshness.
Storing and Reheating Tips
Store assembled skewers in a single layer in an airtight container, refrigerated, for up to 24 hours. Don’t add the balsamic glaze and oil until just before serving to prevent sogginess. These don’t freeze well due to the fresh ingredients. Best enjoyed at cool room temperature.
Recipe 3: Pasta Salad with Fresh Vegetables
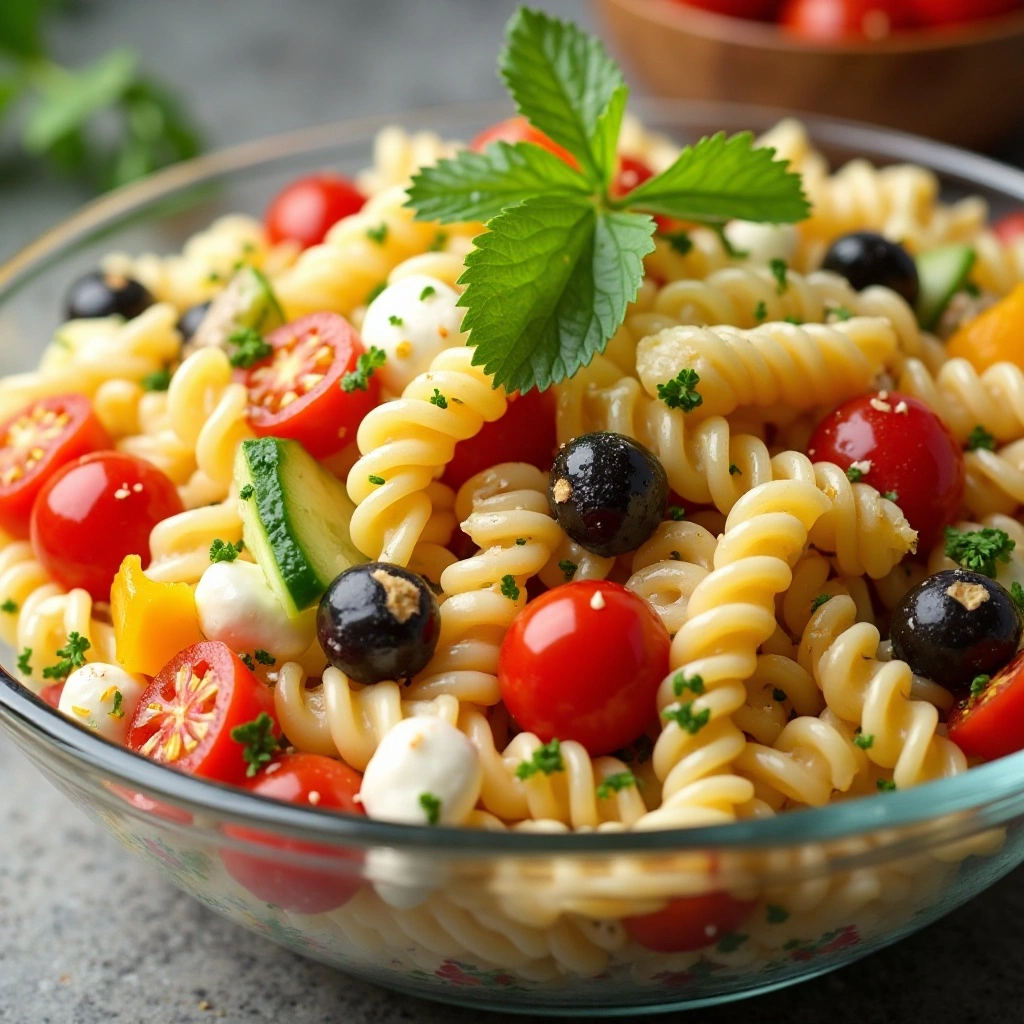
What Is Pasta Salad with Fresh Vegetables?
Remember those potluck dinners where everyone fights over the pasta salad bowl? That’s the power of a great pasta salad! This colorful dish combines tender pasta with crisp vegetables and a tangy dressing. It’s comfort food meets healthy eating. As they say, “the way to anyone’s heart is through their stomach,” and this recipe proves it! Ready to create picnic perfection?
Why You’ll Love This Pasta Salad
This pasta salad delivers big flavor with every forkful. The rainbow of vegetables adds crunch, color, and nutrition that kids actually enjoy eating. Making it at home costs far less than store-bought versions and tastes infinitely better. The Italian dressing seeps into the pasta, creating flavor in every bite. If you loved our Mediterranean quinoa salad, this pasta version offers familiar flavors in a more kid-friendly format. Time to get mixing!
How to Make Pasta Salad with Fresh Vegetables
Quick Overview
This recipe takes about 30 minutes total and requires just boiling pasta and chopping vegetables. The creamy-tangy dressing brings everything together beautifully. It’s filling enough to be a main dish yet light enough for warm weather.
Prep Time: 15 minutes Cook Time: 12 minutes Total Time: 27 minutes Servings: 8-10 servings
Key Ingredients for Pasta Salad
- 1 pound rotini or fusilli pasta
- 1 cup cherry tomatoes, halved
- 1 cucumber, diced
- 1 bell pepper (red or yellow), diced
- 1/2 red onion, finely diced
- 1 cup black olives, sliced (optional)
- 1 cup mozzarella pearls or cubed cheese
- 1/2 cup Italian dressing
- 1/4 cup mayonnaise
- 2 tablespoons fresh parsley, chopped
- 1 teaspoon Italian seasoning
- Salt and pepper to taste
Step-by-Step Instructions
Step 1: Cook the Pasta Bring a large pot of salted water to a rolling boil. Add pasta and cook according to package directions until al dente. Drain and rinse under cold water to stop cooking and cool the pasta quickly.
Step 2: Prepare Vegetables While pasta cooks, dice all your vegetables into bite-sized pieces. Keep sizes consistent for even distribution and better presentation. Pat the cucumber dry if it seems watery.
Step 3: Make the Dressing In a small bowl, whisk together Italian dressing, mayonnaise, Italian seasoning, salt, and pepper. The combination creates a creamy yet zesty coating that clings perfectly to pasta.
Step 4: Combine Everything In a large mixing bowl, add cooled pasta, all prepared vegetables, and mozzarella. Pour the dressing over everything and toss gently but thoroughly until well combined.
Step 5: Chill and Season Cover the bowl and refrigerate for at least 1 hour or up to overnight. This chilling time is crucial—it allows flavors to develop. Before serving, taste and adjust seasoning if needed. Sprinkle with fresh parsley.
What to Serve Pasta Salad With
This pasta salad pairs perfectly with grilled chicken, BBQ ribs, or simple sandwiches. It’s substantial enough to be the main attraction or can play a supporting role. Serve with garlic bread and fresh watermelon for a complete picnic spread.
Top Tips for Perfecting Pasta Salad
Don’t overcook your pasta—al dente is essential for good texture. Add dressing while pasta is slightly warm for better absorption. Reserve some dressing to add before serving, as pasta absorbs liquid while sitting. Use a pasta shape with ridges or curves to hold the dressing better. Add delicate ingredients like cheese right before serving to prevent mushiness.
Storing and Reheating Tips
Store pasta salad in an airtight container in the refrigerator for up to 4 days. The flavor actually improves after a day as ingredients marinate. Stir well before serving and add a splash more dressing if it seems dry. This dish doesn’t freeze well. Serve chilled or at cool room temperature—never hot.
Recipe 4: Peanut Butter and Jelly Roll-Ups

What Are Peanut Butter and Jelly Roll-Ups?
Who says PB&J has to be boring? These fun spiral treats take the classic sandwich to exciting new heights! Kids absolutely flip for these rolled wonders. They’re easier to eat, more fun to look at, and taste just as delicious. After all, “the way to a child’s heart is through their stomach”—especially when it involves peanut butter! Let’s roll!
Why You’ll Love These PB&J Roll-Ups
These roll-ups transform a simple sandwich into something special without extra effort. Kids love the pinwheel appearance and how easy they are to grab and munch. Making them costs next to nothing, and they’re less messy than traditional sandwiches. The tortilla provides a softer texture that many picky eaters prefer. If you enjoyed our banana sushi bites, these offer similar fun with classic flavors. Perfect for little hands!
How to Make Peanut Butter and Jelly Roll-Ups
Quick Overview
These take just 5 minutes to make and require zero cooking. They’re soft, sweet, and incredibly portable. The tortilla creates a mess-free wrapper that keeps everything contained.
Prep Time: 5 minutes Cook Time: 0 minutes Total Time: 5 minutes Servings: 4 roll-ups
Key Ingredients for PB&J Roll-Ups
- 4 large flour tortillas (soft taco size)
- 1/2 cup creamy peanut butter (or sunflower seed butter for allergies)
- 1/2 cup grape or strawberry jelly
- 2 tablespoons honey (optional, for extra sweetness)
- 1/4 teaspoon cinnamon (optional)
Step-by-Step Instructions
Step 1: Prepare Tortillas Lay tortillas flat on a clean work surface. Make sure they’re at room temperature—cold tortillas crack when rolled.
Step 2: Spread Peanut Butter Spread peanut butter evenly across each tortilla, leaving a half-inch border around the edges. Use the back of a spoon for smooth, even coverage.
Step 3: Add Jelly Spread jelly over the peanut butter layer. Don’t use too much or it will squeeze out when rolling. A thin, even layer works best.
Step 4: Roll Tightly Starting from one end, roll the tortilla tightly like a sleeping bag. Press gently as you roll to ensure it stays together. The peanut butter acts as glue.
Step 5: Slice and Pack Using a sharp knife, slice each roll into 1-inch pinwheels. Arrange cut-side up in your container so the pretty spiral shows. Secure with toothpicks if needed.
What to Serve PB&J Roll-Ups With
These pair perfectly with apple slices, carrot sticks, or cheese cubes. Add some pretzels or crackers for extra crunch. A juice box or milk completes this kid-friendly meal. Fresh grapes make an excellent side too.
Top Tips for Perfecting PB&J Roll-Ups
Use fresh, soft tortillas—stale ones will crack. Warm tortillas slightly in the microwave for 10 seconds if they seem stiff. Don’t overfill or they’ll be impossible to roll. Cut with a serrated knife using a gentle sawing motion. For nut-free versions, use sunflower seed butter or cream cheese with jelly.
Storing and Reheating Tips
Store roll-ups in an airtight container with parchment paper between layers, refrigerated, for up to 24 hours. Don’t slice them until right before serving to prevent drying out. These don’t freeze well as the jelly makes everything soggy when thawed. Best enjoyed at room temperature or slightly chilled.
Recipe 5: Deviled Eggs with a Twist
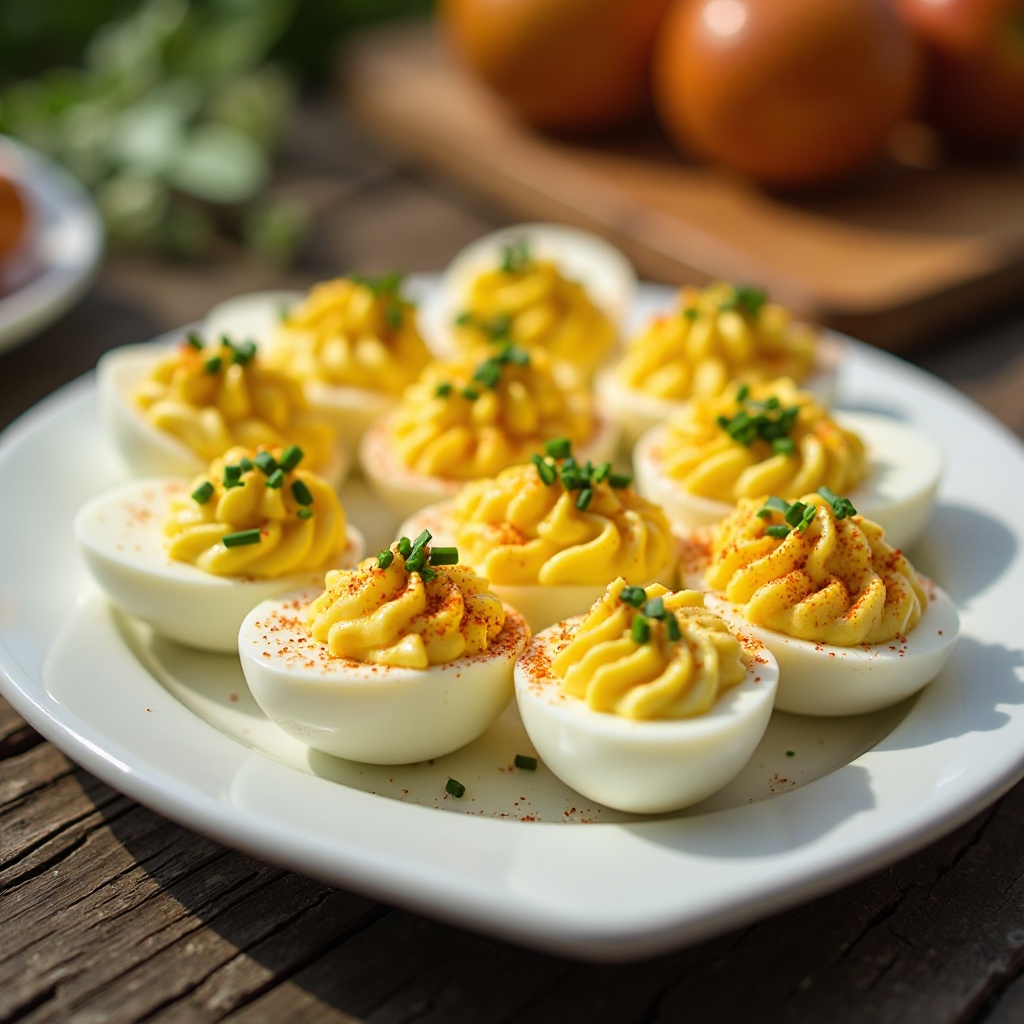
What Are Deviled Eggs?
Could there be a more perfect picnic food than deviled eggs? These creamy, tangy little bites have been gracing picnic baskets since the 1800s! The name doesn’t refer to anything spicy—it comes from the culinary term “deviling,” meaning heavily seasoned. They’re elegant yet simple, fancy yet family-friendly. As the saying goes, “the way to everyone’s heart is through their stomach,” and deviled eggs work every time! Ready to devil some eggs?
Why You’ll Love These Deviled Eggs
These deviled eggs deliver that perfect balance of creamy filling and tender egg white. The addition of a special ingredient elevates them beyond ordinary. Making them at home costs a fraction of store-bought versions and tastes fresher. Each bite provides protein and flavor that satisfies everyone. If you loved our egg salad sandwiches, you’ll adore this portable version. Let’s get cracking!
How to Make Deviled Eggs with a Twist
Quick Overview
This recipe takes about 25 minutes total and produces perfectly creamy, flavorful eggs. The twist ingredient adds an unexpected depth that people always ask about. They’re substantial enough to be filling yet light enough for warm weather.
Prep Time: 15 minutes Cook Time: 10 minutes Total Time: 25 minutes Servings: 24 deviled egg halves
Key Ingredients for Deviled Eggs
- 12 large eggs
- 1/2 cup mayonnaise
- 2 tablespoons Greek yogurt
- 2 teaspoons Dijon mustard
- 1 teaspoon white vinegar
- 1/4 teaspoon garlic powder
- Salt and black pepper to taste
- 2 tablespoons sweet pickle relish (the twist!)
- Paprika for garnish
- Fresh chives or parsley for garnish
Step-by-Step Instructions
Step 1: Boil the Eggs Place eggs in a single layer in a large pot. Cover with cold water by 1 inch. Bring to a rolling boil over high heat. Once boiling, remove from heat, cover, and let sit for 10 minutes exactly.
Step 2: Cool and Peel Transfer eggs to an ice bath immediately to stop cooking. Let sit for 5 minutes. This makes peeling much easier and prevents that gray ring around the yolk.
Step 3: Prepare Eggs Peel eggs carefully under cool running water. Slice each egg in half lengthwise. Gently remove yolks and place in a medium bowl. Arrange whites on your serving platter.
Step 4: Make the Filling Mash egg yolks with a fork until completely crumbly. Add mayonnaise, Greek yogurt, mustard, vinegar, garlic powder, pickle relish, salt, and pepper. Mix until completely smooth and creamy.
Step 5: Fill and Garnish Spoon or pipe the yolk mixture back into the egg white halves. A piping bag with a star tip creates beautiful presentation. Sprinkle with paprika and garnish with chopped chives.
What to Serve Deviled Eggs With
These eggs pair beautifully with crackers, fresh vegetable crudités, or a simple green salad. They complement sandwiches perfectly and add protein to lighter fare. Serve alongside cheese and fruit for a complete picnic spread.
Top Tips for Perfecting Deviled Eggs
Use eggs that are at least a week old—they peel much easier than fresh eggs. Don’t skip the ice bath; it’s crucial for easy peeling. For ultra-smooth filling, use a food processor instead of mashing. Make filling a day ahead for even better flavor development. Transport them in an egg carrier or muffin tin to prevent sliding.
Storing and Reheating Tips
Store deviled eggs in an airtight container in the refrigerator for up to 2 days. Keep them covered to prevent absorbing refrigerator odors. Don’t freeze deviled eggs—the texture becomes rubbery. If transporting, keep them cold with ice packs and consume within 2 hours at room temperature.
Recipe 6: Fresh Fruit Kabobs with Honey Yogurt Dip

What Are Fresh Fruit Kabobs?
Ever wonder how to make kids excited about eating fruit? Put it on a stick! These colorful kabobs turn healthy snacking into a fun activity. They’re nature’s candy arranged in the most appealing way possible. The rainbow of colors makes everyone smile. Remember, “the way to a child’s heart is through their stomach,” and fun presentation matters! Let’s skewer some sweetness!
Why You’ll Love These Fruit Kabobs
These kabobs make fruit exciting and accessible for even the pickiest eaters. The variety of colors, textures, and flavors keeps every bite interesting. Making them at home costs significantly less than buying pre-made fruit trays. The honey yogurt dip adds creamy sweetness that complements the fresh fruit perfectly. If you enjoyed our fruit and cheese platter, these offer similar appeal with added fun. Get ready for rainbow deliciousness!
How to Make Fresh Fruit Kabobs
Quick Overview
Assembly takes just 15 minutes and requires zero cooking. The variety of fruits provides vitamins, fiber, and natural sweetness. They’re refreshing, hydrating, and absolutely perfect for hot picnic days.
Prep Time: 15 minutes Cook Time: 0 minutes Total Time: 15 minutes Servings: 12 kabobs
Key Ingredients for Fruit Kabobs
- 2 cups strawberries, hulled
- 2 cups pineapple chunks
- 2 cups red grapes
- 2 cups melon cubes (cantaloupe or honeydew)
- 2 cups blueberries
- 12 wooden skewers (10-inch)
- 1 cup vanilla Greek yogurt
- 2 tablespoons honey
- 1/2 teaspoon vanilla extract
- Pinch of cinnamon
Step-by-Step Instructions
Step 1: Prepare All Fruit Wash all fruits thoroughly and pat completely dry. Cut strawberries in half if large. Cut pineapple and melon into bite-sized chunks. Keep grapes and blueberries whole.
Step 2: Assemble Kabobs Thread fruit onto skewers in a colorful pattern. Alternate colors and types for visual appeal. A typical pattern might be: strawberry, pineapple, grape, melon, blueberry, then repeat.
Step 3: Arrange on Platter Place assembled kabobs on a large serving platter. Arrange them in rows or in a circular pattern. This makes them easy to grab and looks beautiful.
Step 4: Make Yogurt Dip In a small bowl, combine Greek yogurt, honey, vanilla extract, and cinnamon. Whisk until smooth and creamy. Taste and adjust sweetness if desired.
Step 5: Chill Until Serving Cover the platter with plastic wrap and refrigerate until picnic time. Keep the yogurt dip separate in a sealed container with an ice pack.
What to Serve Fruit Kabobs With
These kabobs pair wonderfully with granola parfaits, yogurt tubes, or cheese cubes. They’re perfect alongside sandwiches or wraps for a balanced meal. Serve with sparkling water or lemonade for a refreshing combination.
Top Tips for Perfecting Fruit Kabobs
Choose firm fruits that won’t fall apart when skewered. Brush pineapple and apple pieces with lemon juice to prevent browning. Don’t make these more than 4 hours ahead as cut fruit releases moisture. Use blunt-ended skewers for safety with young children. For extra fun, let kids assemble their own kabobs!
Storing and Reheating Tips
Store assembled kabobs in a single layer in an airtight container, refrigerated, for up to 24 hours. Keep the yogurt dip separate until serving. Don’t freeze fruit kabobs as the texture becomes mushy when thawed. Best enjoyed fresh and cold straight from the cooler.
Recipe 7: Homemade Granola Bars
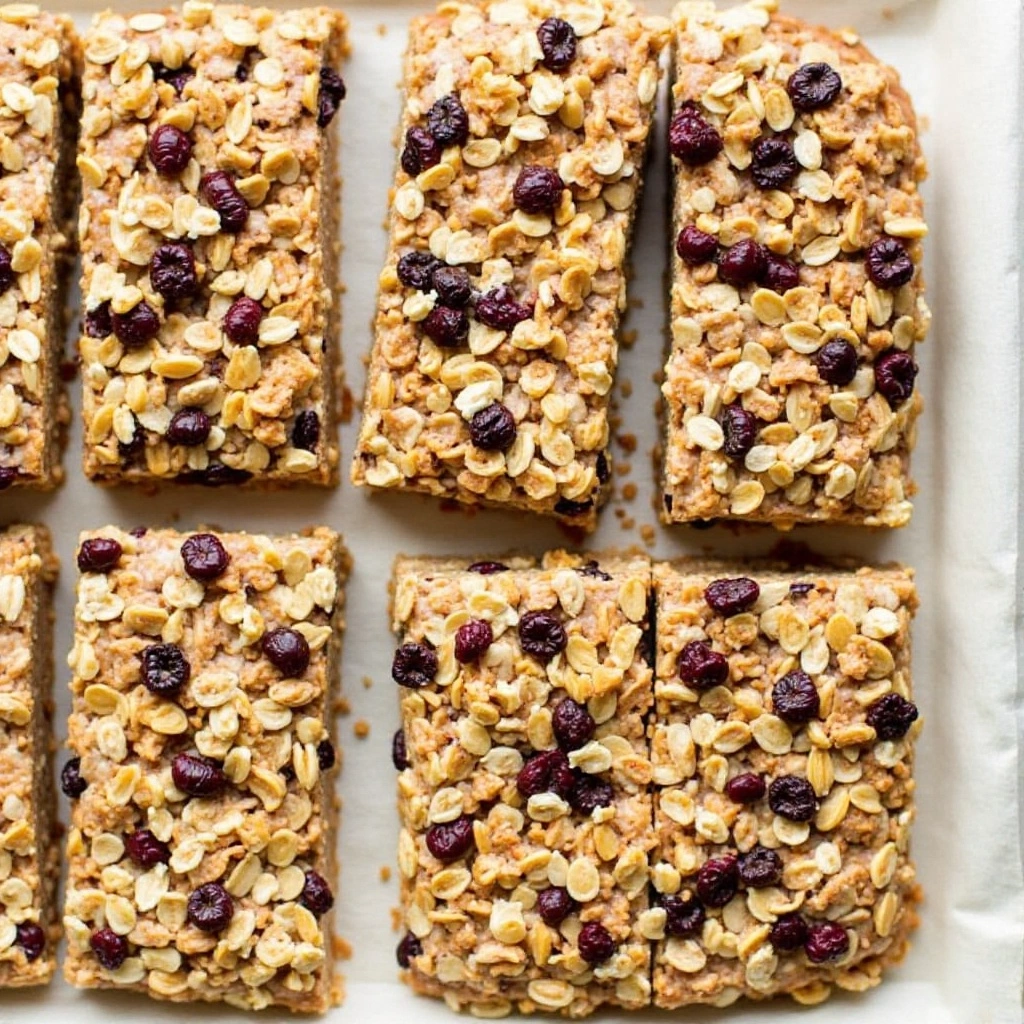
What Are Homemade Granola Bars?
Why buy expensive granola bars when you can make better ones at home? These chewy, nutty treats are packed with wholesome ingredients and zero weird additives. They’re the ultimate grab-and-go snack that actually tastes like real food. Plus, they hold together perfectly without crumbling all over your picnic blanket. As they say, “the way to anyone’s heart is through their stomach,” especially when it’s filled with homemade goodness! Ready to bake?
Why You’ll Love These Granola Bars
These bars deliver satisfying chewiness with just the right amount of sweetness. Making them at home costs a fraction of store-bought brands and lets you control ingredients. The combination of oats, nuts, and dried fruit provides lasting energy for active picnic days. If you loved our no-bake energy balls, these offer similar nutrition with a more traditional bar format. Let’s get mixing!
How to Make Homemade Granola Bars
Quick Overview
These bars take about 35 minutes total including baking time. They’re naturally sweetened, incredibly filling, and hold together beautifully. The nutty, slightly sweet flavor appeals to all ages.
Prep Time: 10 minutes Cook Time: 25 minutes Total Time: 35 minutes Servings: 16 bars
Key Ingredients for Granola Bars
- 3 cups old-fashioned rolled oats
- 1 cup mixed nuts, chopped (almonds, pecans)
- 1/2 cup pumpkin seeds or sunflower seeds
- 1/2 cup honey
- 1/3 cup coconut oil, melted
- 1/4 cup brown sugar
- 1 teaspoon vanilla extract
- 1/2 teaspoon cinnamon
- 1/4 teaspoon salt
- 1 cup dried fruit (raisins, cranberries, chopped dates)
- 1/2 cup mini chocolate chips (optional)
Step-by-Step Instructions
Step 1: Prepare Pan Preheat your oven to 325°F (165°C). Line a 9×13-inch baking pan with parchment paper, leaving overhang on two sides for easy removal. This prevents sticking completely.
Step 2: Toast Oats and Nuts Spread oats, chopped nuts, and seeds on a large baking sheet. Toast in the oven for 10 minutes, stirring halfway through. This develops nutty flavor and adds crunch.
Step 3: Make Wet Mixture In a small saucepan over low heat, combine honey, melted coconut oil, and brown sugar. Stir until sugar dissolves completely. Remove from heat and stir in vanilla extract.
Step 4: Combine Everything Transfer toasted oat mixture to a large bowl. Add cinnamon, salt, and dried fruit. Pour the honey mixture over everything and stir thoroughly until completely coated. Every piece should be sticky.
Step 5: Press and Bake Press mixture firmly into prepared pan using the back of a measuring cup or your hands. Pack it tightly—this helps bars hold together. Bake for 15 minutes until edges are golden brown.
Step 6: Cool and Cut Let the pan cool completely on a wire rack for at least 2 hours. Don’t rush this step! Use the parchment overhang to lift the entire slab out. Cut into 16 bars with a sharp knife.
What to Serve Granola Bars With
These bars pair perfectly with fresh fruit, cheese sticks, or yogurt. They’re substantial enough to be a snack or light breakfast on the go. Serve alongside water bottles or juice boxes for a complete picnic snack.
Top Tips for Perfecting Granola Bars
Press the mixture firmly—loose packing leads to crumbly bars. Don’t overbake or they’ll become hard and crunchy instead of chewy. Let them cool completely before cutting to prevent falling apart. Store between layers of parchment paper to prevent sticking. Add chocolate chips after the bars cool slightly if you don’t want them to melt.
Storing and Reheating Tips
Store granola bars in an airtight container at room temperature for up to 1 week. For longer storage, wrap individually in parchment paper and freeze for up to 3 months. Thaw at room temperature for 30 minutes before eating. These taste great at any temperature—no reheating needed!
Recipe 8: Turkey and Cheese Pinwheels
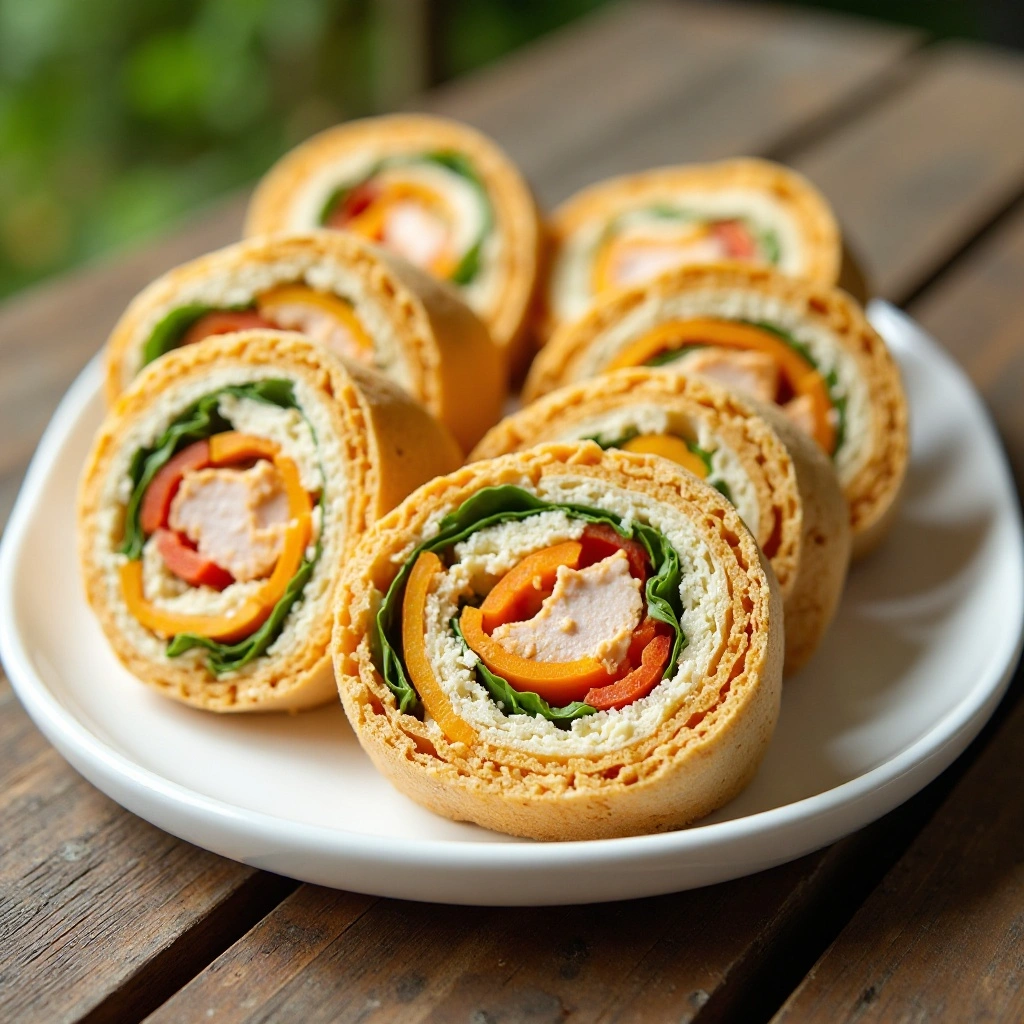
What Are Turkey and Cheese Pinwheels?
Looking for a sandwich alternative that’s less messy and more fun? Enter pinwheels! These spiral sandwiches pack all the deliciousness of a regular sandwich into a bite-sized package. Kids love the fun shape, adults appreciate the convenience. They’re pretty enough for parties yet practical enough for everyday picnics. After all, “the way to everyone’s heart is through their stomach,” and these pinwheels prove it deliciously! Let’s roll!
Why You’ll Love These Pinwheels
These pinwheels deliver all the flavors of a deli sandwich without the mess. The cream cheese acts as both spread and glue, keeping everything perfectly contained. Making them at home costs significantly less than buying them pre-made from the store. Each bite combines protein, cheese, and vegetables in perfect harmony. If you enjoyed our club sandwich wraps, these offer similar satisfaction with easier eating. Perfect for picnics!
How to Make Turkey and Cheese Pinwheels
Quick Overview
These take just 10 minutes to assemble with zero cooking required. They’re protein-packed, satisfying, and travel beautifully without falling apart. The combination of flavors makes every bite interesting.
Prep Time: 10 minutes Cook Time: 0 minutes Total Time: 10 minutes Servings: 32 pinwheel pieces (4 wraps)
Key Ingredients for Turkey Pinwheels
- 4 large flour tortillas (burrito size)
- 8 ounces cream cheese, softened
- 1 tablespoon ranch seasoning mix
- 12 slices deli turkey breast
- 8 slices cheddar or Swiss cheese
- 1 cup fresh spinach leaves
- 1/2 cup shredded carrots
- 1/4 cup diced bell peppers
Step-by-Step Instructions
Step 1: Prepare Cream Cheese Spread In a small bowl, mix softened cream cheese with ranch seasoning until smooth and spreadable. The seasoning adds flavor and the cream cheese provides the “glue” that holds everything together.
Step 2: Spread Tortillas Lay tortillas flat on a clean work surface. Spread cream cheese mixture evenly across each tortilla, covering edge to edge. Use about 2 tablespoons per tortilla.
Step 3: Layer Ingredients On each tortilla, layer 3 slices of turkey, 2 slices of cheese, a handful of spinach leaves, shredded carrots, and diced peppers. Keep ingredients in the center, leaving edges clear.
Step 4: Roll Tightly Starting from one end, roll each tortilla as tightly as possible without tearing. The cream cheese will seal the edge. Wrap each roll in plastic wrap and refrigerate for 30 minutes.
Step 5: Slice and Serve Remove plastic wrap and place each roll seam-side down on a cutting board. Using a sharp serrated knife, slice into 8 pieces per roll, creating pinwheel shapes. Arrange on a platter cut-side up.
What to Serve Turkey Pinwheels With
These pinwheels pair beautifully with tortilla chips and salsa, fresh fruit, or a simple garden salad. They’re substantial enough to be the main attraction. Add some pretzels or pickles for extra crunch and variety.
Top Tips for Perfecting Pinwheels
Use room-temperature cream cheese for easier spreading. Don’t overfill or the pinwheels won’t roll properly. Chill before slicing—this makes clean cuts much easier. Wipe your knife between cuts for neat, professional-looking slices. For variety, use different deli meats like ham or roast beef.
Storing and Reheating Tips
Store pinwheels in an airtight container, refrigerated, for up to 3 days. Don’t slice until ready to serve to prevent drying out. These don’t freeze well as the vegetables become watery when thawed. Best served chilled or at cool room temperature within 2 hours.
Recipe 9: Crispy Baked Chicken Tenders

What Are Crispy Baked Chicken Tenders?
Is there anything kids love more than chicken tenders? These homemade versions are crispy on the outside, juicy on the inside, and free from mystery ingredients. They’re finger food perfection that adults secretly love too! Baked instead of fried means less mess and less guilt. As the saying goes, “the way to a child’s heart is through their stomach,” and chicken tenders are the fast track! Let’s get cooking!
Why You’ll Love These Chicken Tenders
These tenders deliver that satisfying crunch without deep frying. The coating stays crispy even after cooling, making them perfect for picnics. Making them at home costs a fraction of restaurant versions and you control what goes in them. The tender, juicy chicken inside contrasts beautifully with the crunchy exterior. If you loved our breaded chicken cutlets, these offer similar appeal in kid-friendly form. Get ready for empty plates!
How to Make Crispy Baked Chicken Tenders
Quick Overview
These tenders take about 35 minutes from start to finish. They’re incredibly flavorful, wonderfully crispy, and bake hands-free in the oven. The simple coating technique ensures perfect results every time.
Prep Time: 15 minutes Cook Time: 20 minutes Total Time: 35 minutes Servings: 6-8 servings (about 20 tenders)
Key Ingredients for Chicken Tenders
- 2 pounds chicken tenderloins
- 1 cup all-purpose flour
- 2 teaspoons garlic powder
- 2 teaspoons paprika
- 1 teaspoon onion powder
- Salt and black pepper to taste
- 3 large eggs
- 2 tablespoons milk
- 2 cups panko breadcrumbs
- 1/2 cup grated Parmesan cheese
- 3 tablespoons olive oil
- Cooking spray
Step-by-Step Instructions
Step 1: Set Up Breading Station Preheat oven to 425°F (220°C). Line a large baking sheet with parchment paper and spray with cooking spray. Set up three shallow bowls for breading.
Step 2: Prepare Coating Mixtures In the first bowl, mix flour, garlic powder, paprika, onion powder, salt, and pepper. In the second bowl, whisk eggs with milk. In the third bowl, combine panko breadcrumbs, Parmesan cheese, and olive oil. Mix until evenly distributed.
Step 3: Bread the Chicken Pat chicken tenderloins dry with paper towels. Dredge each piece in flour mixture, shaking off excess. Dip in egg mixture, letting excess drip off. Finally, press into breadcrumb mixture, coating completely. Place on prepared baking sheet.
Step 4: Bake Until Golden Arrange breaded tenders in a single layer with space between each piece. Spray tops lightly with cooking spray. Bake for 10 minutes, flip each tender, then bake another 10 minutes until golden brown and internal temperature reaches 165°F.
Step 5: Cool and Pack Transfer to a wire rack and let cool for 10 minutes. This helps the coating set and stay crispy. Pack in containers once completely cooled for maximum crispiness during transport.
What to Serve Chicken Tenders With
These tenders pair perfectly with honey mustard, ranch dressing, or ketchup for dipping. Serve alongside coleslaw, potato salad, or fresh vegetables. Add some fruit and crackers for a well-rounded picnic meal.
Top Tips for Perfecting Chicken Tenders
Don’t skip patting the chicken dry—moisture prevents good adhesion. Press breadcrumbs firmly onto each piece for better coating. Use a wire rack over the baking sheet for crispier bottoms. Don’t overcrowd the pan or they’ll steam instead of crisp. Let them rest after baking so juices redistribute.
Storing and Reheating Tips
Store cooked chicken tenders in an airtight container, refrigerated, for up to 3 days. For best texture, reheat in a 375°F oven for 10 minutes rather than microwaving. These freeze beautifully—freeze in a single layer, then transfer to a freezer bag for up to 3 months. Reheat from frozen at 400°F for 15-20 minutes.
Recipe 10: Veggie Hummus Wraps
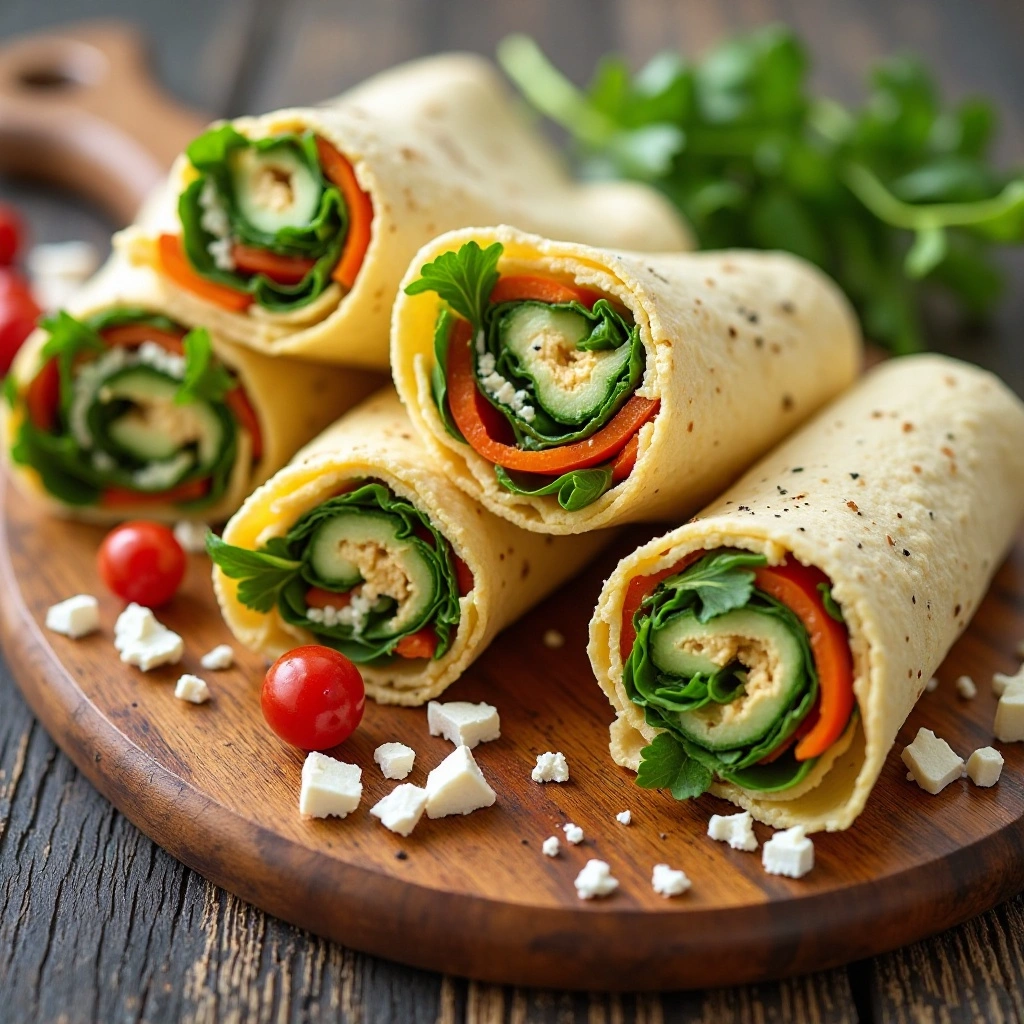
What Are Veggie Hummus Wraps?
Looking for a lighter picnic option that’s still satisfying? These colorful wraps pack maximum crunch with minimal calories. They’re proof that healthy food can be absolutely delicious and fun to eat. The creamy hummus paired with crisp vegetables creates textural magic. They’re vegetarian-friendly and kid-approved—a rare combination! Remember, “the way to everyone’s heart is through their stomach,” even vegetable lovers! Let’s wrap it up!
Why You’ll Love These Veggie Wraps
These wraps deliver satisfying crunch and creamy smoothness in every bite. The rainbow of vegetables provides vitamins, fiber, and natural sweetness that even picky eaters enjoy. Making them at home costs pennies compared to café versions. Each wrap is light yet filling, perfect for warm weather picnics. If you enjoyed our Greek veggie pita, these offer similar freshness with easier eating. Veggie power!
How to Make Veggie Hummus Wraps
Quick Overview
Assembly takes just 10 minutes with zero cooking required. These wraps are fresh, colorful, and incredibly refreshing. The hummus adds protein and creaminess that makes vegetables irresistible.
Prep Time: 10 minutes Cook Time: 0 minutes Total Time: 10 minutes Servings: 4 wraps
Key Ingredients for Veggie Wraps
- 4 large whole wheat or spinach tortillas
- 1 cup hummus (any flavor)
- 1 cup shredded lettuce or baby spinach
- 1 cucumber, julienned
- 1 bell pepper (any color), thinly sliced
- 1 carrot, shredded or julienned
- 1/2 cup cherry tomatoes, halved
- 1/4 red onion, thinly sliced (optional)
- 1/2 cup feta cheese, crumbled (optional)
- Salt and pepper to taste
Step-by-Step Instructions
Step 1: Prepare All Vegetables Wash and dry all vegetables thoroughly. Slice cucumber and bell pepper into thin strips. Shred or julienne carrot. Halve cherry tomatoes. Having everything prepped makes assembly quick and easy.
Step 2: Spread Hummus Lay each tortilla flat on a clean work surface. Spread 1/4 cup hummus evenly across the center of each tortilla, leaving a 2-inch border on all sides. The hummus acts as a flavor base and helps everything stick.
Step 3: Layer Vegetables Arrange lettuce or spinach down the center over the hummus. Layer cucumber strips, bell pepper slices, shredded carrot, halved tomatoes, and red onion if using. Sprinkle with feta cheese if desired. Season lightly with salt and pepper.
Step 4: Fold and Roll Fold the sides of the tortilla inward over the filling. Then, starting from the bottom, roll tightly like a burrito. The hummus and vegetables will hold everything in place.
Step 5: Secure and Slice Wrap each rolled tortilla tightly in parchment paper or plastic wrap. Refrigerate for 15-30 minutes to help them hold their shape. When ready to pack, slice each wrap in half diagonally for easier eating.
What to Serve Veggie Wraps With
These wraps pair wonderfully with pita chips, olives, or a simple fruit salad. They’re light enough to serve with heartier items like pasta salad or potato chips. Add some trail mix or nuts for a protein boost.
Top Tips for Perfecting Veggie Wraps
Don’t overfill the wraps or they’ll be impossible to roll and eat. Pat watery vegetables like cucumber and tomatoes dry before adding. Use room-temperature tortillas for easier rolling without cracking. Add delicate ingredients like tomatoes in the center to prevent them from falling out. Wrap tightly in parchment for transport—it holds shape and makes eating easier.
Storing and Reheating Tips
Store wrapped wraps in an airtight container, refrigerated, for up to 24 hours. Don’t assemble more than 4 hours before serving or tortillas become soggy. These don’t freeze well due to the fresh vegetables. Best enjoyed cold or at cool room temperature.
Recipe 11: Mini Quiche Cups

What Are Mini Quiche Cups?
Ever wish you could have fancy brunch food at a picnic? These mini quiche cups make it possible! They’re like having individual egg pies that fit perfectly in your hand. Portable, protein-packed, and absolutely delicious whether warm or cold. They look impressive but are surprisingly simple to make. As they say, “the way to everyone’s heart is through their stomach,” and these elegant bites prove it! Let’s get baking!
Why You’ll Love These Mini Quiches
These little cups deliver big flavor in perfectly portioned bites. The fluffy egg filling combined with cheese and vegetables creates a satisfying mini meal. Making them at home costs a fraction of bakery prices and tastes infinitely fresher. Each cup provides protein and vegetables in one convenient package. If you enjoyed our breakfast egg muffins, these offer a more elegant presentation with similar convenience. Brunch anywhere!
How to Make Mini Quiche Cups
Quick Overview
These quiches take about 40 minutes including baking time. They’re fluffy, flavorful, and stay delicious even at room temperature. The muffin tin format makes them perfectly portable.
Prep Time: 15 minutes Cook Time: 25 minutes Total Time: 40 minutes Servings: 12 mini quiches
Key Ingredients for Mini Quiche Cups
- 6 large eggs
- 1/2 cup milk or heavy cream
- 1/2 cup shredded cheddar cheese
- 1/4 cup grated Parmesan cheese
- 1/2 cup diced bell peppers
- 1/3 cup diced onion
- 1/2 cup chopped fresh spinach
- 4 strips cooked turkey bacon, crumbled (optional)
- Salt and black pepper to taste
- 1/4 teaspoon garlic powder
- Cooking spray
Step-by-Step Instructions
Step 1: Prepare Muffin Tin Preheat oven to 350°F (175°C). Generously spray a 12-cup muffin tin with cooking spray, making sure to coat sides and bottoms completely. This prevents sticking.
Step 2: Sauté Vegetables In a small skillet over medium heat, sauté diced onion and bell peppers for 3-4 minutes until softened. Add chopped spinach and cook for 1 minute more until wilted. Let cool slightly.
Step 3: Mix Egg Mixture In a large bowl, whisk together eggs, milk, salt, pepper, and garlic powder until well combined. Stir in both cheeses, sautéed vegetables. Mix until evenly distributed.
Step 4: Fill and Bake Pour egg mixture evenly into prepared muffin cups, filling each about 3/4 full. The eggs will puff up during baking. Bake for 20-25 minutes until centers are set and tops are lightly golden.
Step 5: Cool and Remove Let quiches cool in the pan for 5 minutes. Run a butter knife around edges to loosen. Remove carefully and transfer to a wire rack. They’ll firm up as they cool.
What to Serve Mini Quiches With
These quiches pair beautifully with fresh fruit salad, croissants, or a simple green salad. They’re substantial enough to be the main dish or can accompany sandwiches. Serve with juice or sparkling water for a complete meal.
Top Tips for Perfecting Mini Quiches
Don’t overfill the muffin cups or they’ll overflow during baking. Use a silicone muffin pan for even easier removal. Let vegetables cool before adding to egg mixture to prevent premature cooking. These taste great warm or at room temperature. Customize with your favorite cheese and vegetable combinations.
Storing and Reheating Tips
Store cooled quiches in an airtight container, refrigerated, for up to 4 days. Reheat in a 300°F oven for 10 minutes or microwave for 30-45 seconds. These freeze beautifully—wrap individually and freeze for up to 2 months. Thaw overnight in the fridge and reheat before serving or enjoy cold.
Recipe 12: Chocolate Chip Cookie Bars
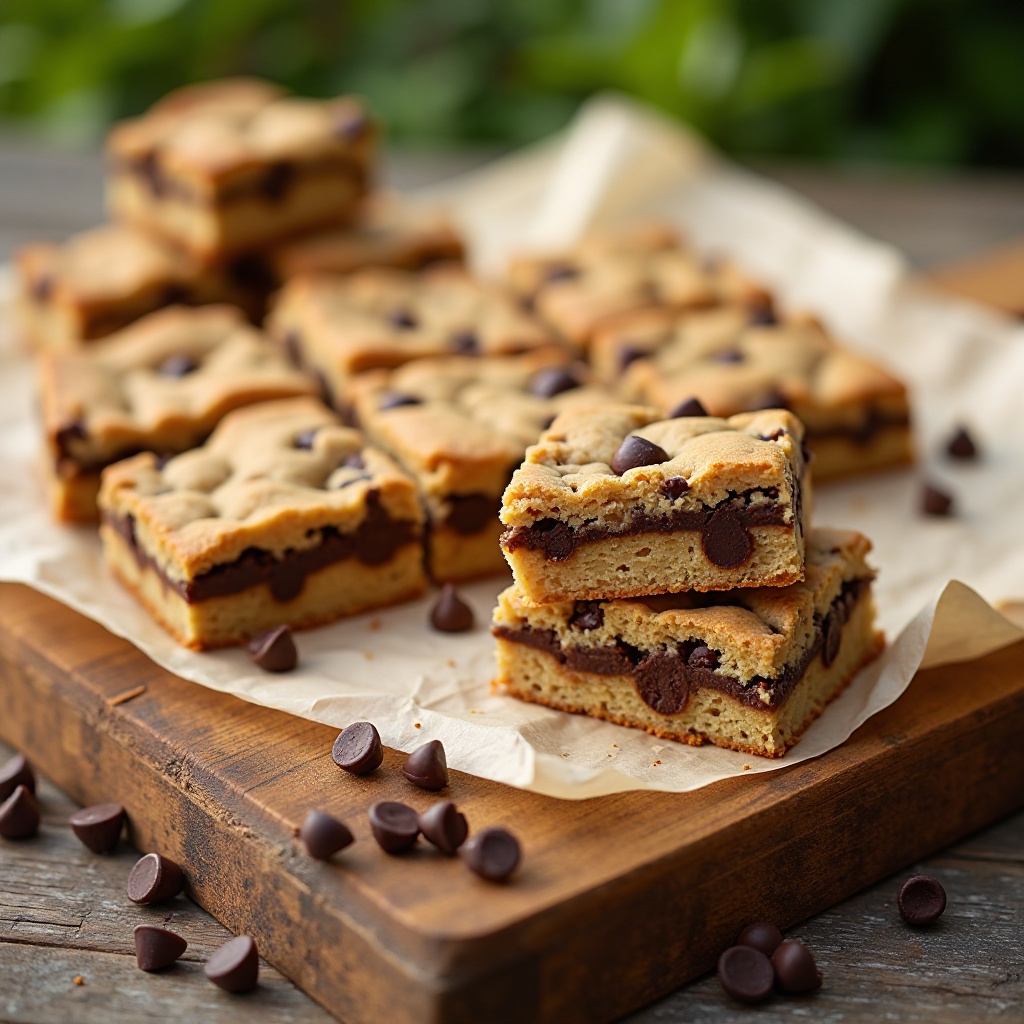
What Are Chocolate Chip Cookie Bars?
Why fuss with individual cookies when you can have all that chocolatey goodness in easy-to-cut bars? These cookie bars deliver classic chocolate chip flavor without the hassle of scooping dozens of cookies. They’re chewy, rich, and transport beautifully without breaking. Perfect for picnics where you need portable dessert that everyone loves. After all, “the way to everyone’s heart is through their stomach”—especially when chocolate is involved! Let’s bake!
Why You’ll Love These Cookie Bars
These bars deliver that perfect chewy texture with crispy edges. Making them at home costs significantly less than buying cookies and tastes a hundred times better. The bars cut cleanly and stack nicely for easy transport. Every bite is packed with melty chocolate chips. If you enjoyed our brownies, these offer similar convenience with classic cookie flavor. Get ready for dessert happiness!
How to Make Chocolate Chip Cookie Bars
Quick Overview
These bars take about 35 minutes total including baking. They’re wonderfully chewy, perfectly sweet, and loaded with chocolate chips. The simple preparation means anyone can make them successfully.
Prep Time: 10 minutes Cook Time: 25 minutes Total Time: 35 minutes Servings: 24 bars
Key Ingredients for Cookie Bars
- 1 cup (2 sticks) unsalted butter, melted
- 1 cup brown sugar, packed
- 1/2 cup granulated sugar
- 2 large eggs
- 2 teaspoons vanilla extract
- 2 1/4 cups all-purpose flour
- 1 teaspoon baking soda
- 1 teaspoon salt
- 2 cups semi-sweet chocolate chips
- 1/2 cup chopped walnuts (optional)
Step-by-Step Instructions
Step 1: Prepare Pan Preheat oven to 350°F (175°C). Line a 9×13-inch baking pan with parchment paper, leaving overhang on two sides. This makes removal and cutting much easier.
Step 2: Mix Wet Ingredients In a large bowl, whisk together melted butter, brown sugar, and granulated sugar until smooth. Add eggs and vanilla extract, whisking until completely combined and slightly thickened.
Step 3: Add Dry Ingredients Add flour, baking soda, and salt to the wet mixture. Stir with a wooden spoon just until no flour streaks remain. Don’t overmix or bars will be tough.
Step 4: Fold in Chocolate Fold in chocolate chips (and walnuts if using) until evenly distributed throughout the dough. The dough will be thick and dense—this is perfect.
Step 5: Bake and Cool Press dough evenly into prepared pan. Bake for 25-28 minutes until edges are golden and center is just set but still soft. Don’t overbake! Let cool completely in pan before lifting out and cutting into bars.
What to Serve Cookie Bars With
These bars pair perfectly with cold milk, fresh berries, or vanilla ice cream for an extra treat. They’re substantial enough to be dessert on their own. Serve alongside coffee or hot chocolate for the adults.
Top Tips for Perfecting Cookie Bars
Don’t overbake—the center should look slightly underdone when you remove them. They’ll continue cooking as they cool, resulting in perfect chewiness. Let them cool completely before cutting for clean edges. Use parchment paper for easiest removal. For extra gooey bars, add an extra 1/2 cup chocolate chips.
Storing and Reheating Tips
Store cookie bars in an airtight container at room temperature for up to 5 days. Layer with parchment paper to prevent sticking. These freeze beautifully—wrap individually or in stacks separated by parchment, freeze for up to 3 months. Thaw at room temperature for 30 minutes before serving.
Recipe 13: Cucumber Cream Cheese Sandwiches
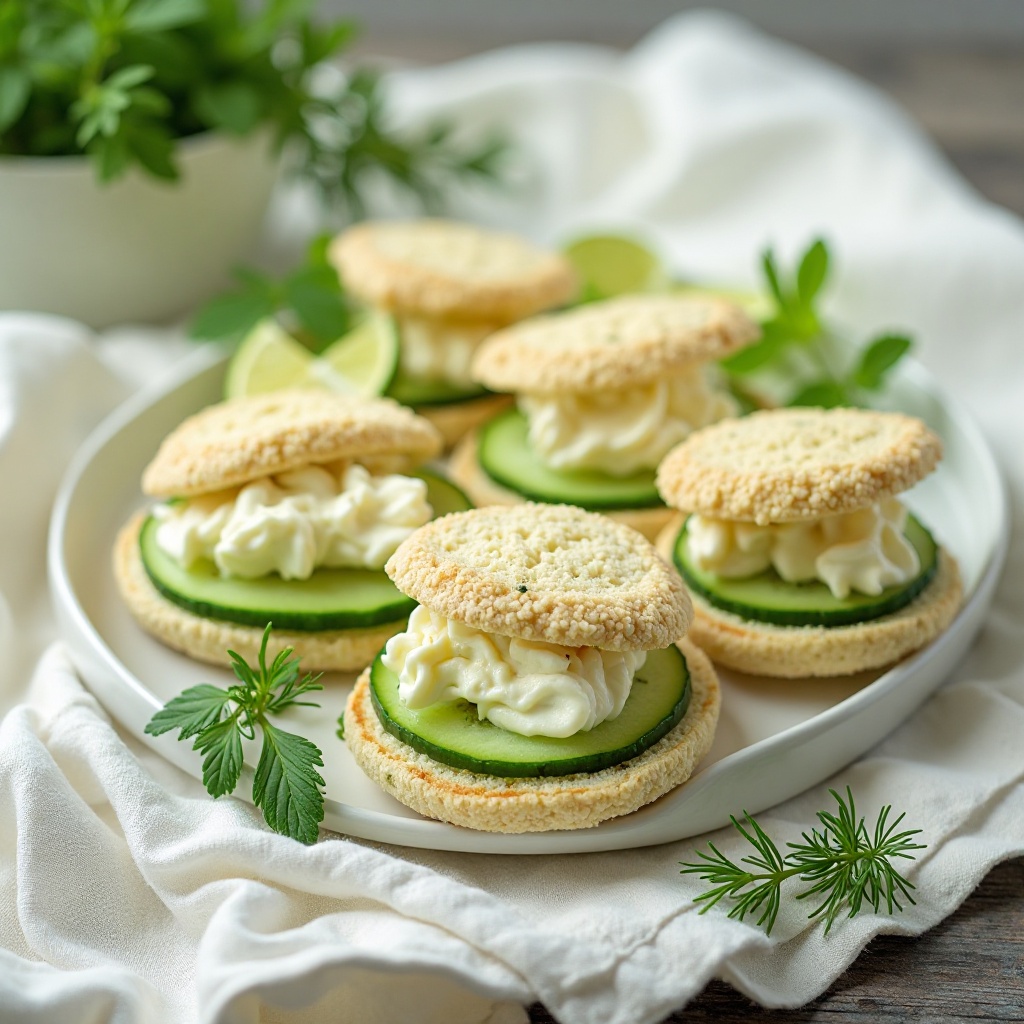
What Are Cucumber Cream Cheese Sandwiches?
Could anything be more refreshing on a hot picnic day? These delicate sandwiches bring elegant tea-party vibes to your outdoor feast. Don’t let their simplicity fool you—the combination of cool cucumber, tangy cream cheese, and soft bread is absolutely divine. They’re light, refreshing, and surprisingly filling. As the saying goes, “the way to everyone’s heart is through their stomach,” and these prove that sometimes simple is best! Let’s make magic!
Why You’ll Love These Cucumber Sandwiches
These sandwiches deliver cool, refreshing flavor perfect for warm weather. The cream cheese provides richness while cucumber adds crisp freshness. Making them at home costs almost nothing and takes just minutes. Each bite is light yet satisfying, never heavy or overfilling. If you enjoyed our tea sandwiches, these offer similar elegance with even simpler preparation. Refreshment awaits!
How to Make Cucumber Cream Cheese Sandwiches
Quick Overview
These sandwiches take just 15 minutes to prepare with zero cooking. They’re incredibly light, wonderfully refreshing, and perfect for hot days. The simple ingredients let the flavors shine.
Prep Time: 15 minutes Cook Time: 0 minutes Total Time: 15 minutes Servings: 12 sandwiches
Key Ingredients for Cucumber Sandwiches
- 8 ounces cream cheese, softened
- 2 tablespoons fresh dill, chopped
- 1 tablespoon fresh lemon juice
- 1/4 teaspoon garlic powder
- Salt and white pepper to taste
- 1 English cucumber, thinly sliced
- 12 slices white or wheat bread
- Butter for spreading (optional)
Step-by-Step Instructions
Step 1: Prepare Cream Cheese Spread In a medium bowl, mix softened cream cheese, chopped dill, lemon juice, garlic powder, salt, and white pepper until smooth and fluffy. The lemon adds brightness while dill provides herbal notes.
Step 2: Slice Cucumber Slice English cucumber as thin as possible using a sharp knife or mandoline. Pat slices dry with paper towels to remove excess moisture. This prevents soggy sandwiches.
Step 3: Prep Bread If desired, lightly butter one side of each bread slice. This creates a moisture barrier. Alternatively, spread cream cheese mixture directly on bread.
Step 4: Assemble Sandwiches Spread cream cheese mixture generously on one slice of bread. Layer cucumber slices in a single, slightly overlapping layer. Top with second bread slice. Press gently to seal.
Step 5: Trim and Cut Using a sharp knife, trim crusts from sandwiches for an elegant presentation. Cut each sandwich into quarters diagonally or into finger sandwiches. Arrange on a platter.
What to Serve Cucumber Sandwiches With
These pair beautifully with fruit salad, chips, or other finger sandwiches for variety. They’re perfect alongside iced tea or lemonade. Serve with cherry tomatoes and cheese cubes for a light, complete meal.
Top Tips for Perfecting Cucumber Sandwiches
Always pat cucumber slices dry—moisture is the enemy of crispy sandwiches. Use English cucumbers as they have fewer seeds and less water. Make these no more than 2 hours before serving for best texture. Cover with a damp paper towel and plastic wrap to prevent drying. For extra flavor, add a thin layer of everything bagel seasoning.
Storing and Reheating Tips
Store assembled sandwiches covered with damp paper towels and plastic wrap, refrigerated, for up to 4 hours. Don’t freeze these sandwiches as cucumbers become watery when thawed. Best enjoyed fresh and cold. Keep in a cooler with ice packs during transport.
Recipe 14: Trail Mix Energy Bites
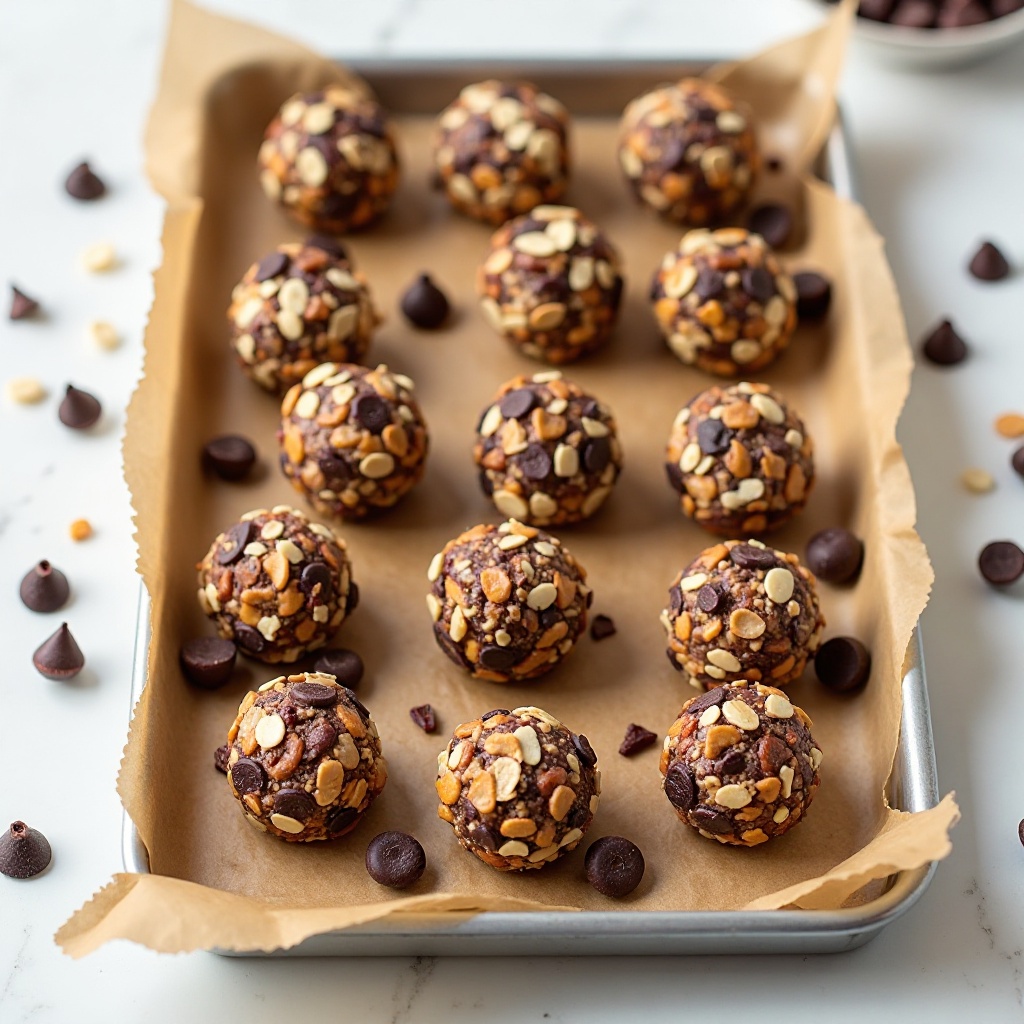
What Are Trail Mix Energy Bites?
Need a quick energy boost between picnic activities? These no-bake bites pack the goodness of trail mix into convenient ball form. They’re naturally sweet, satisfyingly chewy, and full of wholesome ingredients. No oven required means you can whip these up anytime without heating up the kitchen. They’re perfect for active picnic days when everyone needs sustained energy. Remember, “the way to everyone’s heart is through their stomach,” especially when energy is involved! Let’s roll!
Why You’ll Love These Energy Bites
These bites deliver natural sweetness and lasting energy from wholesome ingredients. Making them at home costs far less than buying pre-packaged energy snacks. The combination of oats, nuts, and dried fruit provides fiber, protein, and natural sugars. Each bite is portable, mess-free, and doesn’t melt in warm weather. If you enjoyed our protein balls, these offer similar nutrition with trail mix flavors. Energy boost incoming!
How to Make Trail Mix Energy Bites
Quick Overview
These bites take just 15 minutes to make with zero baking required. They’re naturally sweetened, wonderfully chewy, and packed with nutrition. The no-cook method makes them perfect for hot days.
Prep Time: 15 minutes Chill Time: 30 minutes Total Time: 45 minutes Servings: 24 bites
Key Ingredients for Energy Bites
- 1 1/2 cups old-fashioned oats
- 1/2 cup natural peanut butter or almond butter
- 1/3 cup honey
- 1/2 cup mixed nuts, chopped (almonds, cashews)
- 1/2 cup dried cranberries or raisins
- 1/4 cup mini chocolate chips
- 1/4 cup pumpkin seeds
- 2 tablespoons ground flaxseed
- 1 teaspoon vanilla extract
- Pinch of salt
Step-by-Step Instructions
Step 1: Mix Wet Ingredients In a large bowl, combine peanut butter and honey. Microwave for 30 seconds if needed to make stirring easier. Add vanilla extract and stir until smooth.
Step 2: Add Dry Ingredients Add oats, chopped nuts, dried cranberries, chocolate chips, pumpkin seeds, flaxseed, and salt to the wet mixture. Stir thoroughly until everything is evenly coated and combined.
Step 3: Chill Mixture Cover the bowl and refrigerate for 30 minutes. This makes the mixture easier to roll and helps the bites hold their shape better.
Step 4: Form Bites Using a small cookie scoop or tablespoon, scoop mixture and roll between your palms to form balls about 1 inch in diameter. Place on a parchment-lined plate or baking sheet.
Step 5: Final Chill Refrigerate formed bites for another 30 minutes to firm up completely. This helps them maintain their shape during transport and eating.
What to Serve Energy Bites With
These bites pair perfectly with fresh fruit, cheese sticks, or yogurt tubes. They’re substantial enough to be a snack on their own. Serve alongside water bottles to keep everyone hydrated during active play.
Top Tips for Perfecting Energy Bites
If mixture seems too dry, add more honey a tablespoon at a time. If too wet, add more oats. Use natural nut butter without added oils for best texture. Roll with slightly wet hands to prevent sticking. Store different varieties in separate containers to prevent flavor mixing.
Storing and Reheating Tips
Store energy bites in an airtight container, refrigerated, for up to 2 weeks. They also freeze beautifully—freeze in a single layer, then transfer to a freezer bag for up to 3 months. Thaw for 10 minutes before eating or enjoy them frozen for a firmer texture. No reheating needed!
Recipe 15: Watermelon Feta Salad
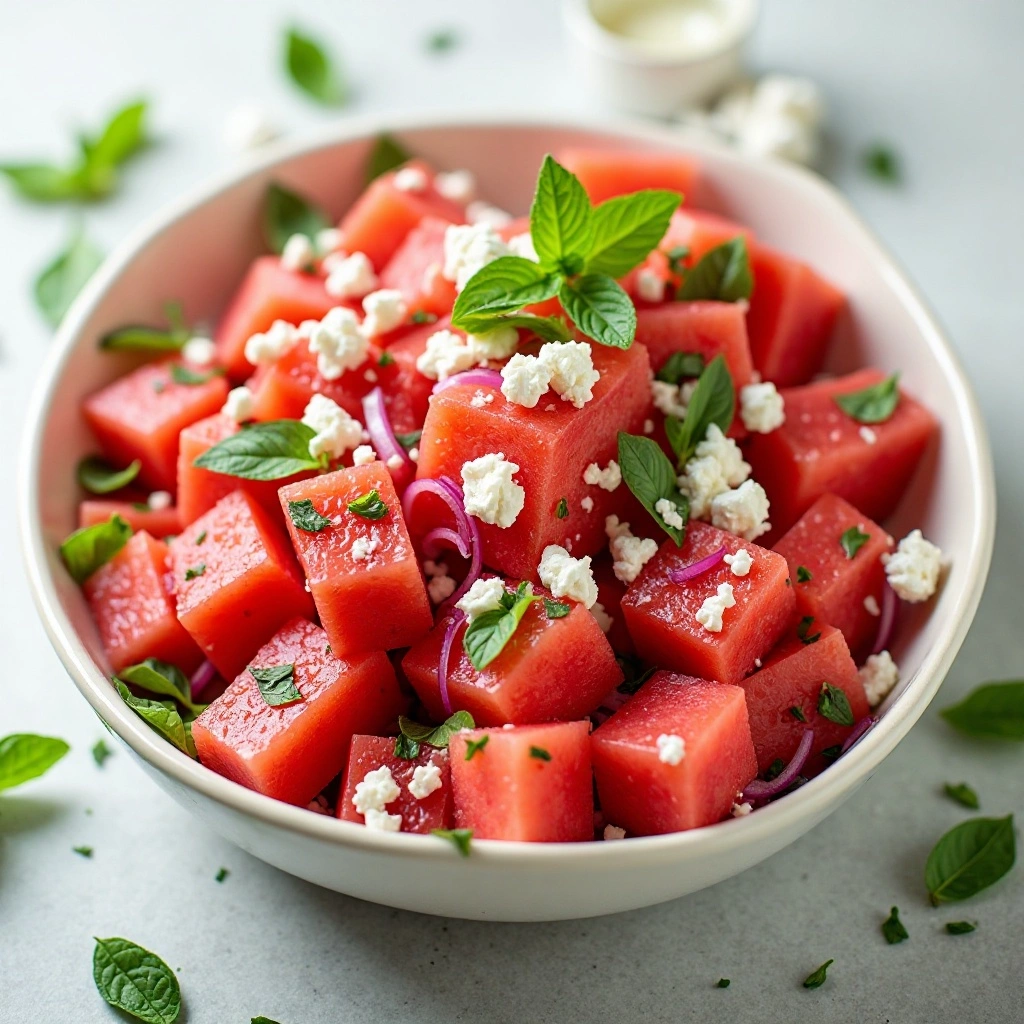
What Is Watermelon Feta Salad?
Sweet watermelon and salty feta cheese together? It sounds unusual but trust us—this combination is absolute magic! This refreshing salad has been trending at summer gatherings for good reason. It’s hydrating, flavorful, and incredibly refreshing on hot days. The contrast of textures and flavors creates something truly special. As the saying goes, “the way to everyone’s heart is through their stomach,” and this salad takes an unexpected route! Ready to be amazed?
Why You’ll Love This Watermelon Feta Salad
This salad delivers mind-blowing flavor contrasts in every bite. The sweet watermelon paired with salty feta creates a taste sensation that surprises and delights. Making it at home costs just dollars and requires minimal effort. The mint and lime add freshness that makes this incredibly refreshing on warm days. If you enjoyed our fruit salad, this offers a more sophisticated flavor profile. Prepare for compliments!
How to Make Watermelon Feta Salad
Quick Overview
This salad takes just 10 minutes to prepare with zero cooking. It’s light, hydrating, and bursting with summer flavors. The combination of ingredients creates a taste experience unlike any ordinary salad.
Prep Time: 10 minutes Cook Time: 0 minutes Total Time: 10 minutes Servings: 6-8 servings
Key Ingredients for Watermelon Feta Salad
- 6 cups watermelon, cubed (seedless)
- 1 cup feta cheese, crumbled
- 1/2 red onion, thinly sliced
- 1/4 cup fresh mint leaves, torn
- 1/4 cup fresh basil leaves, torn (optional)
- 2 tablespoons extra virgin olive oil
- 2 tablespoons fresh lime juice
- 1/4 teaspoon black pepper
- Pinch of sea salt
Step-by-Step Instructions
Step 1: Prepare Watermelon Cut watermelon into bite-sized cubes, about 1-inch pieces. Remove any seeds you find. Pat dry gently with paper towels to remove excess moisture.
Step 2: Slice Onion and Herbs Slice red onion as thin as possible—a mandoline works great for this. Tear fresh mint and basil leaves by hand rather than cutting. This prevents bruising and browning.
Step 3: Combine Ingredients In a large serving bowl, gently combine watermelon cubes, crumbled feta cheese, sliced onion, and torn herbs. Toss very gently to avoid breaking up the watermelon.
Step 4: Make Dressing In a small bowl, whisk together olive oil, lime juice, black pepper, and a pinch of salt. The salt should be minimal since feta is already salty.
Step 5: Dress and Serve Drizzle dressing over the salad just before serving. Toss one final time very gently. The salad tastes best when components are still cool and crisp.
What to Serve Watermelon Feta Salad With
This salad pairs beautifully with grilled chicken, sandwiches, or as a refreshing side to any picnic main dish. It’s light enough to serve alongside heavier items. The sweetness provides a nice contrast to savory foods.
Top Tips for Perfecting Watermelon Feta Salad
Use cold watermelon straight from the refrigerator for best results. Don’t dress the salad more than 15 minutes before serving or it becomes watery. For less onion bite, soak sliced onion in ice water for 10 minutes, then drain. Use good-quality feta for best flavor. This salad doesn’t keep well, so make only what you’ll eat.
Storing and Reheating Tips
This salad is best enjoyed immediately after assembly. If you must store it, keep ingredients separate and combine just before serving. Don’t store assembled salad for more than 2 hours as watermelon releases water. This salad doesn’t freeze well. Always serve cold or at cool room temperature.
What to Pack for Your Picnic
Beyond the food, successful picnics require the right supplies. Pack a large cooler with plenty of ice packs to keep everything fresh and safe. Bring a comfortable blanket or tablecloth for seating. Don’t forget plates, napkins, utensils, and cups—reusable options are environmentally friendly.
Include hand sanitizer or wet wipes for easy cleanup. Bring garbage bags to pack out all trash. A sharp knife for cutting and serving helps with various dishes. Consider bringing a portable speaker for background music and games for entertainment.
Pack foods in sturdy containers that seal tightly to prevent spills. Layer ice packs throughout the cooler, not just on top. Place the most perishable items closest to the ice. Keep the cooler in the shade and open it minimally to maintain cold temperatures
Food Safety Tips for Picnics
Food safety is crucial for outdoor dining. Keep cold foods cold (below 40°F) and hot foods hot (above 140°F). The danger zone between these temperatures allows bacteria to multiply rapidly. Pack raw and cooked foods separately to prevent cross-contamination.
Don’t let perishable foods sit at room temperature for more than 2 hours. In temperatures above 90°F, this time drops to just 1 hour. When in doubt, throw it out—foodborne illness isn’t worth the risk.
Wash hands thoroughly before preparing and eating food. If water isn’t available, use hand sanitizer with at least 60% alcohol content. Keep foods covered when not actively serving to protect from insects and debris.
Use separate cutting boards and utensils for different food types, especially raw meats and ready-to-eat foods. Store leftovers promptly and properly upon returning home.
Frequently Asked Questions
What are the best picnic foods that don’t need refrigeration?
The best non-refrigerated picnic foods include granola bars, trail mix, crackers, chips, cookies, whole fruits like apples and oranges, dried fruits, nuts, and peanut butter sandwiches. These shelf-stable items remain safe at room temperature for several hours. Hard cheeses like cheddar can last a few hours unrefrigerated. Avoid mayonnaise-based items and anything with dairy if you lack cooling.
How do you keep food cold at a picnic?
Keep food cold by using a well-insulated cooler with plenty of ice packs. Freeze water bottles and use them as ice packs that turn into cold drinks. Layer ice packs throughout the cooler, not just on one level. Keep the cooler closed as much as possible and store it in the shade. Pre-chill foods before packing them. Pack items in the reverse order you’ll use them—first items needed on top.
What should I pack for a picnic with kids?
Pack simple, familiar foods kids enjoy like sandwiches, crackers, cheese cubes, fruit slices, veggie sticks with dip, juice boxes, and cookies. Include plenty of napkins and wet wipes. Bring activities like frisbees, balls, or card games to keep them entertained. Don’t forget sunscreen and bug spray. Pack extra snacks—kids always eat more than expected outdoors.
How early should you prepare picnic food?
Prepare most picnic foods the night before or morning of your outing. Items like pasta salad and deviled eggs taste better after flavors meld overnight. Sandwiches should be assembled no more than 2-4 hours before eating to prevent sogginess. Cut fresh fruits the morning of your picnic. Assemble items like skewers and wraps within 4 hours of serving for best freshness.
What are good picnic desserts that travel well?
Excellent traveling desserts include brownies, cookie bars, granola bars, whole cookies, fruit salad, and cupcakes with secure frosting. Avoid items with whipped cream, custard, or cream cheese frosting in hot weather. Individual portions work better than whole cakes. Pack desserts in rigid containers to prevent crushing during transport.
How long can food sit out at a picnic?
Food shouldn’t sit out longer than 2 hours at temperatures below 90°F. When temperatures exceed 90°F, this time drops to just 1 hour. After these timeframes, bacteria multiply rapidly to dangerous levels. Use a cooler with ice packs for perishable items. Discard any questionable foods rather than risk foodborne illness.
How do you prevent ants and bugs at a picnic?
Prevent bugs by keeping all food covered when not eating. Use mesh food covers for serving dishes. Choose a spot away from trash cans and standing water. Lay your blanket away from ant hills or bee nests. Clean up spills immediately. Pack food in sealed containers. Natural repellents like citronella candles can help. Dispose of trash promptly in sealed bags.
Nutrition Information Table
| Nutrient | Chicken Salad Sandwich | Caprese Skewers | Pasta Salad | PB&J Roll-Ups |
|---|---|---|---|---|
| Calories | 320 | 85 | 280 | 210 |
| Protein | 22g | 6g | 10g | 8g |
| Carbs | 35g | 5g | 42g | 28g |
| Fat | 10g | 6g | 8g | 9g |
| Fiber | 4g | 1g | 3g | 3g |
| Sugar | 8g | 3g | 6g | 12g |
| Nutrient | Deviled Eggs | Fruit Kabobs | Granola Bars | Turkey Pinwheels |
|---|---|---|---|---|
| Calories | 130 (2 halves) | 95 | 180 | 245 |
| Protein | 11g | 2g | 5g | 15g |
| Carbs | 2g | 24g | 28g | 22g |
| Fat | 10g | 0.5g | 7g | 12g |
| Fiber | 0g | 3g | 4g | 2g |
| Sugar | 1g | 18g | 14g | 3g |
Note: Nutritional values are approximate and vary based on specific ingredients used.
Tips for Avoiding Common Picnic Food Mistakes
Mistake #1: Over-seasoning cold dishes
Foods served cold need less seasoning than hot dishes since cold temperatures dull flavors. Always taste and adjust seasoning just before serving. Add salt, pepper, and acids like lemon juice gradually—you can always add more.
Mistake #2: Making sandwiches too far in advance
Sandwiches become soggy when made hours ahead. Prepare components separately and assemble within 2-4 hours of eating. Use lettuce as a moisture barrier between wet ingredients and bread.
Mistake #3: Not keeping foods properly chilled
Use enough ice packs and don’t overpack your cooler—air circulation is essential. Keep the cooler closed and in the shade. Pre-chill all foods before packing. Layer ice packs strategically throughout.
Mistake #4: Choosing foods that don’t travel well
Avoid delicate items like cream pies or layered dishes that shift during transport. Choose sturdy foods that maintain their structure. Pack items in rigid containers with tight lids.
Mistake #5: Forgetting utensils and supplies
Make a comprehensive packing list including plates, forks, knives, napkins, cups, bottle opener, cutting board, serving spoons, trash bags, and hand sanitizer. Check it twice before leaving.
Mistake #6: Not testing recipes beforehand
Always make new recipes at home first before serving at a picnic. You’ll discover timing issues, portion sizes, and flavor adjustments needed. Stick with tried-and-true favorites for important gatherings.
Mistake #7: Ignoring food allergies and preferences
Ask guests about dietary restrictions before planning your menu. Label dishes clearly, especially those containing common allergens like nuts, dairy, or eggs. Always provide variety to accommodate different needs.
Conclusion
There you have it—15 fantastic picnic food ideas that will make your outdoor meal absolutely unforgettable! From classic chicken salad sandwiches to surprising watermelon feta salad, these recipes cover every course from appetizers through dessert.
The beauty of these recipes lies in their simplicity and portability. None require complicated techniques or hard-to-find ingredients. Most can be prepared ahead of time, leaving you free to enjoy the sunshine and company.
Remember that the best picnics combine great food with wonderful company and beautiful surroundings. Don’t stress about perfection—focus on creating memories. Pack more than you think you’ll need, keep foods at safe temperatures, and don’t forget the wet wipes!
Whether you’re heading to the park, beach, mountains, or your own backyard, these picnic food ideas will help you create a delicious outdoor feast. The combination of make-ahead convenience and crowd-pleasing flavors ensures your picnic will be the talk of the summer.
So grab your basket, pack your cooler, and head outdoors. Beautiful weather, delicious food, and quality time with loved ones await. Happy picnicking!