
5 Minute Peanut Sauce for Spring Rolls Everyone Will Love
Picture this: crispy vegetables wrapped in delicate rice paper, ready to dive into a pool of silky, nutty goodness. That’s what peanut sauce for spring rolls brings to your table! This magical condiment transforms simple fresh rolls into an unforgettable experience your whole family will crave.
Whether you’re hosting a gathering or enjoying a quiet family dinner, this sauce takes just 5 minutes to whip up and uses ingredients you probably already have in your pantry.
It’s one of those recipes that feels fancy but couldn’t be easier—kind of like our popular garlic bread recipe that everyone keeps asking for. Get ready to become the hero of your next meal!
What is Peanut Sauce for Spring Rolls?
Ever wondered why this amazing dip gets everyone so excited? Peanut sauce for spring rolls is that creamy, sweet, slightly tangy concoction that makes your taste buds dance with joy! It’s the perfect marriage of nutty peanut butter, savory seasonings, and just the right touch of sweetness. Some call it Vietnamese peanut sauce, others know it as Thai peanut sauce—but honestly? We just call it absolutely delicious.
The beauty of this sauce lies in its simplicity. You’re literally whisking together pantry staples to create restaurant-quality magic. As the old saying goes, “the way to anyone’s heart is through their stomach,” and this sauce proves it every single time! Ready to fall in love with the easiest, most crowd-pleasing sauce you’ll ever make? Let’s dive in!
Why You’ll Love This Peanut Sauce for Spring Rolls
Restaurant Quality at Home
First things first—this sauce tastes just like what you’d get at your favorite Asian restaurant, maybe even better! The combination of creamy peanut butter with savory hoisin sauce creates that perfect balance of sweet and salty that keeps you coming back for more. The texture is smooth and velvety, coating each spring roll perfectly without being too thick or too runny.
Budget-Friendly Goodness
Making peanut sauce for spring rolls at home saves you serious money compared to ordering takeout. A jar of peanut butter, some basic seasonings, and you’ve got enough sauce to serve a crowd! Plus, you control exactly what goes into it—no mysterious ingredients or additives. Your wallet will thank you, and so will your family when they taste how fresh and flavorful homemade really is.
Versatile and Customizable
Here’s the beautiful thing about this recipe: it’s incredibly adaptable! Want it spicier? Add more sriracha. Prefer it sweeter? A touch more honey does the trick. You can make it nut-free (we’ll share that tip later!), adjust the consistency, or even use it beyond spring rolls.
Drizzle it over rice bowls, toss it with noodles, or use it as a salad dressing. Similar to our versatile honey mustard sauce, this peanut sauce becomes your kitchen’s secret weapon. Once you master this recipe, you’ll find yourself reaching for it again and again—it’s that good!
How to Make Peanut Sauce for Spring Rolls
Quick Overview
This peanut sauce for spring rolls comes together in minutes and requires zero cooking skills. Seriously, if you can whisk, you can make this sauce! The secret is in the ratio of ingredients and how you combine them for that silky-smooth texture everyone loves.
Total Time: 5-7 minutes
Prep Time: 5 minutes
Cook Time: 0-2 minutes (optional warming)
Servings: Makes about 1 cup (enough for 12-16 spring rolls)
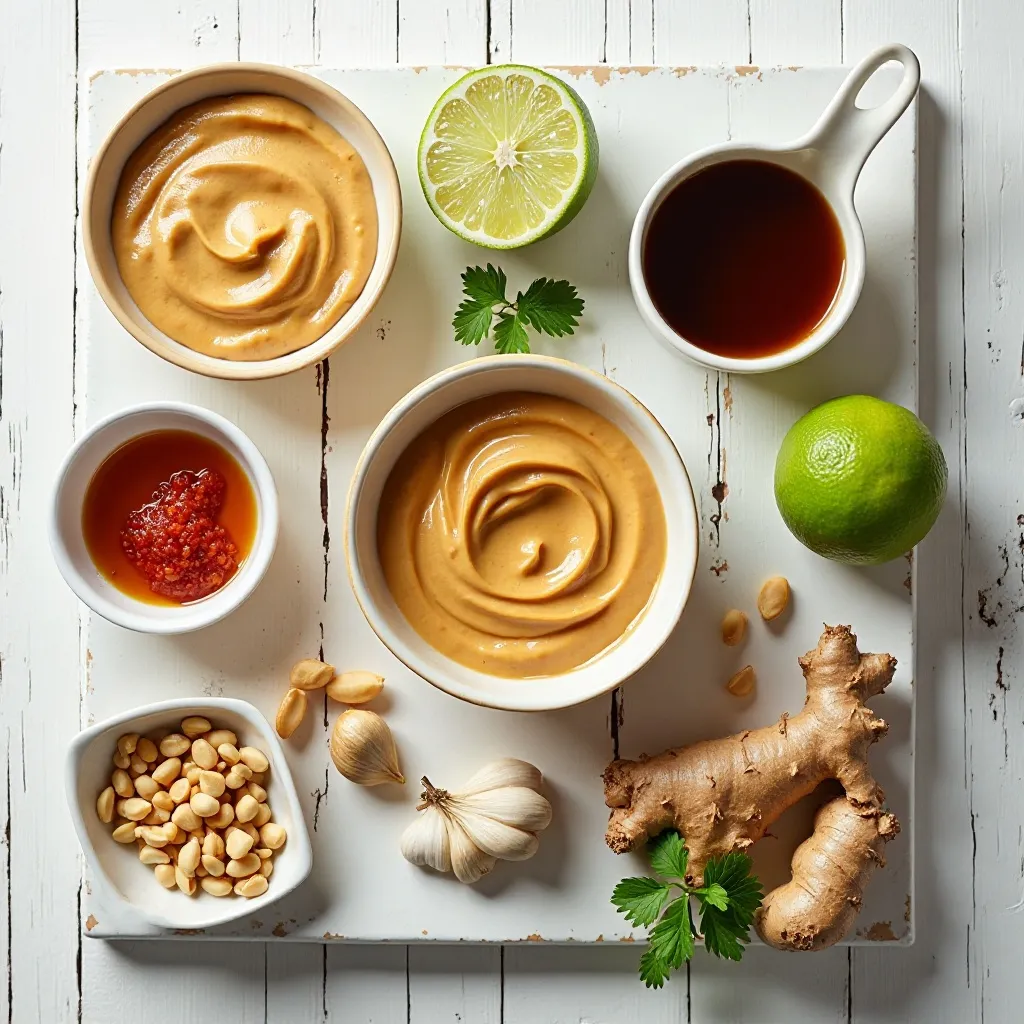
Key Ingredients for Peanut Sauce for Spring Rolls
Here’s everything you’ll need to create this incredible sauce:
Base Ingredients:
- ½ cup creamy peanut butter (regular or natural works great)
- 2 tablespoons hoisin sauce (adds that sweet-savory depth)
- 2 tablespoons soy sauce or tamari (for gluten-free option)
- 1 tablespoon rice vinegar (or lime juice for tang)
- 1 tablespoon honey or maple syrup
- 2-3 cloves garlic, minced (fresh is best!)
- ⅓ to ½ cup warm water (to reach desired consistency)
Optional Add-Ins:
- 1 teaspoon sriracha or chili garlic sauce (for heat lovers)
- 1 teaspoon sesame oil (adds nutty richness)
- ½ teaspoon fresh grated ginger (extra zing!)
- Crushed roasted peanuts for garnish
Pro Tip: Use warm water instead of cold—it helps the peanut butter blend much more smoothly!
Step-by-Step Instructions
Step 1: Prepare Your Bowl
Grab a medium-sized mixing bowl and your favorite whisk. Make sure the bowl is big enough to whisk comfortably without splashing—nobody wants peanut sauce on the ceiling! Having all your ingredients measured and ready before you start makes this process even smoother.
Step 2: Combine the Base
Add your peanut butter to the bowl first. If your peanut butter is very thick or cold, you can warm it in the microwave for about 10-15 seconds to make whisking easier. Now add the hoisin sauce, soy sauce, rice vinegar, and honey right on top. Start whisking these together. At first, it might look lumpy or separated—don’t worry, that’s totally normal!
Step 3: Add Garlic and Seasonings
Stir in your minced garlic. This is when the sauce starts smelling absolutely incredible! If you’re adding sriracha, ginger, or sesame oil, toss those in now too. Keep whisking until everything is combined, even if it still looks thick and paste-like.
Step 4: The Water Magic
Here’s where the transformation happens! Start adding warm water one tablespoon at a time while whisking constantly. You’ll notice the sauce might look curdled or weird at first—keep going! Keep adding water gradually and whisking until the sauce becomes smooth, glossy, and reaches your desired consistency. For a dipping sauce, aim for something that coats a spoon but still drips off slowly. For a drizzling sauce, add a bit more water.
Step 5: Taste and Adjust
This is the fun part! Dip a spoon in and taste your creation. Need more sweetness? Add a bit more honey. Want it tangier? Squeeze in some lime juice. Too thick? More water. Too thin? A touch more peanut butter will thicken it right up. Make it yours!
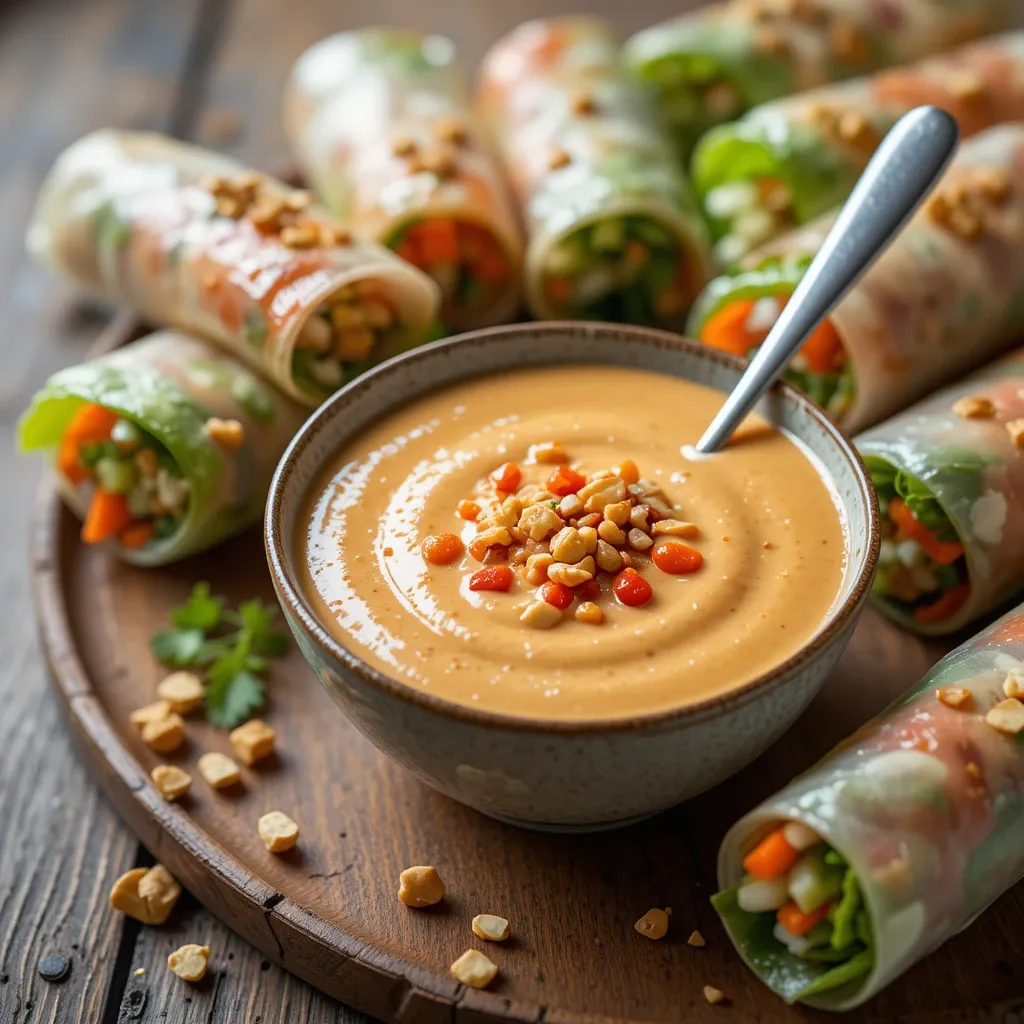
Step 6: Serve or Store
Transfer your peanut sauce to a serving bowl. If you want to get fancy, sprinkle some crushed peanuts on top and drizzle with sriracha for a beautiful presentation. The sauce is ready to use immediately, or you can refrigerate it for later.
Optional Warming Method: Some families prefer their peanut sauce slightly warm. Simply heat it gently in a small pot over low heat, whisking constantly, for about 2 minutes. This deepens the flavors and creates an extra-silky texture.
What to Serve Peanut Sauce for Spring Rolls With
While this sauce is obviously perfect for fresh spring rolls, don’t stop there! Here are some fantastic pairing ideas:
Main Dishes:
- Fresh Vietnamese spring rolls (goi cuon) with shrimp or tofu
- Crispy egg rolls or fried spring rolls
- Grilled chicken satay skewers
- Rice paper wraps filled with your favorite veggies
Sides and Bowls:
- Cold sesame noodle salads
- Asian-inspired grain bowls with quinoa or rice
- Crunchy cabbage slaw
- Lettuce wraps with ground turkey or plant-based protein
Veggies for Dipping:
- Cucumber sticks
- Carrot strips
- Bell pepper slices
- Snap peas
Beverages:
- Iced green tea
- Fresh lemonade
- Sparkling water with lime
- Coconut water for a tropical twist
The sauce also makes an incredible salad dressing when thinned out with a bit more water or rice vinegar. Try it on an Asian-inspired chopped salad—your family will love it!
Top Tips for Perfecting Peanut Sauce for Spring Rolls
Tip 1: Choose the Right Peanut Butter
Natural peanut butter works beautifully, but it tends to be runnier, so you might need less water. Regular creamy peanut butter (like Jif or Skippy) gives you a more consistent result every time. Avoid crunchy peanut butter unless you specifically want chunky sauce—most people prefer it smooth for dipping.
Tip 2: Temperature Matters
Always use warm or room temperature water, never cold. Cold water makes the peanut butter seize up and become grainy. If your sauce looks separated or grainy, it’s probably a temperature issue. Try warming it gently while whisking to bring it back together.
Tip 3: Add Water Gradually
The biggest mistake beginners make is dumping all the water in at once. Add it slowly, whisking between additions. This gives you complete control over the consistency and prevents that weird, separated look. Remember, you can always add more water, but you can’t take it out!
Tip 4: Fresh Garlic is Best
While garlic powder works in a pinch (use ¼ teaspoon), fresh minced garlic gives you that authentic, vibrant flavor. If you’re worried about raw garlic being too sharp, you can briefly sauté it in a tiny bit of oil before adding it to the sauce. This mellows it out beautifully.
Tip 5: Make It Nut-Free
For families with peanut allergies, use sunflower seed butter or tahini instead! The flavor will be slightly different but still delicious. You might want to add an extra touch of honey to balance the slight bitterness of sunflower seed butter.
Tip 6: Adjust for Kids
If you’re making this for little ones, skip the sriracha and use mild hoisin sauce. You can always offer hot sauce on the side for adults who want extra kick. Kids love the natural sweetness of the peanut butter and honey combination.
Tip 7: Prevent Separation
If your sauce separates after sitting, don’t panic! This is normal, especially with natural peanut butter. Just give it a good stir or whisk, and it’ll come back together. If it’s too thick after refrigeration, whisk in a tablespoon of warm water.
Storing and Reheating Tips
Refrigerator Storage
Store your peanut sauce in an airtight container in the refrigerator for up to 7 days. Glass jars or plastic containers with tight-fitting lids work perfectly. The sauce will thicken as it chills—this is completely normal! Before serving, let it sit at room temperature for about 10 minutes, then stir well. You can also add a tablespoon or two of warm water and whisk to restore the original consistency.
Freezing Instructions
Yes, you can freeze peanut sauce! Pour it into ice cube trays for individual portions, or freeze larger amounts in freezer-safe containers for up to 3 months. Leave a little room at the top of the container since the sauce expands slightly when frozen. To thaw, transfer to the refrigerator overnight or microwave on low power in 15-second intervals, stirring between each.
Reheating Method
For the best flavor, reheat peanut sauce gently. Microwave in a microwave-safe bowl in 15-second bursts, stirring between each, until warm. Alternatively, warm it in a small saucepan over low heat, whisking frequently. Don’t overheat—you just want it lukewarm, not hot. Hot peanut sauce can become oily and separate.
Make-Ahead Magic
This sauce is perfect for meal prep! Make a double batch on Sunday and use it throughout the week. It’s a game-changer for quick weeknight dinners. Just pull it out, stir, and serve with whatever you’re making.
Frequently Asked Questions
Can I make peanut sauce without hoisin sauce?
Absolutely! If you don’t have hoisin sauce, you can substitute with a combination of soy sauce, honey, and a tiny bit of molasses or brown sugar. Use 1 tablespoon soy sauce plus 1 tablespoon honey to replace 2 tablespoons hoisin. The flavor will be slightly different but still delicious.
Why is my peanut sauce grainy or separated?
This usually happens when cold water meets peanut butter, or when ingredients aren’t whisked thoroughly enough. To fix it, warm the sauce gently while whisking vigorously. If that doesn’t work, transfer it to a blender and blend on low speed until smooth.
How do I make peanut sauce thicker or thinner?
To thicken: Add more peanut butter, one tablespoon at a time, whisking well after each addition. You can also let it sit in the fridge—it naturally thickens when cold. To thin: Whisk in warm water, one tablespoon at a time, until you reach your desired consistency. For a drizzle-worthy sauce, you might need up to ¾ cup total water.
Is peanut sauce gluten-free?
It can be! Use tamari instead of regular soy sauce, and check that your hoisin sauce is labeled gluten-free (some brands contain wheat). Most peanut butter, rice vinegar, and other ingredients are naturally gluten-free, but always check labels to be sure.
Can I make this sauce spicier?
Definitely! Start with ½ teaspoon sriracha and taste, adding more if you want extra heat. You can also use chili garlic sauce, sambal oelek, or a pinch of red pepper flakes. For serious heat lovers, add a dash of cayenne pepper or fresh minced Thai chilies.
What can I substitute for peanut butter?
For nut-free options, try sunflower seed butter, tahini, or almond butter. Each creates a slightly different flavor profile. Sunflower seed butter is the closest to peanut butter in texture. Tahini gives you a more sesame-forward taste that’s equally delicious but distinctly different.
How long does peanut sauce last?
In the refrigerator, properly stored peanut sauce lasts 5-7 days. In the freezer, it stays good for up to 3 months. Always smell and taste before using older sauce—if it smells off or tastes rancid, toss it and make a fresh batch.
Can kids help make this recipe?
Yes! This is a perfect recipe for little helpers. Kids can measure ingredients, whisk the sauce, and taste-test along the way. Just supervise the whisking to prevent spills, and handle the garlic mincing yourself for younger children.
Tips for Avoiding Common Mistakes
Mistake 1: Using Cold Ingredients
Starting with refrigerator-cold peanut butter makes everything harder. Let your peanut butter sit at room temperature for 20-30 minutes before making the sauce, or warm it briefly in the microwave. This simple step prevents lumps and makes whisking a breeze.
Mistake 2: Adding All the Water at Once
Dumping in all the water at once is a recipe for disaster—literally! You’ll end up with a thin, separated mess. Always add water gradually, whisking constantly, so you can stop at the perfect consistency.
Mistake 3: Not Tasting as You Go
Everyone’s taste preferences are different! What’s perfect for one person might need tweaking for another. Taste your sauce and adjust the seasonings to your family’s preferences. More sweet? More tangy? More savory? Trust your taste buds!
Mistake 4: Overheating the Sauce
If you choose to warm your peanut sauce, keep the heat low. High heat can cause the oils in the peanut butter to separate, making your sauce greasy and broken. Gentle heat is all you need to bring out the flavors.
Mistake 5: Using Old or Rancid Peanut Butter
Peanut butter can go rancid, especially natural varieties. Always smell your peanut butter before using it. If it smells off, stale, or funny, don’t use it! Fresh peanut butter makes all the difference in creating a vibrant, delicious sauce.
Mistake 6: Forgetting to Adjust After Refrigeration
Remember that your sauce will thicken in the fridge! Don’t worry if it seems too thick when you pull it out. Just whisk in a little warm water, and it’ll return to that perfect, dippable consistency.
Nutrition Information (Per 2 Tablespoon Serving)
| Nutrient | Amount |
|---|---|
| Calories | 95 |
| Total Fat | 7g |
| Saturated Fat | 1g |
| Sodium | 210mg |
| Total Carbohydrates | 7g |
| Dietary Fiber | 1g |
| Sugars | 4g |
| Protein | 3g |
Note: Nutrition information is approximate and may vary based on specific brands and ingredients used.
There you have it—the ultimate peanut sauce for spring rolls that’ll have your family asking for seconds, thirds, and maybe even fourths! This recipe is proof that incredible flavor doesn’t have to be complicated or time-consuming. With just a handful of pantry staples and a few minutes of whisking, you’re creating something truly special.
The beauty of this sauce is how it brings people together. Whether you’re teaching your kids to roll their first spring rolls, hosting a casual dinner party, or just treating yourself to a delicious snack, this peanut sauce elevates everything it touches. It’s become a staple in so many kitchens because it’s reliable, delicious, and endlessly versatile.
So grab that jar of peanut butter from your pantry and get whisking! Your taste buds will thank you, your wallet will thank you, and your family will definitely thank you. Happy cooking, and don’t forget to save any leftovers—though honestly, there probably won’t be any!