
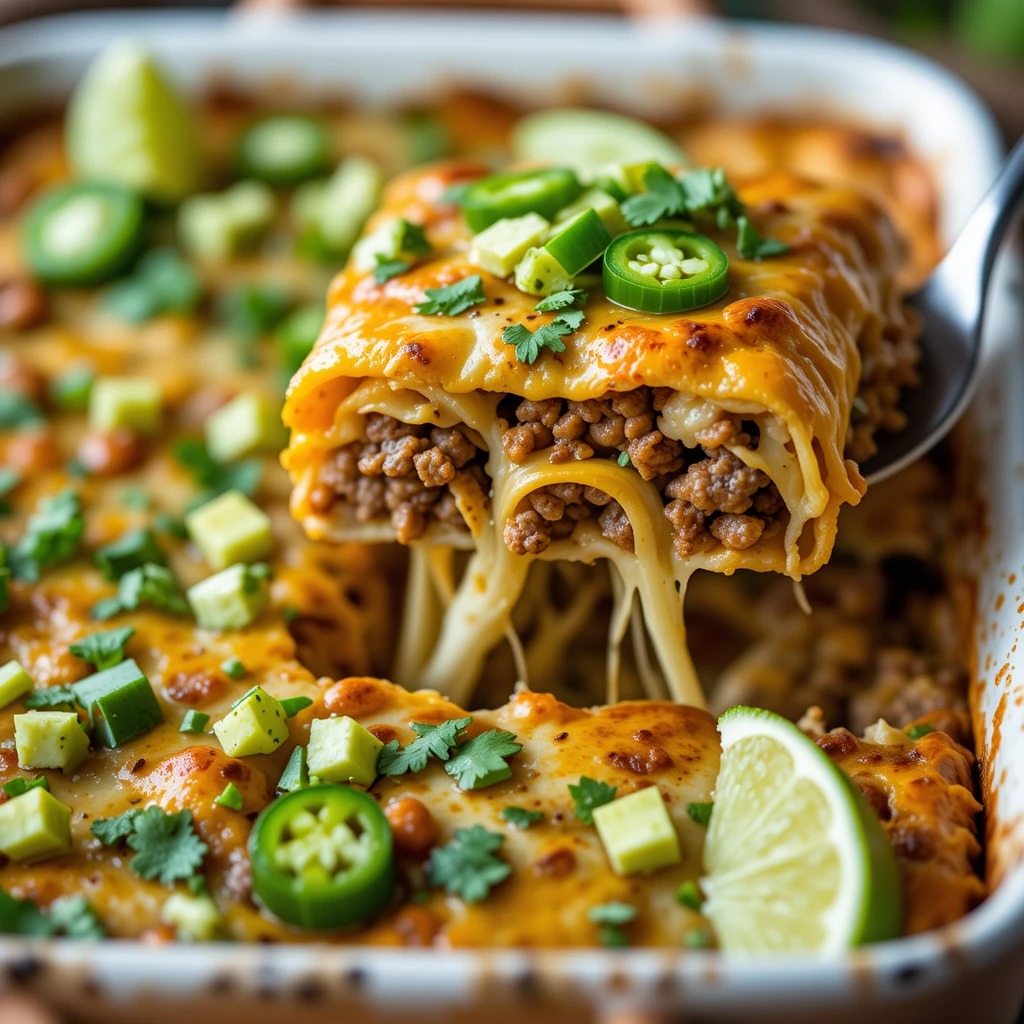
Easy Keto Taco Casserole with Zucchini in 30 Minute
Imagine layers of seasoned ground beef, tender zucchini noodles, melted cheese, and zesty taco flavors all baked into one glorious dish. This keto taco casserole with zucchini is pure comfort food magic without the carb overload! I discovered this recipe during my own keto journey when I was desperately craving Mexican food but wanted to keep things healthy.
It’s become our weekly staple, and my kids don’t even realize they’re eating their veggies. Ready in just 45 minutes with minimal cleanup, this crowd-pleaser proves that eating low-carb doesn’t mean sacrificing flavor or satisfaction.
What is Keto Taco Casserole with Zucchini?
Ever wondered how to enjoy taco night without the carb guilt? This keto taco casserole with zucchini is your answer! It’s basically all the delicious flavors of traditional tacos wrapped up in a bubbly, cheesy casserole where spiralized zucchini plays the hero role instead of pasta or tortillas.
You know what they say, the way to a person’s heart is through their stomach, and this dish delivers straight to the heart with every bite. Don’t let the word “zucchini” scare you – even veggie skeptics become believers after one forkful!
Why You’ll Love This Keto Taco Casserole with Zucchini
It’s a Complete Meal in One Dish
This recipe is everything you love about taco night packed into a single baking dish. The combination of protein-rich ground beef, fiber-filled zucchini, and calcium-loaded cheese creates a nutritionally balanced meal that keeps you satisfied for hours.
The zucchini noodles absorb all those beautiful taco seasonings while maintaining a slight crunch that adds wonderful texture. Unlike my popular keto lasagna recipe, this version comes together even faster and requires zero boiling or pre-cooking of the “noodles.”
Budget-Friendly Without Sacrificing Flavor
Making this keto taco casserole with zucchini at home costs a fraction of what you’d spend at a Mexican restaurant, and you’ll have leftovers for days! Zucchini is incredibly affordable, especially during peak growing season, and a little ground beef goes a long way when you’re bulking it up with vegetables. The basic pantry spices you likely already own create that authentic taco shop flavor without needing expensive specialty ingredients.
Customizable Toppings Make It Personal
The real magic happens with the toppings! Fresh cilantro adds a bright herbaceous note, while diced avocado brings creamy richness. A dollop of sour cream cools down the spices, and a squeeze of lime juice adds that essential zing. Hot sauce enthusiasts can drizzle their favorite brand on top, while those who prefer milder flavors can skip it entirely. Everyone gets to build their perfect plate, making this ideal for families with different taste preferences.
Ready to transform your weeknight dinner routine? Let’s make this incredible keto taco casserole with zucchini together!
How to Make Keto Taco Casserole with Zucchini
Quick Overview
This keto taco casserole with zucchini is surprisingly simple to prepare, even for beginner cooks. You’ll love how the seasoned beef mingles with tender zucchini noodles while the melted cheese creates an irresistible golden crust on top. The casserole bakes to bubbly perfection, filling your kitchen with mouthwatering aromas that’ll have everyone asking “when’s dinner ready?”
Created with AI guidance and not personally tested, we do our best to ensure accuracy.
Preparation Time:
- Prep Time: 15 minutes
- Cook Time: 30 minutes
- Total Time: 45 minutes
- Servings: 6-8 portions
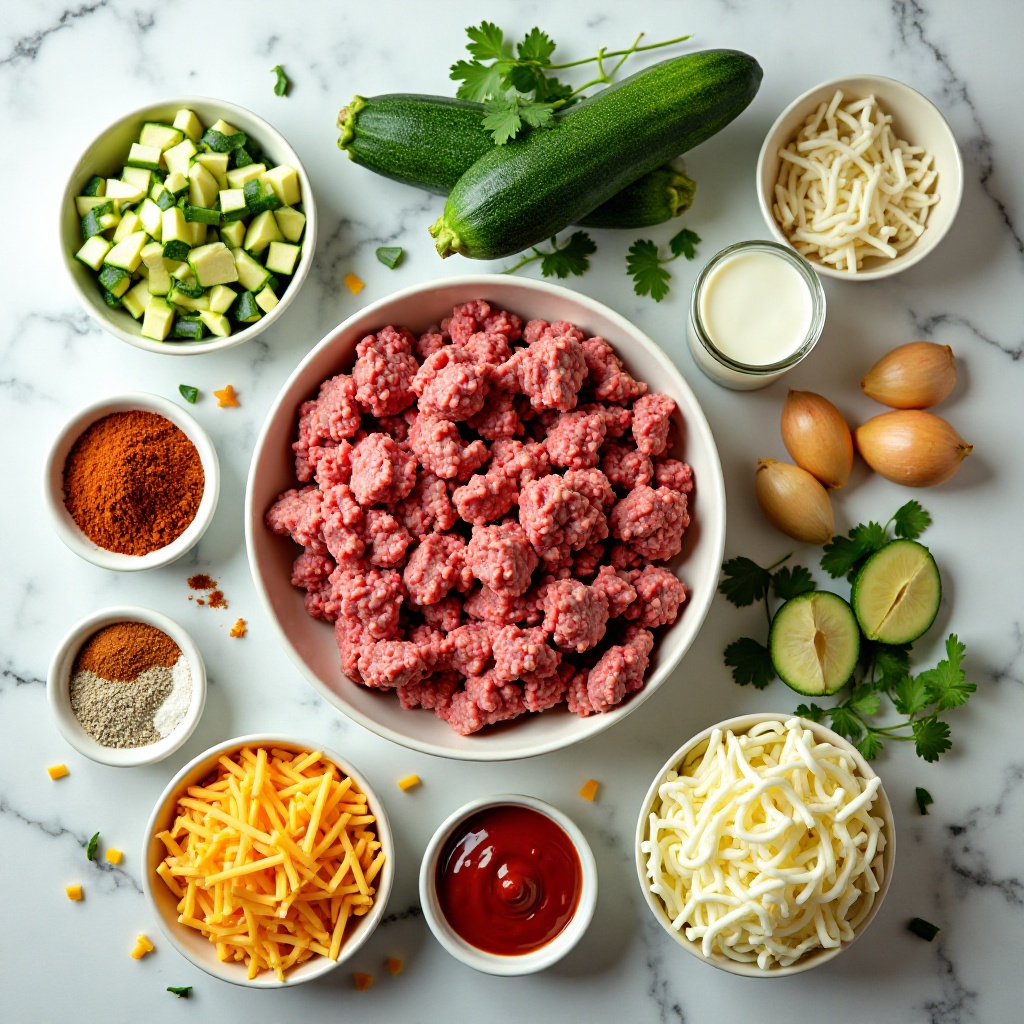
Key Ingredients for Keto Taco Casserole with Zucchini
For the Casserole Base:
- 1.5 pounds ground beef (80/20 blend works best)
- 4 medium zucchinis, spiralized or julienned
- 1 medium onion, diced
- 3 cloves garlic, minced
- 1 can (14 oz) diced tomatoes with green chilies
- 2 tablespoons tomato paste
- 2 cups shredded cheddar cheese
- 1 cup shredded mozzarella cheese
Taco Seasoning Blend:
- 2 tablespoons chili powder
- 1 tablespoon cumin
- 1 teaspoon paprika
- 1 teaspoon oregano
- 1/2 teaspoon garlic powder
- 1/2 teaspoon onion powder
- 1/4 teaspoon cayenne pepper (adjust to taste)
- Salt and black pepper to taste
For Topping:
- Fresh cilantro, chopped
- Sour cream
- Diced avocado
- Sliced jalapeños
- Lime wedges
- Sugar-free salsa (optional)
Step-by-Step Instructions
Prepare Your Zucchini Noodles
Start by washing and drying your zucchini thoroughly. Using a spiralizer or julienne peeler, create long zucchini noodles. If you don’t have these tools, simply slice the zucchini into thin half-moons. Place the zucchini noodles in a colander and sprinkle with 1 teaspoon of salt. Let them sit for 10 minutes to draw out excess moisture. This crucial step prevents your casserole from becoming watery. After 10 minutes, gently squeeze the zucchini in small handfuls to remove as much liquid as possible, then pat dry with paper towels.
Brown the Ground Beef
Preheat your oven to 375°F (190°C). Heat a large skillet over medium-high heat and add the ground beef. Break it up with a wooden spoon as it cooks, ensuring even browning. Cook for about 6-8 minutes until no pink remains and the meat develops a nice brown crust. The fat from the beef adds flavor, but if there’s excessive grease, drain most of it, leaving about 1 tablespoon in the pan for flavor. Season the meat with a pinch of salt and pepper while it cooks.
Sauté the Aromatics
Push the cooked beef to the sides of the skillet and add the diced onion to the center. Sauté for 3-4 minutes until the onion becomes translucent and fragrant. Add the minced garlic and cook for another 30 seconds, stirring constantly to prevent burning. The garlic should smell amazing but not take on any color. Mix everything together so the aromatics coat the beef evenly.
Add Seasonings and Tomatoes
Sprinkle all your taco seasonings over the beef mixture: chili powder, cumin, paprika, oregano, garlic powder, onion powder, and cayenne pepper. Stir everything together and let the spices toast for about 1 minute – this brings out their essential oils and deepens the flavors. Add the tomato paste and stir until it’s completely incorporated and turns a deeper red color. Pour in the diced tomatoes with green chilies, including all the juices. Reduce heat to medium-low and let this simmer for 5 minutes, stirring occasionally. The mixture should thicken slightly and smell incredible.
Assemble the Casserole Layers
Grease a 9×13 inch baking dish with butter or cooking spray. Spread half of the prepared zucchini noodles evenly across the bottom of the dish. They don’t need to be perfectly arranged – just create an even layer. Spoon half of the seasoned beef mixture over the zucchini, spreading it to cover completely. Sprinkle 1 cup of cheddar cheese over the beef layer. Repeat these layers one more time: remaining zucchini, remaining beef mixture, and finish with the remaining cheddar cheese plus all the mozzarella cheese on top. The double cheese layer creates that irresistible golden, bubbly top we all love.
Bake to Perfection
Cover the baking dish tightly with aluminum foil and place it in your preheated oven. Bake covered for 20 minutes – this allows the zucchini to cook through and the flavors to meld together. After 20 minutes, carefully remove the foil and continue baking for an additional 10 minutes uncovered. The cheese should be melted, bubbly, and starting to turn golden brown in spots. If you want an extra crispy cheese top, turn on the broiler for the last 2 minutes, but watch it closely to prevent burning.
Rest Before Serving
Remove the casserole from the oven and let it rest for 5-10 minutes before cutting. This resting time is essential – it allows the casserole to set up so your slices hold their shape instead of falling apart. The bubbling will settle down, and the cheese will firm up just slightly, making serving so much easier. Trust me, I learned this the hard way when I tried serving it immediately and ended up with beautiful but messy plates!
What to Serve Keto Taco Casserole with Zucchini With
This casserole is hearty enough to stand alone, but pairing it with complementary sides takes your meal to the next level.
Fresh Salads: A crisp romaine lettuce salad with a lime-cilantro dressing cuts through the richness beautifully. Try adding cucumber, radishes, and a sprinkle of pepitas for extra crunch and nutrition.
Cauliflower Rice: For those who want extra volume on their plate, cilantro-lime cauliflower rice is a perfect low-carb companion. It soaks up any extra sauce and adds another serving of vegetables.
Keto-Friendly Chips: Make homemade cheese crisps by baking small mounds of shredded cheddar until crispy. These provide that satisfying crunch you might be missing from traditional tortilla chips.
Refreshing Beverages: Pair with unsweetened iced tea with fresh lime, sparkling water with a splash of sugar-free lime juice, or my personal favorite – a virgin mojito made with fresh mint and lime.
Fresh Guacamole: While avocado is already suggested as a topping, serving a bowl of chunky guacamole on the side adds extra healthy fats and makes the meal feel more festive.
Top Tips for Perfecting Keto Taco Casserole with Zucchini
Salt Your Zucchini – This Cannot Be Skipped
The single most important step is removing moisture from your zucchini. Zucchini is about 95% water, and if you skip the salting step, you’ll end up with a soupy mess instead of a firm, sliceable casserole. After spiralizing, always salt the noodles and let them drain for at least 10 minutes. Squeeze them thoroughly – you’ll be amazed at how much water comes out. Some cooks even place the zucchini between layers of paper towels and press with a heavy pan for extra moisture removal.
Choose the Right Ground Beef Ratio
While leaner beef seems healthier, 80/20 ground beef provides the best flavor and moisture for this dish. The fat renders out during cooking and carries all those beautiful spice flavors throughout the casserole. If you prefer leaner meat like 90/10, consider adding a tablespoon of olive oil or butter when browning to prevent dryness. For even more richness, try using ground beef that’s 85/15 – it’s the sweet spot.
Let Your Spices Toast
Don’t just dump the seasonings in and immediately add liquid. Let those spices sit in the hot beef for 30-60 seconds first. This toasting process activates the essential oils in the spices and creates deeper, more complex flavors. You’ll notice the spices become very fragrant – that’s exactly what you want.
Layer Strategically for Best Results
Always start with zucchini on the bottom, not the beef. This creates a barrier between the baking dish and the meat, preventing sticking and making cleanup easier. The cheese between layers acts as a binder, helping everything hold together when you cut portions. Don’t skip the middle cheese layer – it’s not just about abundance, it serves a structural purpose!
Temperature Matters for Cheese Perfection
Using room temperature cheese melts more evenly than cold cheese straight from the refrigerator. Take your shredded cheese out about 15 minutes before assembling. Also, shred your own cheese from a block rather than buying pre-shredded. Pre-shredded cheese is coated with anti-caking agents that prevent it from melting as smoothly and creating those gorgeous cheese pulls we all love.
Make It Ahead for Better Flavor
This casserole actually tastes even better the next day as the flavors continue to develop. You can assemble it completely, cover tightly, and refrigerate for up to 24 hours before baking. Just add 5-10 minutes to the covered baking time since you’re starting with a cold dish. This make-ahead quality makes it perfect for meal prep or entertaining.
Customize the Heat Level
Control the spiciness by adjusting the cayenne pepper and choosing mild or spicy diced tomatoes with green chilies. For a family-friendly version, use all mild ingredients and let people add hot sauce at the table. For serious heat lovers, add diced jalapeños to the beef mixture or use pepper jack cheese in your cheese blend.
Storing and Reheating Tips
Refrigerator Storage
Let the casserole cool completely to room temperature before storing – this usually takes about 30 minutes. Cover the entire baking dish tightly with plastic wrap or aluminum foil, or transfer individual portions to airtight containers. Properly stored, your keto taco casserole with zucchini stays fresh in the refrigerator for up to 4 days. The flavors actually intensify over time, making day-two portions taste even better than day one.
Freezing for Later
This casserole freezes beautifully for up to 3 months. For best results, cut the cooled casserole into individual portions and wrap each piece tightly in plastic wrap, then place in a freezer-safe container or zip-top bag. Label with the date so you remember when you made it. Alternatively, freeze the entire assembled but unbaked casserole – just wrap the baking dish in several layers of plastic wrap and foil. This method means you can pull it out, thaw overnight, and bake fresh.
Reheating Instructions
For refrigerated portions, the microwave works perfectly. Place a serving in a microwave-safe dish, cover loosely with a damp paper towel to prevent drying out, and heat on 70% power for 2-3 minutes, stirring halfway through. For oven reheating, which I prefer because it maintains better texture, preheat to 350°F, cover the portion with foil, and heat for 15-20 minutes until warmed through. Remove the foil for the last 5 minutes to crisp up the cheese on top.
For frozen portions, thaw overnight in the refrigerator for best results, then reheat using the methods above. In a pinch, you can reheat from frozen in the microwave using the defrost setting first, then regular heating, though the texture won’t be quite as good.
Common Mistakes to Avoid When Making Keto Taco Casserole with Zucchini
Not Removing Enough Moisture from Zucchini
I cannot stress this enough – watery zucchini ruins the casserole. Many home cooks think they’ve squeezed enough water out, but you can always get more. Really press those zucchini noodles hard. If you think you’ve squeezed them enough, squeeze them one more time. Your casserole’s success depends on this step.
Overcooking the Zucchini Initially
Some recipes suggest pre-cooking the zucchini noodles before assembling, but this is a mistake. The zucchini will cook perfectly during the baking time, and pre-cooking makes them mushy and releases even more water. Keep your zucchini raw (but drained) when assembling.
Using Pre-Packaged Taco Seasoning
Store-bought taco seasoning often contains hidden sugars, starches, and fillers that add unnecessary carbs. Making your own spice blend takes two minutes and tastes infinitely better. Plus, you can control the salt level and spice intensity perfectly for your family’s preferences.
Cutting Portions Too Soon
I know it’s tempting to dig in immediately, but cutting into the casserole while it’s piping hot and bubbling will result in messy, sloppy portions. That 5-10 minute rest time allows everything to firm up and set properly. Use this time to prepare your toppings and set the table.
Not Adjusting Bake Time for Different Ovens
Every oven runs slightly differently. If you know your oven runs hot, check the casserole a few minutes early. If it runs cool, it might need extra time. The casserole is done when the cheese is melted and bubbly, and you can see the edges starting to turn golden brown. A thermometer inserted in the center should read at least 165°F.
Skipping the Broiler Step
Those last two minutes under the broiler transform the top from merely melted cheese to gorgeously golden, slightly crispy perfection with caramelized edges. It makes such a difference in both appearance and texture. Just don’t walk away – cheese can go from golden to burned in seconds under a broiler.
Frequently Asked Questions
Can I use ground turkey or chicken instead of beef?
Absolutely! Ground turkey or chicken works wonderfully in this recipe. Since these meats are leaner, add a tablespoon of olive oil when browning to prevent dryness. Ground turkey has a milder flavor, so you might want to increase the seasonings slightly. I also recommend using dark meat ground chicken or turkey rather than all white meat for better moisture and flavor.
How many net carbs are in each serving?
Each serving of this keto taco casserole with zucchini contains approximately 6-8 net carbs, depending on portion size and specific ingredients used. The zucchini contributes about 3-4g net carbs, while the tomatoes and seasonings add the rest. Using full-fat cheese and avoiding any sugar-added products keeps the carb count keto-friendly.
Can I make this casserole dairy-free?
Yes, with modifications. Use nutritional yeast or dairy-free cheese alternatives, though the texture and flavor will differ from the traditional version. Coconut cream can replace sour cream for topping. The casserole won’t have the same gooey, melty quality without traditional cheese, but it’s still delicious and holds together reasonably well.
What if I don’t have a spiralizer?
No problem! You can use a julienne peeler, mandoline slicer, or even just cut the zucchini into thin matchsticks or rounds with a regular knife. The shape doesn’t matter – you’ll still get all the delicious flavors. Pre-spiralized zucchini noodles are also available in many grocery stores in the produce section, though they’re more expensive.
Is this recipe meal prep friendly?
Extremely! This is one of my favorite meal prep recipes because it portions beautifully and tastes great all week. Divide into individual containers after baking and cooling, and grab one each day for lunch or dinner. It reheats well and actually tastes better on day two and three as the flavors develop.
Can I add other vegetables?
Definitely! Bell peppers, mushrooms, and cauliflower florets work beautifully. Dice them small and sauté with the onions. Just remember that adding high-moisture vegetables means you’ll need to cook them down to release their water before adding to the casserole. Spinach is another great addition – just wilt it and squeeze out the excess water first.
Why did my casserole turn out watery?
The most common cause is not removing enough moisture from the zucchini. Always salt, drain, and squeeze thoroughly. Other causes include using tomatoes packed in too much liquid (drain them well), not simmering the beef mixture long enough to thicken, or cutting into the casserole too soon before it has time to set.
Can I use Mexican cheese blend instead of cheddar and mozzarella?
Absolutely! Mexican cheese blend works perfectly and adds nice variety with the combination of cheeses. Monterey Jack, Colby, or pepper jack are all excellent choices too. The key is using good melting cheeses. Avoid using all Parmesan or similar hard cheeses as they don’t create that gooey texture we’re looking for.
Nutrition Information
| Nutrient | Per Serving (1/8 of recipe) |
|---|---|
| Calories | 385 |
| Total Fat | 28g |
| Saturated Fat | 13g |
| Protein | 26g |
| Total Carbohydrates | 10g |
| Dietary Fiber | 2g |
| Net Carbohydrates | 8g |
| Sugar | 4g |
| Sodium | 520mg |
| Cholesterol | 95mg |
Note: Nutritional values are approximate and may vary based on specific ingredients used and portion sizes.
This keto taco casserole with zucchini has become a permanent fixture in my weekly meal rotation, and I hope it does in yours too! The combination of familiar taco flavors with the clever use of zucchini noodles creates a dish that satisfies cravings while keeping you on track with your low-carb lifestyle. Whether you’re cooking for keto veterans or trying to sneak more vegetables into your family’s diet, this casserole delivers on every level.
The beauty of this recipe lies in its flexibility – you can prep it ahead, customize the heat level, adjust the toppings to your preferences, and even freeze portions for those busy nights when cooking from scratch isn’t an option. It’s proven that eating keto doesn’t mean giving up the comfort foods you love; it just means getting creative with how you make them.
I’d love to hear how your keto taco casserole with zucchini turns out! Did you add any unique toppings or make substitutions that worked wonderfully? Drop a comment below and share your experience. And if you’re looking for more low-carb Mexican-inspired recipes, check out my keto enchilada bake and cauliflower rice burrito bowls. Happy cooking, and here’s to delicious, guilt-free comfort food!