
Best Keto Chicken Chili Recipe – Friendly Family Dinner
Imagine spooning into a bowl of rich, hearty chili that warms you from the inside out while keeping your carb count wonderfully low. This Keto Chicken Chili brings together tender chicken, robust spices, and a medley of peppers in a thick, satisfying sauce that’ll make you forget you’re eating healthy.
It’s comfort food that loves you back, ready in under 45 minutes and perfect for those busy weeknights when you need something substantial without derailing your wellness goals.
What is Keto Chicken Chili?
Ever wondered why chili gets its name? Well, it’s not rocket science—it comes from the chili peppers that give it that signature kick! But here’s the twist: our keto version swaps out the traditional beans for extra veggies and protein-packed chicken.
They say the way to anyone’s heart is through their stomach, and this bowl of goodness proves that theory right. You’re getting all the soul-warming comfort of traditional chili without the carb overload. Ready to fall in love with dinner again?
Why You’ll Love This Keto Chicken Chili
It’s Ridiculously Versatile and Crowd-Pleasing
This isn’t just another diet recipe that tastes like sacrifice. The combination of juicy chicken, smoky cumin, and fire-roasted tomatoes creates layers of flavor that’ll have everyone asking for seconds. The best part? Nobody at your dinner table will even realize they’re eating low-carb. The rich, thick consistency rivals any traditional chili you’ve ever tasted.
Save Money While Eating Better
Making this at home costs a fraction of what you’d spend on restaurant keto meals or pre-made low-carb dinners. A single batch feeds 6-8 people for around $15-20, depending on your local prices. Compare that to $12-15 per serving at a restaurant! Plus, chicken is typically more budget-friendly than beef, making this an economical choice for families watching their grocery bills.
Customize with Amazing Toppings
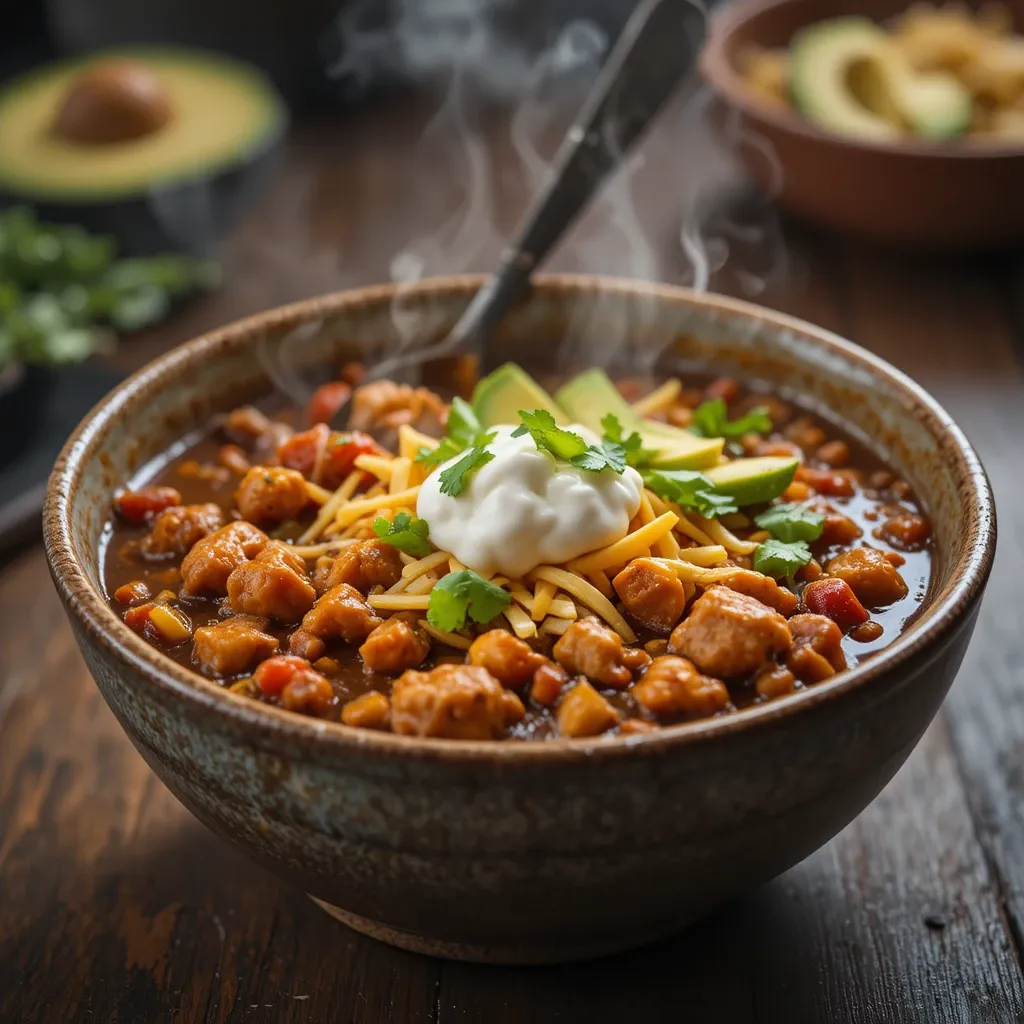
The real magic happens when you load up your bowl with keto-friendly toppings. Think shredded cheddar cheese melting into the hot chili, cool dollops of sour cream, fresh cilantro, diced avocado. Each spoonful becomes a textural adventure. If you love customizable meals like our popular Keto Taco Salad, you’ll absolutely adore this chili. It’s like a blank canvas waiting for your creative touches!
How to Make Keto Chicken Chili
Quick Overview
This recipe delivers maximum flavor with minimal effort. You’ll love how the one-pot method makes cleanup a breeze while developing deep, complex flavors. The chicken becomes incredibly tender as it simmers in the spiced tomato base, absorbing all those beautiful seasonings.
This recipe hasn’t been prepared in our kitchen and was created with AI guidance; we aim to be as accurate as possible.
Time Breakdown:
- Prep Time: 15 minutes
- Cook Time: 30 minutes
- Total Time: 45 minutes
- Servings: 6-8 generous bowls
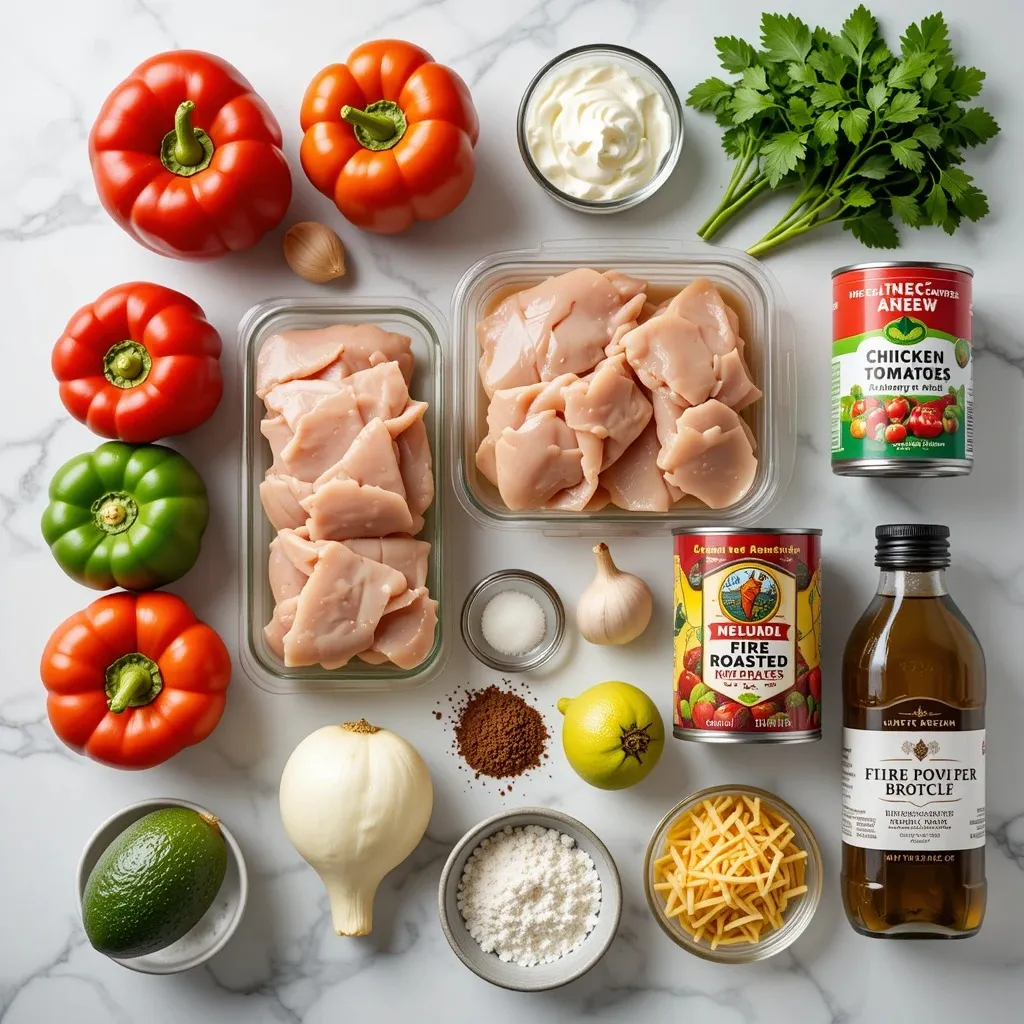
Key Ingredients for Keto Chicken Chili
Protein & Base:
- 2 pounds boneless, skinless chicken thighs or breasts, cut into bite-sized pieces
- 2 tablespoons avocado oil or olive oil
- 1 large yellow onion, diced
- 4 cloves garlic, minced
Peppers & Vegetables:
- 1 large red bell pepper, diced
- 1 large green bell pepper, diced
- 2 jalapeño peppers, seeded and finely chopped (adjust for heat preference)
Liquids & Tomatoes:
- 1 can (28 oz) crushed tomatoes
- 1 can (14.5 oz) fire-roasted diced tomatoes
- 2 cups chicken broth (low sodium preferred)
Seasonings & Spices:
- 3 tablespoons chili powder
- 2 tablespoons ground cumin
- 1 tablespoon smoked paprika
- 1 teaspoon oregano
- 1 teaspoon sea salt (adjust to taste)
- ½ teaspoon black pepper
- ½ teaspoon cayenne pepper (optional, for extra heat)
Optional Toppings:
- Shredded cheddar or Monterey Jack cheese
- Sour cream or Greek yogurt
- Fresh cilantro, chopped
- Avocado slices
- Lime wedges
- Sugar-free hot sauce
Step-by-Step Instructions
Step 1: Prepare Your Ingredients
Start by cutting your chicken into roughly 1-inch cubes. This size ensures the chicken cooks evenly and quickly. Dice your onion and bell peppers into similar-sized pieces for uniform cooking. Mince the garlic finely—don’t skip this step as fresh garlic adds incredible depth. Have all your spices measured and ready in a small bowl so you can add them quickly when needed.
Step 2: Brown the Chicken
Heat the oil in a large, heavy-bottomed pot or Dutch oven over medium-high heat. Once the oil shimmers, add half the chicken pieces in a single layer. Don’t overcrowd the pot—this is crucial for getting a nice golden color. Let the chicken cook undisturbed for 3-4 minutes until it develops a golden-brown crust on one side. Flip and cook for another 2-3 minutes. Remove to a plate and repeat with the remaining chicken. The chicken doesn’t need to be fully cooked through at this stage.
Step 3: Sauté the Vegetables
In the same pot, add the diced onion and bell peppers. The residual oil and chicken bits will flavor your vegetables beautifully. Cook for 5-6 minutes, stirring occasionally, until the onions become translucent and the peppers soften slightly. Add the minced garlic and chopped jalapeños, cooking for another minute until fragrant. You’ll know it’s ready when your kitchen smells absolutely amazing.
Step 4: Add Spices and Toast
Sprinkle in all your spices—chili powder, cumin, smoked paprika, oregano, salt, pepper, and cayenne if using. Stir continuously for about 1 minute. This toasting process wakes up the spices and releases their essential oils, creating a more complex and robust flavor profile. The mixture will become very fragrant and slightly darker.
Step 5: Build Your Chili Base
Pour in the crushed tomatoes, diced tomatoes (with their juices), and chicken broth. Stir well, scraping up any browned bits from the bottom of the pot—that’s pure flavor gold. Return the chicken and any accumulated juices to the pot. Stir everything together until well combined.
Step 6: Simmer to Perfection
Bring the mixture to a boil, then reduce the heat to low. Cover partially with a lid and let it simmer gently for 20-25 minutes. Stir occasionally to prevent sticking. The chili will thicken as it cooks, and the flavors will meld beautifully. The chicken should be tender and fully cooked through, easily shredding with a fork if desired.
Step 7: Final Adjustments
Taste your chili and adjust the seasonings as needed. Some people like more salt, others want extra heat. This is your moment to make it perfect for your palate. If the chili seems too thick, add a splash more broth. If it’s too thin, let it simmer uncovered for a few more minutes.
Step 8: Serve and Enjoy
Ladle the hot chili into bowls and set up a toppings bar with all your favorite garnishes. Let everyone customize their own bowl. The contrast of cold toppings against the hot chili creates an incredible eating experience.
Top Tips for Perfecting Keto Chicken Chili
Choose the Right Chicken Cut
While both work, chicken thighs deliver more flavor and stay moister during the longer cooking time. They have slightly more fat, which adds richness to the chili. Chicken breasts work if that’s your preference, but watch them carefully to prevent drying out. You can even use a combination of both for varied texture.
Don’t Rush the Browning Step
That initial sear on the chicken creates the foundation for deep flavor through the Maillard reaction. Resist the urge to stir too frequently. Let the chicken sit and develop that golden crust. Those browned bits stuck to the pot will dissolve into the sauce later, adding incredible depth.
Adjust Heat Levels to Your Preference
Everyone’s spice tolerance differs. Start with less jalapeño and cayenne, then add more if needed. Remember, you can always add heat, but you can’t take it away. Keep some sour cream handy as it helps cool down overly spicy chili.
Make It Ahead for Better Flavor
Like most chili recipes, this one tastes even better the next day. The overnight rest allows all the spices to fully penetrate the chicken and vegetables. Make it on Sunday for easy weeknight meals throughout the week.
Thicken Naturally Without Flour
If you prefer thicker chili, let it simmer uncovered for the last 10 minutes of cooking. The liquid will reduce and concentrate, creating a luxuriously thick consistency. Alternatively, mash some of the vegetables against the side of the pot to release their starches.
Use Quality Spices
Fresh spices make a noticeable difference. If your chili powder has been sitting in your cabinet for years, it’s time for a replacement. Fresh spices are more potent and aromatic, requiring less quantity for maximum flavor impact.
Storing and Reheating Tips
Refrigerator Storage: Allow the chili to cool completely before transferring to airtight containers. It will keep beautifully in the refrigerator for 4-5 days. The flavors actually improve during this time, making leftovers even more delicious than the original meal. Store toppings separately to maintain their freshness and texture.
Freezer Storage: This chili freezes exceptionally well for up to 3 months. Portion it into freezer-safe containers or heavy-duty freezer bags, leaving about an inch of space at the top for expansion. Label with the date and contents. Freeze flat for easy stacking and quicker thawing.
Reheating Instructions: For refrigerated chili, reheat in a pot over medium-low heat, stirring occasionally, until heated through (about 10 minutes). Add a splash of broth if it seems too thick. Microwave individual portions in 1-minute intervals, stirring between each, until steaming hot.
For frozen chili, thaw overnight in the refrigerator for best results, then reheat as directed above. In a pinch, you can reheat from frozen—just use low heat and stir frequently to ensure even heating.
Frequently Asked Questions
Can I use ground chicken instead of chicken pieces?
Absolutely! Ground chicken works wonderfully in this recipe. Brown it in the pot first, breaking it up with a wooden spoon, then proceed with the rest of the recipe as written. The cooking time remains the same, and you’ll get a more traditional chili texture that some people prefer.
Is this chili really keto-friendly?
Yes! Each serving contains approximately 8-10 net carbs, depending on your specific ingredients and portion size. Traditional chili with beans can have 30-40 net carbs per serving. This version gets most of its carbs from tomatoes and peppers, which also provide beneficial nutrients and fiber.
Can I make this in a slow cooker?
Definitely! Brown the chicken and sauté the vegetables as directed in steps 2-4, then transfer everything to your slow cooker. Cook on low for 6-8 hours or high for 3-4 hours. The longer cooking time makes the chicken incredibly tender and allows flavors to develop even more deeply.
What if I don’t like spicy food?
No problem! Simply omit the jalapeños and cayenne pepper. You can also reduce the chili powder to 2 tablespoons for a milder version. The cumin and smoked paprika will still provide wonderful flavor without excessive heat. Use mild diced tomatoes instead of fire-roasted for an even gentler taste.
Can I add vegetables like zucchini or cauliflower?
Absolutely! Diced zucchini, cauliflower florets, or chopped mushrooms make excellent additions. Add them during step 6 when you’re simmering the chili. They’ll absorb the delicious flavors while adding extra nutrients and bulk without significantly increasing carbs.
How do I know when the chicken is fully cooked?
The chicken should reach an internal temperature of 165°F (74°C). After 20-25 minutes of simmering, cut into a piece to check—it should be white throughout with no pink remaining. The chicken should also be tender enough to shred easily with a fork.
Can I use turkey instead of chicken?
Yes! Ground turkey or turkey chunks work perfectly in this recipe. Turkey tends to be slightly leaner than chicken, so you might want to add an extra tablespoon of oil to prevent dryness. The flavor will be similar, though slightly milder.
Why is my chili too watery?
This usually happens if you didn’t allow enough simmering time. Continue cooking uncovered for 10-15 more minutes to reduce the liquid. Next time, you can also use less broth or drain some liquid from the canned tomatoes before adding them.
Avoiding Common Mistakes
Mistake 1: Using Pre-Cut Chicken Pre-cut chicken pieces often vary wildly in size, leading to uneven cooking. Some pieces become overcooked and dry while others remain undercooked. Take the extra five minutes to cut your own chicken into uniform pieces.
Mistake 2: Adding All Ingredients at Once Each component needs its moment. Browning the chicken, sautéing vegetables, and toasting spices are separate steps that build layers of flavor. Dumping everything in together results in one-dimensional, bland chili.
Mistake 3: Not Tasting and Adjusting Every batch of chili needs personal adjustment. Tomatoes vary in acidity, spices differ in potency, and personal preferences matter. Always taste before serving and adjust salt, spices, or acidity with a splash of vinegar.
Mistake 4: Cooking on Too High Heat High heat causes the bottom to scorch while the top stays undercooked. A gentle simmer is key. You should see small bubbles breaking the surface occasionally, not a rolling boil.
Mistake 5: Skipping the Resting Time Serving immediately after cooking doesn’t give flavors time to marry. If possible, let the chili rest for 15-20 minutes off the heat before serving. Better yet, make it a day ahead.
Nutrition Information
| Nutrient | Per Serving (1.5 cups) |
|---|---|
| Calories | 285 |
| Protein | 32g |
| Total Fat | 11g |
| Saturated Fat | 2.5g |
| Total Carbohydrates | 14g |
| Dietary Fiber | 4g |
| Net Carbohydrates | 10g |
| Sugar | 7g |
| Sodium | 680mg |
| Cholesterol | 95mg |
Note: Nutrition information is approximate and doesn’t include optional toppings. Values may vary based on specific ingredients used.
This Keto Chicken Chili has become my go-to recipe for those evenings when I want something substantial that won’t leave me feeling sluggish afterward. There’s something deeply satisfying about a bowl of perfectly spiced chili, especially knowing it fits beautifully into a healthy lifestyle.
Whether you’re fully committed to keto or just looking to reduce carbs occasionally, this recipe delivers on every level—taste, nutrition, and simplicity. Give it a try this week and discover why it’s earned a permanent spot in my dinner rotation!