
Homemade Mayonnaise Recipe You’ll Make Over and Over Again
There is something almost magical about a spoonful of thick, glossy, perfectly creamy mayonnaise — especially when you made it yourself. If you have ever looked at a sandwich, a potato salad, or a dipping platter and thought, ‘this needs something,’ homemade mayonnaise is almost always that something. It is rich, velvety, and full of flavor in a way that no store-bought jar can quite replicate.
Here is a fun little fact: mayonnaise is one of the oldest condiments still in widespread use today, believed to date back to 18th-century France (or possibly Spain — food historians still argue about it, which is very charming). And yet for all its history, making it at home feels surprisingly modern and exciting.
This recipe comes together in about five minutes flat, uses pantry staples you almost certainly already have, and produces a condiment that will make your kids ask why store-bought mayo ever existed. It is the kind of recipe that once you try it, you wonder why you waited so long. Much like our beloved homemade hummus recipe that readers return to again and again, this mayonnaise is proof that the simplest recipes are often the most rewarding.
Ready to give it a go? Let us dive right in.
What is Homemade Mayonnaise?
So what exactly is homemade mayonnaise, and why does it sound so intimidating when it is really, truly not? At its heart, mayonnaise is simply an emulsion — a smooth, stable mixture of oil and egg yolk, brought together with a little acid (lemon juice or vinegar) and seasoned simply with salt. That is it. No mystery ingredient, no culinary school required.
The name ‘mayonnaise’ has a wonderfully debated origin. Some say it comes from the French city of Bayonne. Others insist it was named after Port Mahon in Menorca, Spain, after a French victory in 1756. As the old saying goes, the way to a man’s heart is through his stomach — and apparently, the way to naming an iconic sauce is through a good battle.
Whatever its origin, homemade mayonnaise is simply the freshest, most flavorful version of this classic condiment — made with love, without additives, and ready to elevate everything it touches. Give it a try and you will never look back.
Why You’ll Love This Homemade Mayonnaise
It Tastes Absolutely Outstanding
Homemade mayonnaise has a flavor depth that is genuinely hard to describe until you taste it. It is creamier, richer, and more complex than anything from a jar. The fresh lemon juice gives it a bright lift, the egg yolk lends it a luxurious body, and the oil brings it all together into something smooth and indulgent. One bite and you will understand why people dedicate entire recipe posts to it.
It Saves You Money and Avoids Preservatives
A single batch of homemade mayonnaise costs a fraction of what you’d spend on a premium store-bought jar — and it contains zero artificial preservatives, no hidden additives, and nothing you cannot pronounce. For families looking to eat cleaner without spending more, this is one of those small but powerful kitchen habits that really adds up over time.
It is Endlessly Customizable
Once you have mastered the base recipe, the world is your oyster. Stir in roasted garlic for an aioli-style spread. Add a pinch of smoked paprika for a dip with depth. Mix in fresh herbs for a gorgeous green mayo perfect for vegetables. The base recipe is a blank canvas, and that is precisely what makes it so exciting. If you enjoy building your own condiment toolkit, you might also love our homemade mustard recipe — another simple, family-friendly classic worth bookmarking.
How to Make Homemade Mayonnaise
Quick Overview
Homemade mayonnaise is a blender or immersion blender recipe that takes approximately five minutes from start to finish. You will need just a handful of everyday ingredients, a steady hand (or a reliable machine), and about five minutes of your day. The result is a thick, creamy, glossy condiment that keeps well in the fridge for up to two weeks.
At a Glance:
- Prep Time: 5 minutes
- Cook Time: 0 minutes
- Total Time: 5 minutes
- Servings: Makes approximately 1 cup (16 tablespoons)
- Difficulty: Very Easy — perfect for beginners
- Equipment: Immersion blender, jar, or food processor
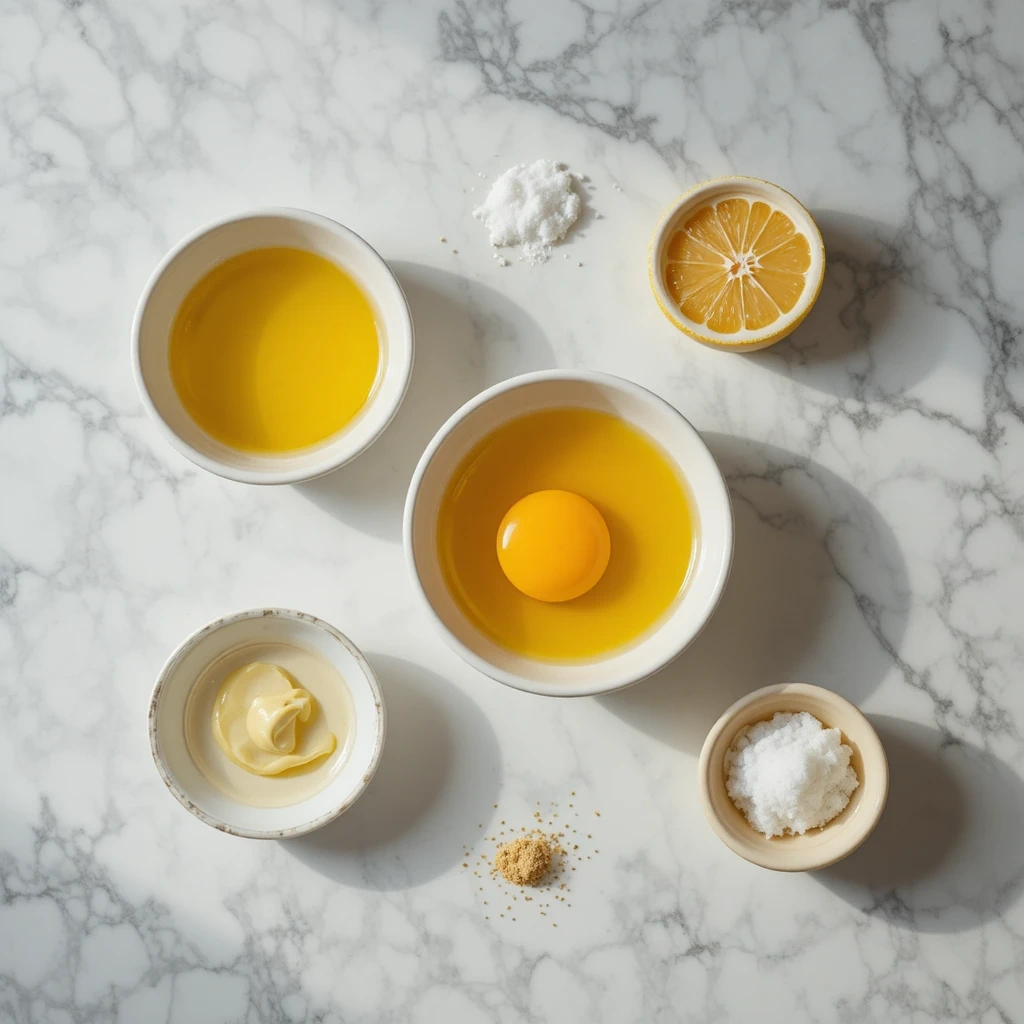
Key Ingredients for Homemade Mayonnaise
(Note: Add your ingredient photo here showing all items laid out on a clean kitchen surface for best visual impact.)
Ingredients:
- 1 large egg (room temperature — this is important!)
- 1 tablespoon fresh lemon juice (or white wine vinegar)
- 1 teaspoon Dijon mustard (helps emulsify and adds subtle flavor)
- 1/4 teaspoon fine sea salt (adjust to taste)
- 1 cup neutral oil (such as sunflower, avocado, or light olive oil)
- Optional: pinch of white pepper, 1/2 teaspoon garlic powder
A Quick Note on Ingredients:
Room temperature eggs are non-negotiable for a stable emulsion. Cold eggs are the number one reason homemade mayo breaks. Pull your egg out of the fridge at least 30 minutes before you begin, and the rest will take care of itself.
Step-by-Step Instructions
Step 1: Prepare Your Equipment and Ingredients
Make sure your egg is at room temperature. Measure out your oil into a container with a pour spout — you will need to add it slowly and a steady stream is much easier with a spout. Have your immersion blender, a tall narrow jar (a wide-mouth pint mason jar works beautifully), and all your ingredients lined up and ready to go.
Step 2: Add the Base Ingredients to the Jar
Crack your egg into the bottom of your tall jar. Add the lemon juice, Dijon mustard, and salt. Do not stir. Do not mix. Simply let everything sit in the jar undisturbed. This step matters more than it might seem — you want the egg to sit at the very bottom before the oil goes in.
Step 3: Add the Oil
Pour all of the oil directly on top of the egg mixture. Again, do not stir. It will look alarming — layers of oil sitting on top of egg — and that is completely normal. This is exactly what you want. Trust the process.
Step 4: Blend from the Bottom Up
Lower your immersion blender to the very bottom of the jar. Press it firmly against the bottom and turn it on at high speed. Hold it there without moving it for about 10 to 15 seconds. You will see a beautiful, thick white mayonnaise start to form from the bottom up. Only once you see that creamy base forming should you begin to slowly pull the blender upward through the oil, incorporating it gradually as you go.
Step 5: Check the Consistency
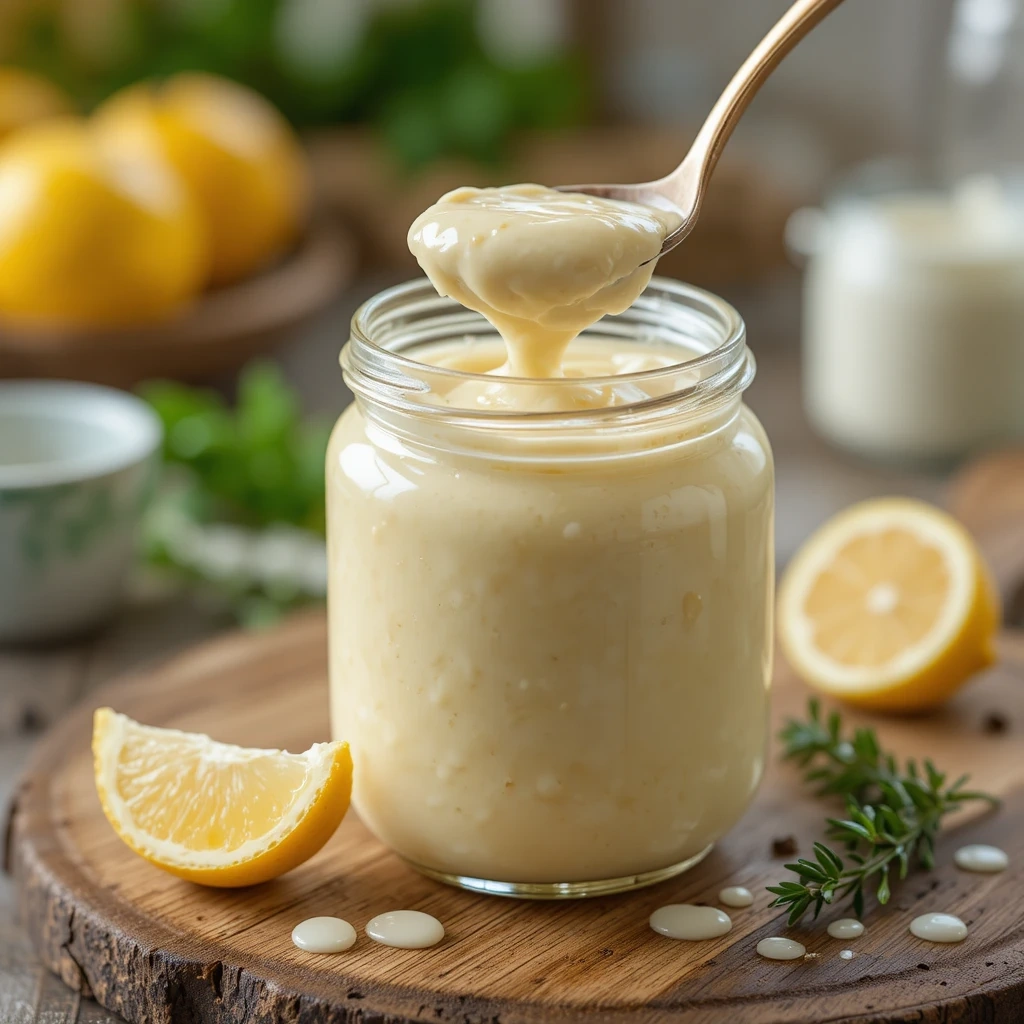
Once all the oil is incorporated, your mayonnaise should be thick, glossy, and creamy. Taste it and adjust seasoning as needed — a little more salt, a tiny squeeze more lemon juice if you like it brighter. If it seems a touch thin, blend for another few seconds. It will thicken as it chills.
Step 6: Transfer and Refrigerate
Scoop your mayonnaise into a clean, airtight jar. Smooth the top, seal tightly, and refrigerate immediately. Label with today’s date. Your homemade mayonnaise is ready to use right away, though it firms up a little more after an hour in the fridge.
What to Serve Homemade Mayonnaise With
Once you have a jar of this gorgeous homemade mayo in your fridge, you will find yourself reaching for it constantly. Here are some of our favorite ways to use it:
- Classic sandwiches and club sandwiches — spread generously on both sides of the bread
- Homemade potato salad — the creamier the mayo, the better the salad
- As a dip for oven-baked sweet potato fries or regular fries
- Stirred into chicken salad or tuna salad for a creamy, satisfying filling
- As the base for homemade coleslaw dressing
- Spread on corn on the cob before grilling for a street-food-inspired side
- Mixed with a little sriracha for a spicy dipping sauce kids and adults love equally
- Used as a base for creamy pasta salad dressings
- Served alongside roasted vegetables as a dipping condiment
Top Tips for Perfecting Homemade Mayonnaise
Always Use Room Temperature Eggs
This cannot be stressed enough. Cold eggs are the most common cause of broken or thin mayonnaise. Cold fat and cold water-based liquids simply do not want to emulsify together. Take your egg out of the fridge a full 30 to 45 minutes before you begin. If you forget, you can place the egg in a bowl of warm (not hot) water for 5 minutes as a shortcut.
Choose the Right Oil
Strong-flavored oils like extra-virgin olive oil will produce a bitter, heavy mayo that some people find unpleasant. Stick to neutral oils: sunflower, avocado, grapeseed, or light olive oil all work beautifully. If you love a mild olive oil flavor, use half light olive oil and half neutral oil for a more nuanced result.
Add Oil Slowly — Then Fast
If you are using a whisk or food processor instead of an immersion blender, add the oil drop by drop at the beginning — almost comically slowly. Once the emulsion is established and you see the mixture starting to thicken, you can pour the oil in a thin, steady stream. Rushing this step before the emulsion is established is what causes mayo to break.
The Immersion Blender Method is the Most Foolproof
Of all the methods — whisk, stand mixer, food processor — the immersion blender method is the most reliable and the fastest. It takes 60 seconds and almost never fails. If you are new to making mayonnaise, start with this method every time.
Season at the End
Mayo always tastes slightly underseasoned before it chills. Add your salt and lemon juice conservatively at first, taste after refrigerating for 30 minutes, and adjust then. You will get a much more accurate sense of the final flavor once it has had time to meld.
Use Fresh Lemon Juice, Not Bottled
The bright, fresh acidity of real lemon juice makes a noticeable difference in the final flavor. Bottled lemon juice works in a pinch but can add a slightly processed, flat note. Fresh is always better here.
Tips for Avoiding Common Mayonnaise-Making Mistakes
Mistake 1: Using Cold Eggs
As mentioned above, this is the number one culprit behind broken mayo. Room temperature is not a suggestion — it is a requirement. Cold egg proteins do not bond properly with oil molecules, and the emulsion never forms correctly.
Mistake 2: Adding Oil Too Quickly
Even with an immersion blender, if you do not let the base emulsify first (by keeping the blender at the bottom for those crucial first 10 to 15 seconds), the oil will not incorporate and you will be left with a loose, oily mess. Patience in those first few seconds pays off enormously.
Mistake 3: Using Too Much Acid
Lemon juice and vinegar are essential, but too much acid will prevent the emulsion from holding. Stick to the amounts listed in the recipe and taste before adding more. A little goes a very long way.
Mistake 4: Skipping the Mustard
Dijon mustard is not just a flavor ingredient — it is an emulsifier. It contains compounds that help bind the oil and water phases together, making your mayo more stable and less likely to separate. Do not leave it out, even if you are not a mustard fan. The flavor is very subtle in the final product.
Mistake 5: Storing in a Warm Spot
Homemade mayo must go into the refrigerator immediately after making. Unlike commercial mayo, there are no preservatives keeping it shelf-stable. Never leave it out at room temperature for more than 2 hours, and always store with the lid tightly sealed.
Storing and Reheating Tips
Refrigerator Storage
Transfer your homemade mayonnaise to a clean, airtight glass jar and refrigerate immediately. Properly stored, it will keep well in the refrigerator for up to 2 weeks. Always use a clean spoon or utensil to scoop from the jar — double dipping or using a dirty spoon introduces bacteria and will significantly shorten the shelf life.
Labeling
Always label your jar with the date you made it. It is easy to forget, and two weeks passes faster than you think. A simple piece of masking tape and a marker takes ten seconds and saves a lot of guessing later.
Freezing — Not Recommended
Mayonnaise does not freeze well. The emulsion will break during freezing and thawing, leaving you with a separated, watery, oily mess that cannot be salvaged. Instead, make smaller batches more frequently rather than trying to freeze a large amount.
How to Fix Broken Mayo
If your mayo separated during storage (this is rare but can happen), do not despair. Start fresh with a new egg yolk in a clean bowl. Slowly whisk in the broken mayo, a little at a time, treating it exactly as you would fresh oil. The new egg yolk will re-emulsify the mixture and rescue your batch beautifully.
Nutrition Information
Approximate values per 1 tablespoon serving (15g). Based on recipe using sunflower oil.
| Nutrient | Per Tablespoon (15g) | % Daily Value |
| Calories | 94 kcal | – |
| Total Fat | 10.4g | 13% |
| Saturated Fat | 1.6g | 8% |
| Cholesterol | 9mg | 3% |
| Sodium | 88mg | 4% |
| Total Carbohydrate | 0.1g | 0% |
| Protein | 0.2g | 0% |
| Vitamin E | 0.9mg | 6% |
| Vitamin K | 5.4mcg | 5% |
Note: Nutritional values are estimates and may vary depending on specific ingredients and brands used.
Frequently Asked Questions (FAQ)
How long does homemade mayonnaise last in the fridge?
Properly stored in an airtight container, homemade mayonnaise will stay fresh for up to 2 weeks in the refrigerator. Always use clean utensils when scooping, and give it a quick smell test before using if it has been more than a week.
Can I make mayonnaise without a blender?
Absolutely. You can whisk mayonnaise by hand — it just requires a bit more patience and arm strength. Whisk together the egg yolk, mustard, salt, and lemon juice in a bowl, then add the oil drop by drop while whisking constantly. A food processor also works well with the same technique.
Is it safe to eat homemade mayo with raw egg?
This is a common concern and a fair one. For most healthy adults, homemade mayo made with fresh, high-quality eggs is perfectly safe. If you are serving young children, pregnant women, elderly individuals, or anyone with a compromised immune system, consider using pasteurized eggs to eliminate any concern.
Why did my homemade mayonnaise turn out runny?
Runny mayo is almost always caused by one of three things: a cold egg, oil added too quickly before the emulsion established, or a jar that was too wide for the immersion blender to work properly. Use a tall, narrow jar, a room temperature egg, and keep the blender at the bottom for those first 10 to 15 seconds.
Can I use olive oil for homemade mayonnaise?
You can, but with some caution. Strong extra-virgin olive oil tends to produce a bitter, heavy-tasting mayonnaise, especially when emulsified at speed. Light olive oil works much better. Many people like a blend of half light olive oil and half neutral oil for a gentle olive flavor without the bitterness.
How do I fix broken or separated mayonnaise?
Start with a fresh egg yolk in a clean bowl. Whisk it with a tiny pinch of salt and a few drops of lemon juice. Then, very slowly, whisk your broken mayo into this new yolk, a teaspoon at a time, until you have re-established the emulsion. Once it is smooth and thick again, you can add the remaining broken mayo more quickly.
Can I make mayo without eggs?
Yes! Aquafaba — the liquid from a can of chickpeas — works as a surprisingly effective egg substitute in mayonnaise. Use 3 tablespoons of aquafaba in place of the egg yolk, follow the same method, and you will get a creamy, vegan-friendly mayo that holds its own against the original.
What is the best oil for homemade mayonnaise?
The best oil for mayonnaise is one with a neutral, mild flavor: sunflower oil, avocado oil, grapeseed oil, or light olive oil. Avoid strongly flavored oils like regular extra-virgin olive oil, sesame oil, or coconut oil, as they will dominate the flavor in ways that are not always pleasant in a condiment.
Can kids eat homemade mayonnaise?
Yes, homemade mayonnaise is a family-friendly condiment. For added peace of mind when serving young children, opt for pasteurized eggs, which undergo a gentle heating process that eliminates harmful bacteria while keeping the egg raw for use in mayo. Many grocery stores carry pasteurized eggs in regular cartons.
How can I make flavored mayonnaise at home?
Once you have the base recipe down, flavoring is where the fun begins. Try blending in roasted garlic for an aioli, adding a teaspoon of harissa paste for a smoky kick, mixing in fresh chopped herbs like chives or tarragon, or stirring in lemon zest and capers for a bright, briny spread. The possibilities are genuinely endless.
A Final Word from the Kitchen
Homemade mayonnaise is one of those recipes that seems like a small thing until you actually make it — and then it suddenly feels like the best decision you have made in the kitchen in a long time. It is quick, it is simple, it is infinitely better than anything from a jar, and it gives you a real sense of satisfaction every single time.
Whether you are spreading it on a sandwich for the kids’ lunchboxes, dolloping it onto a roasted vegetable platter, or using it as the base for your next creamy salad dressing, this homemade mayonnaise will become a permanent fixture in your refrigerator. We hope you love it as much as we do.
Happy cooking — and do not forget to tag us if you make this recipe. We love seeing your creations!