
10 High Protein Chicken Recipes the Whole Family Will Love
There’s something magical about chicken that transforms into pure comfort when cooked with love. I still remember my grandmother saying, “A good chicken dish can turn any ordinary day into something special.” These high protein chicken recipes aren’t just about hitting your macros—they’re about creating meals that make you excited to step into the kitchen.
Whether you’re meal prepping for the week or cooking for your family tonight, these protein-packed dishes deliver incredible flavor without the fuss. Plus, if you’ve tried my crispy baked chicken thighs, you know I’m all about making chicken anything but boring!
What Are High Protein Chicken Recipes?
Ever wondered why chicken became the go-to protein for fitness enthusiasts and busy families alike? High protein chicken recipes are dishes that maximize the natural protein content of chicken while keeping it delicious and satisfying.
With chicken breast packing around 31 grams of protein per 100g and thighs offering about 26 grams, you’re getting serious nutritional bang for your buck. And let’s be honest—the way to anyone’s heart really is through their stomach, especially when that meal is both healthy and incredibly tasty. Ready to discover your new favorite weeknight dinner? Let’s dive in!
This recipe was produced entirely by AI and has not been tested by our team. Our site exists to support our readers, and those who’ve tried other recipes here often report positive results.
Why You’ll Love These High Protein Chicken Recipes
Incredible Protein Without the Bland Factor
Let’s face it—dry, flavorless chicken breast is nobody’s idea of a good time. These recipes prove you can get 30+ grams of protein per serving while enjoying bold seasonings, creamy sauces, and crispy textures that actually make you look forward to meal time.
Budget-Friendly Home Cooking
Restaurant meals can easily cost $15-20 per person, but making these dishes at home? You’re looking at around $4-6 per serving, even with quality ingredients. Your wallet will thank you, and your body will too. It’s a win-win that keeps on giving.
Flavor-Packed Ingredients That Shine
From aromatic garlic and herbs to tangy marinades and zesty spices, each recipe showcases ingredients that bring chicken to life. Think Mediterranean oregano, smoky paprika, fresh cilantro, and zingy lime—flavors that make healthy eating feel like a treat rather than a chore. And if you’ve enjoyed my garlic herb roasted chicken, you’ll absolutely love where we’re going with these recipes. Go ahead, grab your apron and let’s make some magic happen in your kitchen!
How to Make High Protein Chicken Recipes
Quick Overview
These high protein chicken recipes are designed for real life—meaning they’re simple enough for busy weeknights but impressive enough for weekend gatherings. Most dishes come together in 30-45 minutes, with minimal cleanup required. You’ll love how easy it is to create restaurant-quality meals that deliver serious protein.
Average Cooking Time:
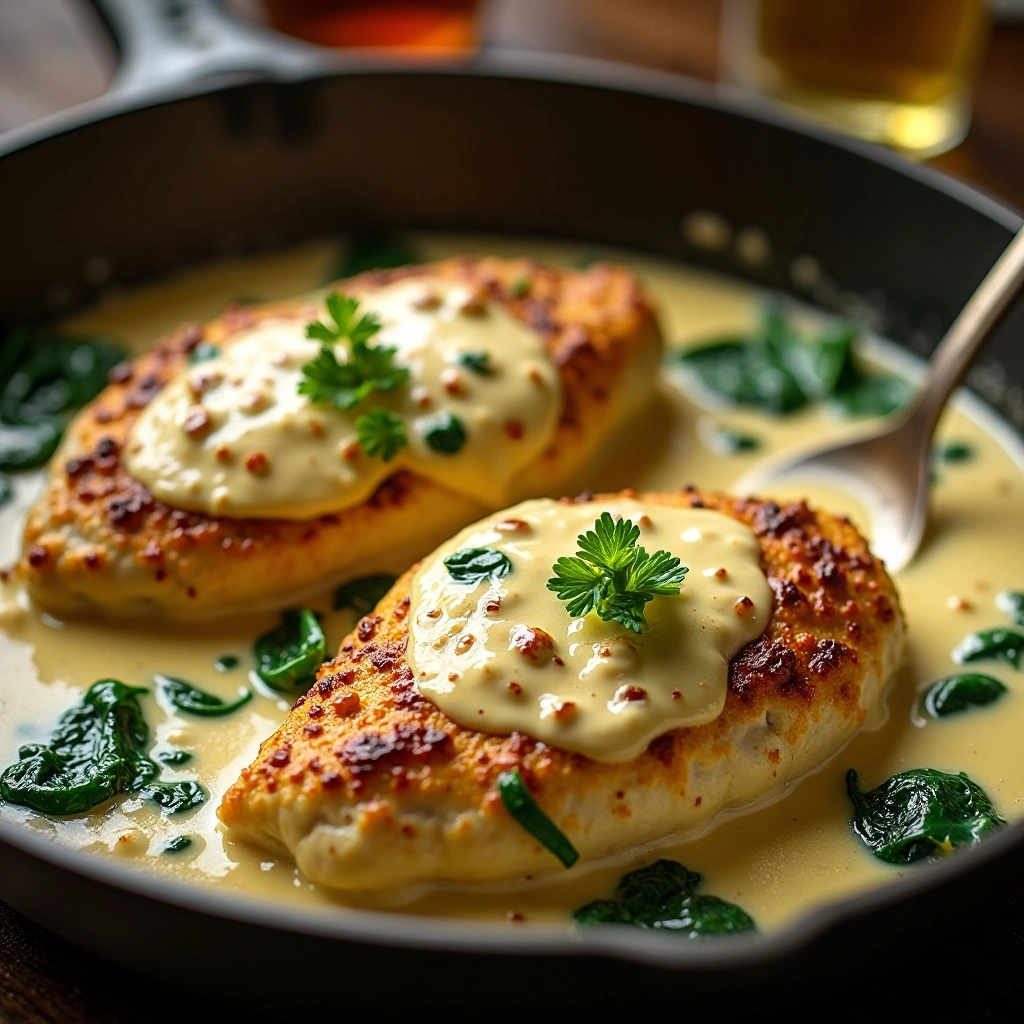
Recipe 1: Creamy Garlic Parmesan Chicken
- Prep: 10-15 minutes
- Cook: 20-35 minutes
- Total: 30-45 minutes
This luxurious dish delivers 45g of protein per serving with a velvety sauce that’ll have everyone asking for seconds.
Key Ingredients
- 4 boneless, skinless chicken breasts (about 6-7 oz each)
- 3 tablespoons olive oil
- 6 garlic cloves, minced
- 1 cup heavy cream
- 1 cup freshly grated Parmesan cheese
- 1 cup chicken broth
- 2 teaspoons Italian seasoning
- 1 teaspoon paprika
- Salt and black pepper to taste
- Fresh parsley for garnish
- 2 cups fresh spinach (optional)
Step-by-Step Instructions
Step 1: Prepare the Chicken Pat the chicken breasts completely dry using paper towels. This is crucial for getting that beautiful golden crust. Season both sides generously with salt, pepper, paprika, and Italian seasoning. Press the seasonings into the meat so they adhere properly.
Step 2: Sear the Chicken Heat olive oil in a large skillet over medium-high heat until it shimmers. Place chicken breasts in the pan, making sure not to overcrowd them. Cook for 6-7 minutes on the first side without moving them—this creates that gorgeous caramelization. Flip and cook another 6-7 minutes until the internal temperature reaches 165°F. Remove chicken and set aside on a plate.
Step 3: Make the Garlic Sauce In the same skillet, reduce heat to medium. Add minced garlic and cook for about 1 minute until fragrant but not browned. Pour in chicken broth and use a wooden spoon to scrape up all those flavorful brown bits from the bottom of the pan.
Step 4: Create the Creamy Base Stir in heavy cream and bring to a gentle simmer. Let it bubble for 3-4 minutes, stirring occasionally. The sauce will start to thicken slightly. Add the Parmesan cheese gradually, stirring constantly until melted and smooth.
Step 5: Finish and Serve Return the chicken to the skillet along with any accumulated juices. If using spinach, add it now and let it wilt into the sauce. Spoon the creamy sauce over the chicken and let everything simmer together for 2-3 minutes. The sauce should coat the back of a spoon beautifully. Garnish with fresh parsley and serve immediately.
What to Serve With
This rich, creamy chicken pairs wonderfully with cauliflower rice for a low-carb option, or serve it over whole wheat pasta, quinoa, or alongside roasted vegetables like asparagus or green beans. A crisp Caesar salad cuts through the richness perfectly. For a complete meal, add some crusty bread to soak up that incredible sauce.
Top Tips for Perfecting Creamy Garlic Parmesan Chicken
Use chicken breasts that are similar in size for even cooking. If you have thick breasts, pound them to an even thickness using a meat mallet.
Don’t skip the searing step—this creates deep flavor through the Maillard reaction. Make sure your pan is hot enough before adding the chicken.
Full-fat ingredients work best here. Low-fat cream won’t create the same luxurious texture, and pre-shredded Parmesan often contains anti-caking agents that can make the sauce grainy.
If your sauce seems too thick, add a splash of chicken broth. Too thin? Let it simmer a bit longer or add an extra tablespoon of Parmesan.
Storing and Reheating Tips
Store leftovers in an airtight container in the refrigerator for up to 3 days. The sauce may thicken when cold—just add a splash of cream or broth when reheating. Reheat gently on the stovetop over low heat, stirring occasionally, or microwave in 30-second intervals. This dish doesn’t freeze well due to the cream-based sauce, which can separate when thawed.
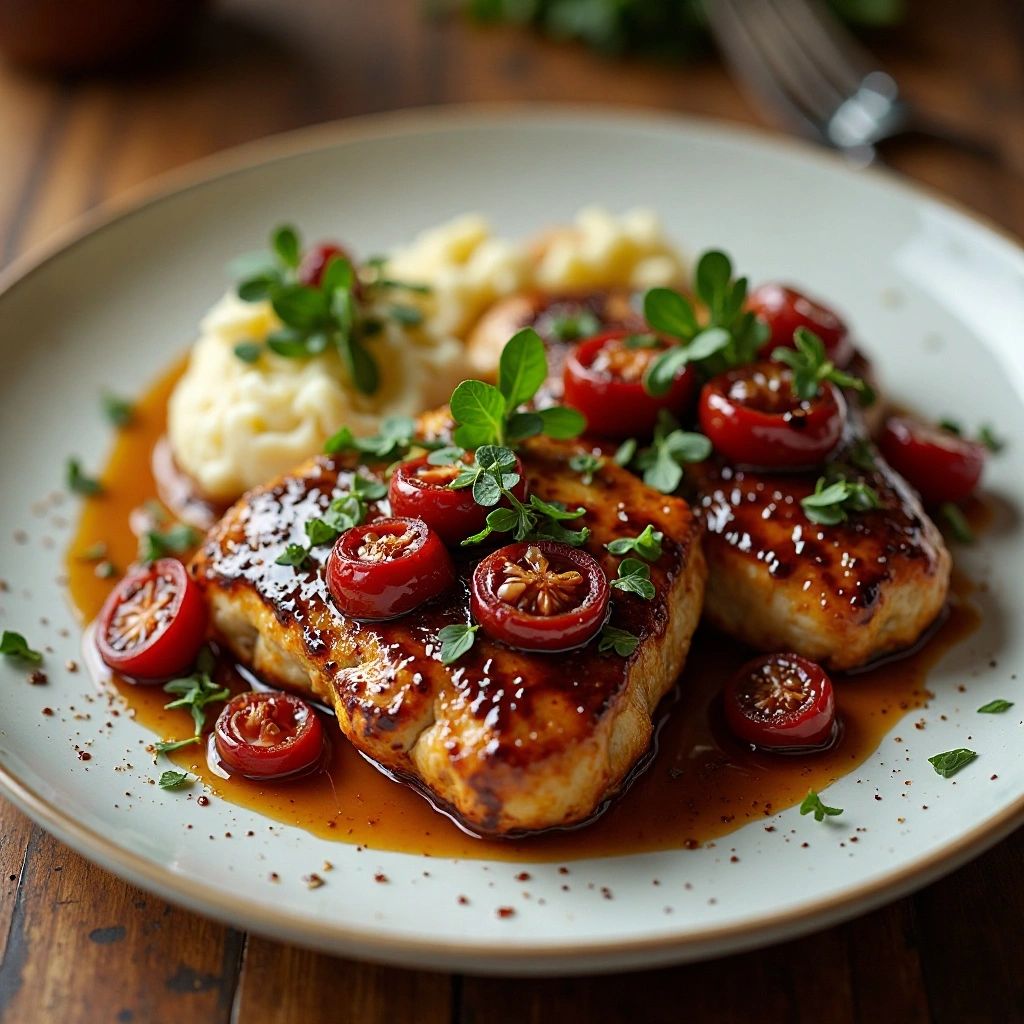
Recipe 2: Spicy Honey Sriracha Chicken Thighs
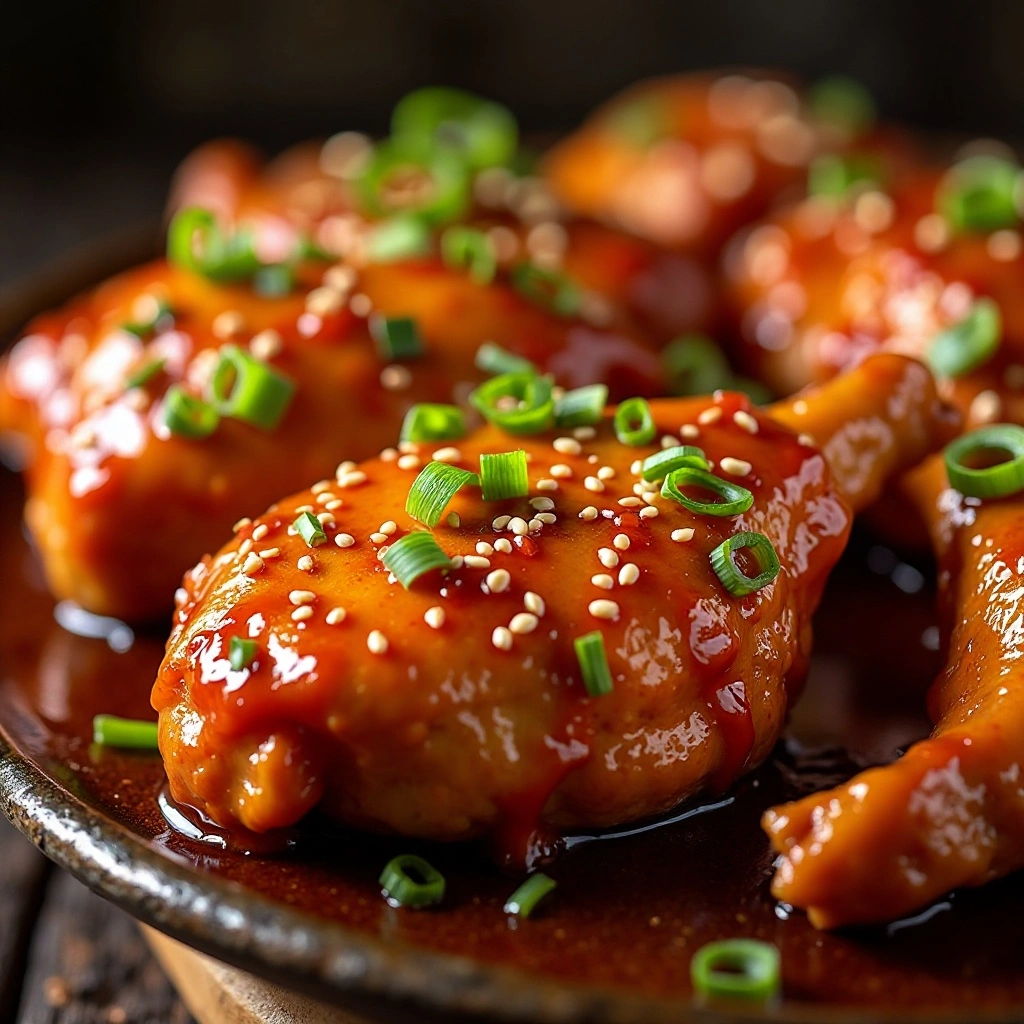
Sweet, spicy, and loaded with 38g of protein per serving—these sticky glazed thighs are pure magic.
Key Ingredients
- 8 bone-in, skin-on chicken thighs
- 1/4 cup honey
- 3 tablespoons sriracha sauce (adjust to taste)
- 2 tablespoons soy sauce
- 2 tablespoons rice vinegar
- 4 garlic cloves, minced
- 1 tablespoon fresh ginger, grated
- 1 tablespoon sesame oil
- 1 teaspoon cornstarch
- Salt and pepper to taste
- Sesame seeds and green onions for garnish
Step-by-Step Instructions
Step 1: Prepare the Marinade In a medium bowl, whisk together honey, sriracha, soy sauce, rice vinegar, minced garlic, grated ginger, and sesame oil until well combined. This creates a sweet-spicy-savory balance that’s absolutely addictive. Reserve 1/4 cup of the marinade in a separate small bowl for basting later.
Step 2: Marinate the Chicken Pat chicken thighs dry and season with salt and pepper. Place them in a large ziplock bag or shallow dish and pour the marinade over them. Make sure each piece is well coated. Refrigerate for at least 30 minutes, or up to 4 hours for deeper flavor. The longer you marinate, the more flavorful your chicken will be.
Step 3: Preheat and Prepare Preheat your oven to 425°F. Line a baking sheet with aluminum foil and place a wire rack on top. Spray the rack with cooking spray. This setup allows air to circulate around the chicken, making the skin crispy all over.
Step 4: Bake the Chicken Remove chicken from marinade, letting excess drip off. Arrange thighs skin-side up on the prepared rack, leaving space between each piece. Bake for 35-40 minutes, basting with the reserved marinade every 15 minutes. The skin should be deeply golden and crispy, and the internal temperature should reach 175°F for thighs.
Step 5: Create the Glaze While chicken bakes, pour the remaining reserved marinade into a small saucepan. Mix cornstarch with 1 tablespoon water and add to the saucepan. Bring to a simmer over medium heat, stirring constantly until thickened into a glossy glaze, about 2-3 minutes.
Step 6: Glaze and Serve Brush the thickened glaze over the hot chicken thighs. Let them rest for 5 minutes before serving. Sprinkle with sesame seeds and sliced green onions for that restaurant-quality presentation.
What to Serve With
These sticky thighs are phenomenal over steamed jasmine rice or coconut rice. Add some stir-fried bok choy, snap peas, or broccoli on the side. For a complete Asian-inspired meal, serve with cucumber salad or kimchi. The cool, crunchy vegetables balance the sweet-spicy chicken perfectly.
Top Tips for Perfecting Spicy Honey Sriracha Chicken Thighs
Adjust the sriracha based on your heat tolerance. Start with 2 tablespoons if you’re sensitive to spice, or go up to 4 tablespoons if you love the heat.
Don’t discard the marinade that touched raw chicken—always use fresh reserved marinade for basting or cook it thoroughly if you want to use it as a sauce.
Bone-in, skin-on thighs stay juicier and have better flavor than boneless, skinless. The bones also add richness to the dish.
For extra crispy skin, pat the chicken completely dry before marinating, and don’t overcrowd the baking sheet.
Storing and Reheating Tips
Store in an airtight container in the refrigerator for up to 4 days. Reheat in a 350°F oven for 15-20 minutes to maintain the crispy skin. You can also freeze these for up to 2 months—thaw overnight in the refrigerator before reheating. The glaze may separate slightly when frozen, but it comes back together when warmed.
Recipe 3: Mediterranean Herb Chicken Skewers
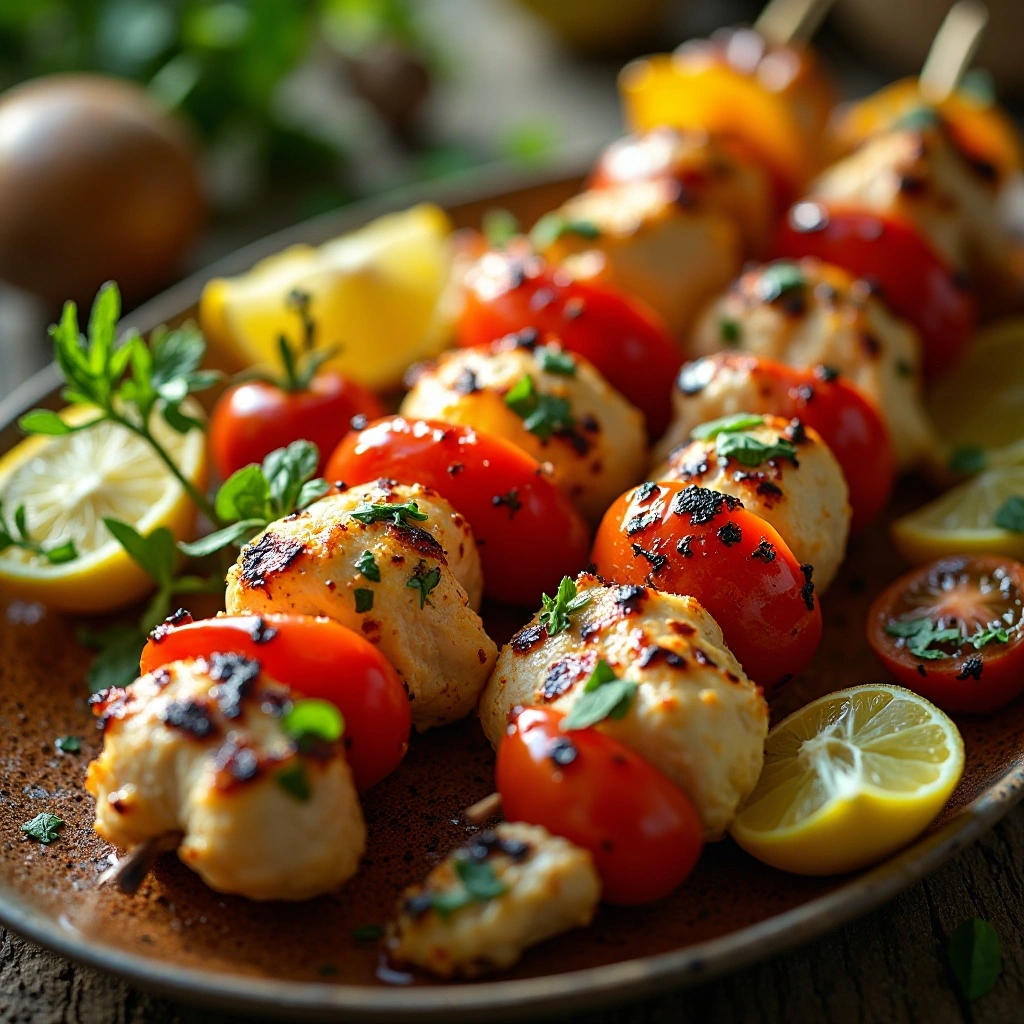
Fresh, vibrant, and delivering 35g of protein per serving—these skewers bring the flavors of the Mediterranean to your table.
Key Ingredients
- 2 lbs boneless, skinless chicken breasts, cut into 1.5-inch cubes
- 1/4 cup extra virgin olive oil
- Juice of 2 lemons
- Zest of 1 lemon
- 4 garlic cloves, minced
- 2 tablespoons fresh oregano, chopped
- 2 tablespoons fresh basil, chopped
- 1 tablespoon fresh thyme
- 1 teaspoon cumin
- 1 teaspoon paprika
- Salt and black pepper to taste
- Cherry tomatoes and bell peppers for skewering
- Wooden or metal skewers
Step-by-Step Instructions
Step 1: Make the Marinade In a large bowl, combine olive oil, lemon juice, lemon zest, minced garlic, oregano, basil, thyme, cumin, paprika, salt, and pepper. Whisk everything together until emulsified. The fresh herbs are key here—they provide brightness that dried herbs simply can’t match.
Step 2: Marinate the Chicken Add cubed chicken to the marinade, tossing to coat every piece. Cover and refrigerate for at least 1 hour, preferably 2-3 hours. The acid from the lemon helps tenderize the meat while the herbs infuse incredible flavor. Give the bowl a shake or stir every 30 minutes to redistribute the marinade.
Step 3: Prepare Your Skewers If using wooden skewers, soak them in water for at least 30 minutes to prevent burning. Remove chicken from marinade and thread onto skewers, alternating with cherry tomatoes and bell pepper chunks. Leave a little space between each piece for even cooking.
Step 4: Grill the Skewers Preheat your grill to medium-high heat (about 400°F) or heat a grill pan over medium-high heat. Brush grates with oil to prevent sticking. Place skewers on the grill and cook for 10-12 minutes total, turning every 3-4 minutes to cook all sides evenly. Chicken should reach 165°F internal temperature and have beautiful char marks.
Step 5: Rest and Serve Remove skewers from heat and let rest for 5 minutes. This allows the juices to redistribute throughout the meat. Drizzle with extra lemon juice and sprinkle with fresh herbs before serving.
What to Serve With
These Mediterranean skewers are fantastic with tzatziki sauce, hummus, or tahini drizzle. Serve over a bed of couscous, bulgur wheat, or cauliflower rice. Add a Greek salad with feta, olives, and cucumbers for an authentic Mediterranean feast. Warm pita bread on the side makes it extra special.
Top Tips for Perfecting Mediterranean Herb Chicken Skewers
Cut chicken pieces uniformly so they cook at the same rate. Pieces that are too small will dry out, while oversized chunks won’t cook through properly.
Don’t over-marinate—more than 4 hours and the acid can start to make the chicken mushy on the outside.
If you’re using a grill pan indoors, work in batches to avoid overcrowding. Overcrowding creates steam instead of the sear you want.
Brush vegetables lightly with olive oil before skewering to prevent them from drying out on the grill.
Storing and Reheating Tips
Store cooked skewers in an airtight container for up to 3 days in the refrigerator. Remove chicken and vegetables from skewers before storing for easier reheating. Warm in the microwave for 1-2 minutes or in a 350°F oven for 10 minutes. These freeze well for up to 2 months—just thaw overnight before reheating.
Recipe 4: One-Pan Pesto Chicken with Vegetables
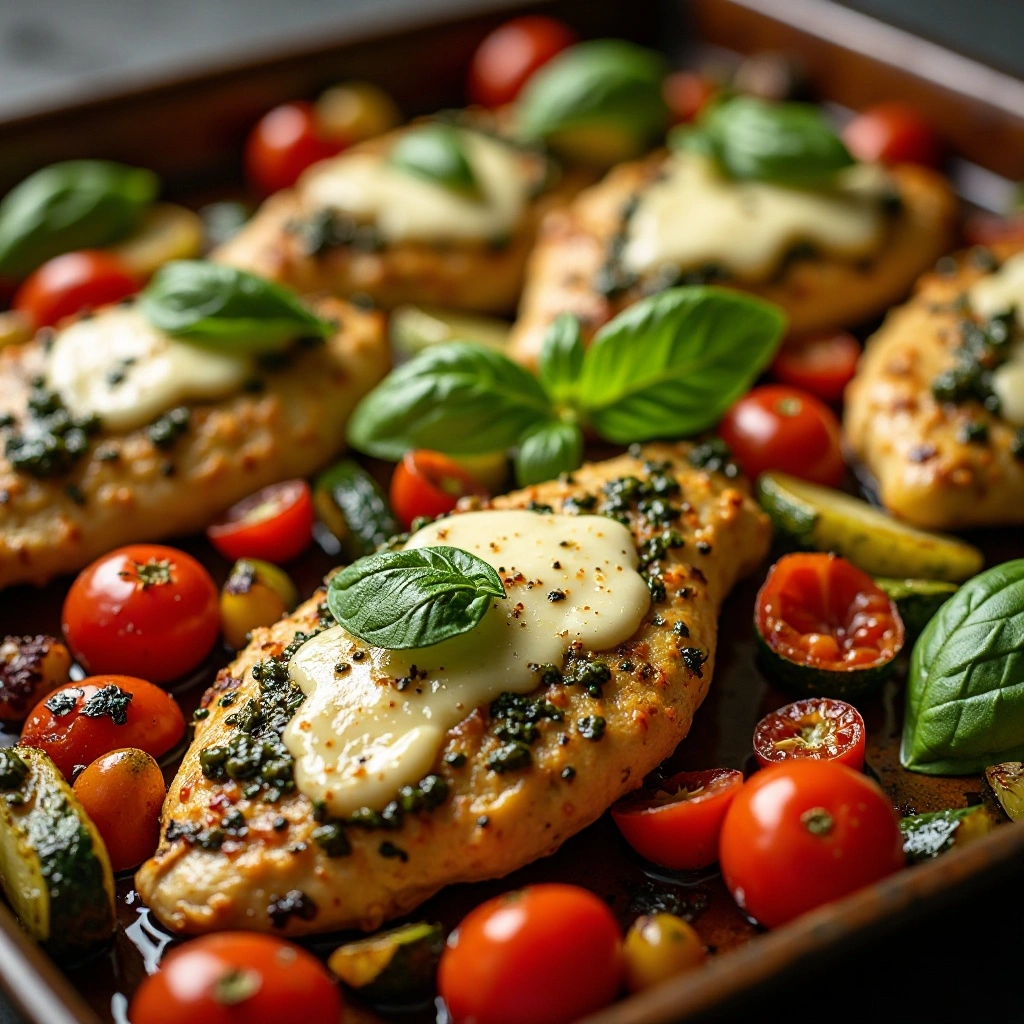
A complete meal in one pan with 40g of protein that tastes like you spent hours in the kitchen.
Key Ingredients
- 4 boneless, skinless chicken breasts
- 1/2 cup basil pesto (store-bought or homemade)
- 2 cups cherry tomatoes, halved
- 2 zucchini, sliced into half-moons
- 1 red bell pepper, cut into strips
- 1 yellow bell pepper, cut into strips
- 1 red onion, cut into wedges
- 3 tablespoons olive oil
- 1/2 cup mozzarella cheese, shredded
- Fresh basil leaves for garnish
- Salt and pepper to taste
Step-by-Step Instructions
Step 1: Prepare the Chicken Preheat oven to 400°F. Pat chicken breasts dry and season with salt and pepper. Spread 2 tablespoons of pesto evenly over the top of each chicken breast, making sure to coat the surface completely. The pesto will create a flavorful crust as it bakes.
Step 2: Prep the Vegetables In a large bowl, toss cherry tomatoes, zucchini, bell peppers, and red onion with olive oil, salt, and pepper. Make sure vegetables are evenly coated. The olive oil helps them caramelize beautifully in the oven.
Step 3: Arrange in Pan On a large rimmed baking sheet or in a large baking dish, arrange the vegetables in a single layer around the edges. Place the pesto-coated chicken breasts in the center, spacing them evenly. This arrangement ensures everything cooks at the same rate.
Step 4: Bake Bake for 25-30 minutes, or until chicken reaches an internal temperature of 165°F and vegetables are tender with slightly charred edges. The timing may vary depending on the thickness of your chicken breasts. Check at the 20-minute mark if your breasts are on the smaller side.
Step 5: Add Cheese and Finish Remove from oven and sprinkle mozzarella cheese over the chicken. Return to oven for 3-5 minutes until cheese is melted and bubbly. Let rest for 5 minutes, then garnish with fresh basil leaves and serve.
What to Serve With
This is already a complete meal with protein and vegetables, but you can add quinoa, brown rice, or crusty bread if you want extra carbs. A simple arugula salad with lemon vinaigrette on the side adds a peppery, fresh contrast to the rich pesto flavors.
Top Tips for Perfecting One-Pan Pesto Chicken
Use quality pesto—either make your own or invest in a good store-bought brand. The pesto is the star here, so it makes a difference.
Don’t cut vegetables too thin or they’ll get mushy. Aim for 1/4 to 1/2-inch thickness for zucchini and substantial chunks for peppers.
Line your baking sheet with parchment paper for the easiest cleanup imaginable.
If your chicken breasts are very thick, butterfly them or pound them to even thickness so they cook at the same rate as the vegetables.
Storing and Reheating Tips
Store chicken and vegetables separately in airtight containers for up to 4 days. Reheat in a 350°F oven for 10-15 minutes for best results. The chicken stays moist and the vegetables maintain their texture better than microwaving. You can freeze this for up to 2 months, though the vegetables may be slightly softer after thawing.
Recipe 5: Cajun Blackened Chicken
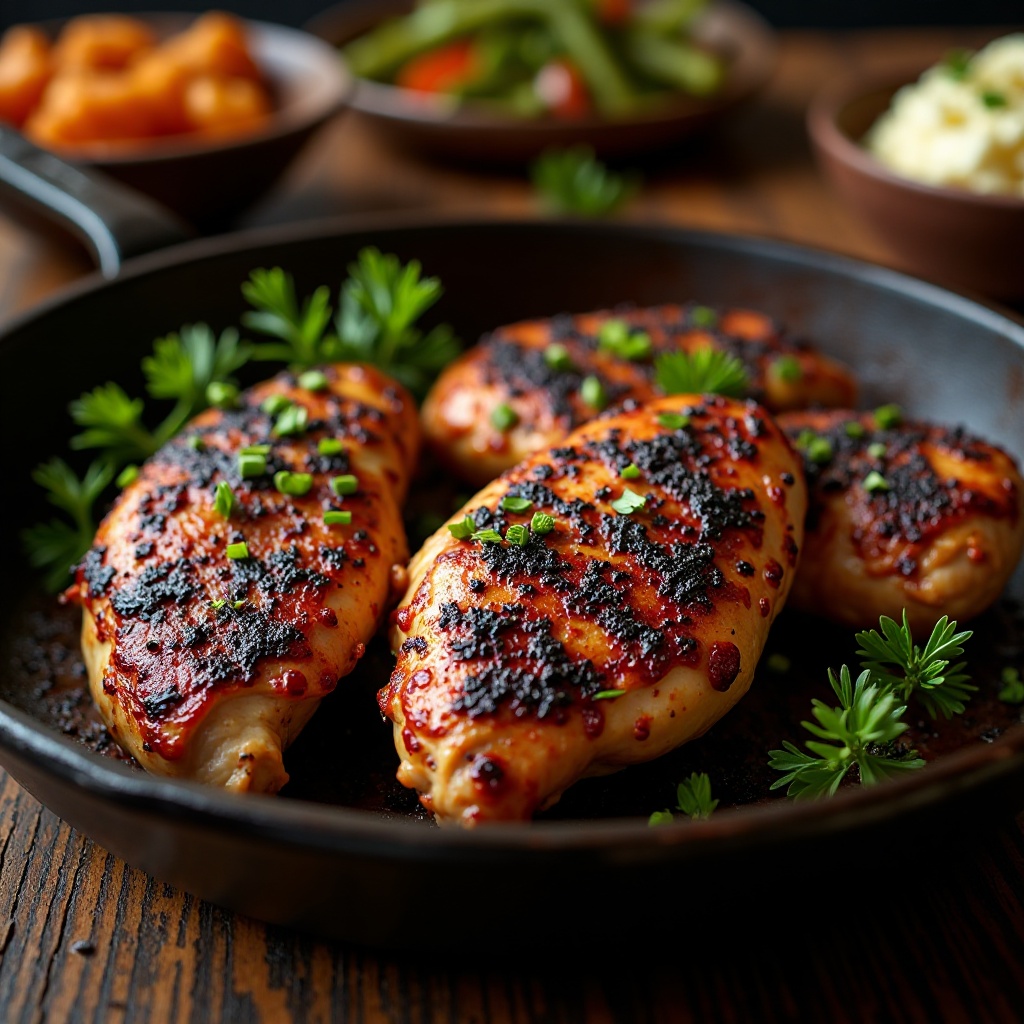
Smoky, spicy, and packing 42g of protein—this restaurant-quality dish comes together in just 20 minutes.
Key Ingredients
- 4 boneless, skinless chicken breasts (6-7 oz each)
- 2 tablespoons paprika
- 1 tablespoon garlic powder
- 1 tablespoon onion powder
- 1 tablespoon dried oregano
- 1 tablespoon dried thyme
- 2 teaspoons cayenne pepper (adjust for heat preference)
- 2 teaspoons black pepper
- 2 teaspoons salt
- 1 teaspoon white pepper
- 3 tablespoons butter, melted
- 2 tablespoons olive oil
Step-by-Step Instructions
Step 1: Make the Cajun Seasoning In a small bowl, combine paprika, garlic powder, onion powder, oregano, thyme, cayenne pepper, black pepper, salt, and white pepper. Mix thoroughly until all spices are evenly distributed. This makes enough for this recipe plus extra to store for future use.
Step 2: Prepare the Chicken Pat chicken breasts completely dry—this is crucial for the blackened crust. If your chicken breasts are very thick, pound them to about 3/4-inch thickness for even cooking. Brush both sides of each breast generously with melted butter.
Step 3: Season Heavily Coat both sides of the chicken breasts with the Cajun spice mixture, pressing it into the meat so it adheres well. Don’t be shy here—you want a thick coating of spices. This creates that characteristic blackened crust.
Step 4: Heat the Pan This is important: Heat a cast-iron skillet or heavy-bottomed pan over high heat until it’s smoking hot. Add olive oil and let it heat for 30 seconds. Your kitchen will get smoky, so turn on the exhaust fan or open a window.
Step 5: Blacken the Chicken Carefully place chicken breasts in the hot pan. Don’t move them—let them sear for 4-5 minutes until a dark crust forms. The spices should be deeply browned but not burnt. Flip and cook another 4-5 minutes until the internal temperature reaches 165°F.
Step 6: Rest and Serve Remove chicken from heat and let rest on a cutting board for 5 minutes. This resting period allows juices to redistribute. Slice and serve immediately while still hot.
What to Serve With
Classic pairings include creamy coleslaw, cornbread, and collard greens for a true Southern feast. For a lighter option, serve over a fresh salad or with roasted sweet potatoes and green beans. Cajun rice or dirty rice makes an excellent side that complements the spicy chicken perfectly.
Top Tips for Perfecting Cajun Blackened Chicken
Use a cast-iron skillet if possible—it distributes heat evenly and gets hot enough for proper blackening.
This recipe generates smoke. Make sure your kitchen is well-ventilated, or cook outdoors on a burner.
Reduce cayenne to 1 teaspoon for a milder version, or use up to 1 tablespoon if you love serious heat.
Don’t overcook—chicken can go from juicy to dry quickly at high heat. Use a meat thermometer to ensure perfect doneness.
Storing and Reheating Tips
Store in an airtight container in the refrigerator for up to 3 days. The crust softens when stored, but you can crisp it back up by reheating in a hot skillet for 2-3 minutes per side. Alternatively, reheat in a 350°F oven for 10 minutes. This chicken freezes beautifully for up to 3 months—the spices actually seem to deepen in flavor after freezing.
Recipe 6: Asian-Inspired Ginger Chicken Stir-Fry
Colorful, quick, and loaded with 36g of protein—this stir-fry proves healthy eating never has to be boring.
Key Ingredients
- 1.5 lbs boneless, skinless chicken breast, sliced into thin strips
- 3 tablespoons fresh ginger, grated
- 4 garlic cloves, minced
- 1/4 cup low-sodium soy sauce
- 2 tablespoons oyster sauce
- 1 tablespoon honey
- 1 tablespoon rice vinegar
- 1 tablespoon cornstarch
- 2 tablespoons sesame oil
- 2 cups broccoli florets
- 1 red bell pepper, sliced
- 1 cup snap peas
- 2 carrots, julienned
- 3 green onions, chopped
- Sesame seeds for garnish
Step-by-Step Instructions
Step 1: Prepare the Sauce In a small bowl, whisk together soy sauce, oyster sauce, honey, rice vinegar, and cornstarch until the cornstarch is fully dissolved. The cornstarch will thicken the sauce as it cooks, creating that glossy coating you see in restaurant stir-fries. Set aside.
Step 2: Prep the Chicken Slice chicken breasts against the grain into thin strips, about 1/4-inch thick. Thinner pieces cook faster and stay tender. In a medium bowl, toss chicken strips with half of the grated ginger and half of the minced garlic. Let it sit while you prep the vegetables.
Step 3: Prepare Vegetables Cut all vegetables into similar-sized pieces for even cooking. Have everything ready before you start cooking—stir-frying happens fast, and you won’t have time to chop once the wok is hot.
Step 4: Cook the Chicken Heat 1 tablespoon of sesame oil in a large wok or skillet over high heat until shimmering. Add chicken in a single layer (work in batches if needed) and cook for 3-4 minutes, stirring occasionally, until chicken is cooked through and lightly browned. Remove and set aside.
Step 5: Stir-Fry the Vegetables Add remaining sesame oil to the wok. Add the remaining ginger and garlic, stirring for 30 seconds until fragrant. Add broccoli and carrots first since they take longer to cook. Stir-fry for 2-3 minutes. Then add bell peppers and snap peas. Continue cooking for another 2-3 minutes until vegetables are crisp-tender.
Step 6: Combine and Finish Return chicken to the wok. Give the sauce a quick stir and pour it over everything. Toss constantly for 1-2 minutes until the sauce thickens and coats everything with a beautiful glaze. Remove from heat, top with green onions and sesame seeds.
What to Serve With
Serve over jasmine rice, brown rice, or cauliflower rice for a low-carb option. Rice noodles or lo mein noodles work wonderfully too. For extra protein and nutrients, add a fried egg on top. A side of miso soup or hot and sour soup completes the Asian-inspired meal.
Top Tips for Perfecting Asian-Inspired Ginger Chicken Stir-Fry
Fresh ginger is essential—don’t substitute with ground ginger. The flavor is completely different. Use a spoon to easily peel fresh ginger by scraping the skin off.
Have all ingredients prepped and ready to go before you start cooking. Stir-frying is fast-paced, and you can’t step away to chop something mid-cook.
Don’t overcrowd the wok. If your wok isn’t large enough, cook chicken and vegetables in separate batches for the best texture.
Use high heat and keep ingredients moving. The constant motion prevents burning while achieving that slight char that adds depth of flavor.
Storing and Reheating Tips
Store in an airtight container for up to 3 days in the refrigerator. Reheat in a skillet over medium-high heat for best results—this helps maintain the texture of the vegetables. You can also microwave for 2-3 minutes, though the vegetables will be slightly softer. This dish doesn’t freeze well due to the vegetables, which become mushy when thawed.
Recipe 7: Lemon Herb Baked Chicken Drumsticks
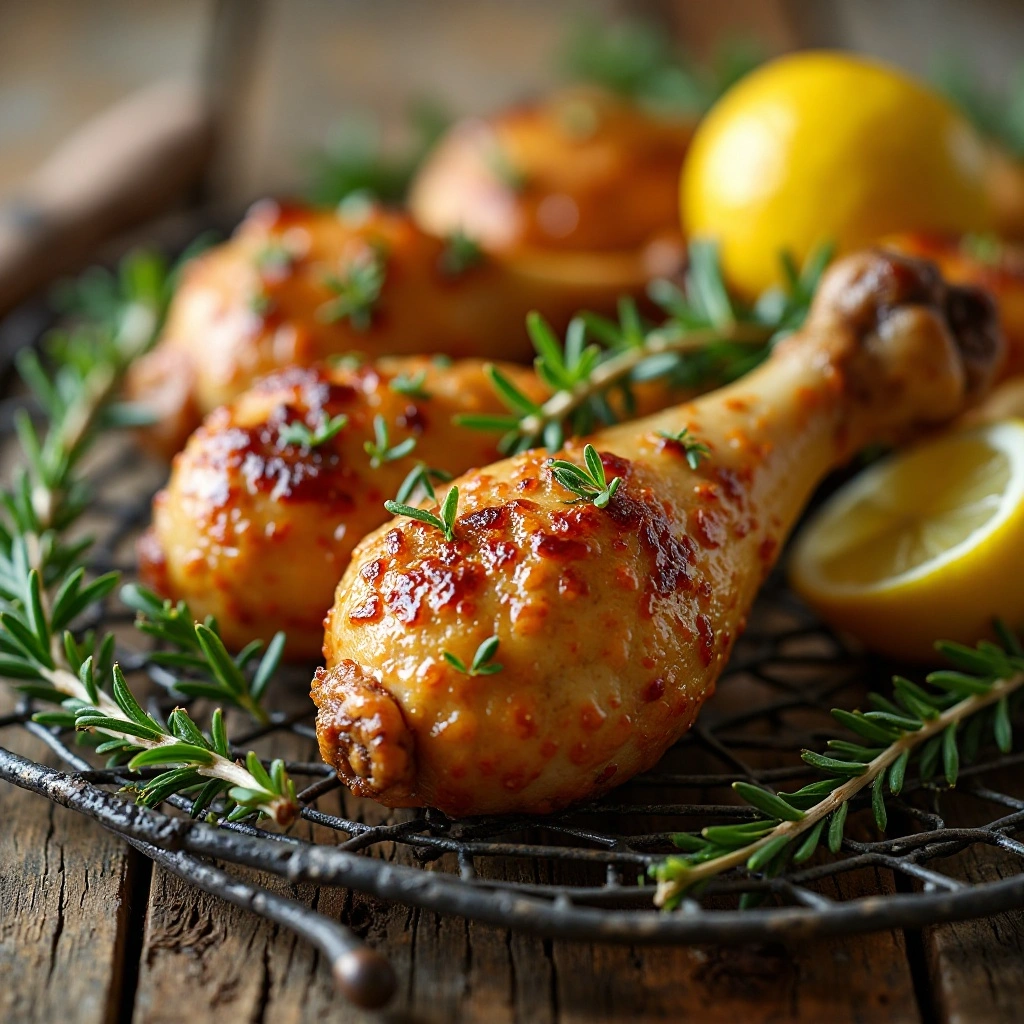
Budget-friendly and bursting with 32g of protein, these drumsticks prove that simple ingredients can create extraordinary flavor.
Key Ingredients
- 12 chicken drumsticks
- 1/4 cup olive oil
- Juice of 2 lemons
- Zest of 2 lemons
- 4 garlic cloves, minced
- 2 tablespoons fresh rosemary, chopped
- 2 tablespoons fresh thyme
- 1 tablespoon fresh parsley, chopped
- 1 tablespoon Dijon mustard
- 2 teaspoons smoked paprika
- Salt and pepper to taste
Step-by-Step Instructions
Step 1: Make the Marinade In a large bowl, whisk together olive oil, lemon juice, lemon zest, minced garlic, rosemary, thyme, parsley, Dijon mustard, paprika, salt, and pepper. The mustard helps emulsify the marinade and adds a subtle tang that complements the lemon beautifully.
Step 2: Marinate the Drumsticks Pat drumsticks dry with paper towels. Add them to the marinade, turning to coat each piece completely. Cover and refrigerate for at least 2 hours, preferably overnight. Turn the drumsticks occasionally so all sides get equal time in the marinade.
Step 3: Prepare for Baking Preheat oven to 425°F. Line a large baking sheet with aluminum foil and place a wire rack on top. Spray the rack with cooking spray. This setup allows heat to circulate around the drumsticks, making the skin crispy on all sides.
Step 4: Arrange and Bake Remove drumsticks from marinade, letting excess drip off. Arrange on the prepared rack with space between each piece. Reserve any marinade that hasn’t touched raw chicken. Bake for 40-45 minutes, turning once halfway through, until the skin is golden and crispy and the internal temperature reaches 175°F.
Step 5: Glaze and Finish In the last 10 minutes of baking, brush drumsticks with fresh lemon juice and any reserved marinade (that didn’t touch raw chicken) for extra flavor and shine. Let rest for 5 minutes before serving.
What to Serve With
These lemony drumsticks are delicious with roasted potatoes, potato salad, or garlic mashed potatoes. Add some grilled corn on the cob and coleslaw for a picnic-perfect meal. Roasted asparagus or green beans with almonds make elegant sides for a dinner party.
Top Tips for Perfecting Lemon Herb Baked Chicken Drumsticks
Fresh herbs make all the difference, but if you must use dried, reduce the amount by half as dried herbs are more concentrated.
Don’t skip the wire rack—it’s the secret to crispy skin all around instead of soggy bottoms.
Let the chicken come to room temperature for 20-30 minutes before baking for more even cooking.
If you want extra crispy skin, pat the drumsticks dry again before baking to remove excess marinade moisture.
Storing and Reheating Tips
Store in an airtight container in the refrigerator for up to 4 days. Reheat in a 375°F oven for 15-20 minutes to restore the crispy skin. You can also enjoy them cold—they make fantastic picnic food or packed lunches. These freeze exceptionally well for up to 3 months. Thaw overnight in the refrigerator before reheating.
Recipe 8: Thai Coconut Curry Chicken
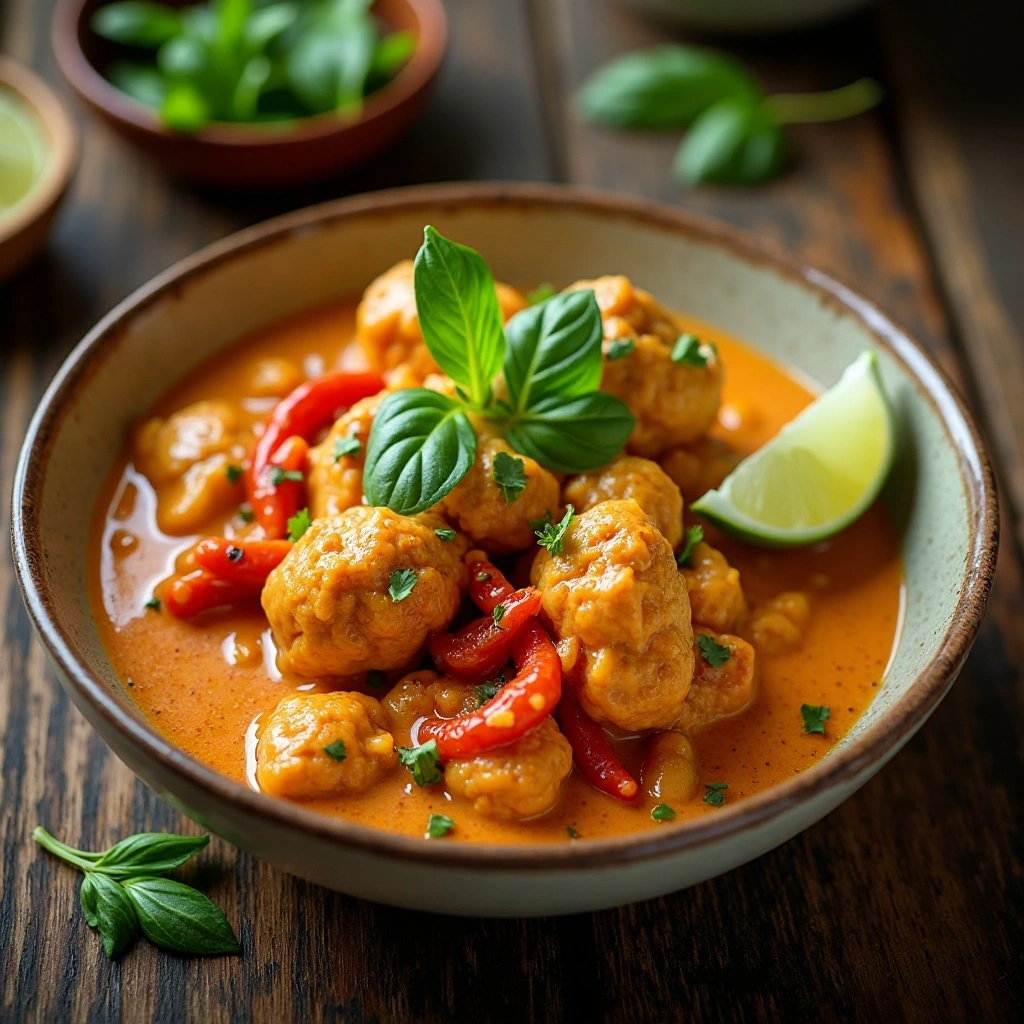
Creamy, aromatic, and delivering 37g of protein—this curry transports your taste buds to Thailand.
Key Ingredients
- 2 lbs boneless, skinless chicken thighs, cut into bite-sized pieces
- 1 can (14 oz) coconut milk
- 2 tablespoons Thai red curry paste (adjust to taste)
- 1 tablespoon fish sauce
- 1 tablespoon brown sugar
- 1 red bell pepper, sliced
- 1 cup bamboo shoots
- 1 cup Thai basil leaves
- 2 tablespoons vegetable oil
- 3 garlic cloves, minced
- 1 tablespoon fresh ginger, grated
- Juice of 1 lime
- Lime wedges and fresh cilantro for garnish
Step-by-Step Instructions
Step 1: Prepare the Chicken Cut chicken thighs into uniform bite-sized pieces, about 1-inch cubes. This ensures even cooking. Season lightly with salt and pepper. Having everything prepped before you start cooking makes this dish come together seamlessly.
Step 2: Sauté Aromatics Heat vegetable oil in a large, deep skillet or wok over medium-high heat. Add garlic and ginger, stirring constantly for about 30 seconds until fragrant. Be careful not to burn them—burnt garlic tastes bitter.
Step 3: Add Curry Paste Add Thai red curry paste to the aromatics and cook for 1-2 minutes, stirring constantly. This step “blooms” the spices in the curry paste, releasing their essential oils and deepening the flavor. Your kitchen will smell absolutely incredible.
Step 4: Cook the Chicken Add chicken pieces to the pan and toss to coat with the curry paste. Cook for 5-6 minutes, stirring occasionally, until chicken is mostly cooked through and lightly browned on the edges.
Step 5: Create the Curry Pour in coconut milk, fish sauce, and brown sugar. Stir well to combine. Bring to a simmer, then reduce heat to medium-low. Add bell peppers and bamboo shoots. Let simmer for 10-12 minutes until chicken is fully cooked, vegetables are tender, and the sauce has thickened slightly.
Step 6: Finish with Fresh Herbs Remove from heat and stir in Thai basil leaves and lime juice. The residual heat will wilt the basil just enough while keeping its vibrant color and fresh flavor. Taste and adjust seasonings if needed. Garnish with lime wedges and fresh cilantro.
What to Serve With Thai Coconut Curry Chicken
Serve this aromatic curry over jasmine rice or sticky rice to soak up all that delicious sauce. Rice noodles or zucchini noodles work wonderfully too. Add cucumber salad or fresh spring rolls on the side for a complete Thai-inspired feast.
Top Tips for Perfecting Thai Coconut Curry Chicken
Start with less curry paste and add more to taste—brands vary significantly in heat level. You can always add more, but you can’t take it away.
Use full-fat coconut milk for the creamiest, most authentic texture. Light coconut milk won’t create the same rich sauce.
Fish sauce is essential for authentic Thai flavor, providing umami depth that salt alone can’t achieve. Don’t skip it.
If you can’t find Thai basil, regular basil works, though the flavor will be slightly different. In a pinch, cilantro adds freshness too.
Storing and Reheating Tips
Store curry in an airtight container for up to 4 days in the refrigerator. The flavors actually deepen overnight, making leftovers even better. Reheat gently on the stovetop, adding a splash of coconut milk if the sauce has thickened too much. This curry freezes beautifully for up to 3 months—just thaw overnight before reheating.
Recipe 9: Balsamic Glazed Chicken with Sun-Dried Tomatoes
Sophisticated, flavorful, and boasting 41g of protein—this dish tastes like fine dining at home.
Key Ingredients
- 4 boneless, skinless chicken breasts
- 1/2 cup balsamic vinegar
- 2 tablespoons honey
- 1/2 cup sun-dried tomatoes in oil, chopped
- 4 garlic cloves, minced
- 1 cup chicken broth
- 1/2 cup heavy cream
- 2 tablespoons olive oil
- 1/4 cup fresh basil, chopped
- 1/4 cup Parmesan cheese, grated
- Salt and pepper to taste
Step-by-Step Instructions
Step 1: Prepare the Chicken
Pat chicken breasts dry and season generously with salt and pepper on both sides. If your chicken breasts are thick, pound them to even thickness so they cook uniformly.
Step 2: Sear the Chicken
Heat olive oil in a large skillet over medium-high heat. Once shimmering, add chicken breasts and sear for 5-6 minutes per side until golden brown and cooked through to 165°F. Remove chicken and set aside on a plate.
Step 3: Make the Balsamic Glaze
In the same skillet, add minced garlic and cook for 30 seconds. Add balsamic vinegar and honey, stirring to combine. Let this bubble and reduce for 3-4 minutes until it thickens into a syrupy glaze. The acidity will mellow and the sweetness will concentrate.
Step 4: Build the Sauce
Add sun-dried tomatoes and chicken broth to the skillet. Scrape up any browned bits from the bottom—those are pure flavor. Simmer for 3-4 minutes to reduce slightly. Stir in heavy cream and bring to a gentle simmer. The sauce should be smooth and velvety.
Step 5: Finish and Serve
Return chicken to the skillet along with any accumulated juices. Spoon the sauce over the chicken and let simmer together for 2-3 minutes. The sauce will thicken slightly. Remove from heat and stir in fresh basil and Parmesan cheese. Let the residual heat melt the cheese into the sauce.
What to Serve With
This elegant chicken pairs beautifully with creamy polenta, garlic mashed potatoes, or pasta. Serve with sautéed spinach, roasted Brussels sprouts, or a simple arugula salad. The rich sauce begs for something to soak it up, so crusty Italian bread is a must.
Top Tips for Perfecting Balsamic Glazed Chicken
Use good quality balsamic vinegar—it makes a noticeable difference. Look for aged balsamic if possible.
Don’t rush the reduction of the balsamic vinegar. Let it simmer and thicken naturally for the best flavor and texture.
If your sauce seems too thick, add a splash more chicken broth. Too thin? Let it simmer longer to reduce.
Sun-dried tomatoes packed in oil have better flavor and texture than the dry-packed version for this recipe.
Storing and Reheating Tips
Store in an airtight container for up to 3 days in the refrigerator. Reheat gently on the stovetop over low heat, adding a splash of cream or broth if the sauce has thickened. This dish doesn’t freeze well due to the cream-based sauce, which can separate when thawed.
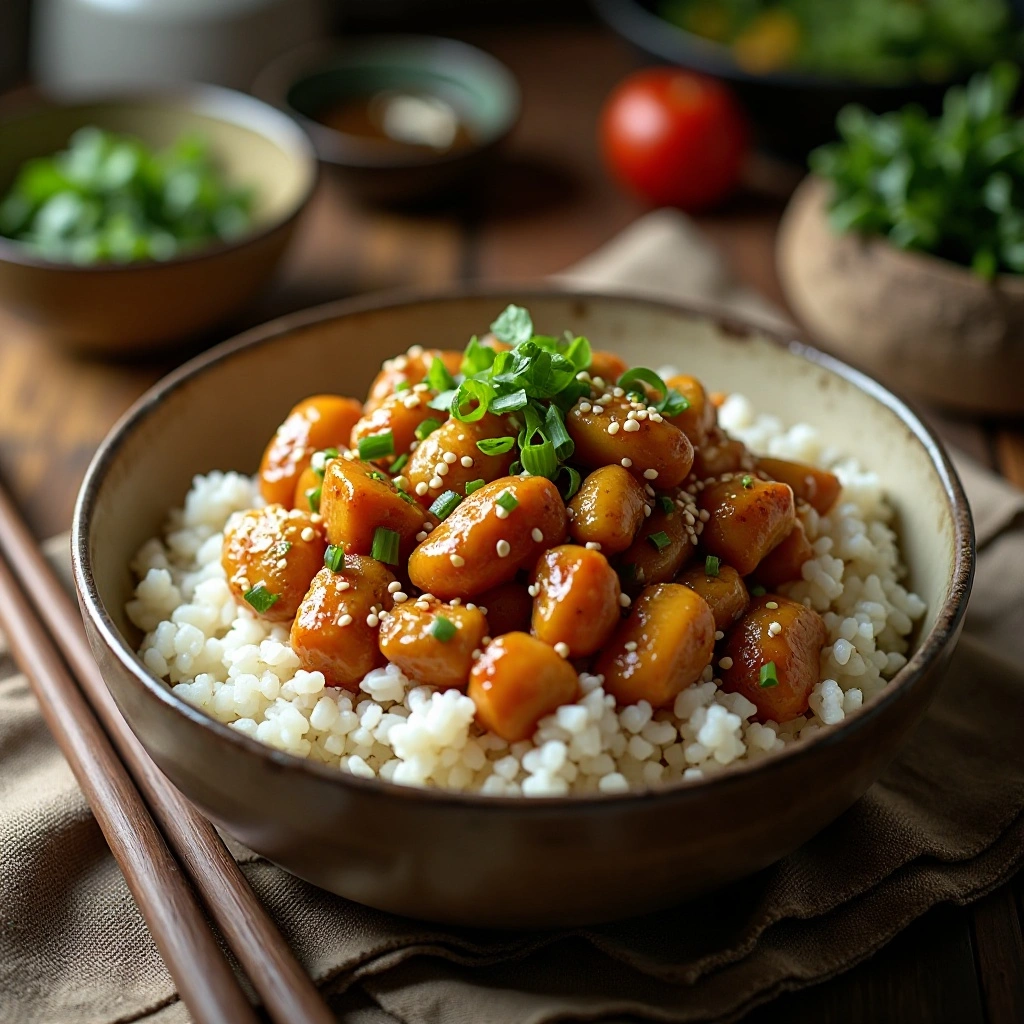
Recipe 10: Mexican Chipotle Lime Chicken
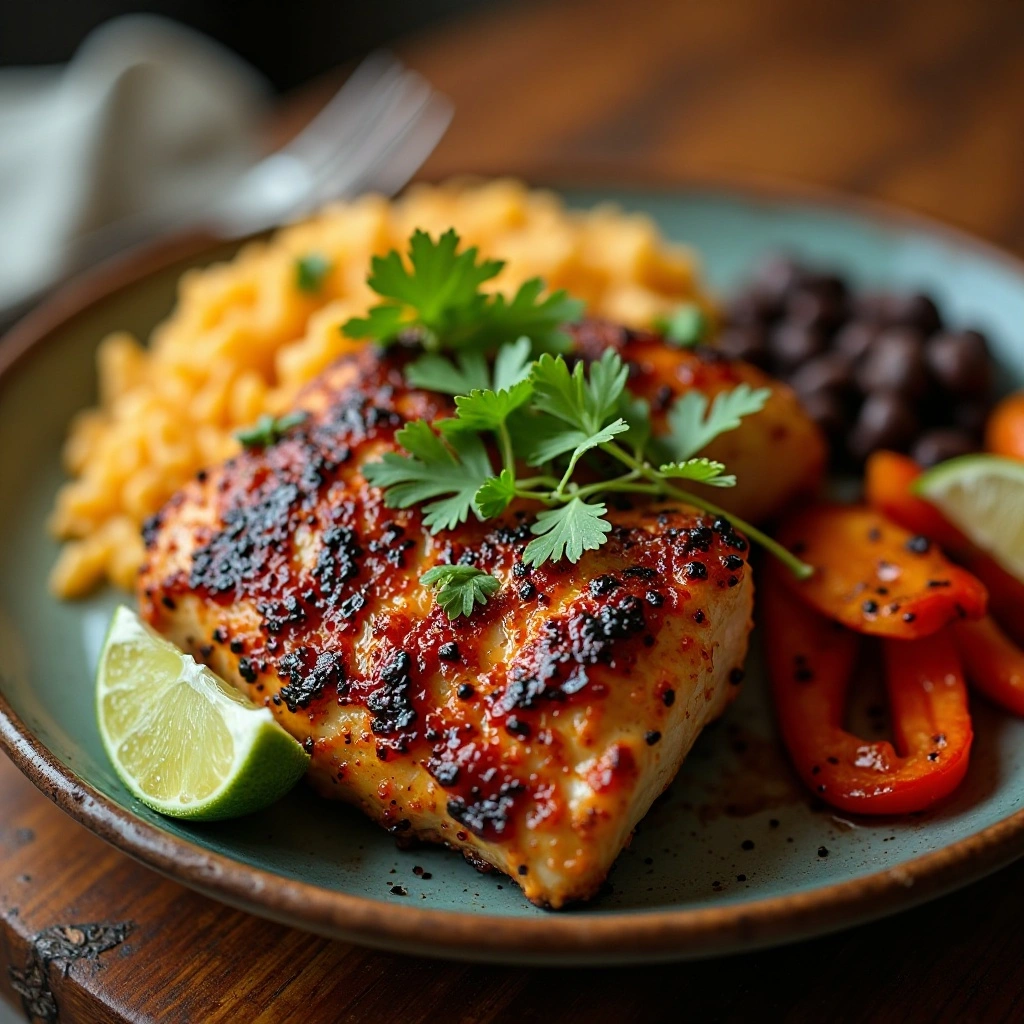
Smoky, tangy, and loaded with 39g of protein—this chicken brings bold Mexican flavors to your dinner table.
Key Ingredients
- 2 lbs boneless, skinless chicken thighs
- 2 chipotle peppers in adobo sauce, minced
- 2 tablespoons adobo sauce from the can
- Juice of 3 limes
- Zest of 2 limes
- 4 garlic cloves, minced
- 2 tablespoons olive oil
- 1 tablespoon cumin
- 1 tablespoon chili powder
- 1 teaspoon smoked paprika
- 1 teaspoon oregano
- Salt and pepper to taste
- Fresh cilantro for garnish
- Lime wedges for serving
Step-by-Step Instructions
Step 1: Create the Marinade
In a blender or food processor, combine chipotle peppers, adobo sauce, lime juice, lime zest, garlic, olive oil, cumin, chili powder, smoked paprika, and oregano. Blend until smooth. This creates a flavorful paste that will permeate every bite of chicken.
Step 2: Marinate the Chicken
Place chicken thighs in a large ziplock bag or shallow dish. Pour the marinade over the chicken, making sure each piece is well coated. Seal and refrigerate for at least 2 hours, or up to 8 hours for maximum flavor. Turn the bag occasionally to redistribute the marinade.
Step 3: Prepare for Cooking
Remove chicken from refrigerator 20 minutes before cooking to bring it to room temperature. This ensures more even cooking. Preheat your grill to medium-high heat (about 400°F) or heat a large skillet over medium-high heat.
Step 4: Cook the Chicken
Remove chicken from marinade, letting excess drip off. If grilling, place chicken on grates and cook for 6-7 minutes per side until charred and cooked through to 165°F. If using a skillet, cook for 7-8 minutes per side. The marinade will create beautiful caramelization.
Step 5: Rest and Serve
Let chicken rest for 5 minutes before slicing. This resting period is crucial—it allows the juices to redistribute, keeping your chicken moist. Slice against the grain, garnish with fresh cilantro, and serve with lime wedges.
What to Serve With
These smoky chicken thighs are perfect for tacos, burrito bowls, or served over Mexican rice. Add black beans, grilled peppers and onions, guacamole, and pico de gallo for a complete fiesta. Serve with warm tortillas, corn on the cob, or a fresh cabbage slaw.
Top Tips for Perfecting Mexican Chipotle Lime Chicken
Chipotle peppers in adobo can be very spicy. Start with one pepper and taste the marinade. Add the second if you want more heat.
Don’t discard leftover adobo sauce—it keeps in the refrigerator for months and adds amazing flavor to marinades, soups, and sauces.
If you’re sensitive to spice, remove the seeds from the chipotle peppers before blending.
Fresh lime juice is essential. Bottled lime juice lacks the bright, fresh flavor this dish needs.
Storing and Reheating Tips
Store in an airtight container for up to 4 days in the refrigerator. Reheat in a skillet over medium heat for 3-4 minutes, or microwave for 1-2 minutes. The chicken actually tastes better the next day as the flavors continue to develop. Freeze for up to 3 months—thaw overnight before reheating.
Frequently Asked Questions
What is the best cut of chicken for high protein recipes?
Chicken breast offers the highest protein content with about 31g per 100g and very low fat. However, chicken thighs provide around 26g of protein per 100g with more flavor and stay juicier during cooking. Both are excellent choices depending on your taste preferences and cooking method. For grilling or high-heat cooking, thighs are more forgiving, while breasts work beautifully in dishes with sauces that keep them moist.
How do I prevent chicken from drying out?
The key is not overcooking. Use a meat thermometer and remove chicken from heat when it reaches 165°F for breasts and 175°F for thighs. Let it rest for 5 minutes before cutting—this allows juices to redistribute. Brining chicken in salt water for 2 hours before cooking also helps retain moisture. Cooking methods like braising, using marinades with some fat content, and avoiding ultra-high heat also contribute to juicier results.
Can I meal prep these high protein chicken recipes?
Absolutely! Most of these recipes are perfect for meal prep. Cook your chicken at the beginning of the week and store in airtight containers for 3-4 days. Dishes with sauces actually improve in flavor over time. Store components separately if possible—for example, keep the chicken separate from vegetables in stir-fries to prevent sogginess. Label containers with the date and reheat only what you’ll eat to maintain the best quality.
Are chicken thighs as healthy as chicken breasts?
Chicken thighs contain more calories and fat than breasts but also offer more iron, zinc, and B vitamins. They have slightly less protein per ounce but the difference is minimal. The extra fat makes them more flavorful and harder to overcook. If you’re watching calories closely, opt for skinless thighs and trim visible fat. For most people, thighs are a healthy choice that makes sticking to a protein-rich diet more enjoyable.
How can I add more protein to chicken recipes?
Layer protein by adding ingredients like Greek yogurt in marinades, cheese in sauces, or quinoa as a side dish. Top finished dishes with nuts, seeds, or a fried egg. Serve chicken over lentils or chickpeas instead of plain rice. Pair with high-protein sides like edamame, black beans, or roasted chickpeas. These small additions can boost your meal’s total protein by 10-15 grams per serving.
What’s the best way to season chicken for maximum flavor?
Salt chicken at least 30 minutes before cooking—this allows seasoning to penetrate the meat. Use a combination of dried spices and fresh herbs for depth. Don’t be afraid to season generously. Marinades with acid (lemon, vinegar) tenderize and flavor simultaneously. Finish dishes with fresh herbs, citrus zest, or a drizzle of quality olive oil right before serving. Layer flavors throughout the cooking process rather than relying on a single seasoning step.
How long should I marinate chicken?
For maximum flavor, marinate chicken for 2-4 hours. Acidic marinades (with citrus or vinegar) should not exceed 4 hours as they can make the exterior mushy. Oil-based marinades can go longer, up to 8 hours. Thirty minutes is the minimum for any noticeable flavor impact. Always marinate in the refrigerator, never at room temperature. Turn the chicken occasionally to ensure even coverage.
Can I freeze cooked chicken?
Yes! Most cooked chicken freezes well for 2-3 months. Let it cool completely before freezing in airtight containers or freezer bags. Remove as much air as possible to prevent freezer burn. Label with the date and contents. Thaw overnight in the refrigerator, never at room temperature. Chicken in sauce freezes better than plain cooked chicken, as the sauce helps maintain moisture. Reheat thoroughly to 165°F before eating.
Nutrition Information
Here’s a general nutritional breakdown per serving for high protein chicken recipes:
| Nutrient | Chicken Breast (6 oz) | Chicken Thigh (6 oz) |
|---|---|---|
| Calories | 280-320 | 350-400 |
| Protein | 45-52g | 38-42g |
| Fat | 6-9g | 18-22g |
| Carbs | 0-2g | 0-2g |
| Fiber | 0g | 0g |
| Sodium | 120-180mg | 140-200mg |
Note: Nutritional values vary based on specific preparation methods, sauces, and additional ingredients. Values shown are for plain, cooked chicken without added ingredients.
Tips for Avoiding Common Mistakes
Don’t Skip the Meat Thermometer
Guessing doneness leads to dry, overcooked chicken or worse, undercooked poultry. Invest in an instant-read thermometer and take the guesswork out. Insert it into the thickest part of the meat without touching bone for an accurate reading.
Pat Your Chicken Dry
Excess moisture prevents proper browning and creates steam instead of a sear. Take 30 seconds to pat your chicken thoroughly dry with paper towels before seasoning. This simple step dramatically improves texture and flavor.
Avoid Overcrowding the Pan
When chicken pieces touch in the pan, they steam rather than sear. Leave space between pieces or cook in batches. This applies to roasting too—give each piece breathing room on the baking sheet for crispy, golden results.
Don’t Move Chicken Too Soon
Let chicken develop a proper crust before flipping. If it’s sticking to the pan, it’s not ready to flip yet. Wait another minute and it will release naturally. Patience is key to that beautiful golden-brown exterior.
Season Properly
Under-seasoning is the most common mistake in home cooking. Chicken needs generous seasoning because most of the seasoning stays on the surface. Season both sides and don’t be shy with salt and spices. You can always add a sauce, but you can’t fix bland chicken once it’s cooked.
Let It Rest
Cutting into chicken immediately releases all those precious juices onto your cutting board instead of staying in the meat. Five minutes of resting makes a massive difference in juiciness. Cover loosely with foil while it rests.
Don’t Fear Dark Meat
Many home cooks default to breasts thinking they’re healthier, then complain when their chicken is dry. Thighs are more forgiving, stay juicier, and have incredible flavor. They’re still high in protein and worth including in your rotation.
Temperature Matters
Starting with cold chicken straight from the fridge leads to uneven cooking—burnt outside, raw inside. Let chicken sit at room temperature for 20-30 minutes before cooking for more even results.
Don’t Overcook for “Safety”
Chicken is safe at 165°F for breasts and 175°F for thighs. Cooking beyond these temperatures dries out the meat significantly. Trust your thermometer and remove chicken at the correct temperature.
Use the Right Pan
Nonstick pans are great for delicate foods, but cast iron or stainless steel creates better browning on chicken. The right pan makes a significant difference in developing flavor through the Maillard reaction.
Additional Helpful Information
Choosing Quality Chicken
Look for chicken that’s firm to the touch with no off odors. Organic, free-range chicken tends to have better flavor and texture, though it costs more. Check the sell-by date and choose packages with the furthest date. Frozen chicken is just as nutritious as fresh if it was frozen at peak freshness.
Food Safety Tips
Always store raw chicken on the bottom shelf of your refrigerator to prevent cross-contamination. Use separate cutting boards for raw chicken and other ingredients. Wash your hands thoroughly with soap and water after handling raw poultry. Never rinse raw chicken—it spreads bacteria around your sink and kitchen.
Batch Cooking for Success
Cook multiple chicken breasts or thighs at once, even if you don’t need them all immediately. Cooked chicken keeps for 3-4 days and makes assembling quick meals throughout the week effortless. Season some plain and some flavored for variety.
Making Your Own Spice Blends
Mix up larger batches of your favorite spice combinations and store in airtight jars. Cajun seasoning, Mediterranean herbs, and Asian-inspired blends keep for months and make weeknight cooking faster.
Pairing Proteins with Vegetables
To create complete, balanced meals, pair your high protein chicken with colorful vegetables. Aim for at least two different vegetables per meal for variety in nutrients, textures, and flavors.
Final Thoughts
There you have it—10 incredible high protein chicken recipes that prove eating healthy doesn’t mean sacrificing flavor or spending hours in the kitchen.
Each of these recipes has been designed to deliver maximum protein while maintaining that delicious, home-cooked taste your family craves.
Whether you’re looking to build muscle, lose weight, or simply enjoy nutritious meals, these chicken dishes have you covered.
The beauty of these recipes lies in their versatility. Make them exactly as written, or adapt them based on what you have in your pantry. Swap vegetables, adjust spice levels, and make them your own.
Remember, the best recipe is the one you’ll actually cook. Start with whichever dish calls out to you—maybe it’s the creamy Garlic Parmesan Chicken or the spicy Honey Sriracha Thighs—and build from there.
Your kitchen is about to smell amazing, your protein goals are about to be met, and your taste buds are in for a treat.
I’d love to hear which recipe you try first! Drop a comment below and let me know how it turned out. And if you have any questions about substitutions or techniques, don’t hesitate to ask.
Happy cooking, and here’s to delicious, protein-packed meals that make healthy eating a joy rather than a chore!
Pin this post for later and share it with anyone who loves easy, healthy chicken recipes!