
17 Unique Graduation Party Food Ideas
Planning a graduation party shouldn’t feel harder than passing finals! After watching my nephew graduate last spring, I discovered that the secret to a successful celebration isn’t fancy decorations or expensive rentals—it’s the food.
These 20 graduation party food ideas turned our backyard bash into the talk of the neighborhood, with guests still asking for recipes months later.
What Are Graduation Party Foods?
Ever wonder why graduation parties feel incomplete without amazing food? Here’s the thing: graduation party foods are celebration dishes designed to feed crowds, require minimal last-minute prep, and taste absolutely incredible. They’re the culinary equivalent of tossing that cap in the air—bold, memorable, and worth celebrating. After all, the way to a graduate’s heart (and their friends’ hearts) is definitely through their stomach! Ready to make your party unforgettable?
This recipe was created entirely by AI and has not been tested in our kitchen. We care deeply about our readers, and many who have tried other recipes from our site have shared positive results.
Why You’ll Love These Graduation Party Food Ideas
These recipes solve the biggest party-planning headache: feeding a hungry crowd without spending days in the kitchen or breaking the bank. Restaurant catering for 50 people can easily cost $500-$800, but these homemade options will save you hundreds while tasting better.
The vibrant flavors, customizable toppings, and make-ahead options mean you’ll actually get to enjoy the party instead of stressing in the kitchen. These dishes pair beautifully with my popular crowd-pleasing appetizers, giving you even more options to explore. Trust me, once you try these budget-friendly recipes at home, you’ll never overpay for bland catering again.
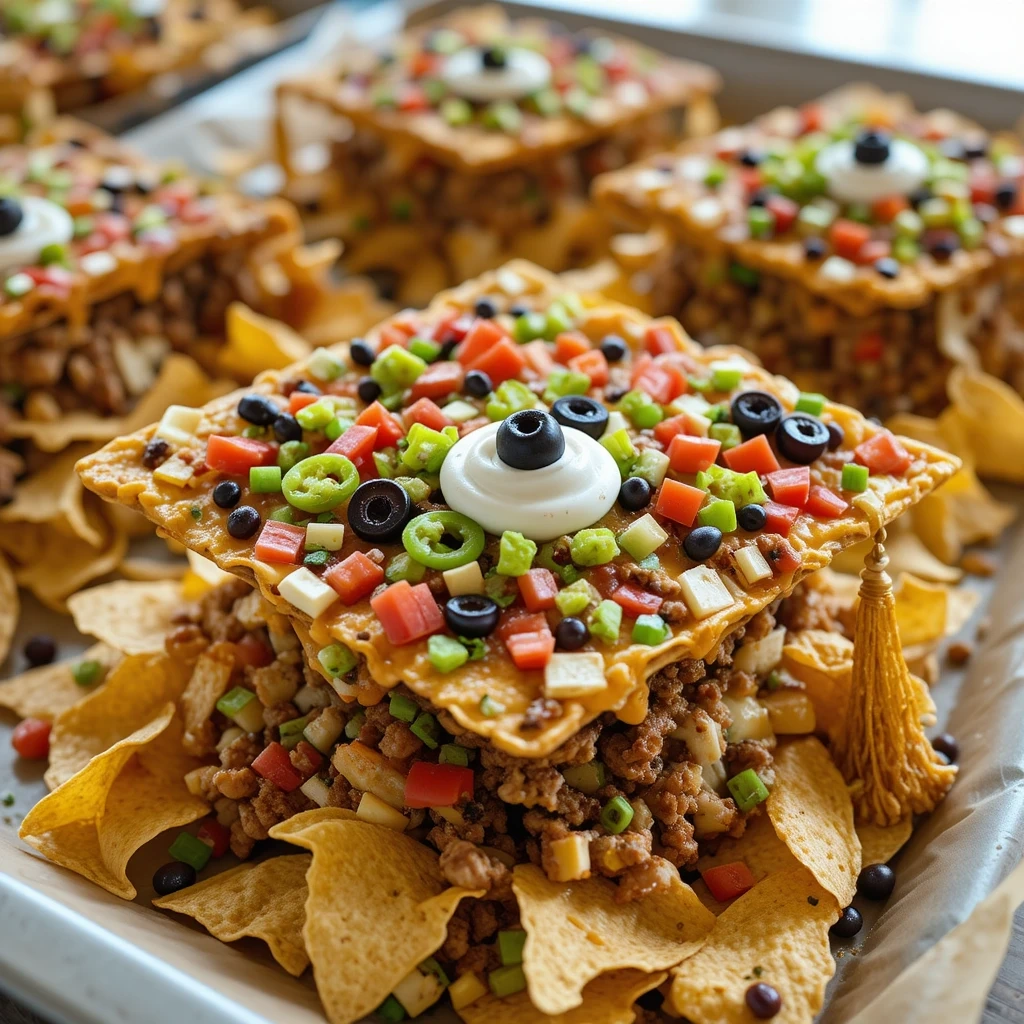
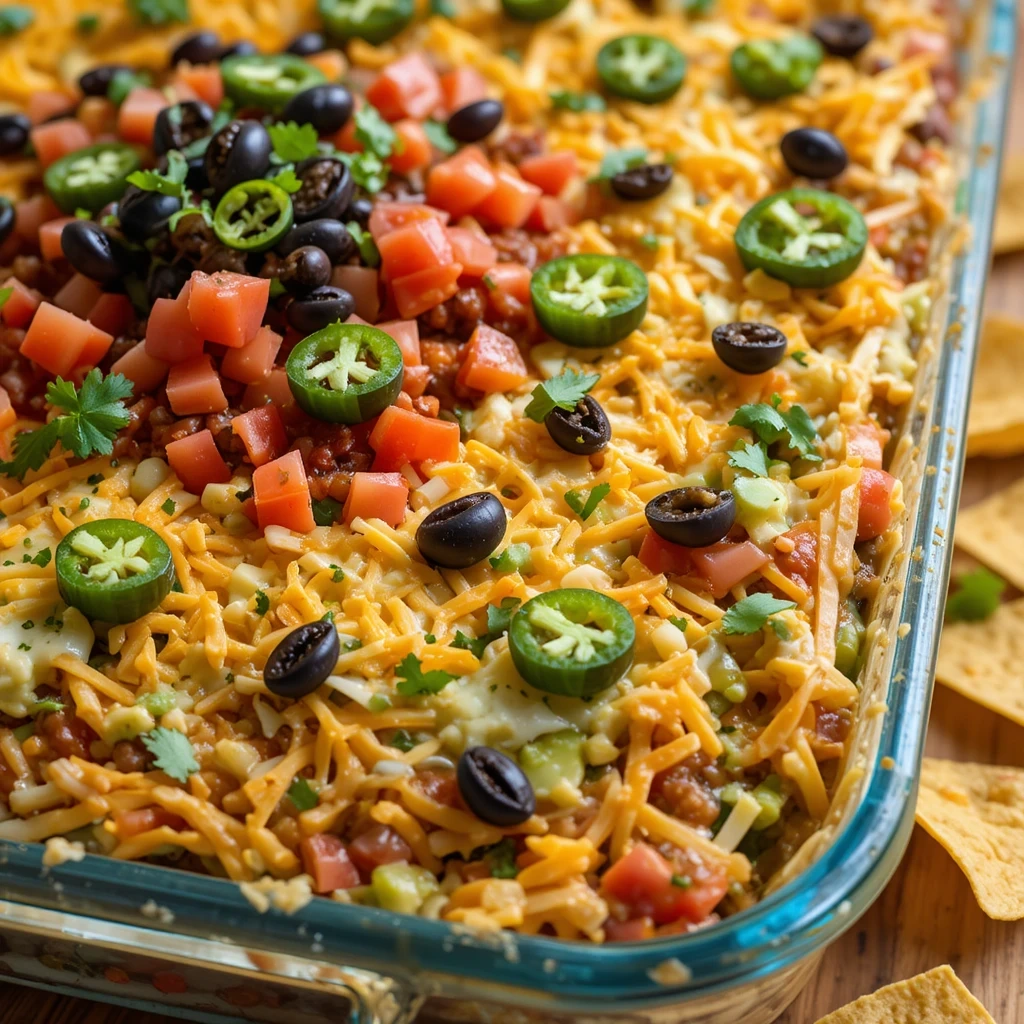
Recipe 1: Loaded Graduation Cap Nachos
Quick Overview
These festive nachos combine crispy tortilla chips with layers of melted cheese, seasoned meat, and fresh toppings arranged in graduation cap shapes. Perfect for serving 15-20 people, they’re ready in just 30 minutes and disappear even faster!
Prep Time: 15 minutes
Cook Time: 15 minutes
Total Time: 30 minutes
Servings: 15-20 people
Key Ingredients for Loaded Graduation Cap Nachos
- 2 large bags (28 oz total) tortilla chips
- 1 pound ground beef or turkey
- 1 packet taco seasoning
- 4 cups shredded Mexican cheese blend
- 1 can (15 oz) black beans, drained
- 1 cup corn kernels
- 1 cup diced tomatoes
- 1/2 cup sliced jalapeños
- 1 cup sour cream
- 1 cup guacamole
- 1/2 cup sliced black olives
- 1/4 cup fresh cilantro, chopped
- Green onions for decoration
Step-by-Step Instructions
Start by preheating your oven to 375°F and lining two large baking sheets with parchment paper. This prevents sticking and makes cleanup incredibly easy.
Brown the ground meat in a large skillet over medium-high heat for 8-10 minutes, breaking it apart with a wooden spoon until fully cooked. Drain any excess fat, then stir in the taco seasoning with 3/4 cup water. Simmer for 5 minutes until the sauce thickens.
Arrange tortilla chips in a single layer across both baking sheets, creating a sturdy base that won’t get soggy. Spread half the cheese evenly over the chips, followed by the seasoned meat, black beans, and corn.
Top with the remaining cheese, ensuring even coverage so every chip gets that melty goodness. Bake for 12-15 minutes until the cheese bubbles and turns golden at the edges.
Remove from the oven and immediately add fresh toppings: diced tomatoes, jalapeños, dollops of sour cream and guacamole. Sprinkle with black olives and cilantro. For the graduation cap effect, arrange triangular chips at the top with a square chip as the “tassel.”
What to Serve Loaded Graduation Cap Nachos With
Pair these nachos with Mexican rice, refried beans, or a fresh pico de gallo salsa bar. Add lime wedges and hot sauce on the side. A crisp garden salad with cilantro-lime dressing balances the richness perfectly.
Top Tips for Perfecting Loaded Graduation Cap Nachos
Layer your cheese between the chips and again on top to create that irresistible cheese pull. Keep wet ingredients like sour cream and guacamole on the side until serving to prevent sogginess. Use thick restaurant-style chips instead of thin ones—they hold toppings better. For vegetarian guests, substitute the meat with seasoned pinto beans or plant-based crumbles.
Storing and Reheating Tips
Nachos taste best fresh, but you can prep components separately up to 24 hours ahead. Store cooked meat, cheese, and toppings in separate containers in the refrigerator. Assemble and bake just before serving. Leftover nachos get soggy, so it’s better to save individual components and reassemble fresh batches.
Recipe 2: Honey Mustard Chicken Skewers

Quick Overview
Juicy chicken pieces marinated in sweet honey mustard, threaded onto skewers, and grilled to perfection. These protein-packed bites serve 20-25 guests and take only 25 minutes of active cooking time.
Prep Time: 20 minutes (plus 2 hours marinating)
Cook Time: 12 minutes
Total Time: 2 hours 32 minutes
Servings: 20-25 people
Key Ingredients for Honey Mustard Chicken Skewers
- 3 pounds boneless chicken breast, cut into 1-inch cubes
- 1/2 cup honey
- 1/2 cup Dijon mustard
- 1/4 cup whole grain mustard
- 3 tablespoons olive oil
- 2 tablespoons apple cider vinegar
- 3 cloves garlic, minced
- 1 teaspoon paprika
- 1/2 teaspoon black pepper
- 1/2 teaspoon salt
- 25-30 wooden skewers, soaked in water
Step-by-Step Instructions
Combine honey, both mustards, olive oil, vinegar, garlic, paprika, pepper, and salt in a large mixing bowl. Whisk vigorously until the marinade is smooth and well blended.
Add cubed chicken to the bowl and toss until every piece is completely coated in the honey mustard marinade. Cover the bowl with plastic wrap and refrigerate for at least 2 hours, or overnight for maximum flavor penetration.
Soak wooden skewers in water for 30 minutes before using to prevent them from burning on the grill. This simple step makes a huge difference.
Thread 4-5 chicken cubes onto each skewer, leaving a small space between pieces for even cooking. Don’t pack them too tightly or the centers won’t cook through properly.
Preheat your grill or grill pan to medium-high heat and lightly oil the grates. Place skewers on the grill and cook for 5-6 minutes per side, turning once, until the chicken reaches an internal temperature of 165°F and develops beautiful char marks.
Let the skewers rest for 3-4 minutes before serving to allow the juices to redistribute throughout the meat.
What to Serve Honey Mustard Chicken Skewers With
These skewers shine alongside fresh coleslaw, grilled vegetables, or a cucumber salad. Add rice pilaf or garlic bread for a heartier meal. Set out extra honey mustard sauce for dipping.
Top Tips for Perfecting Honey Mustard Chicken Skewers
Cut chicken pieces uniformly so they cook at the same rate. For extra caramelization, brush skewers with additional marinade during the last 2 minutes of grilling. If using metal skewers, remember they get extremely hot. Use an instant-read thermometer to ensure chicken reaches 165°F. Prepare these a day ahead through the marinating step to save time.
Storing and Reheating Tips
Store cooked skewers in an airtight container in the refrigerator for up to 3 days. Reheat in a 350°F oven for 8-10 minutes until warmed through. You can also freeze marinated raw chicken in freezer bags for up to 3 months. Thaw in the refrigerator overnight before grilling.
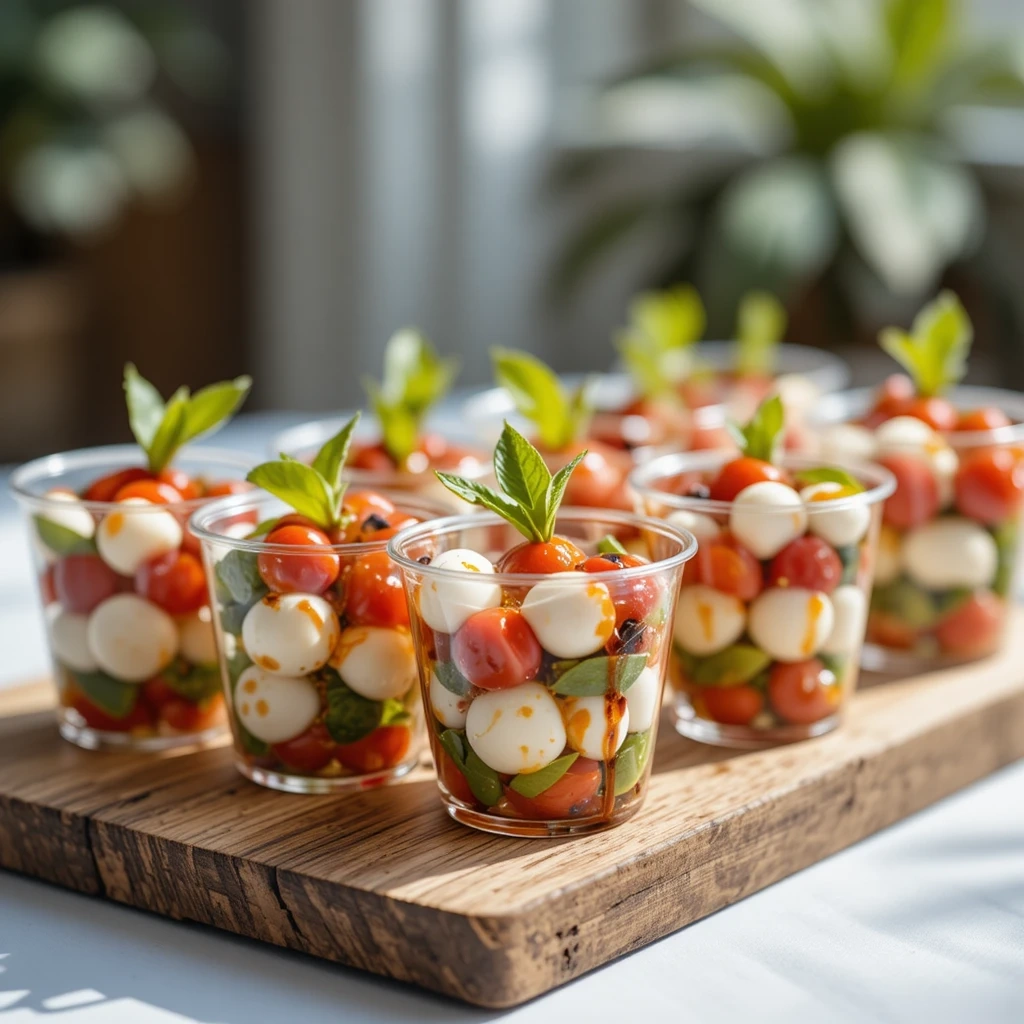
Recipe 3: Mini Caprese Salad Cups
Quick Overview
Fresh mozzarella, cherry tomatoes, and basil leaves layered in individual cups with balsamic glaze. These elegant, no-cook appetizers serve 30 people and assemble in just 20 minutes.
Prep Time: 20 minutes
Cook Time: 0 minutes
Total Time: 20 minutes
Servings: 30 cups
Key Ingredients for Mini Caprese Salad Cups
- 30 small clear plastic cups (2-3 oz size)
- 2 pounds cherry tomatoes, halved
- 2 pounds fresh mozzarella balls (bocconcini or ciliegine)
- 2 cups fresh basil leaves
- 1/2 cup extra virgin olive oil
- 1/4 cup balsamic glaze
- 2 teaspoons sea salt
- 1 teaspoon cracked black pepper
- 1 teaspoon Italian seasoning
Step-by-Step Instructions
Wash and thoroughly dry the cherry tomatoes, then cut each one in half. Pat the mozzarella balls dry with paper towels to remove excess moisture—this prevents the cups from getting watery.
Tear basil leaves into smaller pieces if they’re large, keeping some whole for garnish. The torn edges actually release more flavor than cut edges.
In a small bowl, whisk together olive oil, salt, pepper, and Italian seasoning to create a simple dressing that will coat every ingredient beautifully.
Start layering each cup: place 2 tomato halves at the bottom, followed by 2 mozzarella balls, then a few basil leaves. Repeat the layers until each cup is filled about three-quarters full.
Drizzle each cup with the olive oil mixture, ensuring every layer gets seasoned. Right before serving, drizzle balsamic glaze over the top in a zigzag pattern for that restaurant-quality presentation.
Add a small fresh basil leaf on top of each cup as a final garnish. These can be prepared up to 4 hours before your party.
What to Serve Mini Caprese Salad Cups With
These refreshing cups complement heartier appetizers like meatballs or bruschetta. Serve alongside a charcuterie board or as part of an Italian-themed spread. They pair wonderfully with crusty bread and sparkling water with lemon.
Top Tips for Perfecting Mini Caprese Salad Cups
Use the freshest mozzarella you can find—check the sell-by date and buy from stores with high turnover. Room temperature ingredients taste better than cold ones. For a twist, add tiny pieces of prosciutto between layers. Make sure cups are completely dry before filling. Buy pre-made balsamic glaze to save time, or make your own by reducing balsamic vinegar with a tablespoon of honey.
Storing and Reheating Tips
Assemble these cups up to 4 hours before serving and store them covered in the refrigerator. Don’t add the balsamic glaze until just before serving, as it can make the presentation muddy. These don’t store well after serving, so only make what you’ll use.
Recipe 4: BBQ Meatball Sliders

Quick Overview
Tender meatballs smothered in tangy barbecue sauce, nestled in soft slider buns with melted cheese. These crowd-pleasers serve 24 people and cook in just 35 minutes using simple pantry ingredients.
Prep Time: 15 minutes
Cook Time: 20 minutes
Total Time: 35 minutes
Servings: 24 sliders
Key Ingredients for BBQ Meatball Sliders
- 2 pounds frozen pre-cooked meatballs
- 2 cups barbecue sauce
- 24 slider buns (Hawaiian rolls work great)
- 12 slices cheddar cheese, halved
- 1/4 cup butter, melted
- 2 teaspoons garlic powder
- 1 tablespoon sesame seeds
- Pickle slices (optional)
- Coleslaw (optional)
Step-by-Step Instructions
Preheat your oven to 350°F. Place frozen meatballs in a large baking dish and pour barbecue sauce over them, stirring gently to coat each one completely.
Cover the dish tightly with aluminum foil and bake for 20 minutes until the meatballs are heated through and the sauce is bubbling around the edges.
While the meatballs heat, prepare the buns by slicing the entire sheet of slider rolls in half horizontally without separating individual rolls. This keeps them connected and easier to handle.
Place the bottom half of the slider rolls in a separate baking dish. Arrange the hot meatballs (2 per slider) on the bottom buns, then top each with half a slice of cheese.
Place the top half of the rolls over the cheese-covered meatballs. Mix melted butter with garlic powder and brush generously over the tops of the rolls. Sprinkle with sesame seeds.
Bake the assembled sliders uncovered for 10-12 minutes until the cheese melts, the buns turn golden, and the tops develop a slight crunch.
What to Serve BBQ Meatball Sliders With
These sliders pair perfectly with potato salad, coleslaw, or crispy French fries. Add corn on the cob and baked beans for a complete barbecue feast. Fresh pickles and extra napkins are essential—these get delightfully messy!
Top Tips for Perfecting BBQ Meatball Sliders
Choose a thick barbecue sauce that clings to the meatballs rather than a thin, runny one. Homemade meatballs work beautifully too—just ensure they’re fully cooked before saucing. For extra flavor, add a splash of Worcestershire sauce to the barbecue sauce. Toast the buns slightly before assembly if you prefer less soggy bottoms. These reheat well, making them perfect for meal prep.
Storing and Reheating Tips
Store leftover sliders wrapped in foil in the refrigerator for up to 3 days. Reheat in a 300°F oven for 15 minutes until warmed through. You can prepare these up to the assembly stage, refrigerate, and bake just before serving. The meatball and sauce mixture freezes wonderfully for up to 3 months.
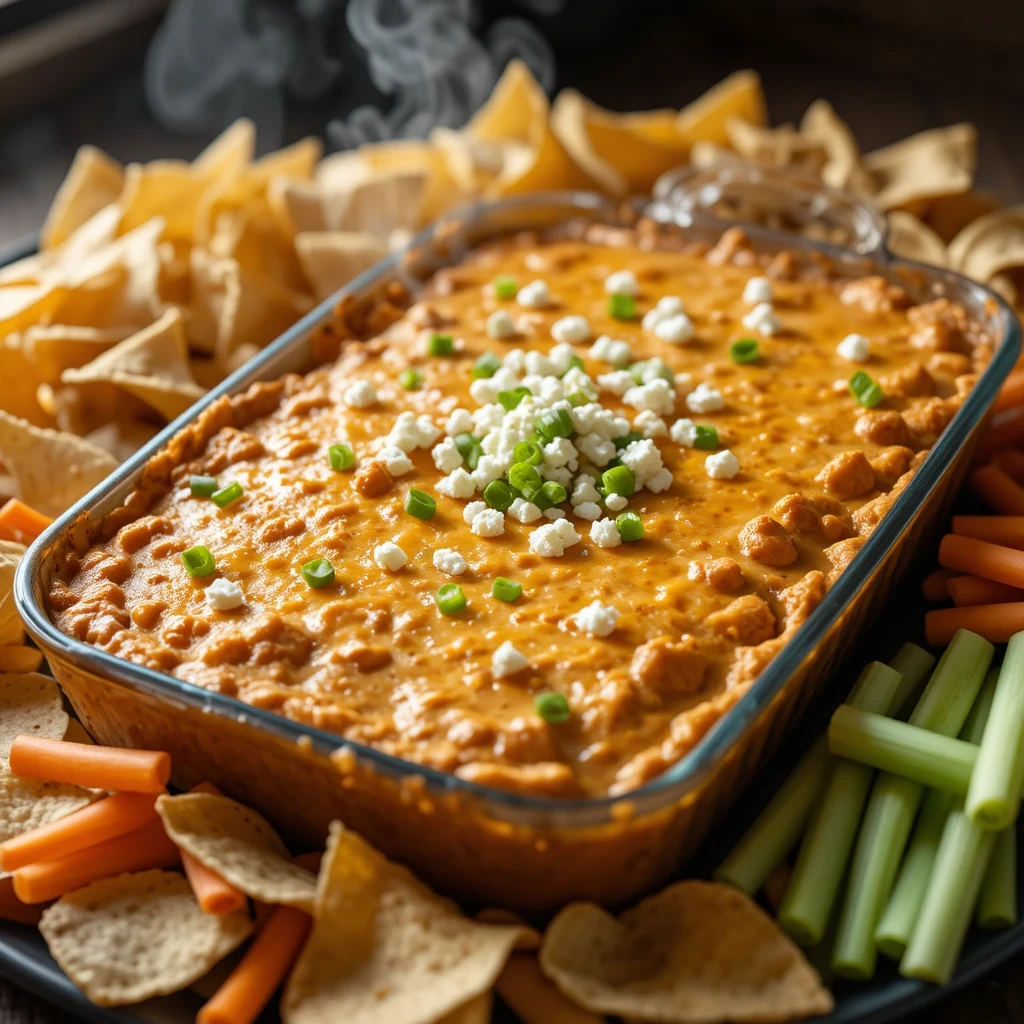
Recipe 5: Buffalo Chicken Dip
Quick Overview
Creamy, spicy, cheesy dip loaded with shredded chicken and hot sauce flavor. This addictive appetizer serves 15-20 people and bakes in just 25 minutes, perfect for keeping warm in a slow cooker throughout your party.
Prep Time: 10 minutes
Cook Time: 25 minutes
Total Time: 35 minutes
Servings: 15-20 people
Key Ingredients for Buffalo Chicken Dip
- 3 cups cooked chicken breast, shredded
- 16 oz cream cheese, softened
- 1 cup sour cream
- 1 cup ranch dressing
- 3/4 cup buffalo hot sauce
- 2 cups shredded cheddar cheese
- 1 cup shredded mozzarella cheese
- 1/2 cup crumbled blue cheese (optional)
- 3 green onions, sliced
- Tortilla chips, celery sticks, and carrots for serving
Step-by-Step Instructions
Preheat your oven to 350°F and grease a 9×13-inch baking dish with cooking spray or butter to prevent sticking.
In a large mixing bowl, beat the softened cream cheese with a hand mixer until smooth and fluffy, about 2 minutes. This step is crucial for achieving a creamy texture without lumps.
Add sour cream, ranch dressing, and buffalo sauce to the cream cheese and mix until completely combined and the mixture is uniformly orange-colored.
Fold in the shredded chicken, 1.5 cups of the cheddar cheese, and half the mozzarella cheese. Mix gently but thoroughly so every bite has chicken and cheese.
Transfer the mixture to your prepared baking dish and spread it evenly with a spatula. Sprinkle the remaining cheddar and mozzarella cheeses over the top, creating a golden layer when baked.
Bake uncovered for 20-25 minutes until the dip is bubbling around the edges and the cheese on top is melted and lightly golden.
Remove from the oven and immediately top with crumbled blue cheese (if using) and sliced green onions while still hot so they stick to the melted cheese.
What to Serve Buffalo Chicken Dip With
This dip begs for sturdy tortilla chips, but celery sticks, carrot sticks, and bell pepper slices add refreshing crunch. Serve with toasted baguette slices or pretzel chips for variety. A cold ranch or blue cheese dressing on the side helps cool the heat.
Top Tips for Perfecting Buffalo Chicken Dip
Use rotisserie chicken for incredible flavor with zero cooking time. Adjust the buffalo sauce amount based on your heat preference—start with 1/2 cup if serving kids. Let cream cheese sit at room temperature for 30 minutes before mixing to avoid lumps. Transfer to a slow cooker after baking to keep it warm throughout your party. Make it a day ahead and refrigerate, then bake when guests arrive.
Storing and Reheating Tips
Store leftover dip in an airtight container in the refrigerator for up to 4 days. Reheat in the microwave in 30-second intervals, stirring between each, or in a 300°F oven for 15 minutes. The dip may separate slightly when reheated—just stir well. Freeze for up to 2 months, thaw overnight in the fridge, and reheat.
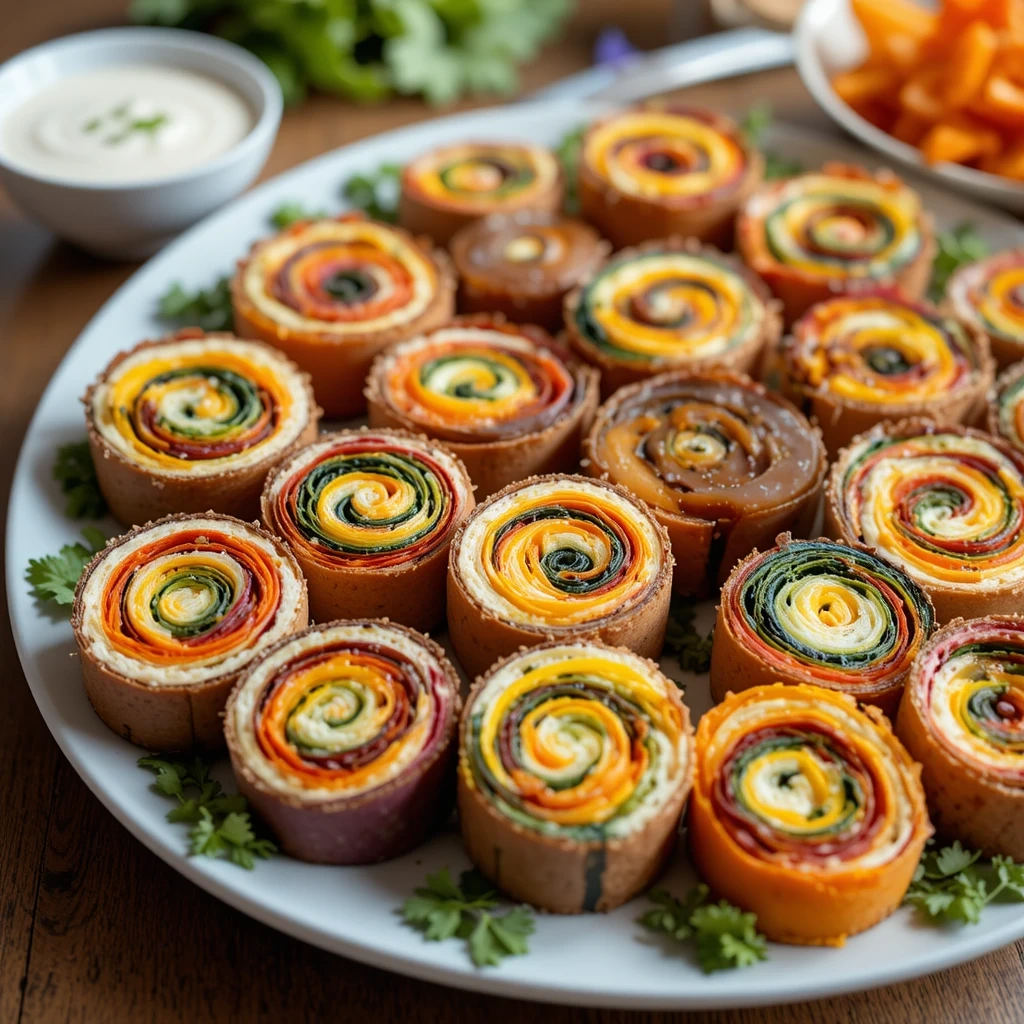
Recipe 6: Rainbow Veggie Pinwheels
Quick Overview
Colorful cream cheese and vegetable roll-ups sliced into pretty spirals. These refreshing, make-ahead appetizers serve 30 people and require zero cooking, making them perfect for busy party hosts.
Prep Time: 25 minutes (plus 1 hour chilling)
Cook Time: 0 minutes
Total Time: 1 hour 25 minutes
Servings: 30 pinwheels
Key Ingredients for Rainbow Veggie Pinwheels
- 5 large flour tortillas (burrito size)
- 16 oz cream cheese, softened
- 1/2 cup ranch dressing
- 1 cup red bell pepper, finely diced
- 1 cup yellow bell pepper, finely diced
- 1 cup carrots, shredded
- 1 cup cucumber, finely diced
- 1 cup purple cabbage, shredded
- 2 cups fresh spinach leaves
- 1 teaspoon garlic powder
- 1 teaspoon dried dill
- Salt and pepper to taste
Step-by-Step Instructions
Beat softened cream cheese in a mixing bowl until completely smooth and fluffy with no lumps remaining—this takes about 3 minutes with a hand mixer.
Mix in ranch dressing, garlic powder, dried dill, salt, and pepper until the mixture is uniform in color and texture. This flavored cream cheese base is the secret to amazing pinwheels.
Lay one tortilla flat on a clean work surface. Spread a generous layer of the cream cheese mixture over the entire surface, going all the way to the edges to ensure flavor in every bite.
Layer spinach leaves over the cream cheese, creating a green base. Then arrange thin strips of each vegetable across the tortilla in rainbow order: red pepper, orange carrots, yellow pepper, cucumber, and purple cabbage.
Starting from the bottom edge, roll the tortilla up tightly but not so tight that the filling squeezes out. Apply gentle pressure as you roll to create a compact pinwheel.
Wrap each rolled tortilla tightly in plastic wrap and refrigerate for at least 1 hour. This chilling step is essential—it allows the cream cheese to firm up so the pinwheels hold their shape when sliced.
Remove from the fridge and use a sharp serrated knife to slice each roll into 6 equal pieces, wiping the knife clean between cuts for neat spirals.
What to Serve Rainbow Veggie Pinwheels With
These fresh pinwheels pair beautifully with hummus, salsa, or ranch dip on the side. Serve alongside other cold appetizers like a vegetable platter or fruit kabobs. They work wonderfully as part of a sandwich platter spread.
Top Tips for Perfecting Rainbow Veggie Pinwheels
Pat vegetables completely dry with paper towels before adding to prevent soggy pinwheels. Use room temperature tortillas—they’re more pliable and less likely to crack. For extra flavor, add a sprinkle of everything bagel seasoning or shredded cheese. Make these up to 24 hours ahead for ultimate convenience. Use a variety of colored tortillas (spinach, tomato, whole wheat) for even more visual appeal.
Storing and Reheating Tips
Store wrapped pinwheels in the refrigerator for up to 24 hours before slicing, or store sliced pinwheels in an airtight container with damp paper towels for up to 8 hours. These don’t freeze well due to the vegetables and cream cheese. Bring to room temperature for 15 minutes before serving for the best texture.
Recipe 7: Sweet & Sour Meatballs
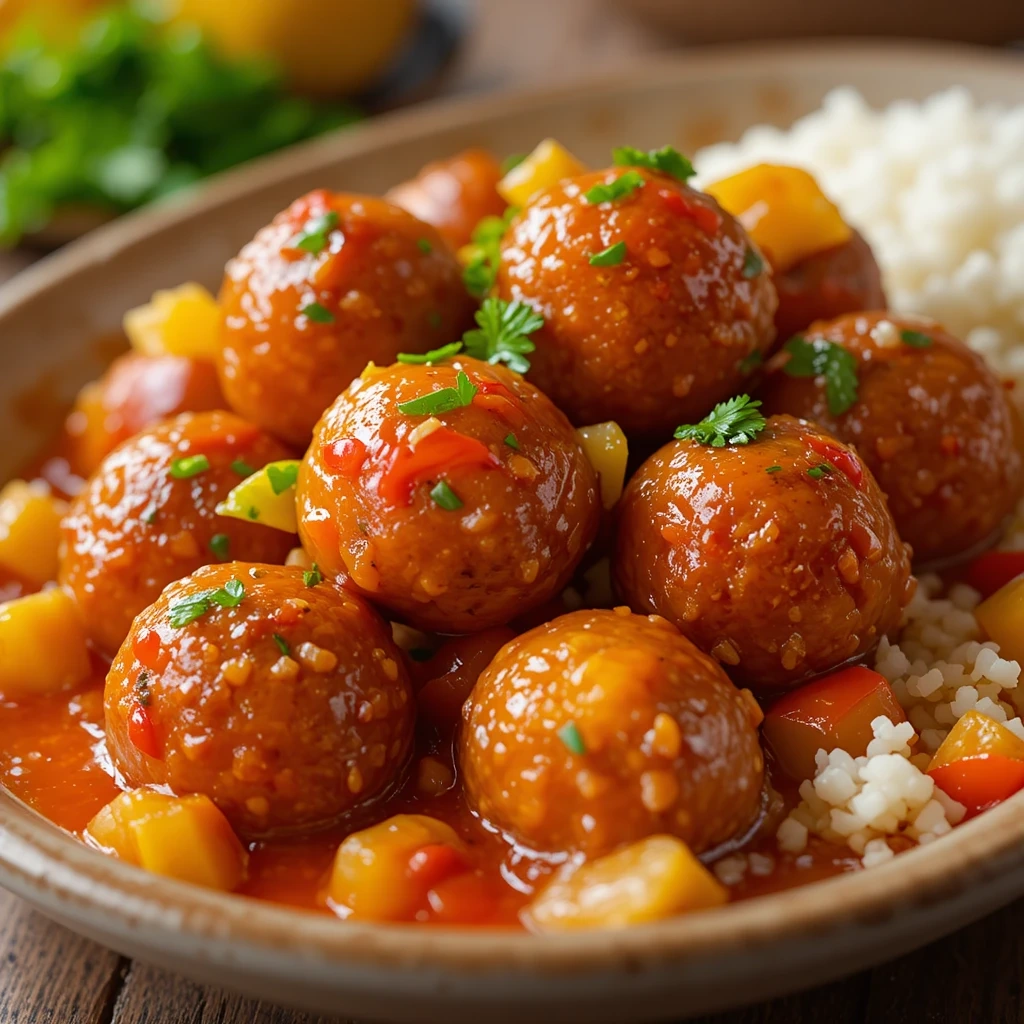
Quick Overview
Juicy meatballs coated in a glossy sweet and sour sauce with pineapple chunks. This crowd-favorite serves 25 people and cooks hands-free in a slow cooker for 3 hours, leaving you free to handle other party tasks.
Prep Time: 10 minutes
Cook Time: 3 hours
Total Time: 3 hours 10 minutes
Servings: 25 people
Key Ingredients for Sweet & Sour Meatballs
- 3 pounds frozen pre-cooked meatballs
- 1 can (20 oz) pineapple chunks, drained (reserve juice)
- 1 cup ketchup
- 3/4 cup brown sugar
- 1/2 cup rice vinegar
- 1/4 cup soy sauce
- 2 tablespoons cornstarch
- 1 red bell pepper, cut into chunks
- 1 green bell pepper, cut into chunks
- 2 teaspoons garlic powder
- 1 teaspoon ground ginger
Step-by-Step Instructions
Place frozen meatballs in a 6-quart slow cooker. There’s no need to thaw them first—they’ll cook perfectly from frozen.
In a medium bowl, whisk together ketchup, brown sugar, rice vinegar, soy sauce, garlic powder, and ground ginger until the sugar dissolves completely and the mixture is smooth.
Pour this sauce over the meatballs in the slow cooker, stirring gently to ensure every meatball gets coated in the sweet and sour goodness.
Set the slow cooker to low and cook for 2.5 hours, stirring occasionally if you’re around, though it’s not absolutely necessary.
While the meatballs cook, mix cornstarch with 3 tablespoons of the reserved pineapple juice to create a slurry. This will thicken the sauce beautifully.
After 2.5 hours, stir in the cornstarch mixture, pineapple chunks, red bell pepper, and green bell pepper. The vegetables will stay crisp-tender rather than mushy.
Continue cooking on low for another 30 minutes until the sauce thickens to a glossy glaze and the peppers are tender but still have a slight bite.
What to Serve Sweet & Sour Meatballs With
Serve over steamed white rice or fried rice for a complete meal. These also work wonderfully over rice noodles or alongside egg rolls and potstickers. Provide toothpicks for easy snacking if serving as an appetizer.
Top Tips for Perfecting Sweet & Sour Meatballs
For richer flavor, brown the meatballs in a skillet before adding to the slow cooker. Adjust sweetness by reducing brown sugar to 1/2 cup if you prefer less sweet. Fresh pineapple works too, but canned is convenient and consistently sweet. Make the sauce tangier by adding an extra tablespoon of vinegar. This recipe doubles easily for larger crowds.
Storing and Reheating Tips
Store leftovers in an airtight container in the refrigerator for up to 5 days. Reheat in the microwave or on the stovetop over medium heat until warmed through. These freeze beautifully for up to 3 months—freeze in the sauce for best results. Thaw overnight in the fridge and reheat gently.
Recipe 8: Mediterranean Hummus Platter
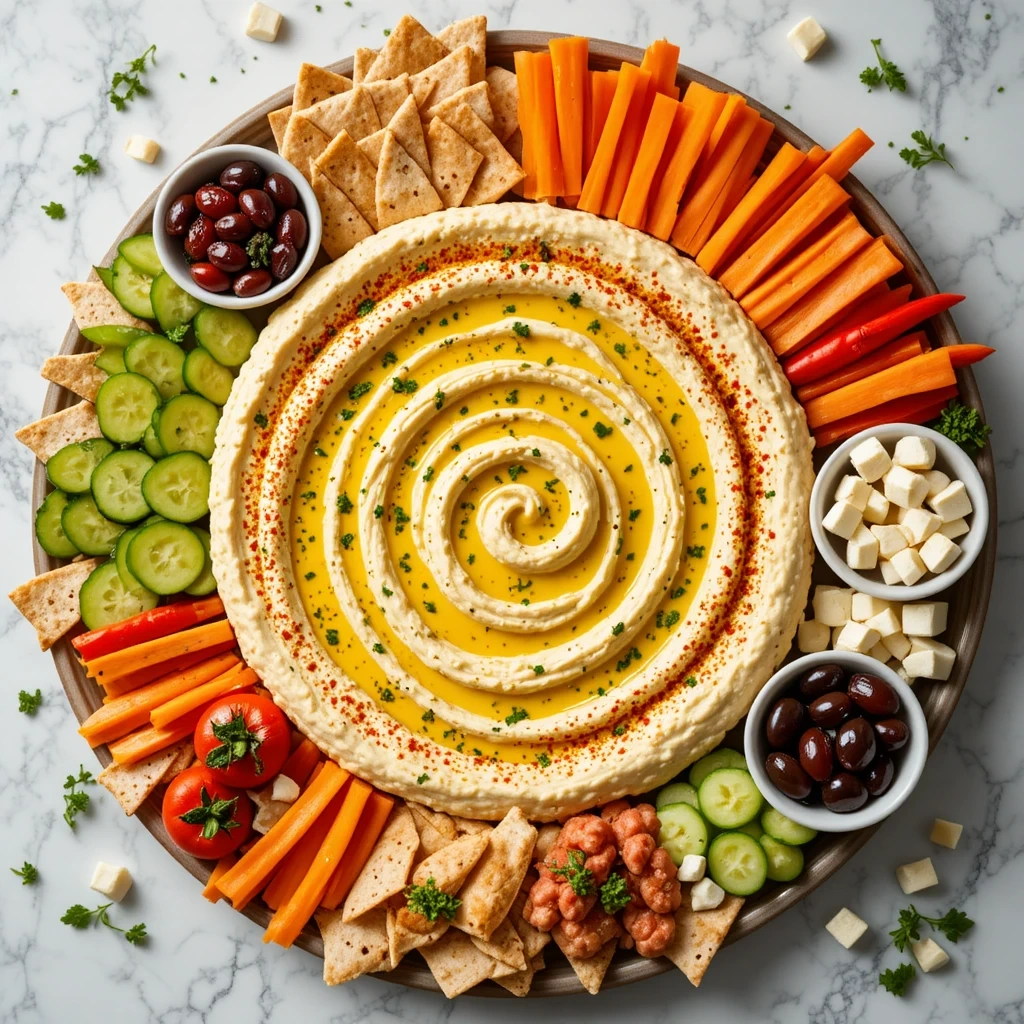
Quick Overview
A stunning display of creamy homemade hummus surrounded by fresh vegetables, pita bread, and Mediterranean toppings. This no-cook platter serves 20 people and assembles in just 30 minutes for an impressive presentation.
Prep Time: 30 minutes
Cook Time: 0 minutes
Total Time: 30 minutes
Servings: 20 people
Key Ingredients for Mediterranean Hummus Platter
- 2 cans (30 oz total) chickpeas, drained (reserve liquid)
- 1/2 cup tahini
- 1/3 cup fresh lemon juice
- 3 cloves garlic, minced
- 1/4 cup olive oil
- 1 teaspoon cumin
- Salt to taste
- Assorted vegetables (cucumbers, cherry tomatoes, bell peppers, carrots)
- Kalamata olives
- Feta cheese cubes
- Fresh parsley
- Pita bread or pita chips
Step-by-Step Instructions
Begin by making fresh hummus: Add drained chickpeas, tahini, lemon juice, garlic, olive oil, cumin, and a pinch of salt to a food processor. Reserve about 1/4 cup of the chickpea liquid for adjusting consistency.
Process on high for 2-3 minutes, scraping down the sides as needed. The hummus should be very smooth and creamy, not grainy. Add reserved chickpea liquid one tablespoon at a time if the mixture is too thick.
Taste and adjust seasonings—add more lemon juice for brightness, more salt for depth, or a pinch more cumin for earthiness. The flavor should be bold and balanced.
Spread the hummus in a wide, shallow serving bowl or large platter, creating a smooth surface with the back of a spoon. Make decorative swirls on top for visual interest.
Drizzle extra virgin olive oil over the hummus and sprinkle with paprika, fresh parsley, and a few whole chickpeas for garnish. This makes it look professional and appetizing.
Arrange fresh vegetables around the hummus in colorful sections: cucumber slices, cherry tomatoes, bell pepper strips, and carrot sticks. Add small bowls of olives and feta cheese cubes for variety.
Cut pita bread into triangles and either serve fresh or toast them in a 350°F oven for 8 minutes until lightly crispy.
What to Serve Mediterranean Hummus Platter With
This platter works beautifully alongside grilled meats, falafel, or Mediterranean salads. Add stuffed grape leaves, tabbouleh, or baba ganoush for an authentic spread. Include warm pita bread and crispy lavash crackers for textural variety.
Top Tips for Perfecting Mediterranean Hummus Platter
For ultra-smooth hummus, peel the chickpea skins (tedious but worth it for special occasions). Let the food processor run for a full 3-4 minutes for that restaurant-quality creaminess. Make hummus up to 3 days ahead for flavors to meld. Add a ice cube while processing for extra fluffiness. Garnish with pine nuts, sun-dried tomatoes, or roasted red peppers for variety.
Storing and Reheating Tips
Store hummus in an airtight container in the refrigerator for up to 5 days with a thin layer of olive oil on top to prevent drying. Prep vegetables up to 24 hours ahead and store in containers with damp paper towels. Assemble the platter no more than 2 hours before serving for optimal freshness.
Recipe 9: Chocolate-Dipped Strawberry Graduation Caps

Quick Overview
Fresh strawberries transformed into adorable graduation caps using chocolate and square cookies. These whimsical desserts serve 30 people and require just 30 minutes to assemble with no baking required.
Prep Time: 30 minutes
Cook Time: 0 minutes (plus 15 minutes setting time)
Total Time: 45 minutes
Servings: 30 caps
Key Ingredients for Chocolate-Dipped Strawberry Graduation Caps
- 30 large fresh strawberries with stems
- 12 oz semi-sweet chocolate chips
- 30 square cookies (Keebler Fudge Shoppe or similar)
- White decorating icing or melted white chocolate
- Yellow fruit strips or yellow icing for tassels
Step-by-Step Instructions
Wash strawberries thoroughly and pat them completely dry with paper towels. Any moisture will prevent the chocolate from adhering properly.
Melt chocolate chips in a microwave-safe bowl in 30-second intervals, stirring between each, until smooth and completely melted. Be careful not to overheat or the chocolate will seize.
Hold each strawberry by the stem and dip the bottom half in melted chocolate, letting excess drip back into the bowl. Place dipped strawberries on a parchment-lined baking sheet.
Refrigerate dipped strawberries for 10 minutes until the chocolate sets firm. This creates a stable base for the “cap.”
Using a small dot of melted chocolate as glue, attach a square cookie to the top of each chocolate-covered strawberry, positioning it slightly off-center like a graduation cap would sit.
Pipe a small white dot in the center of each cookie using decorating icing. Cut tiny strips from yellow fruit leather or pipe yellow icing to create tassels hanging from the center dot.
Refrigerate for another 5 minutes to set everything in place before serving.
What to Serve Chocolate-Dipped Strawberry Graduation Caps With
These pair beautifully with other graduation-themed desserts, a fruit platter, or displayed on a tiered dessert stand. Serve alongside champagne, sparkling cider, or coffee for an elegant dessert table.
Top Tips for Perfecting Chocolate-Dipped Strawberry Graduation Caps
Choose strawberries that can sit flat on their own—this makes assembly much easier. Add a tablespoon of coconut oil to melted chocolate for a shinier finish and easier dipping. Work quickly once chocolate is melted as it hardens fast. Make these no more than 6 hours before serving for the freshest taste. Use a toothpick to help position cookies if your fingers are too large.
Storing and Reheating Tips
These are best served the day they’re made. Store in the refrigerator in a single layer for up to 6 hours before serving. Don’t cover them or condensation will form and make the chocolate sweat. Bring to room temperature 30 minutes before serving for best flavor.
Recipe 10: Spinach Artichoke Stuffed Bread
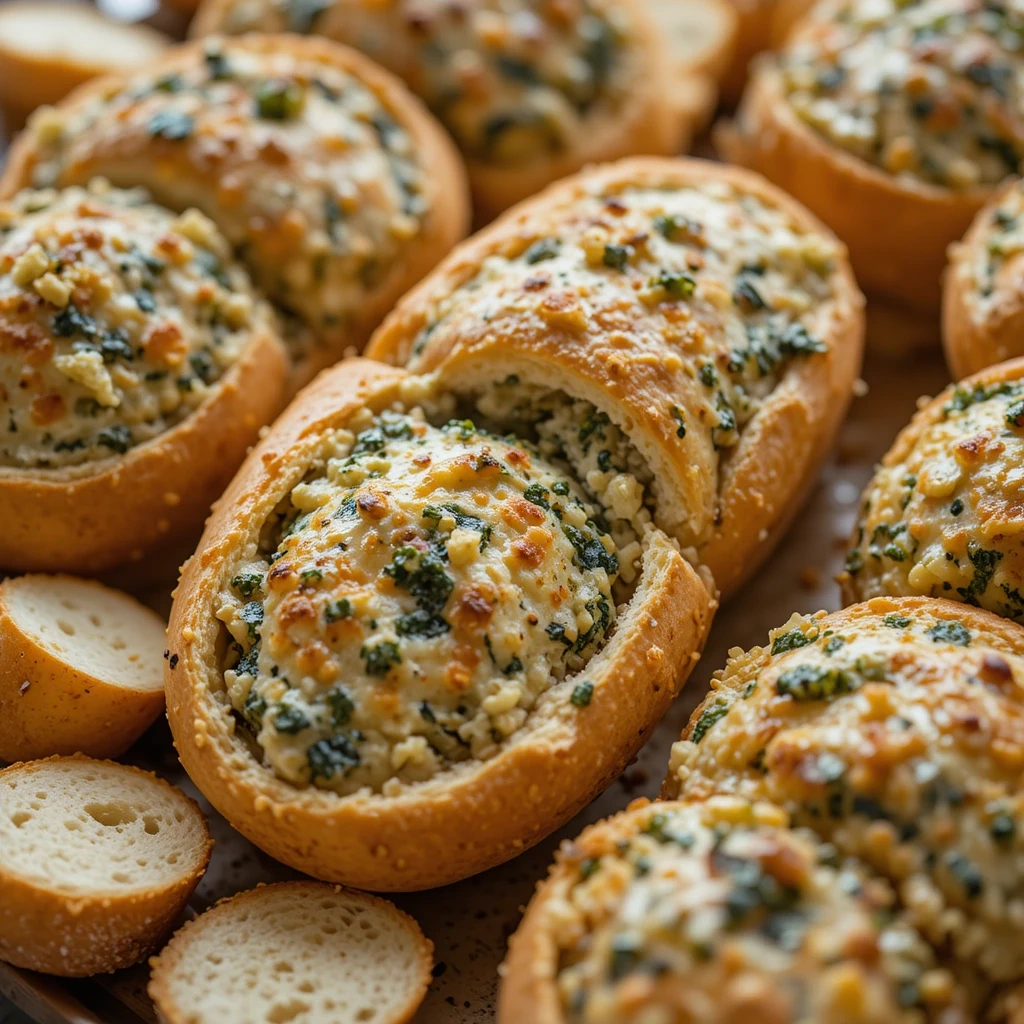
Quick Overview
Crusty Italian bread hollowed out and filled with hot, cheesy spinach artichoke dip. This shareable centerpiece serves 20 people and bakes in just 30 minutes, creating an edible bowl that guests will devour completely.
Prep Time: 15 minutes
Cook Time: 30 minutes
Total Time: 45 minutes
Servings: 20 people
Key Ingredients for Spinach Artichoke Stuffed Bread
- 2 large round sourdough bread loaves
- 16 oz cream cheese, softened
- 1 cup sour cream
- 1 cup mayonnaise
- 2 cups shredded mozzarella cheese (divided)
- 1 cup grated Parmesan cheese
- 1 can (14 oz) artichoke hearts, drained and chopped
- 2 cups frozen spinach, thawed and squeezed dry
- 4 cloves garlic, minced
- 1 teaspoon red pepper flakes
- Salt and pepper to taste
Step-by-Step Instructions
Preheat oven to 350°F. Cut the top off each bread loaf and carefully hollow out the inside, leaving about a 1-inch thick shell. Tear the removed bread into bite-sized pieces for dipping and set aside.
In a large bowl, mix softened cream cheese, sour cream, and mayonnaise until smooth and creamy with no lumps remaining.
Add 1.5 cups mozzarella, Parmesan, chopped artichokes, spinach (make sure it’s really squeezed dry), garlic, red pepper flakes, salt, and pepper. Stir until everything is evenly distributed throughout the mixture.
Spoon the spinach artichoke mixture into both hollowed bread loaves, packing it in firmly. Top with remaining mozzarella cheese.
Place filled bread loaves and bread pieces on a large baking sheet. Brush the bread pieces with olive oil and sprinkle with garlic powder for extra flavor.
Bake for 25-30 minutes until the dip is hot and bubbling and the cheese on top is melted and golden. The bread bowl should be lightly toasted but not hard.
Serve immediately while hot, letting guests tear off pieces of the bread bowl to scoop up the dip, or serve with the toasted bread cubes alongside.
What to Serve Spinach Artichoke Stuffed Bread With
This rich dip pairs perfectly with fresh vegetables like carrots, celery, and bell peppers for balance. Add crackers, pita chips, or baguette slices for those who finish the bread bowl. A simple green salad helps cut the richness.
Top Tips for Perfecting Spinach Artichoke Stuffed Bread
Really squeeze that spinach dry using paper towels or a clean kitchen towel—excess water makes the dip runny. Choose a dense bread that won’t get soggy quickly. Make the filling up to 24 hours ahead and stuff the bread right before baking. For a lighter version, use Greek yogurt instead of sour cream. Add cooked chicken or crab meat for a protein boost.
Storing and Reheating Tips
Store leftover dip in an airtight container in the refrigerator for up to 3 days. Reheat in the oven at 300°F until warmed through. The bread bowl doesn’t store well once filled, so only fill what you’ll use. Freeze leftover dip (without the bread) for up to 2 months.
Recipe 11: Asian Lettuce Wraps
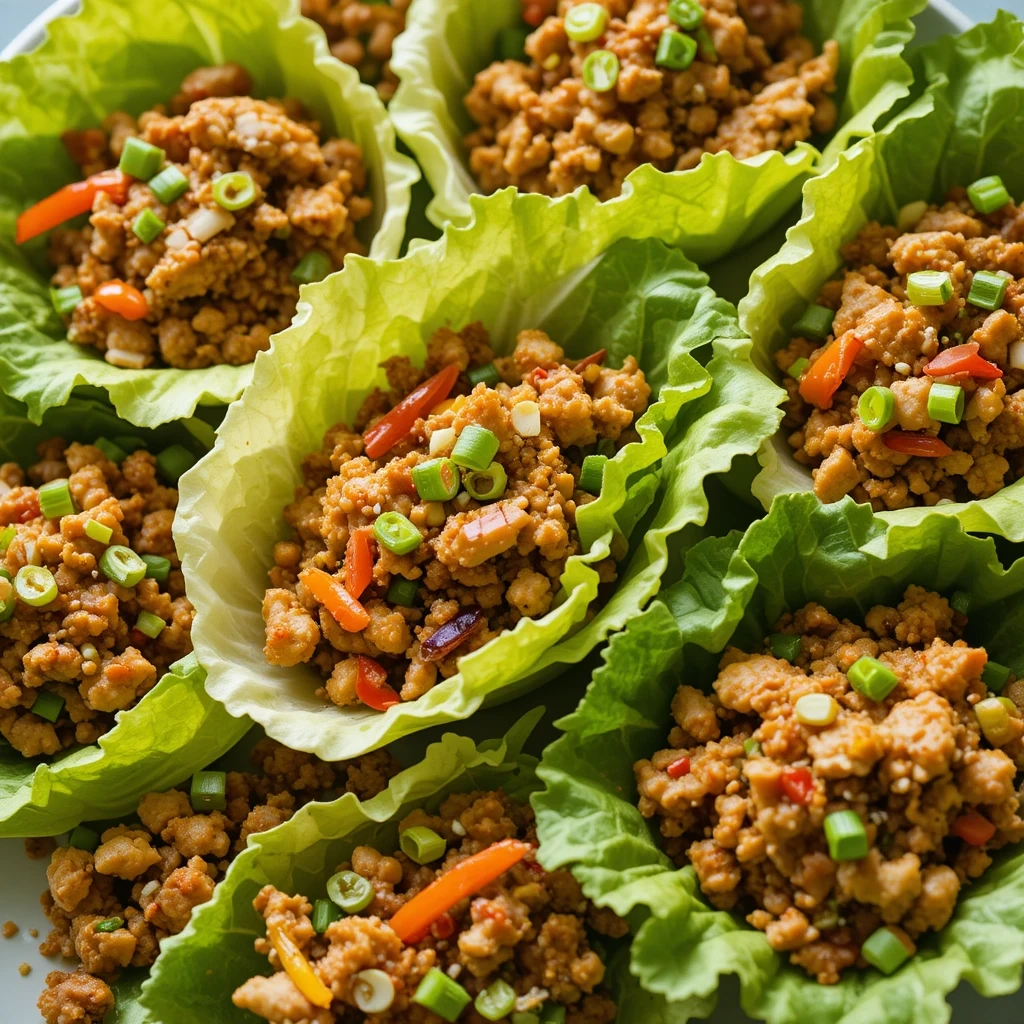
Quick Overview
Savory ground meat and vegetable filling served with crisp lettuce cups for wrapping. These interactive appetizers serve 20 people and cook in just 20 minutes, offering a light yet satisfying option that’s naturally gluten-free.
Prep Time: 15 minutes
Cook Time: 15 minutes
Total Time: 30 minutes
Servings: 20 wraps
Key Ingredients for Asian Lettuce Wraps
- 2 pounds ground chicken or turkey
- 1 can (8 oz) water chestnuts, drained and diced
- 1 cup mushrooms, finely chopped
- 1 cup shredded carrots
- 4 green onions, sliced
- 3 cloves garlic, minced
- 1 tablespoon fresh ginger, minced
- 1/4 cup soy sauce
- 2 tablespoons hoisin sauce
- 1 tablespoon rice vinegar
- 1 tablespoon sesame oil
- 2 teaspoons sriracha sauce
- 2 heads butter lettuce or iceberg lettuce
- Sesame seeds for garnish
Step-by-Step Instructions
Separate lettuce leaves carefully, wash them thoroughly, and pat completely dry. Arrange them on a serving platter like small cups—this makes self-serve easy for guests.
Heat a large skillet or wok over medium-high heat and add a tablespoon of cooking oil. Once hot, add ground meat and cook for 6-8 minutes, breaking it apart with a wooden spoon until fully cooked and no pink remains.
Add garlic and ginger to the cooked meat and stir constantly for 30 seconds until fragrant. These aromatics are the flavor foundation of the dish.
Toss in water chestnuts, mushrooms, and carrots. Cook for 3-4 minutes until the vegetables soften slightly but still retain some crunch. That textural contrast is essential.
In a small bowl, whisk together soy sauce, hoisin sauce, rice vinegar, sesame oil, and sriracha. Pour this sauce over the meat mixture and stir to coat everything evenly.
Cook for another 2 minutes until the sauce reduces slightly and clings to the filling. Remove from heat and stir in most of the green onions, reserving some for garnish.
Transfer the hot filling to a serving bowl and top with remaining green onions and sesame seeds. Let guests assemble their own wraps by spooning filling into lettuce cups.
What to Serve Asian Lettuce Wraps With
These wraps pair wonderfully with fried rice, Asian cucumber salad, or potstickers. Provide small bowls of extra soy sauce, sriracha, and hoisin for those who want additional flavor. Crispy wonton strips add nice textural contrast.
Storing and Reheating Tips
Store filling separately from lettuce leaves in airtight containers in the refrigerator for up to 4 days. Reheat filling in a skillet or microwave until hot. Prep lettuce cups up to 4 hours ahead and store wrapped in damp paper towels in the fridge. The filling freezes well for up to 3 months.
Recipe 12: Graduation Cap Brownie Bites

Quick Overview
Rich chocolate brownies decorated to look like miniature graduation caps. These adorable desserts serve 36 people and require just 35 minutes including decorating time, making them perfect for graduation-themed parties.
Prep Time: 10 minutes
Cook Time: 25 minutes
Total Time: 35 minutes
Servings: 36 brownies
Key Ingredients for Graduation Cap Brownie Bites
- 1 box brownie mix (plus required eggs, oil, water)
- 36 miniature peanut butter cups
- 36 square chocolate candies or cookies
- Yellow decorating icing
- Cooking spray
Step-by-Step Instructions
Preheat your oven to 350°F and spray a mini muffin tin with cooking spray. Using a mini muffin tin creates perfect bite-sized portions.
Prepare brownie batter according to package directions, mixing until just combined. Overmixing leads to tough brownies.
Fill each mini muffin cup about two-thirds full with brownie batter. Don’t overfill or they’ll overflow during baking.
Bake for 12-15 minutes until a toothpick inserted in the center comes out with just a few moist crumbs. These cook faster than regular brownies, so check them early to avoid overbaking.
Let brownies cool in the pan for 5 minutes, then transfer to a wire rack to cool completely. They need to be fully cool or the chocolate decorations will melt.
Once cool, place a small dab of brownie crumb or chocolate frosting on top of each brownie to act as “glue.” Press a miniature peanut butter cup upside down onto this spot.
Add another small dab on top of the peanut butter cup and attach a square chocolate candy at an angle to create the graduation cap. The angle makes it look more realistic.
Use yellow decorating icing to pipe a small dot in the center of each square and create a tassel draping down the side.
What to Serve Graduation Cap Brownie Bites With
These brownies are perfect on a dessert table alongside cookies, cupcakes, or fruit. Serve with cold milk, coffee, or as part of a candy buffet. They look adorable displayed on tiered cake stands with graduation decorations.
Top Tips for Perfecting Graduation Cap Brownie Bites
Use a boxed mix for convenience or your favorite homemade brownie recipe. If peanut butter cups aren’t available, use chocolate chips or Rolo candies. Make brownies a day ahead and decorate the morning of your party. Store decorated brownies in a cool room or they’ll start melting. For nut-free versions, use Sunbutter cups or all chocolate decorations.
Storing and Reheating Tips
Store in an airtight container at room temperature for up to 3 days or refrigerate for up to 5 days. Undecorated brownies freeze beautifully for up to 3 months—wrap individually and thaw before decorating. Don’t freeze decorated brownies as the candies may separate or lose their appearance.
Recipe 13: Seven-Layer Dip
Quick Overview
A colorful Mexican dip with seven distinct layers served in a clear dish for maximum visual impact. This classic crowd-pleaser serves 25 people and assembles in just 20 minutes with no cooking required.
Prep Time: 20 minutes
Cook Time: 0 minutes
Total Time: 20 minutes
Servings: 25 people
Key Ingredients for Seven-Layer Dip
- 2 cans (30 oz total) refried beans
- 1 packet taco seasoning
- 2 cups sour cream
- 2 cups guacamole
- 2 cups salsa
- 2 cups shredded cheddar cheese
- 2 cups shredded lettuce
- 1 cup diced tomatoes
- 1/2 cup sliced black olives
- 1/2 cup sliced jalapeños
- 1/4 cup chopped cilantro
- Tortilla chips for serving
Step-by-Step Instructions
Use a clear glass 9×13-inch baking dish or trifle bowl so all the beautiful layers show through the sides.
Start with the base layer: Mix refried beans with half the taco seasoning packet until well combined. Spread this mixture evenly across the bottom of your dish, reaching all the way to the edges.
For the second layer, mix sour cream with the remaining taco seasoning and spread it carefully over the bean layer. Use an offset spatula for the smoothest application.
Add guacamole as the third layer, spreading it gently so you don’t disturb the sour cream underneath. Take your time—neat layers make the presentation.
Pour salsa over the guacamole, letting it settle into an even layer naturally. Drain excess liquid from the salsa before adding if it’s particularly watery.
Sprinkle shredded cheese evenly as the fifth layer, creating a cheese “blanket” that covers the salsa completely.
Add shredded lettuce as the sixth layer, fluffing it up for a fresh, garden-like appearance.
Finish with the seventh layer of diced tomatoes, spreading them across the top. Garnish with black olives, jalapeño slices, and fresh cilantro for color and flavor.
Cover and refrigerate for at least 1 hour before serving to let flavors meld. Serve with sturdy tortilla chips.
What to Serve Seven-Layer Dip With
This dip demands thick, sturdy tortilla chips that won’t break under the weight of all those layers. Add tortilla scoops for easier dipping. Serve alongside fresh salsa, chips and queso, or Mexican street corn for a full fiesta spread.
Top Tips for Perfecting Seven-Layer Dip
Make this up to 24 hours ahead but add the lettuce and tomatoes just before serving to keep them fresh and crisp. Use homemade guacamole with lime juice to prevent browning. For a healthier version, substitute Greek yogurt for sour cream. Layer in a clear dish for the wow factor—presentation matters! Provide both mild and spicy options by dividing the dip and using different salsas.
Storing and Reheating Tips
Store covered in the refrigerator for up to 24 hours. The lettuce and tomatoes will wilt after this time, so this dip doesn’t keep well long-term. Don’t freeze—the sour cream and vegetables won’t survive the thawing process. Leftover dip can be mixed together and used as a burrito or taco filling.
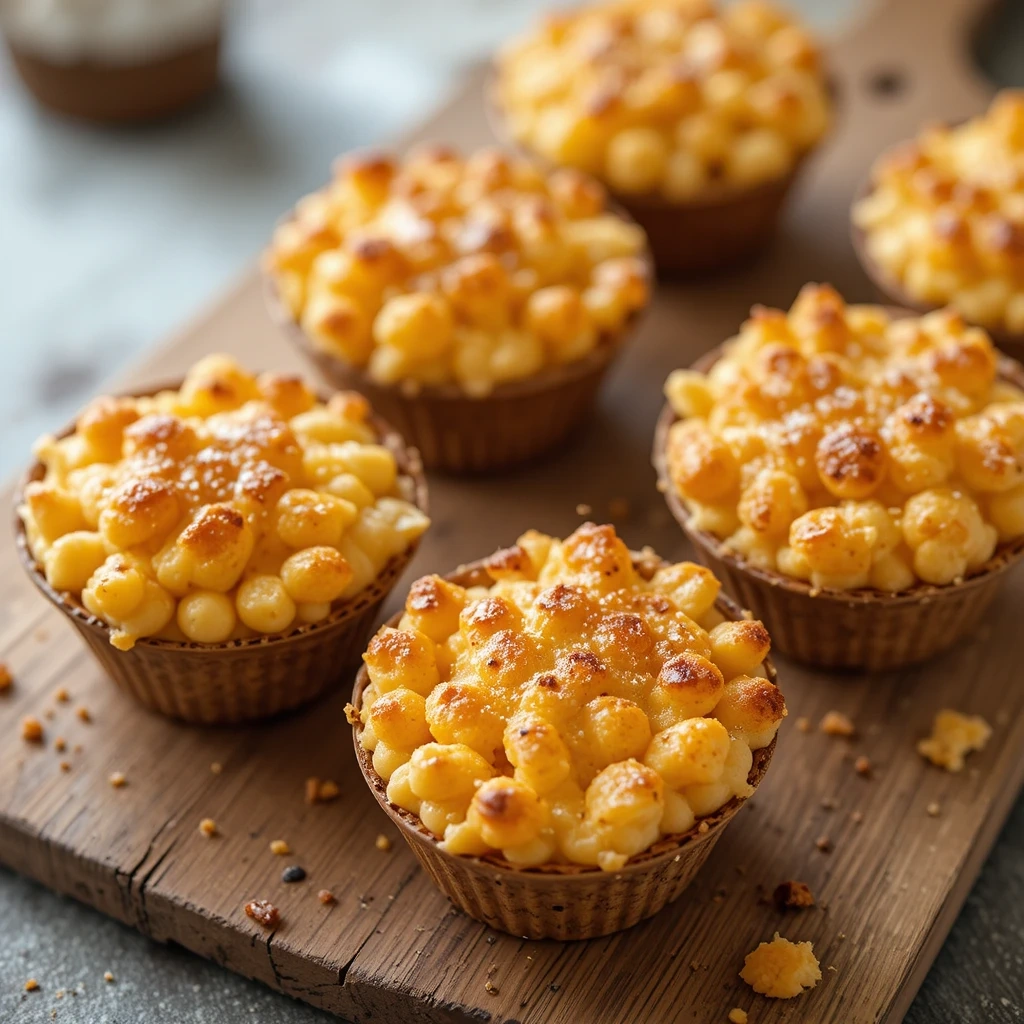
Recipe 14: Baked Mac and Cheese Cups
Quick Overview
Individual portions of creamy baked mac and cheese in muffin tins for easy serving. These comfort food bites serve 24 people and bake in just 30 minutes, offering mess-free mac and cheese that guests can eat with their hands.
Prep Time: 15 minutes
Cook Time: 25 minutes
Total Time: 40 minutes
Servings: 24 cups
Key Ingredients for Baked Mac and Cheese Cups
- 1 pound elbow macaroni
- 4 tablespoons butter
- 4 tablespoons all-purpose flour
- 3 cups whole milk
- 3 cups shredded sharp cheddar cheese
- 1 cup shredded Gruyere cheese
- 1/2 cup grated Parmesan
- 1 teaspoon garlic powder
- 1/2 teaspoon paprika
- Salt and pepper to taste
- 1 cup panko breadcrumbs
- 2 tablespoons melted butter
- Cooking spray
Step-by-Step Instructions
Preheat oven to 375°F and generously spray two 12-cup muffin tins with cooking spray. This is crucial—mac and cheese loves to stick.
Cook macaroni according to package directions but reduce cooking time by 2 minutes—it will cook more in the oven. Drain and set aside.
In a large pot over medium heat, melt butter completely. Add flour and whisk continuously for 2 minutes to create a roux. This removes the raw flour taste.
Gradually pour in milk while whisking constantly to prevent lumps. Continue whisking until the mixture thickens and coats the back of a spoon, about 5-7 minutes.
Remove from heat and stir in cheddar, Gruyere, Parmesan, garlic powder, paprika, salt, and pepper. Stir until cheese melts completely into a smooth, creamy sauce.
Add cooked macaroni to the cheese sauce and stir until every piece of pasta is coated in that gorgeous cheese.
Spoon mac and cheese into prepared muffin cups, filling each to the top. Pack it in firmly so the cups hold their shape after baking.
Mix panko breadcrumbs with melted butter and sprinkle this mixture over the top of each cup for a crispy golden topping.
Bake for 20-25 minutes until the tops are golden brown and crispy and the edges are bubbling.
Let cool in the pan for 5 minutes—this helps them set up and makes removal easier. Run a butter knife around each cup and gently pop them out.
Storing and Reheating Tips
Store mac and cheese cups in an airtight container in the refrigerator for up to 4 days. Reheat in a 300°F oven for 10-12 minutes or microwave for 1-2 minutes. These freeze beautifully for up to 2 months—freeze in a single layer, then transfer to freezer bags. Reheat from frozen in a 350°F oven for 20 minutes.
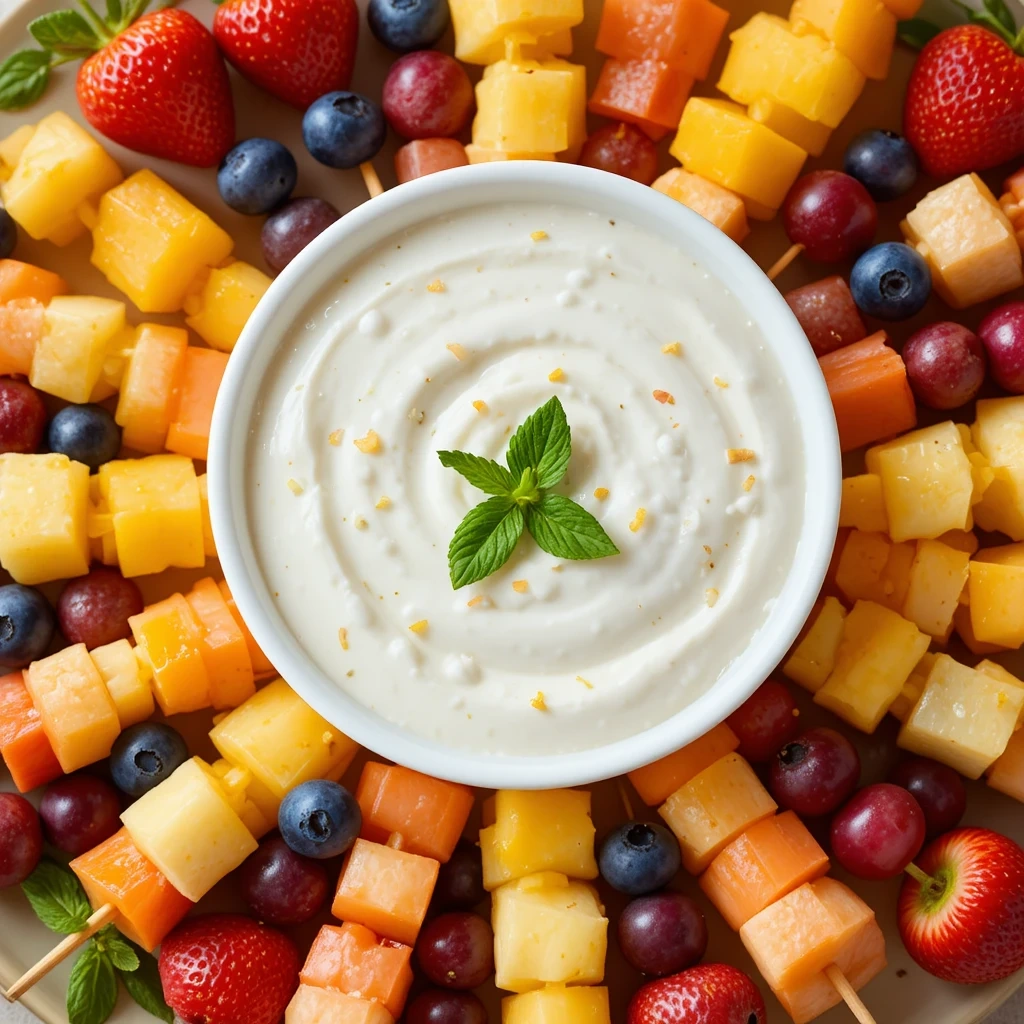
Recipe 15: Fruit Kabobs with Honey Yogurt Dip
Quick Overview
Colorful fresh fruit pieces threaded onto skewers and served with creamy honey yogurt dip. These refreshing treats serve 25 people and assemble in just 25 minutes, providing a healthy option among richer party foods.
Prep Time: 25 minutes
Cook Time: 0 minutes
Total Time: 25 minutes
Servings: 25 kabobs
Key Ingredients for Fruit Kabobs with Honey Yogurt Dip
- 25 wooden skewers (10-inch)
- 2 cups strawberries, hulled
- 2 cups pineapple chunks
- 2 cups cantaloupe cubes
- 2 cups honeydew melon cubes
- 2 cups seedless grapes
- 2 cups blueberries
- For the dip:
- 2 cups vanilla Greek yogurt
- 1/4 cup honey
- 1 teaspoon vanilla extract
- 1/2 teaspoon cinnamon
- Zest of 1 lime
Step-by-Step Instructions
Wash all fruit thoroughly and pat completely dry. Cut larger fruits into uniform bite-sized pieces about 1-inch in size for even distribution on skewers.
Thread fruit onto skewers in a colorful pattern, alternating colors and types for visual appeal. I like to go: strawberry, pineapple, grape, cantaloupe, blueberry, honeydew, creating a rainbow effect.
Leave about 2 inches at the bottom of each skewer as a handle, making them easy for guests to grab and eat.
Arrange completed kabobs on a large serving platter in neat rows or in a sunburst pattern. Cover with plastic wrap and refrigerate until serving time.
Make the honey yogurt dip by whisking together Greek yogurt, honey, vanilla extract, cinnamon, and lime zest in a medium bowl until completely smooth.
Transfer dip to a pretty serving bowl and place it in the center of your fruit kabob platter for easy dipping access.
Keep everything refrigerated until serving time—cold fruit tastes better and stays fresh longer.
What to Serve Fruit Kabobs with Honey Yogurt Dip With
These kabobs work beautifully on a brunch spread alongside pancakes, waffles, or French toast. They’re perfect for balancing heavier desserts on a dessert table. Serve with granola, coconut flakes, or chocolate chips for dipping variety.
Top Tips for Perfecting Fruit Kabobs with Honey Yogurt Dip
Choose firm, ripe fruit that won’t fall apart when skewered. Brush cut fruit with lemon juice to prevent browning. Make kabobs up to 6 hours ahead but add berries just before serving as they’re delicate. Use flavored yogurt in the dip for variety—coconut, lemon, or berry all work wonderfully. Add a sprinkle of mint leaves to the platter for a fresh, elegant touch.
Storing and Reheating Tips
Assemble kabobs up to 6 hours before serving and store covered in the refrigerator. Don’t leave fruit at room temperature for more than 2 hours. The yogurt dip keeps refrigerated for up to 3 days. Store any leftover fruit kabobs in an airtight container for up to 24 hours, though they taste best fresh.
Recipe 16: Sausage Rolls

Quick Overview
Flaky puff pastry wrapped around seasoned sausage filling for handheld perfection. These British-inspired bites serve 32 people and bake in just 25 minutes, delivering crispy, savory goodness that disappears fast.
Prep Time: 15 minutes
Cook Time: 25 minutes
Total Time: 40 minutes
Servings: 32 rolls
Key Ingredients for Sausage Rolls
- 1 cup breadcrumbs
- 1 small onion, finely diced
- 2 cloves garlic, minced
- 2 teaspoons dried sage
- 1 teaspoon dried thyme
- 1/2 teaspoon black pepper
- 2 packages (17 oz each) puff pastry, thawed
- 1 egg, beaten
- 2 tablespoons sesame seeds
- Honey mustard or ketchup for serving
Step-by-Step Instructions
Preheat oven to 400°F and line two large baking sheets with parchment paper for easy cleanup and even baking.
In a large bowl, combine sausage, breadcrumbs, diced onion, garlic, sage, thyme, and pepper. Mix with your hands until everything is evenly incorporated but don’t overmix or the sausage becomes dense.
Roll out one sheet of puff pastry on a lightly floured surface into a 12×10-inch rectangle. Cut lengthwise into two long strips.
Divide half the sausage mixture in two and shape each portion into a long rope running down the center of each pastry strip. The sausage should be about 1 inch in diameter.
Brush one long edge of the pastry with beaten egg. Fold the pastry over the sausage and press the edges together to seal tightly, creating a long sausage-filled log.
Place seam-side down and cut each log into 8 equal pieces using a sharp knife. Repeat with remaining pastry and sausage.
Arrange sausage rolls on prepared baking sheets with space between each one. Cut 2-3 small diagonal slashes on top of each roll—this allows steam to escape and creates an attractive pattern.
Brush tops with beaten egg and sprinkle with sesame seeds for a golden, professional finish.
Bake for 20-25 minutes until the pastry is golden brown and puffed and the sausage is cooked through to 160°F internal temperature.
What to Serve Sausage Rolls With
Serve these with honey mustard, spicy brown mustard, or ketchup for dipping. They pair wonderfully with a simple green salad or roasted vegetables. Add to a brunch spread alongside eggs and fruit.
Top Tips for Perfecting Sausage Rolls
Keep puff pastry cold—work quickly and refrigerate if it starts getting too soft. Use high-quality sausage for the best flavor. Add shredded cheese to the sausage mixture for extra richness. Make these ahead, freeze unbaked on a baking sheet, then transfer to freezer bags and bake directly from frozen (add 5 minutes to baking time). Score the tops decoratively for an elegant presentation.
Storing and Reheating Tips
Store baked sausage rolls in an airtight container in the refrigerator for up to 3 days. Reheat in a 350°F oven for 10 minutes to restore crispiness. Freeze baked rolls for up to 2 months and reheat from frozen at 350°F for 15 minutes. Unbaked rolls can be frozen for up to 3 months and baked directly from frozen.
Recipe 17: Mini Cheesecake Bites

Quick Overview
Individual no-bake cheesecakes topped with fresh fruit in mini dessert cups. These elegant treats serve 24 people and require just 20 minutes of prep with 2 hours chilling time, offering a light, refreshing dessert option.
Prep Time: 20 minutes
Cook Time: 0 minutes (plus 2 hours chilling)
Total Time: 2 hours 20 minutes
Servings: 24 mini cheesecakes
Key Ingredients for Mini Cheesecake Bites
- 24 mini graham cracker crusts (store-bought)
- 16 oz cream cheese, softened
- 1/2 cup powdered sugar
- 1 teaspoon vanilla extract
- 1 cup heavy whipping cream
- Assorted fresh berries (strawberries, blueberries, raspberries)
- 1/4 cup strawberry or apricot jam for glaze
- Mint leaves for garnish
Step-by-Step Instructions
Beat softened cream cheese in a large bowl with an electric mixer on medium speed for 2-3 minutes until completely smooth and fluffy with no lumps.
Add powdered sugar and vanilla extract, beating until fully incorporated and the mixture is light and creamy.
In a separate bowl, whip heavy cream with clean beaters on high speed until stiff peaks form. This takes about 3-4 minutes—don’t overbeat or it will turn to butter.
Gently fold the whipped cream into the cream cheese mixture in three additions, being careful not to deflate the air you just whipped in. The result should be light and mousse-like.
Spoon or pipe the cheesecake mixture into each graham cracker crust, filling them to just below the rim. Smooth the tops with the back of a spoon.
Refrigerate for at least 2 hours until the cheesecake sets firm. They should be able to hold the fruit topping without sinking.
Just before serving, warm the jam in the microwave for 15 seconds until it becomes liquid. Top each cheesecake with fresh berries and brush with the warm jam glaze for shine.
Add a tiny mint leaf to each one for a pop of color and fresh flavor.
What to Serve Mini Cheesecake Bites With
These pair beautifully with coffee, tea, or champagne for an elegant dessert service. Display them on a tiered stand for maximum visual impact. They work wonderfully alongside other finger desserts like brownies and cookies.
Top Tips for Perfecting Mini Cheesecake Bites
Make sure cream cheese is truly softened—leave it at room temperature for at least 30 minutes. Cold cream cheese creates lumps. Don’t skip the whipped cream—it makes the texture light and airy instead of dense. Use a piping bag with a large round tip for the neatest filling. Make these up to 24 hours ahead but add fruit and glaze just before serving. Try different toppings: lemon curd with blueberries, chocolate ganache with raspberries, or caramel sauce with pecans.
Storing and Reheating Tips
Store cheesecake bites covered in the refrigerator for up to 3 days without the fruit topping. Add fresh fruit just before serving for the best appearance and flavor. These can be frozen without toppings for up to 1 month—thaw in the refrigerator overnight before decorating.
Frequently Asked Questions
How far in advance can I prepare graduation party food?
Most of these recipes can be prepared 24-48 hours in advance! Items like dips, marinated meats, and assembled skewers store beautifully in the refrigerator. I always prepare my buffalo chicken dip, seven-layer dip, and deviled eggs the night before. Just add fresh garnishes and crispy toppings right before serving to maintain that just-made quality.
What are the best make-ahead graduation party foods?
The absolute best make-ahead options are slow cooker recipes like sweet and sour meatballs, dips that need chilling time like buffalo chicken dip and seven-layer dip, and anything that benefits from marinating like honey mustard chicken skewers. Baked goods like brownie bites and mac and cheese cups actually taste better the next day after flavors meld together.
How much food should I prepare per person for a graduation party?
Plan for 6-8 appetizer pieces per person for a 2-3 hour party, or 12-15 pieces if you’re not serving a meal. For my nephew’s party with 50 guests, I made 4-5 different recipes with about 300-400 total pieces, and we had perfect portions with minimal leftovers. Always prepare extra of the most popular items and less of experimental flavors.
What are budget-friendly graduation party food ideas?
The most budget-friendly options are dishes that use economical ingredients in bulk. Seven-layer dip, nachos, pasta-based dishes like mac and cheese cups, and anything using ground meat instead of expensive cuts save serious money. Shopping sales, buying store brands, and preparing everything yourself instead of ordering catering can cut costs by 60-70%.
Can I prepare graduation party food for dietary restrictions?
Absolutely! Most of these recipes are easily adaptable. Use plant-based meat in the lettuce wraps and meatballs, substitute dairy-free cream cheese in dips, and use gluten-free tortillas or pasta where needed. Always label dishes clearly with allergen information so guests can make informed choices. I always include at least one vegetarian, one gluten-free, and one dairy-free option.
What foods should I avoid for outdoor graduation parties?
Avoid mayonnaise-based dishes that sit out in heat, delicate desserts that melt quickly, and anything requiring constant temperature control. Skip the deviled eggs and opt for items like fruit kabobs, grilled skewers, and dips that can be replenished from a cooler. Keep hot foods hot in slow cookers and cold foods cold on ice.
How do I keep graduation party food fresh during the event?
Use chafing dishes or slow cookers for hot items, and keep cold items on ice or refrigerate them until needed. Replenish platters in small batches rather than putting everything out at once. Set up a food station in a shaded area if outdoors, and cover items with dome covers between servings to prevent drying out.
What are some elegant graduation party food ideas?
Elevate your spread with antipasto skewers, caprese salad cups, stuffed bread, and beautifully arranged fruit kabobs. Presentation matters—use tiered stands, matching platters, and coordinated serving ware. Add fresh herb garnishes, balsamic glazes, and edible flowers for that upscale catering look without the premium price tag.
Nutrition Information
Below is approximate nutrition information per serving for key recipes:
| Recipe | Calories | Protein | Carbs | Fat |
|---|---|---|---|---|
| Loaded Nachos (per serving) | 285 | 14g | 22g | 16g |
| Honey Mustard Chicken Skewers | 180 | 26g | 8g | 5g |
| Mini Caprese Cups | 95 | 6g | 4g | 7g |
| BBQ Meatball Sliders | 245 | 12g | 28g | 9g |
| Buffalo Chicken Dip (2 tbsp) | 120 | 7g | 3g | 9g |
| Rainbow Veggie Pinwheels | 85 | 3g | 11g | 4g |
| Sweet & Sour Meatballs | 195 | 11g | 18g | 8g |
| Mac and Cheese Cups | 225 | 10g | 24g | 11g |
Note: Nutrition values are estimates and will vary based on specific ingredients used.
Top Tips for Avoiding Common Party Food Mistakes
Don’t Overestimate Appetites
One of the biggest mistakes I made at my first graduation party was making triple the food needed. While leftovers aren’t terrible, I spent way too much money and time. Stick to the 6-8 pieces per person rule for appetizer parties and you’ll nail the portions every time.
Temperature Control is Everything
Room temperature food is the enemy of food safety and flavor. Invest in a few inexpensive chafing fuel canisters for hot dishes and use plenty of ice for cold items. Nothing ruins a party faster than lukewarm dips or melted cheese.
Prep Your Station Properly
Set up your food table with all serving utensils, napkins, and plates before guests arrive. I learned this the hard way when I forgot serving spoons and had to leave guests waiting while I scrambled to find them. Create a logical flow from plates to food to napkins.
Balance Your Menu
Don’t make all heavy dishes or all light dishes. Include a mix of hot and cold, meat and vegetarian, rich and fresh. This variety ensures every guest finds something they love and prevents palate fatigue from too many similar flavors.
Test Recipes Beforehand
Never debut a new recipe at your actual party. Make it at least once before the big day so you know the timing, can adjust seasonings, and work out any issues. I always do a trial run of any new recipe two weeks before an event.
Label Everything Clearly
Use small tent cards or labels to identify each dish, especially noting common allergens like nuts, dairy, or gluten. Your guests will appreciate knowing exactly what they’re eating, and you’ll field fewer questions throughout the party.
Keep Backups Ready
Store backup supplies of your most popular items in the fridge or freezer. When the nachos disappear in 20 minutes (trust me, they will), you’ll be grateful you have another batch ready to go. Nothing’s sadder than empty platters with an hour left in the party
Final Thoughts
Planning graduation party food doesn’t have to drain your bank account or keep you stuck in the kitchen all day. These 20 graduation party food ideas prove that you can serve a crowd with delicious, impressive dishes that require minimal stress and maximum flavor.
The key to success is choosing a mix of make-ahead options, no-cook recipes, and a few warm dishes that can hang out in slow cookers. I’ve used this exact strategy for multiple graduation parties, and guests always leave happy and satisfied.
Remember, the best graduation party food is the kind that lets you actually enjoy celebrating your graduate’s achievement instead of worrying about the next batch of appetizers. Pick 4-5 of these recipes that match your cooking style and your graduate’s favorite flavors, prep what you can the day before, and then relax and celebrate.
Which of these graduation party food ideas are you most excited to try? I’d love to hear about your party planning journey in the comments below!
Happy celebrating and congratulations to your graduate!