
10 Easy Cookout Side Dishes That Steal the Show Every Time
Summer cookouts are pure magic — the sizzle of the grill, the smell of smoke in the warm air, and everyone gathered together with plates piled high. But here is a little secret every seasoned host knows: the side dishes are what truly steal the show. From creamy coleslaw to golden jalapeño cornbread, the right sides transform a simple backyard cookout into a legendary feast that guests talk about all year long.
This collection of 10 best cookout side dishes is built for families — quick enough for a weeknight cookout, impressive enough for a holiday gathering, and delicious enough to make the whole neighborhood jealous. If you loved our Best Backyard Burger recipes, you are going to absolutely adore what comes next. Let’s get grilling!
What Are Cookout Side Dishes?
Cookout side dishes are the supporting cast that turns your grilled main event into a complete, satisfying meal. They are the creamy, crunchy, tangy, and cheesy companions that sit alongside grilled proteins and somehow end up being what everyone talks about. Ever heard the saying ‘the way to a man’s heart is through his stomach’? Well, the secret weapon is always the sides.
Whether it is a cooling cucumber salad on a blazing hot day or bubbling mac and cheese that makes children sprint to the table, these dishes bring balance, variety, and unforgettable flavor to every outdoor spread.
Why You’ll Love These Cookout Side Dishes
They Cover Every Craving at the Table
This collection spans creamy, crunchy, hearty, fresh, and cheesy — so there is genuinely something for every single person at your cookout, from the tiniest picky eater to the most adventurous food lover.
Budget-Friendly and Made With Simple Ingredients
Every recipe uses affordable, widely available ingredients. No specialty store trips required. These are dishes you can pull together from a standard grocery run, yet they taste like you spent all day cooking.
Most Can Be Made Ahead of Time
Almost every recipe in this list is actually better when made ahead. That means less stress on the day of your cookout and more time to enjoy the sunshine with your family.
Quick Overview — All 10 Recipes at a Glance
Here is a bird’s-eye view of what you are about to make:
- Classic Creamy Coleslaw — 15 minutes prep, no cooking required
- Grilled Corn on the Cob with Herb Butter — 20 minutes total
- Baked Beans from Scratch — 20 minutes prep, 3 hours oven time
- Watermelon Feta Mint Salad — 10 minutes, no cooking needed
- Deviled Eggs — 30 minutes total, great make-ahead option
- Pasta Salad with Italian Dressing — 30 minutes total
- Creamy Potato Salad — 40 minutes total, best made a day ahead
- Baked Mac and Cheese — 45 minutes, crowd-pleasing comfort food
- Cucumber Tomato Salad — 10 minutes, fresh and light
- Jalapeño Cheddar Cornbread — 35 minutes, baked in a cast iron skillet
Recipe 1: Classic Creamy Coleslaw
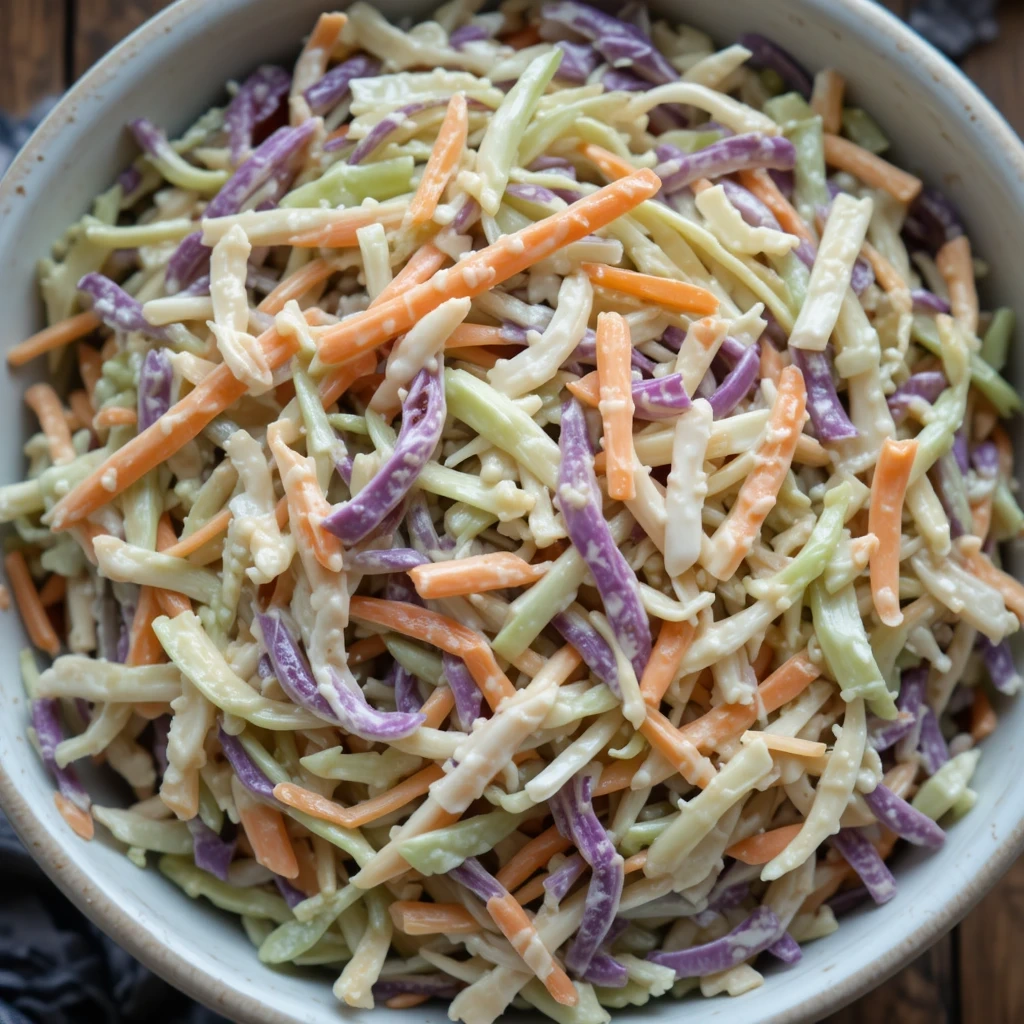
Crunchy, creamy, and refreshing — this coleslaw is the ultimate cookout companion. Every backyard gathering feels incomplete without a big bowl of it sitting right next to the grill!
Quick Overview
This coleslaw comes together in under 15 minutes with simple pantry staples. The creamy dressing clings to every shred of cabbage, and a touch of apple cider vinegar gives it that tangy lift everyone loves.
- Prep Time: 15 minutes
- Cook/Chill Time: 30 minutes (recommended)
- Servings: 8 servings
Key Ingredients for Classic Creamy Coleslaw
- 4 cups green cabbage, thinly shredded
- 1 cup purple cabbage, thinly shredded
- 1 large carrot, grated
- 1/2 cup mayonnaise
- 2 tablespoons apple cider vinegar
- 1 tablespoon honey
- 1 teaspoon Dijon mustard
- 1/2 teaspoon celery seed
- Salt and black pepper to taste
Step-by-Step Instructions for Classic Creamy Coleslaw
- Shred both cabbages finely using a sharp knife or mandoline. Grate the carrot and place all vegetables into a large mixing bowl.
- In a separate bowl, whisk together the mayonnaise, apple cider vinegar, honey, Dijon mustard, and celery seed until smooth and creamy.
- Pour the dressing over the vegetables and toss everything together until every strand is well coated.
- Season with salt and black pepper to taste. Taste and adjust — add more vinegar for tang or honey for sweetness.
- Cover and refrigerate for at least 30 minutes before serving to let the flavors meld beautifully.
Nutrition Information — Classic Creamy Coleslaw
Approximate values per serving:
| Nutrient | Amount (Per Serving) |
| Calories | ~130 kcal |
| Total Fat | 10g |
| Carbohydrates | 9g |
| Fiber | 2g |
| Protein | 1g |
| Sodium | 180mg |
Top Tips for Perfecting Classic Creamy Coleslaw
- Shred cabbage as finely as possible for the best texture.
- Let it chill in the fridge — the longer it sits, the better it tastes.
- For a lighter version, substitute half the mayo with plain Greek yogurt.
- Add a handful of raisins or sunflower seeds for a fun twist kids will love.
Recipe 2: Grilled Corn on the Cob with Herb Butter
Sweet, smoky, and dripping with herby butter — grilled corn is pure summer joy on a stick. It’s the one side dish that makes everyone at the table reach for seconds before the first round is even done!
Quick Overview
Grilling corn brings out its natural sweetness in ways boiling simply cannot. Charred grill marks and a slather of garlic-herb butter make this a showstopper side in just 20 minutes.
- Prep Time: 10 minutes
- Cook/Chill Time: 20 minutes cook time
- Servings: 6 servings
Key Ingredients for Grilled Corn on the Cob with Herb Butter
- 6 ears of fresh corn, husked
- 4 tablespoons unsalted butter, softened
- 2 cloves garlic, minced
- 2 tablespoons fresh parsley, finely chopped
- 1 tablespoon fresh chives, chopped
- 1/2 teaspoon smoked paprika
- Salt and pepper to taste
- Lime wedges for serving
Step-by-Step Instructions for Grilled Corn on the Cob with Herb Butter
- Preheat your grill to medium-high heat (about 400°F). Make sure the grates are clean and lightly oiled.
- In a small bowl, mix the softened butter with garlic, parsley, chives, smoked paprika, salt, and pepper until well combined.
- Place the husked corn directly on the grill. Cook for 15 to 20 minutes, turning every 3 to 4 minutes, until all sides are lightly charred.
- Remove corn from the grill and immediately spread the herb butter generously over each ear.
- Serve hot with lime wedges on the side. Watch them disappear!
Nutrition Information — Grilled Corn on the Cob with Herb Butter
Approximate values per serving:
| Nutrient | Amount (Per Serving) |
| Calories | ~195 kcal |
| Total Fat | 10g |
| Carbohydrates | 26g |
| Fiber | 3g |
| Protein | 4g |
| Sodium | 105mg |
Top Tips for Perfecting Grilled Corn on the Cob with Herb Butter
- Do not rush the grilling — those char marks are where all the flavor lives.
- Make the herb butter ahead of time and refrigerate. It keeps for up to a week.
- For kids who prefer mild flavor, skip the smoked paprika and add a drizzle of honey instead.
- Leaving a small section of husk on makes a great natural handle for little hands.
Recipe 3: Baked Beans from Scratch
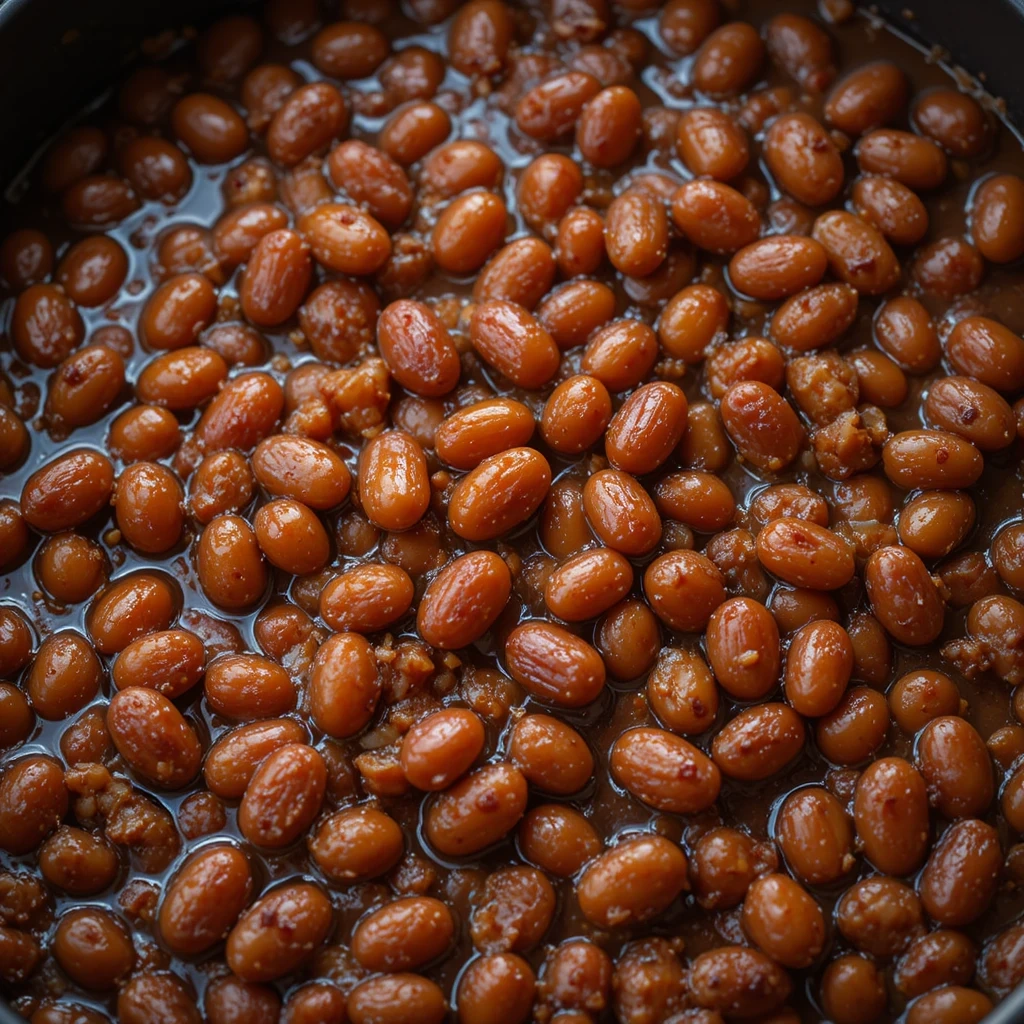
Rich, smoky, and deeply satisfying — homemade baked beans are miles beyond anything that comes in a can. Once you make them this way, you will never look back at those store shelves again.
Quick Overview
Slow-baked with a molasses-tomato sauce, these beans develop incredible depth of flavor. They are sweet, savory, and hearty — and they hold beautifully at a cookout buffet for hours.
- Prep Time: 20 minutes prep
- Cook/Chill Time: 3 hours bake time
- Servings: 10 servings
Key Ingredients for Baked Beans from Scratch
- 2 cans (15 oz each) navy beans or pinto beans, drained and rinsed
- 1 medium onion, finely diced
- 3 cloves garlic, minced
- 1/2 cup tomato ketchup
- 2 tablespoons molasses
- 2 tablespoons brown sugar
- 1 tablespoon apple cider vinegar
- 1 teaspoon smoked paprika
- 1 teaspoon dry mustard powder
- 1/2 teaspoon black pepper
- 1/2 cup water or vegetable broth
- Salt to taste
- 2 tablespoons olive oil
Step-by-Step Instructions for Baked Beans from Scratch
- Preheat your oven to 325°F (165°C). Heat olive oil in an oven-safe Dutch oven over medium heat.
- Sauté the diced onion for 5 minutes until softened and translucent. Add garlic and cook for another minute.
- Stir in the ketchup, molasses, brown sugar, apple cider vinegar, smoked paprika, mustard powder, black pepper, and water. Mix well.
- Add the beans and stir until fully coated in the sauce. Bring to a gentle simmer.
- Cover the pot and transfer to the oven. Bake for 2.5 to 3 hours, checking every hour and adding a splash of water if the beans look dry.
- Remove the lid for the last 30 minutes to allow the sauce to thicken and caramelize on top.
- Taste and adjust seasoning before serving. Serve warm directly from the pot.
Nutrition Information — Baked Beans from Scratch
Approximate values per serving:
| Nutrient | Amount (Per Serving) |
| Calories | ~210 kcal |
| Total Fat | 4g |
| Carbohydrates | 38g |
| Fiber | 7g |
| Protein | 8g |
| Sodium | 320mg |
Top Tips for Perfecting Baked Beans from Scratch
- Low and slow is the secret — resist cranking up the heat to rush the process.
- Stir occasionally to prevent the bottom from sticking and burning.
- These taste even better the next day as the flavors continue to deepen overnight.
- For a smoky twist, add a teaspoon of liquid smoke to the sauce.
Recipe 5: Deviled Eggs
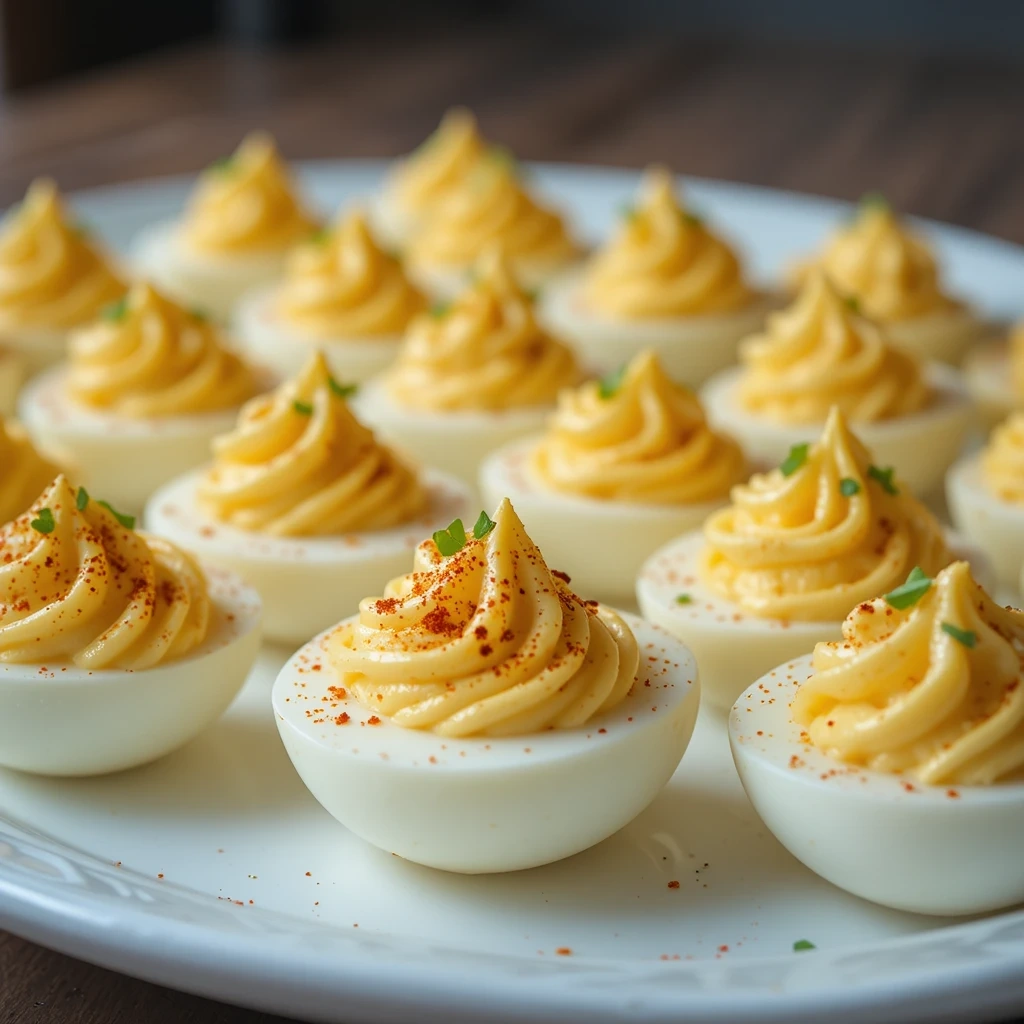
Creamy, tangy, and impossibly snackable — deviled eggs disappear faster than anything else at a cookout. These little bites are pure nostalgia, comfort, and crowd-pleasing magic all rolled into one.
Quick Overview
Perfectly cooked yolks mixed with a creamy, tangy filling piped back into egg whites — deviled eggs are a guaranteed hit. They take about 30 minutes start to finish and can be made ahead for stress-free entertaining.
- Prep Time: 15 minutes
- Cook/Chill Time: 15 minutes cook + cool time
- Servings: 12 servings (24 halves)
Key Ingredients for Deviled Eggs
- 12 large eggs
- 3 tablespoons mayonnaise
- 1 tablespoon Dijon mustard
- 1 tablespoon apple cider vinegar
- 1/2 teaspoon garlic powder
- Salt and white pepper to taste
- Smoked paprika for garnish
- Fresh chives for garnish
Step-by-Step Instructions for Deviled Eggs
- Place eggs in a single layer in a saucepan and cover with cold water by 1 inch. Bring to a boil over medium-high heat.
- Once boiling, remove from heat, cover, and let sit for exactly 11 minutes. Transfer to an ice bath immediately.
- Once cooled, peel the eggs carefully under cold running water and slice each in half lengthwise.
- Pop the yolks into a bowl and mash with a fork until smooth. Add mayonnaise, Dijon, vinegar, garlic powder, salt, and pepper.
- Mix until completely creamy and smooth. Taste and adjust seasoning.
- Spoon or pipe the filling back into the egg white halves. Dust with smoked paprika and garnish with chives.
- Refrigerate until ready to serve. Best enjoyed cold.
Nutrition Information — Deviled Eggs
Approximate values per serving:
| Nutrient | Amount (Per Serving) |
| Calories | ~80 kcal |
| Total Fat | 6g |
| Carbohydrates | 1g |
| Fiber | 0g |
| Protein | 5g |
| Sodium | 115mg |
Top Tips for Perfecting Deviled Eggs
- Older eggs peel more easily than very fresh ones — plan ahead if possible.
- The ice bath is non-negotiable for stopping the cooking and preventing green yolk rings.
- For ultra-smooth filling, press yolks through a fine mesh sieve before mixing.
- Pipe the filling with a zip-lock bag with the corner snipped for a prettier result.
Recipe 6: Pasta Salad with Italian Dressing
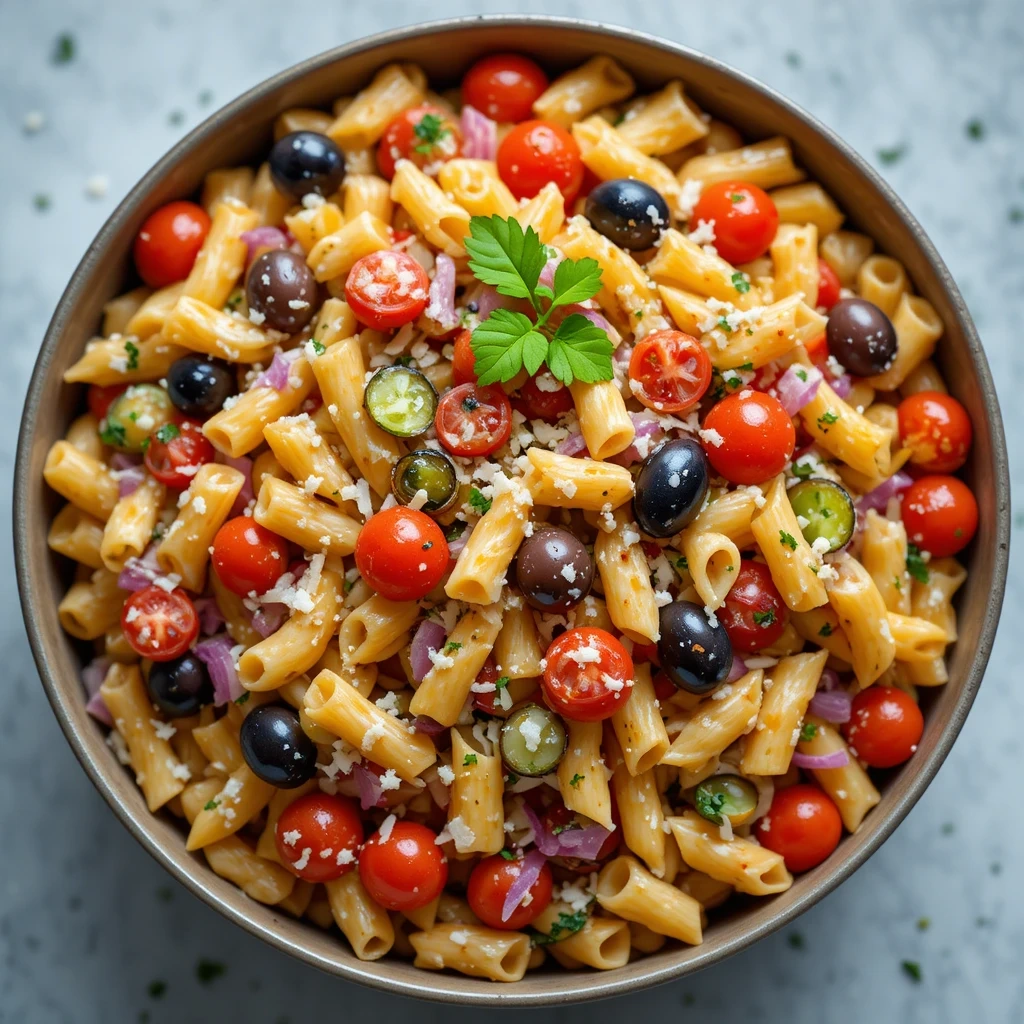
Colorful, hearty, and absolutely loaded with good stuff — pasta salad is the side dish that feeds a crowd without breaking a sweat. It is endlessly customizable, super make-ahead friendly, and always the first empty bowl at the table.
Quick Overview
Al dente pasta tossed with colorful vegetables, olives, and a zesty homemade Italian dressing — this pasta salad is fresh, flavorful, and satisfying. It takes about 30 minutes and gets better with time.
- Prep Time: 20 minutes
- Cook/Chill Time: 30 minutes chill time
- Servings: 10 servings
Key Ingredients for Pasta Salad with Italian Dressing
- 12 oz rotini or penne pasta
- 1 cup cherry tomatoes, halved
- 1 cup cucumber, diced
- 1/2 cup black olives, sliced
- 1/2 cup bell pepper (any color), diced
- 1/4 cup red onion, finely diced
- 1/2 cup shredded mozzarella or cheddar cheese
- 1/4 cup fresh parsley, chopped
- For dressing: 1/3 cup olive oil, 3 tablespoons red wine vinegar, 1 teaspoon Italian seasoning, 1 teaspoon garlic powder, 1/2 teaspoon honey, salt and pepper to taste
Step-by-Step Instructions for Pasta Salad with Italian Dressing
- Cook pasta according to package directions until al dente. Drain and rinse under cold water immediately to stop the cooking.
- Transfer cooled pasta to a large mixing bowl.
- Add cherry tomatoes, cucumber, olives, bell pepper, red onion, and cheese to the bowl.
- Whisk together olive oil, red wine vinegar, Italian seasoning, garlic powder, honey, salt, and pepper until emulsified.
- Pour dressing over the pasta salad and toss well to combine.
- Taste and adjust seasoning. Cover and refrigerate for at least 30 minutes before serving.
- Toss again just before serving and garnish with fresh parsley.
Nutrition Information — Pasta Salad with Italian Dressing
Approximate values per serving:
| Nutrient | Amount (Per Serving) |
| Calories | ~280 kcal |
| Total Fat | 12g |
| Carbohydrates | 35g |
| Fiber | 3g |
| Protein | 8g |
| Sodium | 290mg |
Top Tips for Perfecting Pasta Salad with Italian Dressing
- Always rinse pasta with cold water after cooking — it stops the cooking and prevents sticking.
- Make this up to 24 hours ahead. Add a splash of extra dressing right before serving as pasta absorbs it.
- Tri-color rotini makes this salad extra colorful and fun for kids.
- Add chickpeas or white beans to boost the protein content.
Recipe 7: Creamy Potato Salad
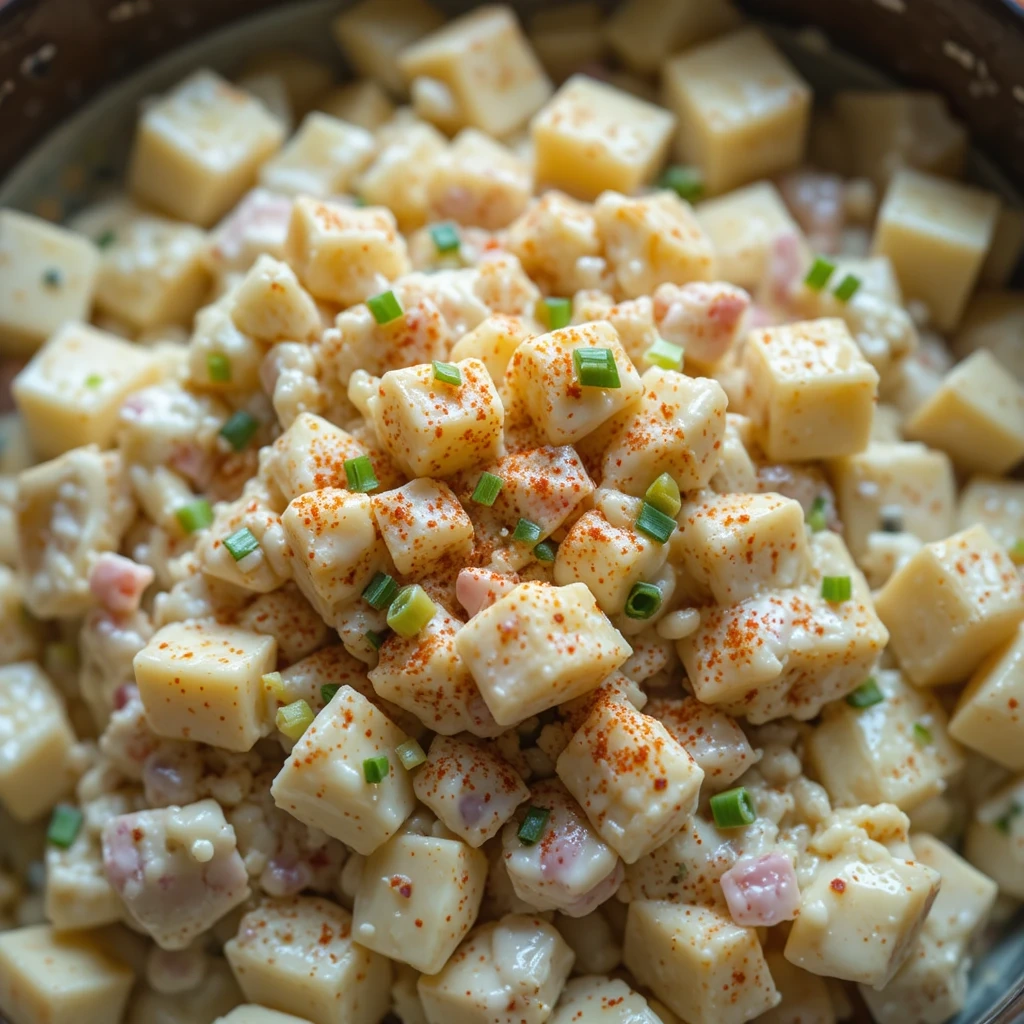
Tender, creamy, and studded with crunchy celery and fresh herbs — potato salad is the undisputed king of cookout sides. No summer gathering feels truly complete without a great big bowl of it front and center.
Quick Overview
Classic American potato salad with a creamy mustard-mayo dressing, hard-boiled eggs, and crisp celery. It takes about 40 minutes and is best made a day ahead for maximum flavor.
- Prep Time: 20 minutes
- Cook/Chill Time: 1 hour minimum chill
- Servings: 10 servings
Key Ingredients for Creamy Potato Salad
- 3 pounds Yukon gold potatoes, cubed
- 4 hard-boiled eggs, chopped
- 3 stalks celery, finely diced
- 1/4 cup red onion, finely diced
- 2 tablespoons sweet pickle relish
- 2/3 cup mayonnaise
- 2 tablespoons yellow mustard
- 1 tablespoon apple cider vinegar
- 1 teaspoon sugar
- Salt and black pepper to taste
- Paprika and fresh chives for garnish
Step-by-Step Instructions for Creamy Potato Salad
- Place cubed potatoes in a large pot of cold salted water. Bring to a boil and cook for 12 to 15 minutes until fork-tender but not falling apart.
- Drain the potatoes and spread them on a baking sheet to cool completely. Never mix warm potatoes with the dressing.
- In a large bowl, whisk together mayonnaise, mustard, apple cider vinegar, sugar, salt, and pepper.
- Add the cooled potatoes, chopped eggs, celery, red onion, and relish to the bowl.
- Fold gently until everything is coated, being careful not to mash the potatoes.
- Taste and adjust seasoning. Cover and refrigerate for at least 1 hour.
- Sprinkle with paprika and chives just before serving.
Nutrition Information — Creamy Potato Salad
Approximate values per serving:
| Nutrient | Amount (Per Serving) |
| Calories | ~265 kcal |
| Total Fat | 14g |
| Carbohydrates | 30g |
| Fiber | 3g |
| Protein | 6g |
| Sodium | 310mg |
Top Tips for Perfecting Creamy Potato Salad
- Never mix the dressing into warm potatoes — it becomes gluey and unpleasant.
- Yukon golds hold their shape better than russets and have a buttery flavor.
- Make it a full day ahead — the flavors are so much better after sitting overnight.
- Add a pinch of turmeric to the dressing for a beautiful golden color kids will love.
Recipe 8: Macaroni and Cheese (Baked)
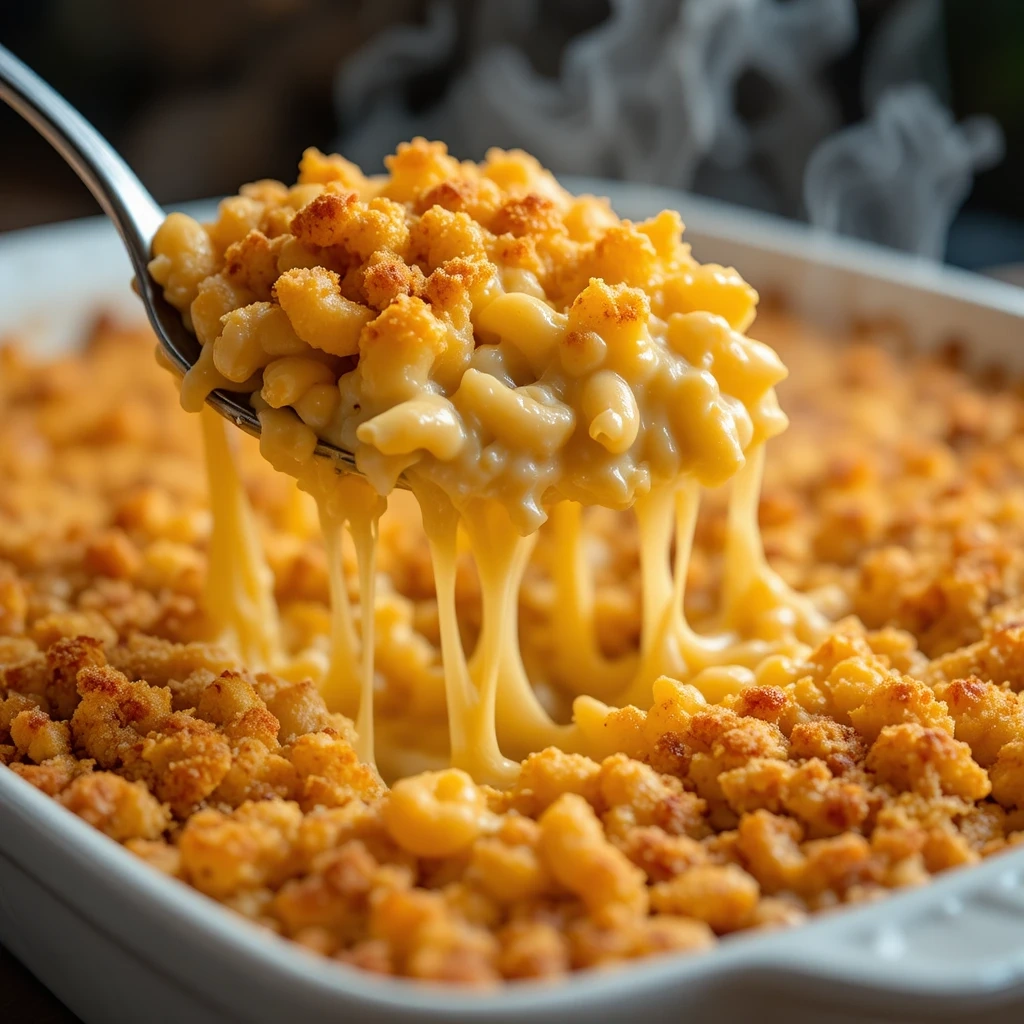
Golden, bubbly, and oozing with three kinds of cheese — baked mac and cheese is the ultimate comfort food side that makes everyone at the cookout instantly happy. Kids go absolutely wild for it, and honestly, so do the adults.
Quick Overview
A creamy stovetop cheese sauce poured over al dente macaroni, then baked until golden and crusty on top. This is rich, cheesy perfection that takes about 45 minutes and feeds a hungry crowd beautifully.
- Prep Time: 20 minutes
- Cook/Chill Time: 25 minutes bake time
- Servings: 10 servings
Key Ingredients for Macaroni and Cheese (Baked)
- 1 pound elbow macaroni
- 3 tablespoons unsalted butter
- 3 tablespoons all-purpose flour
- 3 cups whole milk, warmed
- 1 cup shredded sharp cheddar cheese
- 1 cup shredded Gruyere or Monterey Jack cheese
- 1/2 cup shredded mozzarella
- 1 teaspoon dry mustard powder
- 1/2 teaspoon garlic powder
- Salt, black pepper, and cayenne to taste
- 1/2 cup panko breadcrumbs
- 2 tablespoons melted butter (for topping)
Step-by-Step Instructions for Macaroni and Cheese (Baked)
- Preheat oven to 375°F (190°C). Cook macaroni 1 to 2 minutes less than package directions (it will finish in the oven). Drain and set aside.
- In a large saucepan, melt butter over medium heat. Whisk in flour and cook for 1 to 2 minutes, stirring constantly, until it smells nutty.
- Gradually pour in warm milk, whisking constantly to prevent lumps. Cook for 4 to 5 minutes until the sauce thickens.
- Remove from heat and stir in cheddar, Gruyere, and mozzarella until completely melted. Season with mustard powder, garlic powder, salt, pepper, and a pinch of cayenne.
- Add the drained macaroni to the cheese sauce and stir to combine. Pour into a greased 9×13-inch baking dish.
- Mix panko with melted butter and scatter evenly over the top.
- Bake for 20 to 25 minutes until the top is golden brown and the edges are bubbling. Rest for 5 minutes before serving.
Nutrition Information — Macaroni and Cheese (Baked)
Approximate values per serving:
| Nutrient | Amount (Per Serving) |
| Calories | ~410 kcal |
| Total Fat | 18g |
| Carbohydrates | 46g |
| Fiber | 2g |
| Protein | 17g |
| Sodium | 380mg |
Top Tips for Perfecting Macaroni and Cheese (Baked)
- Always warm the milk before adding it to the roux — cold milk causes lumps.
- Grate your own cheese from a block. Pre-shredded bags contain anti-caking agents that make sauces grainy.
- Undercook the pasta slightly before baking or it will turn mushy.
- For extra crispy topping, broil for the last 2 minutes — but watch it closely.
Recipe 9: Cucumber Tomato Salad
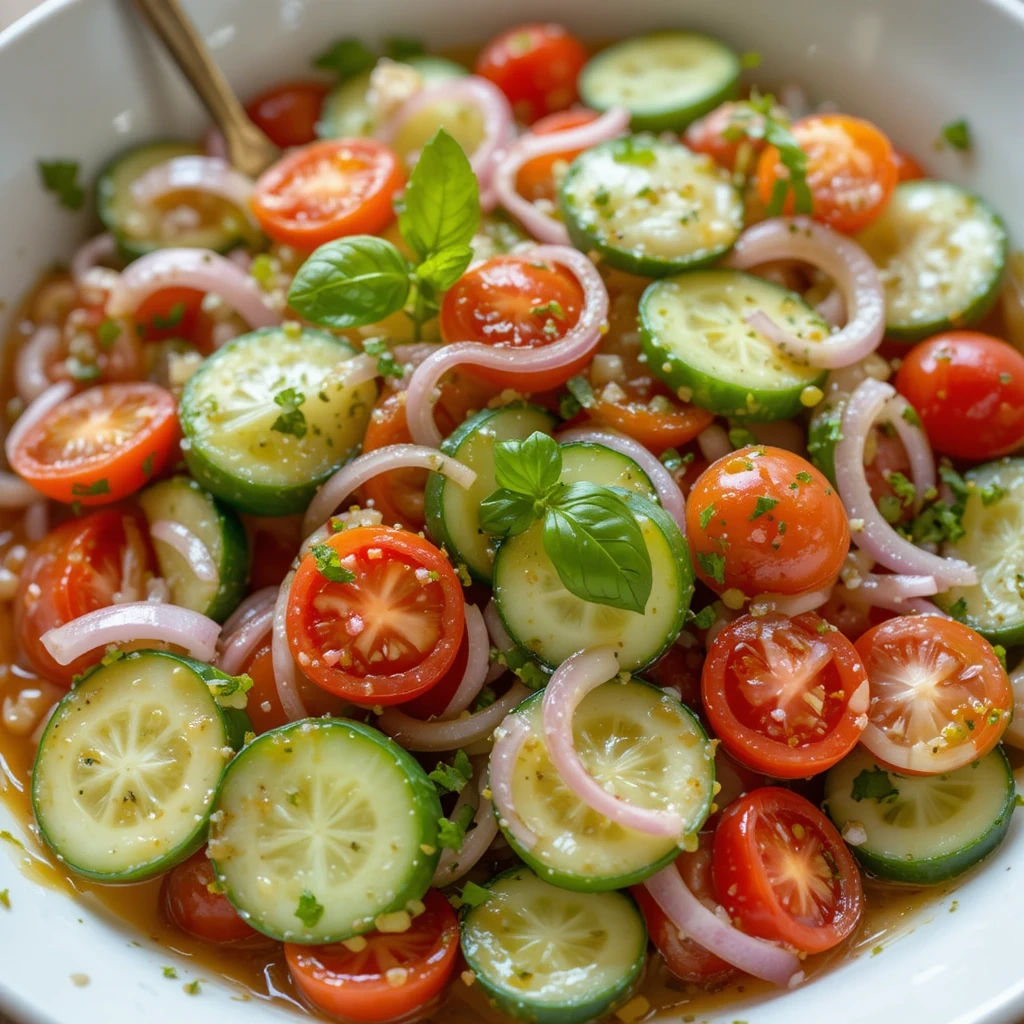
Crisp, bright, and incredibly refreshing — cucumber tomato salad is the light, no-fuss side that balances out all the heavier cookout dishes perfectly. It is ready in minutes and tastes like pure summer in a bowl.
Quick Overview
A simple vinaigrette-dressed salad of crisp cucumbers, juicy tomatoes, and red onion with fresh herbs. Zero cooking required, 10 minutes to make, and absolutely delicious.
- Prep Time: 10 minutes
- Cook/Chill Time: 15 minutes resting time
- Servings: 6 servings
Key Ingredients for Cucumber Tomato Salad
- 2 large English cucumbers, sliced into half-moons
- 2 cups cherry tomatoes, halved
- 1/2 small red onion, very thinly sliced
- 1/4 cup fresh basil or parsley, chopped
- 3 tablespoons olive oil
- 2 tablespoons red wine vinegar
- 1 teaspoon honey
- 1/2 teaspoon dried oregano
- Salt and black pepper to taste
Step-by-Step Instructions for Cucumber Tomato Salad
- Slice cucumbers into half-moons about 1/4-inch thick. Halve the cherry tomatoes. Slice the red onion as thinly as possible.
- Combine all the vegetables in a large bowl.
- Whisk together olive oil, red wine vinegar, honey, oregano, salt, and pepper.
- Pour the dressing over the vegetables and toss to combine.
- Let the salad rest for 10 to 15 minutes before serving to allow the vegetables to absorb the dressing.
- Scatter fresh herbs over the top and serve.
Nutrition Information — Cucumber Tomato Salad
Approximate values per serving:
| Nutrient | Amount (Per Serving) |
| Calories | ~90 kcal |
| Total Fat | 7g |
| Carbohydrates | 7g |
| Fiber | 1g |
| Protein | 1g |
| Sodium | 95mg |
Top Tips for Perfecting Cucumber Tomato Salad
- Slice the red onion paper-thin so it softens in the dressing without overpowering.
- English cucumbers work best as they have fewer seeds and thinner skin.
- This does not store well overnight — best eaten the same day.
- Add crumbled feta for a Greek-inspired twist.
Recipe 10: Jalapeño Cheddar Cornbread
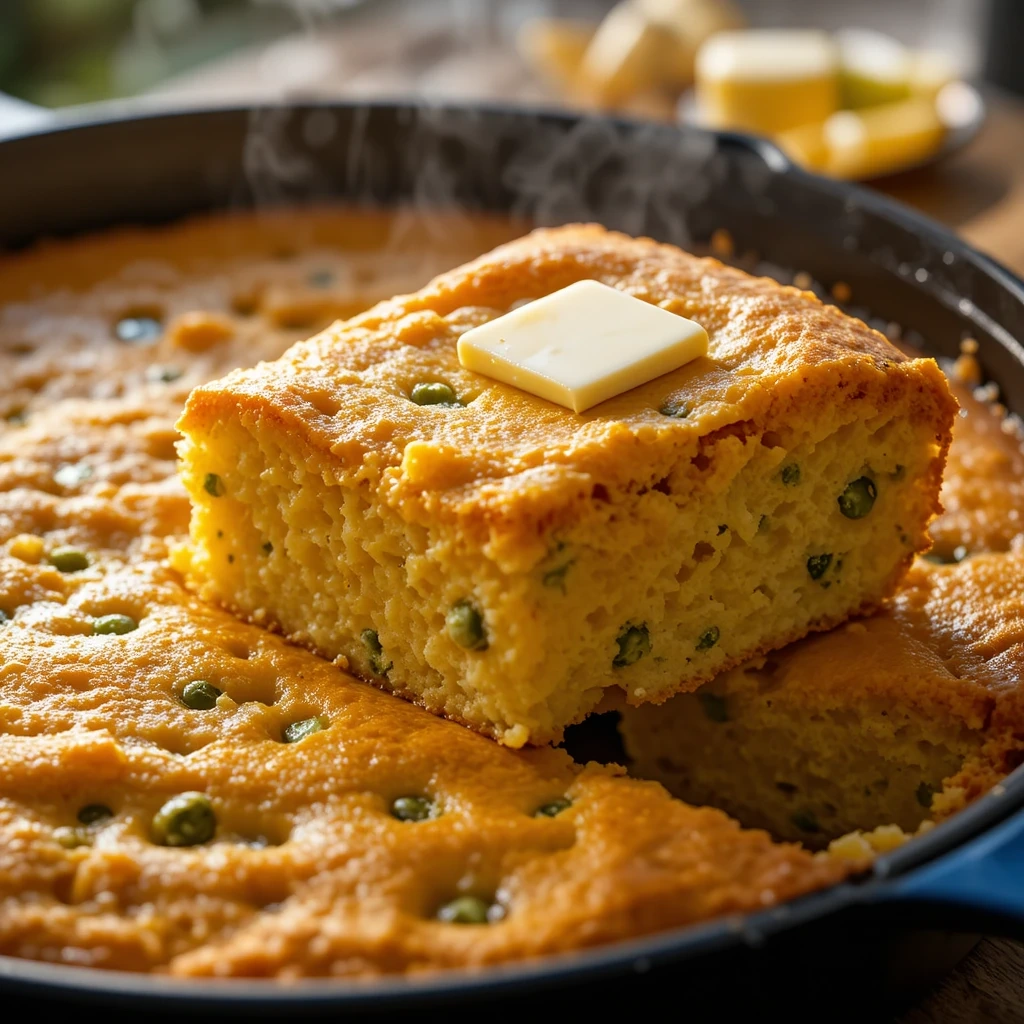
Golden, buttery, and loaded with melty cheddar and just the right kick of jalapeño — this cornbread is the cookout side dish that fills the entire backyard with an irresistible aroma. It disappears in minutes, and everyone always wants to know the secret.
Quick Overview
Moist, fluffy cornbread with sharp cheddar cheese and diced jalapeños baked in a cast iron skillet for crispy edges and a tender crumb. Ready in about 35 minutes and pairs with absolutely everything on the cookout spread.
- Prep Time: 15 minutes
- Cook/Chill Time: 20 minutes bake time
- Servings: 9 squares
Key Ingredients for Jalapeño Cheddar Cornbread
- 1 cup yellow cornmeal
- 1 cup all-purpose flour
- 1 tablespoon baking powder
- 1/2 teaspoon baking soda
- 1/2 teaspoon salt
- 1/4 cup sugar
- 2 large eggs
- 1 cup buttermilk
- 1/3 cup unsalted butter, melted
- 1 cup sharp cheddar cheese, shredded
- 2 jalapeños, seeded and finely diced (reduce for kids)
Step-by-Step Instructions for Jalapeño Cheddar Cornbread
- Preheat oven to 400°F (200°C). Place a 10-inch cast iron skillet in the oven while it preheats.
- In a large bowl, whisk together cornmeal, flour, baking powder, baking soda, salt, and sugar.
- In a separate bowl, whisk eggs, buttermilk, and melted butter together.
- Pour the wet ingredients into the dry ingredients and stir until just combined — a few lumps are fine. Do not overmix.
- Fold in the shredded cheddar and diced jalapeños.
- Carefully remove the hot skillet from the oven. Add a small pat of butter and swirl to coat the pan.
- Pour the batter into the hot skillet and bake for 18 to 22 minutes until golden on top and a toothpick comes out clean.
- Let cool for 5 minutes before slicing and serving warm.
Nutrition Information — Jalapeño Cheddar Cornbread
Approximate values per serving:
| Nutrient | Amount (Per Serving) |
| Calories | ~280 kcal |
| Total Fat | 13g |
| Carbohydrates | 32g |
| Fiber | 2g |
| Protein | 9g |
| Sodium | 390mg |
Top Tips for Perfecting Jalapeño Cheddar Cornbread
- The hot skillet creates the most incredible crispy crust — do not skip this step.
- Do not overmix the batter. Lumps are your friend in cornbread.
- For kids who prefer mild, simply omit the jalapeño and add extra cheese.
- Buttermilk is key for tenderness — substitute with 1 cup milk plus 1 tablespoon lemon juice if needed.
Storing and Reheating Tips for All Side Dishes
Cold Salads (Coleslaw, Pasta Salad, Potato Salad, Cucumber Tomato Salad, Watermelon Salad)
Store in airtight containers in the refrigerator. Most stay fresh for 2 to 3 days. The watermelon salad is best eaten the same day. Always give them a good toss before serving leftovers and add a fresh splash of dressing if needed.
Deviled Eggs
Store covered in the fridge for up to 2 days. Cover with plastic wrap directly on the cut surfaces to prevent drying out. Do not freeze.
Baked Beans
Cool completely, then store in an airtight container in the fridge for up to 5 days. Reheat gently on the stovetop over low heat with a splash of water, stirring often. Beans freeze beautifully for up to 3 months.
Mac and Cheese
Refrigerate in a covered dish for up to 4 days. Reheat in the oven at 350°F with a splash of milk to restore creaminess, or microwave individual portions. The crispy topping softens on reheating — a quick broil for 1 to 2 minutes brings it back.
Grilled Corn and Cornbread
Wrap leftover grilled corn in foil and refrigerate for 2 days. Rewarm on the grill or in the oven. Cornbread keeps wrapped at room temperature for 2 days or in the fridge for up to 5 days. Warm briefly in the oven or microwave before serving.
What to Serve These Cookout Side Dishes With
These sides are designed to complement your grilled mains beautifully. Here are some perfect pairings:
- Backyard burgers and hot dogs — pair with coleslaw, pasta salad, and baked beans
- Grilled chicken — pair with cucumber tomato salad, corn on the cob, and cornbread
- BBQ ribs or pulled chicken — pair with mac and cheese, potato salad, and baked beans
- Veggie or plant-based mains — watermelon salad, deviled eggs, and pasta salad shine here
- Refreshing drinks: lemonade, fruit punch, iced tea, and sparkling water with citrus
Common Cookout Side Dish Mistakes to Avoid
Dressing Salads Too Early
Always dress cold salads right before serving or at most 30 minutes ahead. Over-dressed salads sitting too long become soggy and lose their texture and vibrancy.
Using Warm Potatoes in Potato Salad
This is one of the most common mistakes. Warm potatoes absorb dressing unevenly, become mushy, and can pose a food safety concern. Always cool completely before mixing.
Overcooking the Corn
Over-grilled corn becomes starchy and dry. Aim for 15 to 20 minutes with good char marks, turning frequently. Pull it off while it is still juicy.
Overmixing Cornbread Batter
Overmixing develops gluten and makes cornbread dense and tough rather than tender. Stir just until the dry and wet ingredients are combined — a few lumps are perfectly fine.
Making Everything Last Minute
The biggest cookout mistake is leaving all the prep to the last hour. Most of these side dishes taste better when made ahead. Plan your timeline, prep the day before, and enjoy your party.
Frequently Asked Questions (FAQs)
What side dishes can I make the day before a cookout?
Almost all of these can be made ahead! Potato salad, baked beans, pasta salad, coleslaw, deviled eggs, and cornbread all improve overnight. Avoid making the watermelon salad and cucumber tomato salad more than a few hours before serving.
How do I keep cold side dishes safe in the heat?
Serve cold salads in bowls set over larger bowls of ice. Never leave cold sides out for more than 2 hours in temperatures above 90°F. When in doubt, keep them in a cooler until ready to serve.
Can I make these recipes vegetarian?
Every single recipe in this list is either already vegetarian or can easily be made vegetarian with simple swaps. The baked beans use olive oil and vegetable broth with no meat required.
What is the easiest cookout side dish for a beginner?
The watermelon feta mint salad requires zero cooking and just 10 minutes of assembly. The cucumber tomato salad is equally simple. Both are stunning, crowd-pleasing, and virtually impossible to mess up.
How much side dish should I make per person?
As a general rule, plan for about 1/2 cup to 3/4 cup of each side dish per person. If you are serving 3 or more side dishes, this amount is plenty. Scale up all recipes using the listed servings as a guide.
Can I double these recipes for a large cookout?
Yes, every recipe here doubles or triples easily. Just make sure you have large enough pots, baking dishes, and bowls. For baked dishes like mac and cheese and cornbread, use two pans rather than one oversized pan for even cooking.
Which sides are best for kids?
Mac and cheese, cornbread (made mild), pasta salad, and deviled eggs are universally adored by kids. Watermelon salad is also a big hit with children thanks to the natural sweetness of the fruit.
How do I transport side dishes to a cookout?
Use insulated carriers or coolers for cold dishes. Transport baked dishes like mac and cheese and cornbread in their baking pans wrapped tightly in foil. Mason jars work beautifully for transporting individual salad portions.
Final Thoughts
There is something genuinely heartwarming about a table covered in beautiful side dishes at a summer cookout. Each one of these recipes brings its own personality — the freshness of the watermelon salad, the cozy richness of the mac and cheese, the smoky sweetness of grilled corn. Together, they create the kind of spread that makes guests feel truly looked after and fed with love.
Whether you choose to make all ten or just pick two or three as your cookout staples, we hope these recipes bring joy, laughter, and a whole lot of second helpings to your next gathering. Happy cooking, and happy grilling!