
10 Carnival Food Recipes That Taste Even Better at Home
Close your eyes for a moment. Can you smell it? That irresistible mix of sweet fried dough, buttery popcorn, and caramel-dipped apples drifting through a warm summer evening. Carnival food is more than just a snack — it is a whole experience, full of joy, laughter, and sticky fingers. The great news? You do not have to wait for the fairgrounds to open. These 10 carnival food recipes bring all that magic straight into your kitchen, and they are incredibly easy to make.
We have tested, tweaked, and fallen in love with every single one of these recipes. From the first bite of a golden Corn Dog to the powdery joy of a freshly made Funnel Cake, each dish is designed to be family-friendly, kid-approved, and totally halal. Whether it is a weekend treat or a fun cooking project with the little ones, these recipes will fill your home with happiness — and the amazing aromas that come with it.
If you have already tried our popular Homemade Churros recipe, you are going to love this roundup even more. These carnival classics pair beautifully together, and once you start making them at home, you will wonder why you ever waited in those long fair lines!
What Is Carnival Food?
You know that feeling when you walk through a fairground and suddenly forget every healthy eating promise you ever made? That is carnival food doing its magic! Carnival food refers to the beloved, indulgent treats and savory bites traditionally sold at fairs, festivals, carnivals, and amusement parks. Think deep-fried everything, sweet doughy creations, and handheld snacks you can eat while riding a Ferris wheel.
As the old saying goes, the way to a man’s heart is through his stomach — and carnival food has been winning hearts for generations. From the classic Corn Dog to the glorious Funnel Cake, these recipes have a special place in almost every childhood memory. Now it is your turn to make those memories for your own family, right at home. Ready? Let us dive in!
Why You’ll Love These Carnival Food Recipes
The Authentic Carnival Experience at Home
These recipes have been carefully crafted to nail the flavors and textures you know and love from the fairground. Crispy on the outside, perfectly seasoned, and bursting with nostalgic flavor — every bite will feel like a trip to the carnival.
Budget-Friendly Family Fun
Carnival prices can add up fast, especially with kids! Making these at home saves you serious money while giving the whole family a fun cooking activity. You control the ingredients, the portion sizes, and the quality — without sacrificing any of the deliciousness.
Endlessly Customizable
From topping choices to dipping sauces, each of these recipes is highly adaptable to your family’s taste preferences. Add extra cinnamon sugar, swap the toppings, or make them mini-sized for the kids — the possibilities are endless.
100% Halal and Family-Friendly
Every single recipe in this roundup is completely halal. No forbidden ingredients, no compromises. These are wholesome, safe, and deeply satisfying recipes perfect for the whole family, from toddlers to grandparents.
Recipe 1: Homemade Corn Dogs
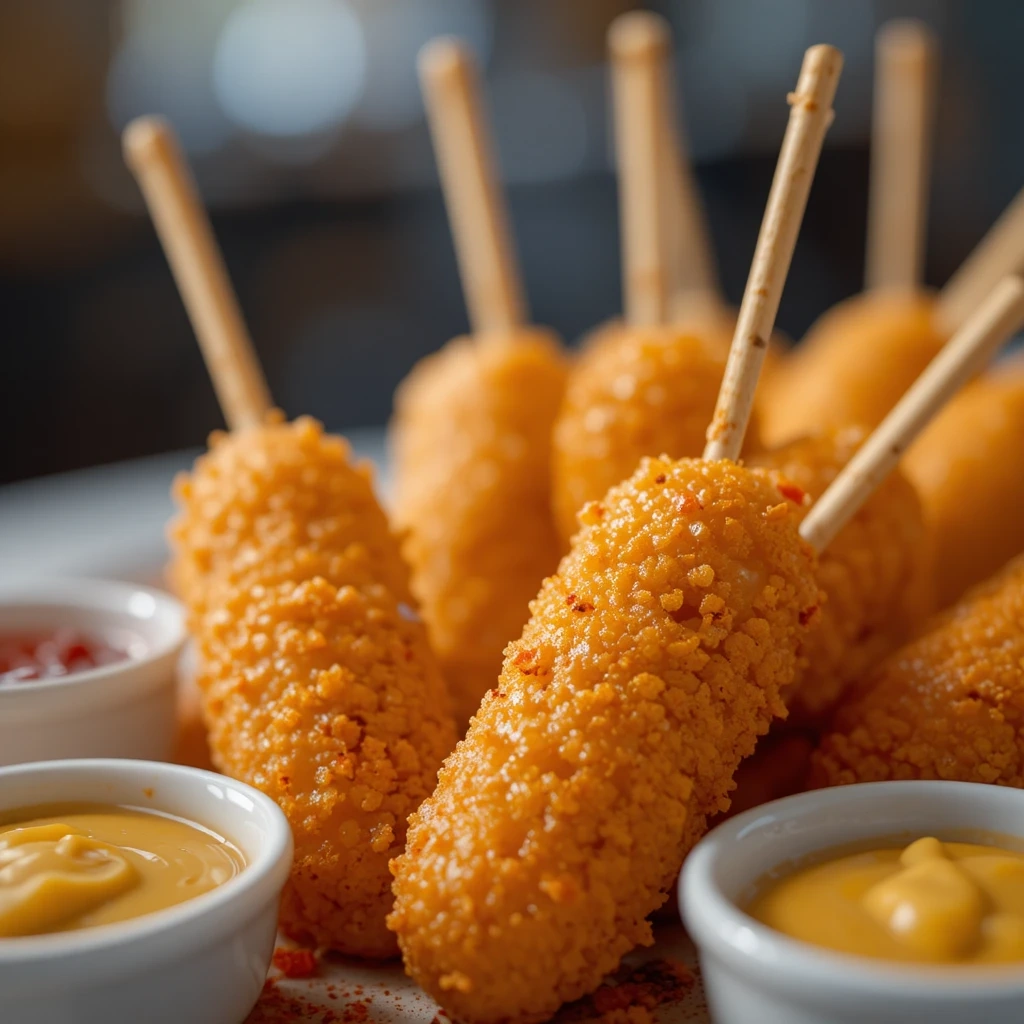
The mighty Corn Dog is the undisputed king of carnival food. Crispy golden cornmeal batter wrapped around a juicy halal beef or chicken sausage — this is the recipe that will make your kids look at you like you are a superhero.
What Are Corn Dogs?
Corn Dogs are classic American fair food — a sausage coated in sweet cornmeal batter, mounted on a stick, and deep-fried to crispy golden perfection. The slightly sweet batter paired with a savory sausage is a combination that has never gone out of style!
Why You’ll Love This Corn Dog Recipe
The Perfect Crispy Coating
That iconic golden crust made from cornmeal and flour gives these Corn Dogs a satisfying crunch that holds up beautifully even after a few minutes of cooling.
Save Money at Home
Carnival Corn Dogs can cost several dollars each. Making a full batch at home costs a fraction of that price, and you get to use quality halal sausages.
Kids Absolutely Love Them
Let the kids help dip and coat the sausages — it is a fun, hands-on cooking project the whole family can enjoy together!
Quick Overview
Corn Dogs are straightforward to make, even for beginner cooks. The batter comes together in minutes, and frying takes only a few minutes per batch. The hardest part? Waiting for them to cool before that first bite!
| Detail | Info |
|---|---|
| Prep Time | 15 minutes |
| Cook Time | 15 minutes |
| Total Time | 30 minutes |
| Servings | 8–10 Corn Dogs |
Key Ingredients for Corn Dogs
- 8 halal beef or chicken sausages / hot dogs
- 1 cup yellow cornmeal
- 1 cup all-purpose flour
- ¼ cup granulated sugar
- 1 tablespoon baking powder
- ½ teaspoon salt
- 1 large egg
- 1 cup whole milk
- Vegetable oil for frying
- Wooden skewers or popsicle sticks
Step-by-Step Instructions
Step 1 — Prep the Sausages
Pat the sausages completely dry with paper towels. Insert a wooden skewer about ¾ of the way through each sausage. Set aside.
Step 2 — Make the Batter
In a tall glass or jar, combine the cornmeal, flour, sugar, baking powder, and salt. Stir together. Add the egg and milk and whisk until a smooth, thick batter forms. If it seems thin, add a tablespoon more flour.
Step 3 — Heat the Oil
Heat vegetable oil in a deep pot to 375°F / 190°C. Use a kitchen thermometer for accuracy — this step is very important.
Step 4 — Dip and Coat
Dip each sausage-on-a-stick into the batter, rotating gently to ensure a complete, even coating. Lift it up and let any excess drip off for a few seconds.
Step 5 — Fry
Carefully lower the coated sausage into the hot oil. Fry for 3–4 minutes, turning occasionally, until deep golden brown.
Step 6 — Drain and Serve
Remove with tongs and place on a wire rack over paper towels to drain. Serve immediately with mustard or ketchup.
What to Serve Corn Dogs With
Corn Dogs love to be served alongside crispy French fries, creamy coleslaw, or a refreshing lemonade. For dipping sauces, mustard, ketchup, and honey mustard are all fantastic choices.
Top Tips for Perfecting Corn Dogs
Always Dry the Sausages
Moisture prevents the batter from sticking properly. Pat them completely dry before dipping.
Use a Tall, Narrow Container for Dipping
A tall glass or jar helps you achieve an even coating all the way up the sausage in one smooth dip.
Fry in Small Batches
Do not let the oil temperature drop too much — fry in small batches of 2–3 at a time to maintain the heat.
Chill the Batter if Needed
If the batter feels too loose, refrigerate it for 10 minutes before dipping.
Storing and Reheating Tips
Store leftover Corn Dogs in an airtight container in the refrigerator for up to 3 days. To reheat, place in an oven or air fryer at 375°F for 8–10 minutes for the best crispiness. Avoid microwaving as this makes the coating soggy. Corn Dogs can also be frozen for up to 2 months — reheat directly from frozen in the oven.
Common Mistakes to Avoid
- Skipping the drying step — wet sausages cause the batter to slide off completely.
- Frying at too low a temperature — the batter absorbs excess oil and becomes greasy.
- Moving the corn dog too early — let the crust set in the first 60 seconds before turning.
Nutrition Information (Per Serving)
| Nutrient | Amount |
|---|---|
| Calories | 290 kcal |
| Total Fat | 14g |
| Carbohydrates | 31g |
| Protein | 10g |
| Sugar | 6g |
| Dietary Fiber | 1g |
| Sodium | 580mg |
Recipe 2: Classic Funnel Cake
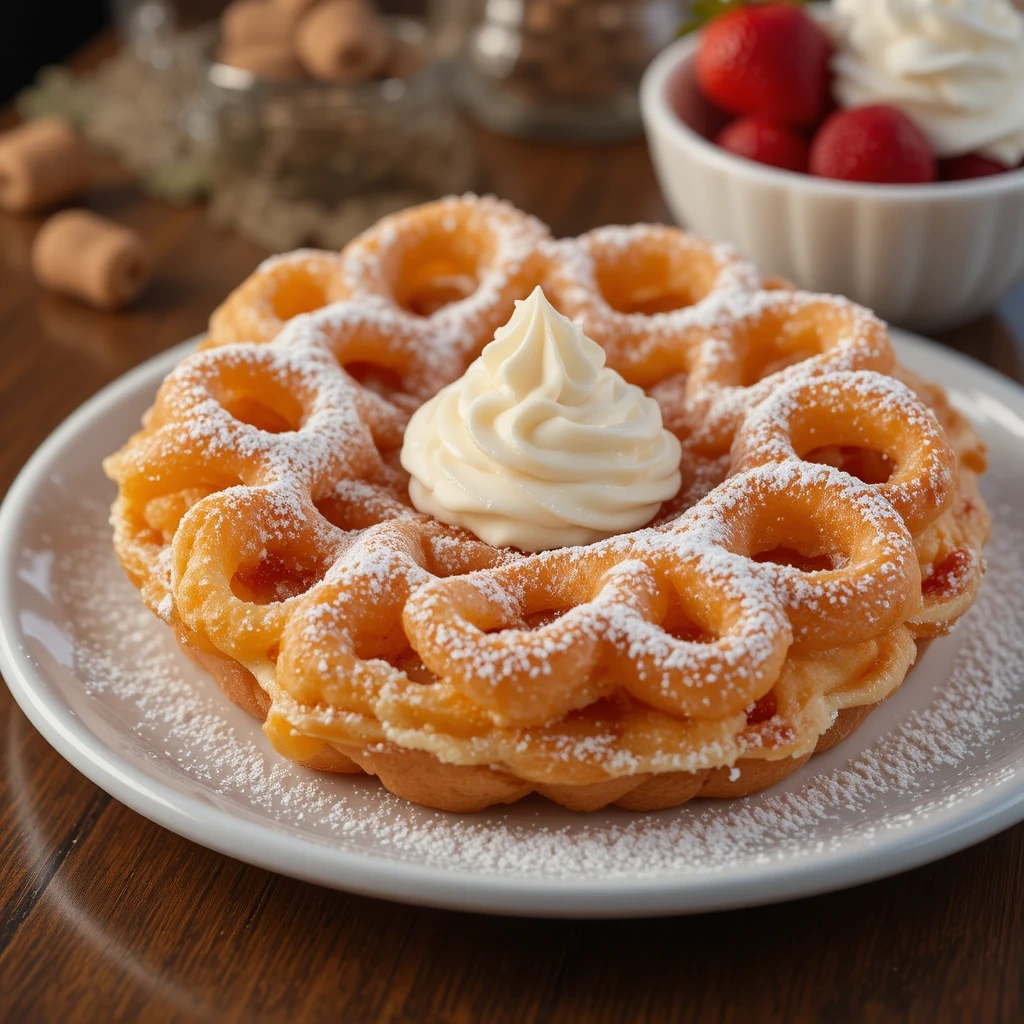
Few things in life are as purely joyful as a warm Funnel Cake dusted with a snowstorm of powdered sugar. It is crispy on the outside, slightly chewy inside, and guaranteed to bring out the child in everyone at the table.
What Is Funnel Cake?
Funnel Cake is a deep-fried fairground classic made by pouring a thin batter through a funnel in a swirling pattern into hot oil, creating a beautifully tangled, lacy fried dough that puffs up and turns golden. Finished with powdered sugar, it is simple, spectacular, and absolutely irresistible.
Why You’ll Love This Funnel Cake Recipe
Incredible Crispy Texture
The thin batter creates a wonderfully crispy, lacy structure that is light and airy. The contrast of crispy edges and soft center is pure perfection.
Ready in Minutes
This recipe takes under 20 minutes from batter to plate. It is the fastest way to bring carnival magic to your home kitchen on a weeknight.
Fun to Make with Kids
Let the kids help pour the batter through the funnel — the swirling pattern is like edible art, and each one comes out beautifully unique!
Quick Overview
Funnel Cake batter is simply a thin pancake-style batter. The magic happens when it hits hot oil — it sizzles and expands into those beautiful golden threads. Top it however you like — powdered sugar is classic, but fresh berries and whipped cream take it to the next level.
| Detail | Info |
|---|---|
| Prep Time | 10 minutes |
| Cook Time | 10 minutes |
| Total Time | 20 minutes |
| Servings | 4 Funnel Cakes |
Key Ingredients for Funnel Cake
- 2 cups all-purpose flour
- 2 tablespoons granulated sugar
- 1 teaspoon baking powder
- ¼ teaspoon salt
- 2 large eggs
- 1½ cups whole milk
- 1 teaspoon pure vanilla extract
- Vegetable oil for frying (at least 2 inches deep in pan)
- Powdered sugar for topping
Step-by-Step Instructions
Step 1 — Make the Batter
In a large mixing bowl, whisk together flour, sugar, baking powder, and salt. Add eggs, milk, and vanilla extract and whisk until completely smooth with no lumps. The batter should be pourable and slightly thin — similar to a crepe batter.
Step 2 — Heat the Oil
Heat oil in a large, deep skillet or pot to 375°F / 190°C. The oil should be at least 2 inches deep.
Step 3 — Prepare the Funnel
Cover the bottom of a funnel with your finger. Pour about ½ cup of batter into the funnel.
Step 4 — Create the Swirl
Hold the funnel about 2–3 inches above the oil. Remove your finger and swirl the batter into the hot oil in a spiral and crisscross motion.
Step 5 — Fry
Fry for 2–3 minutes until golden, then carefully flip using tongs and fry for another 1–2 minutes on the other side.
Step 6 — Finish and Serve
Remove and place on paper towels to drain briefly. Transfer to a plate and dust generously with powdered sugar.
What to Serve Funnel Cake With
Funnel Cake is absolutely divine with fresh strawberries and whipped cream. You can also top it with Nutella, caramel sauce, or even a scoop of vanilla ice cream. For a flavor twist, try a dusting of cinnamon sugar instead of plain powdered sugar.
Top Tips for Perfecting Funnel Cake
Check the Oil Temperature First
Make sure the oil is at the correct temperature before starting. Too cool and the cake absorbs oil; too hot and it burns.
Use a Squeeze Bottle
A squeeze bottle instead of a funnel gives you more control over the batter flow and creates a more even pattern.
One at a Time
Do not overcrowd the pan — fry one at a time for the best result. Serve immediately for maximum crispiness!
Storing and Reheating Tips
Funnel Cake is absolutely best eaten fresh. Leftovers can be stored in an airtight container at room temperature for up to 1 day. Reheat in an air fryer or oven at 350°F for 4–5 minutes to restore crispiness. Avoid refrigerating as this makes them chewy and soggy.
Common Mistakes to Avoid
- Pouring too much batter at once — it will pile up and fry unevenly.
- Moving the cake before it sets — wait 60–90 seconds before attempting to flip.
- Using batter that is too thick — it will not create those beautiful lacy threads.
Nutrition Information (Per Serving)
| Nutrient | Amount |
|---|---|
| Calories | 380 kcal |
| Total Fat | 15g |
| Carbohydrates | 56g |
| Protein | 8g |
| Sugar | 18g |
| Dietary Fiber | 1g |
| Sodium | 240mg |
Recipe 3: Homemade Caramel Apples
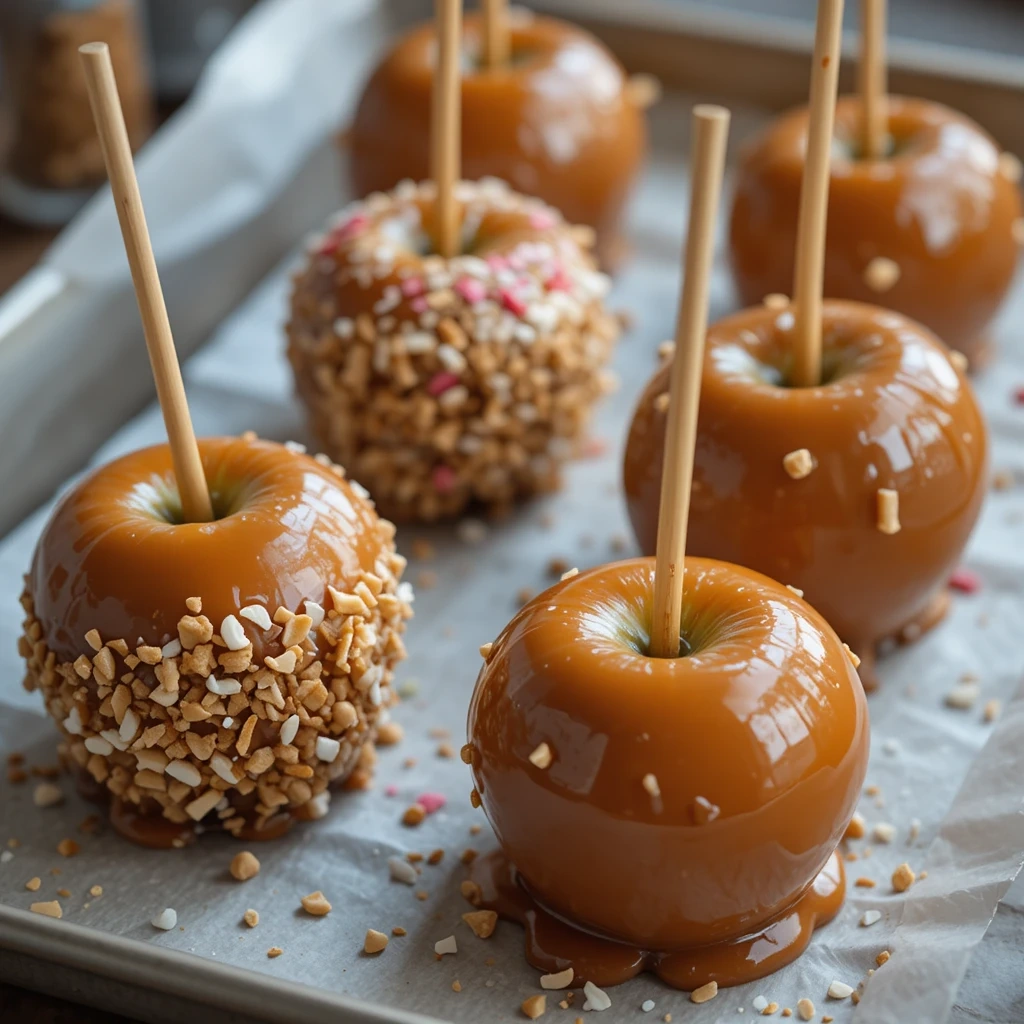
Is there anything more iconic at a carnival than a glossy, caramel-dipped apple on a stick? These Homemade Caramel Apples are sticky, sweet, and absolutely stunning. They are so fun to decorate, kids will consider them an art project as much as a snack.
Why You’ll Love This Caramel Apple Recipe
Rich, Buttery Caramel
This homemade caramel sauce is silky, buttery, and far superior to store-bought varieties. It clings to the apple perfectly and sets to a beautiful glossy finish.
Endlessly Customizable Toppings
Crushed biscuits, mini chocolate chips, sprinkles, chopped nuts, shredded coconut — the toppings are limited only by your imagination. Make a decorating station for the kids!
A Wonderful Family Activity
Making and decorating Caramel Apples is one of the most fun family cooking activities you can do. Little hands love rolling the apples in toppings!
Quick Overview
The caramel sauce requires careful attention on the stovetop, but once it is made, the rest is pure fun. Allow the caramel to cool slightly before dipping for the best coating.
| Detail | Info |
|---|---|
| Prep Time | 15 minutes |
| Cook Time | 20 minutes |
| Total Time | 35 minutes + chilling |
| Servings | 6 Caramel Apples |
Key Ingredients for Caramel Apples
- 6 medium apples (Granny Smith or Fuji work best)
- 6 wooden skewers or popsicle sticks
- 1 cup heavy whipping cream
- 2 cups granulated sugar
- ½ cup light corn syrup (or golden syrup)
- 4 tablespoons unsalted butter
- 1 teaspoon vanilla extract
- Pinch of salt
- Optional toppings: crushed graham crackers, mini chocolate chips, sprinkles, coconut flakes
Step-by-Step Instructions
Step 1 — Prep the Apples
Wash and completely dry the apples. Any moisture will prevent the caramel from sticking. Insert a wooden skewer firmly into the stem end of each apple.
Step 2 — Prepare Your Workspace
Line a baking sheet with parchment paper and lightly grease it. Set aside.
Step 3 — Cook the Caramel
In a medium saucepan over medium heat, combine sugar, corn syrup, and butter. Stir until the butter melts, then stop stirring and let it cook.
Step 4 — Reach Temperature
Continue cooking, swirling the pan occasionally, until the mixture turns a deep amber color and reaches 240°F / 115°C on a candy thermometer.
Step 5 — Add Cream and Vanilla
Remove from heat and carefully stir in the heavy cream (it will bubble vigorously). Add vanilla and salt and stir until smooth.
Step 6 — Cool Slightly
Let the caramel cool for 5–10 minutes until it thickens enough to coat the apple without all running off immediately.
Step 7 — Dip and Decorate
Dip each apple into the caramel, rotating to coat evenly. Allow excess to drip off, then immediately roll in your chosen toppings.
Step 8 — Set and Chill
Place coated apples on the prepared baking sheet. Refrigerate for at least 30 minutes until fully set.
What to Serve Caramel Apples With
Caramel Apples pair beautifully with a glass of cold milk or warm apple cider. For a dessert spread, serve them alongside Funnel Cake or Cotton Candy for the ultimate carnival-at-home experience.
Top Tips for Perfecting Caramel Apples
Use Room Temperature Apples
Cold apples cause caramel to harden too quickly and slide off before setting properly.
Use a Candy Thermometer
Precision matters here. Do not guess the temperature — a candy thermometer is essential for success.
Choose the Right Apple
Granny Smith apples work best because their tartness beautifully balances the sweetness of the caramel.
Storing and Reheating Tips
Caramel Apples can be stored in the refrigerator, individually wrapped, for up to 5 days. They do not need reheating — simply let them come to room temperature for 10 minutes before serving for the best texture.
Nutrition Information (Per Serving)
| Nutrient | Amount |
|---|---|
| Calories | 420 kcal |
| Total Fat | 12g |
| Carbohydrates | 78g |
| Protein | 1g |
| Sugar | 68g |
| Dietary Fiber | 3g |
| Sodium | 95mg |
Recipe 4: DIY Cotton Candy (No Machine Needed!)

Yes, you can actually make cotton candy at home without a machine! This clever technique using a fork and a whisk produces those delicate, cloud-like sugar wisps that kids go absolutely wild for. It is a little messy and a whole lot of fun.
Why You’ll Love This Cotton Candy Recipe
Magical and Impressive
Watching sugar transform into fluffy pink wisps right before your eyes feels like actual magic. This is one of those recipes that will genuinely wow your kids and your guests.
Completely Customizable Colors
Use food coloring to make any color you want — pink, blue, purple, or even rainbow! Make a batch of each for a carnival candy bar at your next party.
No Expensive Equipment
All you need is a saucepan, a fork, and some sugar. No cotton candy machine required!
Quick Overview
The key is cooking the sugar to the right temperature (around 320°F) and then using a whisk or fork to flick the sugar rapidly through the air in thin threads. It takes a little practice but the results are spectacular!
| Detail | Info |
|---|---|
| Prep Time | 5 minutes |
| Cook Time | 15 minutes |
| Total Time | 20 minutes |
| Servings | 4 servings |
Key Ingredients for Cotton Candy
- 2 cups granulated white sugar
- ½ cup water
- ¼ cup light corn syrup
- Food coloring (pink or any color you prefer)
- Flavoring extract (strawberry, raspberry, or vanilla)
Step-by-Step Instructions
Step 1 — Prepare Your Workspace
Lay newspaper or parchment paper on the floor around your workspace to catch the sugar wisps. Set up two wooden spoon handles on the edge of the counter, extending outward.
Step 2 — Cook the Sugar
Combine sugar, water, and corn syrup in a small saucepan over medium-high heat. Stir only until sugar dissolves, then stop stirring.
Step 3 — Reach Temperature
Insert a candy thermometer and cook the mixture until it reaches exactly 320°F / 160°C.
Step 4 — Add Color and Flavor
Remove from heat and stir in 2–3 drops of food coloring and a splash of flavoring extract. Let it sit for 1–2 minutes until slightly thickened.
Step 5 — Create the Threads
Dip a fork into the sugar mixture and rapidly flick it back and forth over the wooden spoon handles to create fine sugar threads.
Step 6 — Shape and Serve
Gather the sugar threads gently from the spoon handles and shape them into a fluffy ball or cone. Serve immediately.
Top Tips for Perfect DIY Cotton Candy
Work Fast
Work quickly once the sugar is ready — it hardens fast. Have everything set up before you start cooking.
Cool Room = Easier Threads
The cooler the room, the easier the threads form. Work in a cool kitchen if possible.
Watch the Temperature
Do not let the sugar get above 325°F or it will burn and turn brown instead of clear.
Storing Tips
Cotton Candy should be served immediately. It dissolves when exposed to humidity. If you need to store it, keep it in an airtight container in a very dry area for a maximum of 1 hour.
Nutrition Information (Per Serving)
| Nutrient | Amount |
|---|---|
| Calories | 190 kcal |
| Total Fat | 0g |
| Carbohydrates | 49g |
| Protein | 0g |
| Sugar | 49g |
| Dietary Fiber | 0g |
| Sodium | 10mg |
Recipe 5: Elephant Ears (Fried Dough)
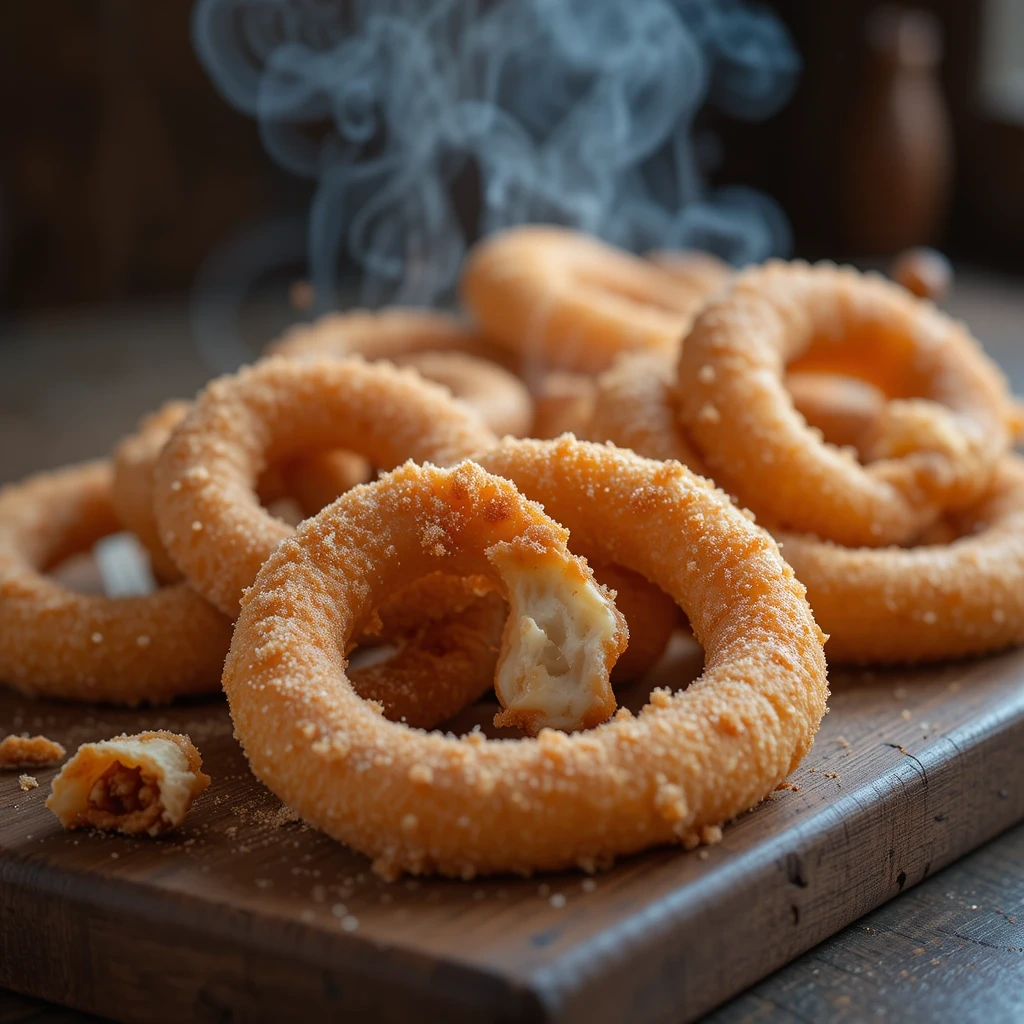
Elephant Ears are the oversized, gloriously crispy fried dough treats that you absolutely cannot walk past at any carnival without buying. Made with a simple yeast dough that puffs up beautifully in hot oil, they are finished with cinnamon sugar for a carnival snack that is truly hard to beat.
Why You’ll Love This Elephant Ear Recipe
Incredibly Light and Crispy
The yeast dough creates a beautifully airy interior while the outside fries to a perfect golden crunch. The contrast of textures is exactly what you want from a great Elephant Ear.
The Cinnamon Sugar Topping Is Addictive
That simple mixture of cinnamon and sugar dusted over hot fried dough might be one of the best things ever created. It is warm, fragrant, and deeply satisfying.
Great for Sharing
Elephant Ears are big enough for sharing — making them the perfect family snack to tear apart together and enjoy!
Quick Overview
Elephant Ears require a little rising time for the yeast dough, but the actual frying is quick. Plan ahead and start the dough about an hour before you want to fry.
| Detail | Info |
|---|---|
| Prep Time | 20 minutes + 1 hour rise |
| Cook Time | 15 minutes |
| Total Time | 1 hour 35 minutes |
| Servings | 6 Elephant Ears |
Key Ingredients for Elephant Ears
- 2¼ teaspoons active dry yeast (1 packet)
- 1 cup warm milk (about 110°F — not hot)
- 2 tablespoons granulated sugar
- 2 tablespoons unsalted butter, melted
- 1 teaspoon salt
- 2½ to 3 cups all-purpose flour
- Vegetable oil for frying
- For topping: ½ cup sugar mixed with 2 teaspoons cinnamon
Step-by-Step Instructions
Step 1 — Activate the Yeast
In a large bowl, combine warm milk and sugar. Sprinkle the yeast over the top and let sit for 5–10 minutes until foamy. This tells you the yeast is active and ready.
Step 2 — Form the Dough
Add melted butter, salt, and 2 cups of flour to the yeast mixture. Stir to combine, then add more flour gradually until a soft, slightly sticky dough forms.
Step 3 — Knead
Turn dough out onto a floured surface and knead for 6–8 minutes until smooth and elastic.
Step 4 — First Rise
Place in a greased bowl, cover with a clean towel, and let rise in a warm spot for 1 hour until doubled in size.
Step 5 — Shape
Punch down the risen dough and divide into 6 equal pieces. Roll each piece very thin — about ⅛ inch thick and roughly oval shaped.
Step 6 — Fry
Heat oil to 375°F. Carefully lower each piece of dough into the hot oil and fry for 2–3 minutes per side until puffed and golden.
Step 7 — Top and Serve
Remove and drain briefly on paper towels. While still hot, sprinkle generously with the cinnamon sugar mixture.
What to Serve Elephant Ears With
Elephant Ears are a beautiful standalone treat, but they also pair wonderfully with fresh strawberries, a drizzle of honey, or a scoop of ice cream on top. Serve with fresh lemonade for the complete carnival experience.
Top Tips for Perfecting Elephant Ears
Roll Them Really Thin
Roll the dough as thin as you can — this is what creates that characteristic crispy, lacy texture. Thicker dough will result in a bread-like center rather than a crispy treat.
Sugar Goes on Hot
Always add the cinnamon sugar while the Elephant Ear is piping hot — it sticks much better and creates a beautiful, slightly caramelized crust.
Serve Immediately
Elephant Ears lose their wonderful crunch very quickly. Have everyone ready at the table before you start frying!
Storing and Reheating Tips
Elephant Ears are best fresh. Store any leftovers in an airtight container for up to 1 day. Reheat in an oven or air fryer at 350°F for 5 minutes. Plan to eat them the same day for the best experience.
Nutrition Information (Per Serving)
| Nutrient | Amount |
|---|---|
| Calories | 350 kcal |
| Total Fat | 14g |
| Carbohydrates | 50g |
| Protein | 7g |
| Sugar | 12g |
| Dietary Fiber | 2g |
| Sodium | 200mg |
Recipe 6: Carnival-Style Loaded Nachos
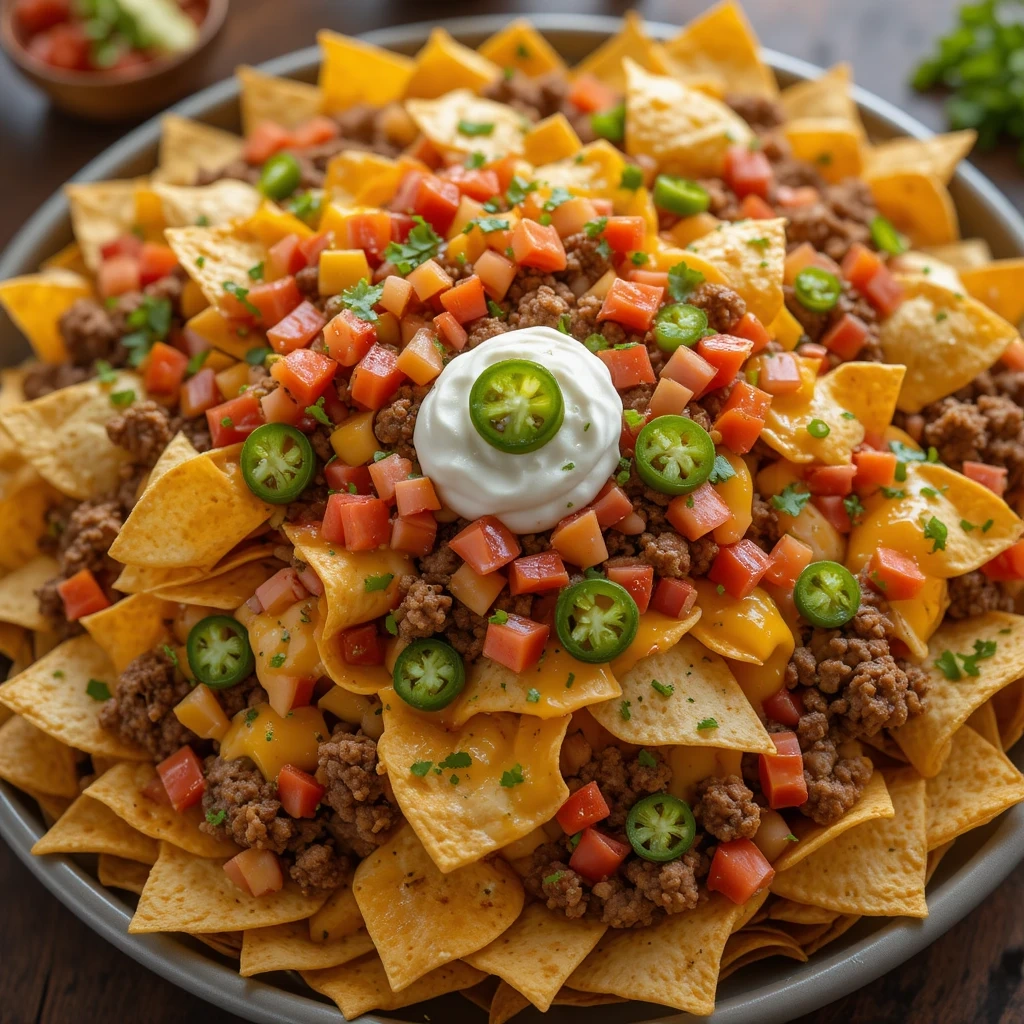
Carnival Nachos are not your average plate of chips and cheese. They are piled impossibly high with toppings, drenched in velvety cheese sauce, and served in a big basket that dares you to finish them. This recipe nails that classic over-the-top carnival presentation.
Why You’ll Love These Loaded Nachos
That Dreamy Cheese Sauce
The secret to great carnival nachos is a smooth, pourable cheese sauce — not shredded cheese that gets all clumpy. This homemade version is rich, creamy, and absolutely pourable perfection.
Fully Loaded with Toppings
Seasoned halal ground beef, fresh tomatoes, sour cream, jalapeños, and salsa — loaded nachos mean loaded, and this recipe delivers on every level.
Perfect for Sharing
Build a huge nacho mountain and put it in the middle of the table. It is the ultimate sharing snack for movie nights, sports events, or family game nights.
Quick Overview
This recipe has three components — crispy nachos, the cheese sauce, and the toppings. Each component is easy on its own, and they come together in about 25 minutes for one spectacular platter.
| Detail | Info |
|---|---|
| Prep Time | 10 minutes |
| Cook Time | 15 minutes |
| Total Time | 25 minutes |
| Servings | 4–6 servings |
Key Ingredients for Loaded Nachos
For the Nachos and Base:
- 1 large bag tortilla chips
- 300g halal ground beef
- 1 teaspoon cumin
- 1 teaspoon smoked paprika
- Salt and pepper to taste
For the Cheese Sauce:
- 2 tablespoons unsalted butter
- 2 tablespoons all-purpose flour
- 1 cup whole milk
- 2 cups shredded cheddar cheese
- ¼ teaspoon garlic powder
- Salt to taste
For the Toppings:
- Diced tomatoes, sliced jalapeños (optional), sour cream, salsa, fresh cilantro
Step-by-Step Instructions
Step 1 — Cook the Beef
Cook the halal ground beef in a skillet over medium-high heat. Season with cumin, paprika, salt, and pepper. Cook until browned and no longer pink. Drain any excess fat and set aside.
Step 2 — Start the Cheese Sauce
Melt butter in a saucepan over medium heat. Whisk in flour and cook for 1 minute, stirring constantly.
Step 3 — Add the Milk
Gradually whisk in milk until smooth. Cook, stirring constantly, until the sauce thickens — about 3–4 minutes.
Step 4 — Melt in the Cheese
Remove from heat and stir in shredded cheddar and garlic powder until fully melted and smooth. Season with salt.
Step 5 — Build the Nachos
Spread tortilla chips on a large platter or in a basket. Top with the seasoned meat.
Step 6 — Finish and Serve
Pour the warm cheese sauce generously over the top. Add all remaining toppings. Serve immediately!
What to Serve Loaded Nachos With
Loaded Nachos pair perfectly with fresh guacamole, extra salsa, and tall glasses of cold lemonade. For a complete carnival spread, serve alongside Corn Dogs or Kettle Corn.
Top Tips for Perfect Nachos
Layer for Even Coverage
Layer chips in two layers with cheese sauce between each layer for the best distribution of flavors in every bite.
Keep the Sauce Warm
Serve the cheese sauce warm — it sets up as it cools and becomes less pourable. Reheat gently if needed.
Add Fresh Toppings Last
Do not add sour cream and fresh toppings until just before serving so they stay fresh and vibrant.
Storing Tips
Loaded Nachos are really a fresh-serve dish. Store any remaining cheese sauce separately in the fridge for up to 3 days and reheat gently. Leftover chips and toppings can be stored separately, but assembled nachos do not store well.
Nutrition Information (Per Serving)
| Nutrient | Amount |
|---|---|
| Calories | 480 kcal |
| Total Fat | 22g |
| Carbohydrates | 48g |
| Protein | 22g |
| Sugar | 4g |
| Dietary Fiber | 3g |
| Sodium | 780mg |
Recipe 7: Deep Fried Oreos
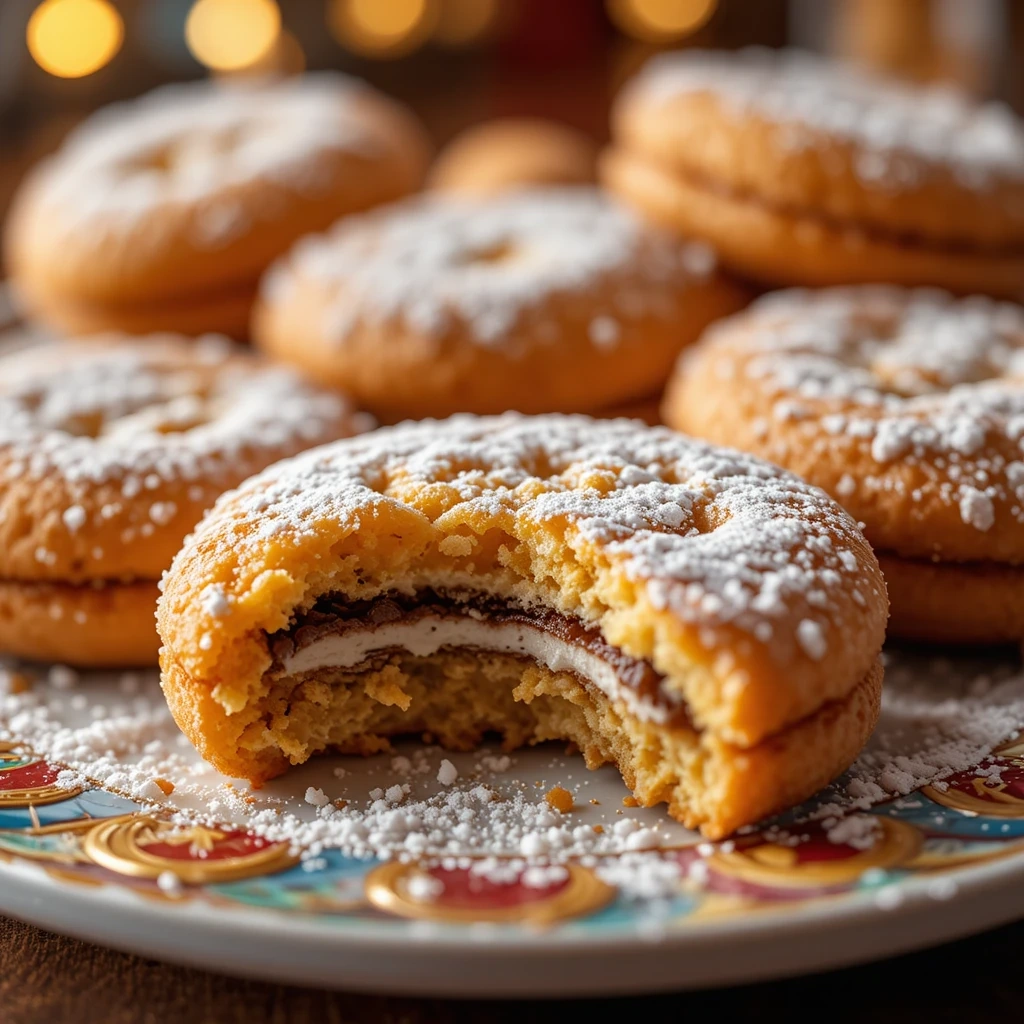
If you have never had a Deep Fried Oreo, prepare to have your mind completely blown. The heat softens the cookie into a fudgy, molten center while the pancake batter coating puffs up into a light, golden shell. It sounds like madness. It tastes like pure bliss.
Why You’ll Love Deep Fried Oreos
The Molten Cookie Center
When the Oreo heats up inside the batter, the cream filling melts and the cookie softens into something truly extraordinary — like a warm, gooey chocolate cake you did not expect.
Quick and Easy
This is one of the fastest carnival recipes in this list. From batter to plate in under 15 minutes!
Incredible Crowd-Pleaser
Serve these at a party and watch them disappear before you can even plate the second batch. They are that good.
Quick Overview
The batter is a simple, slightly sweetened pancake batter. Dip the Oreos, fry briefly, and finish with powdered sugar. That is all there is to it!
| Detail | Info |
|---|---|
| Prep Time | 10 minutes |
| Cook Time | 8 minutes |
| Total Time | 18 minutes |
| Servings | 12 Fried Oreos |
Key Ingredients for Fried Oreos
- 12 Oreo cookies
- 1 cup pancake mix (or all-purpose flour + 1 tsp baking powder)
- ⅔ cup whole milk
- 1 egg
- 1 tablespoon sugar
- Vegetable oil for frying
- Powdered sugar for topping
Step-by-Step Instructions
Step 1 — Heat the Oil
Heat 2 inches of vegetable oil in a deep pot to 375°F / 190°C.
Step 2 — Make the Batter
In a bowl, whisk together pancake mix, milk, egg, and sugar until a smooth batter forms. It should be the consistency of thick pancake batter.
Step 3 — Coat the Oreos
Dip each Oreo cookie into the batter, ensuring it is fully and evenly coated on all sides.
Step 4 — Fry
Carefully lower 3–4 coated Oreos into the hot oil at a time. Fry for 2–3 minutes until the batter is puffed and golden brown.
Step 5 — Drain
Remove with a slotted spoon and drain on paper towels.
Step 6 — Serve
Dust immediately with powdered sugar and serve warm. Enjoy within 5 minutes for the best experience!
What to Serve Fried Oreos With
Fried Oreos are perfect served with a scoop of vanilla ice cream or a drizzle of caramel sauce. They also make a brilliant dessert platter paired with Funnel Cake and Churros.
Top Tips for Perfect Fried Oreos
Freeze the Oreos First
Freeze the Oreos for 15 minutes before dipping — this helps the batter adhere better and keeps the cookie from over-softening.
Small Batches Only
Fry in small batches to maintain oil temperature. Overcrowding drops the temperature and leads to greasy results.
Eat Immediately
Fried Oreos are spectacular when warm — eat within 5 minutes of frying for the absolute best experience.
Storing Tips
Best served immediately. If you must store them, keep in an airtight container at room temperature for up to 4 hours. Reheat in an air fryer at 350°F for 3 minutes.
Nutrition Information (Per Serving)
| Nutrient | Amount |
|---|---|
| Calories | 190 kcal |
| Total Fat | 9g |
| Carbohydrates | 25g |
| Protein | 3g |
| Sugar | 13g |
| Dietary Fiber | 0.5g |
| Sodium | 180mg |
Recipe 8: Carnival Kettle Corn
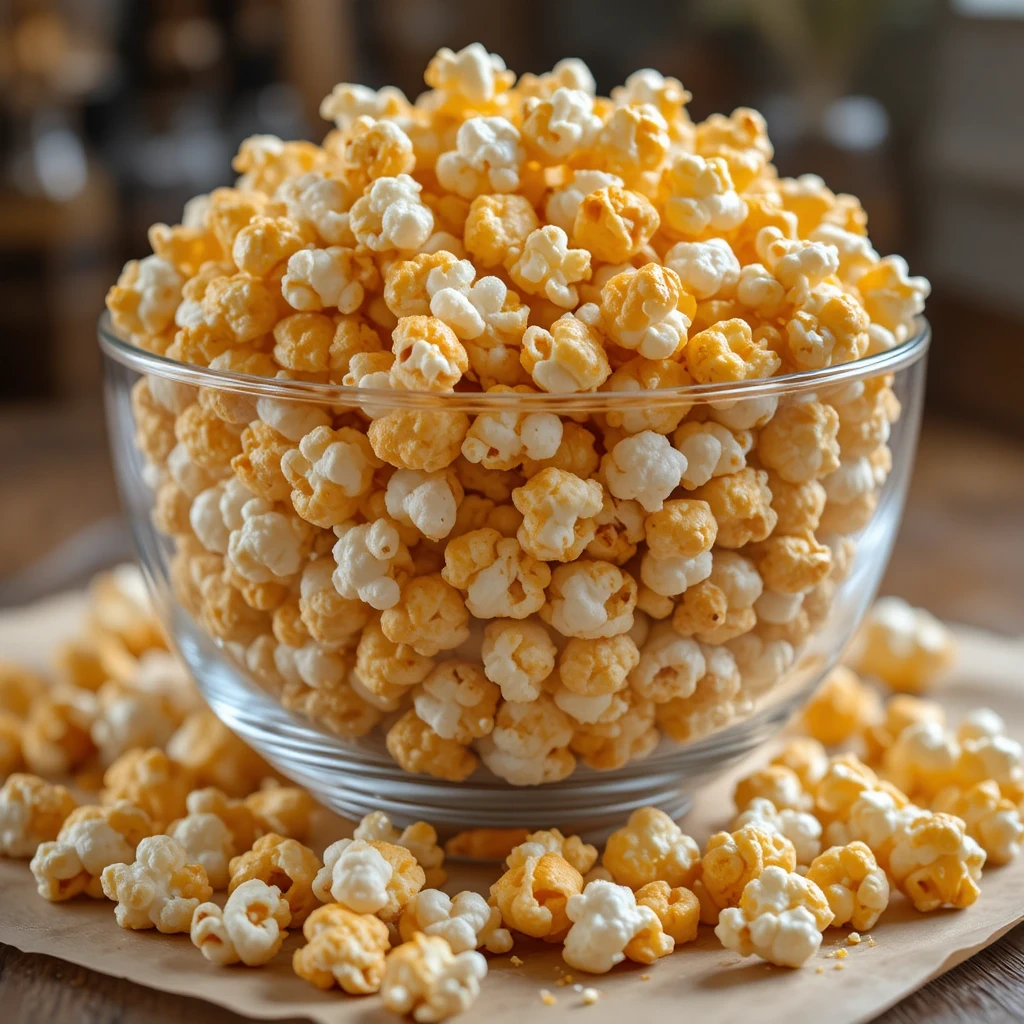
Kettle Corn is the sweet, salty, slightly caramelized popcorn that fills carnival air with its irresistible aroma. Once you make it at home, you will never go back to the plain microwave kind. This version is quick, addictive, and absolutely perfect for family movie nights.
Why You’ll Love This Kettle Corn
That Perfect Sweet-Salty Balance
The combination of just enough sugar to caramelize lightly with the natural saltiness of popcorn creates one of the most moreish snacks imaginable. You simply cannot stop eating it.
Ready in 10 Minutes
From stovetop to bowl in 10 minutes flat — this is the fastest carnival recipe on the list and requires only 4 ingredients.
Perfect for Any Occasion
Movie night, school snack, party treat — Kettle Corn fits every occasion perfectly and costs almost nothing to make.
Quick Overview
The key technique is adding the sugar and oil together before the kernels pop, so every piece of popcorn gets a light caramel coating as it pops in the pot. Shake the pot constantly to prevent burning — this is the secret to perfect Kettle Corn.
| Detail | Info |
|---|---|
| Prep Time | 2 minutes |
| Cook Time | 8 minutes |
| Total Time | 10 minutes |
| Servings | 6 cups |
Key Ingredients for Kettle Corn
- ⅓ cup popcorn kernels
- 3 tablespoons vegetable oil
- 3 tablespoons granulated sugar
- ½ teaspoon salt
Step-by-Step Instructions
Step 1 — Test the Oil
Place oil and 3 test kernels in a large, heavy-bottomed pot with a lid over medium-high heat.
Step 2 — Add Everything
When the test kernels pop, add the remaining popcorn kernels and sugar. Quickly stir to combine.
Step 3 — Cover and Shake
Cover immediately and begin shaking the pot continuously from side to side using the handles.
Step 4 — Keep Shaking
Continue shaking as the corn pops vigorously. This takes about 3–4 minutes.
Step 5 — Listen for the End
When popping slows to about 2 seconds between pops, remove from heat immediately.
Step 6 — Season and Cool
Pour immediately onto a large parchment-lined baking sheet. Sprinkle with salt. Spread in a single layer and let cool for 3–5 minutes. The coating will harden as it cools. Break apart any clumps.
What to Serve Kettle Corn With
Kettle Corn is a brilliant standalone snack, but it also pairs wonderfully with Caramel Apples or Cotton Candy for a carnival-themed snack board. Serve in paper cones for the most authentic carnival presentation!
Top Tips for Perfect Kettle Corn
Never Stop Shaking
Constant motion prevents the sugar from burning on the bottom. This is the single most important step.
Use a Large Pot
Popcorn expands to a large volume very quickly — use a pot that is bigger than you think you need.
Salt After, Not Before
Add the salt after popping, not before — this gives a cleaner, fresher flavor and prevents the salt from affecting the popping process.
Storing Tips
Store cooled Kettle Corn in an airtight container at room temperature for up to 5 days. It stays perfectly crispy and delicious — no reheating needed.
Nutrition Information (Per Serving)
| Nutrient | Amount |
|---|---|
| Calories | 140 kcal |
| Total Fat | 7g |
| Carbohydrates | 18g |
| Protein | 1g |
| Sugar | 8g |
| Dietary Fiber | 2g |
| Sodium | 195mg |
Recipe 9: Fresh-Squeezed Carnival Lemonade
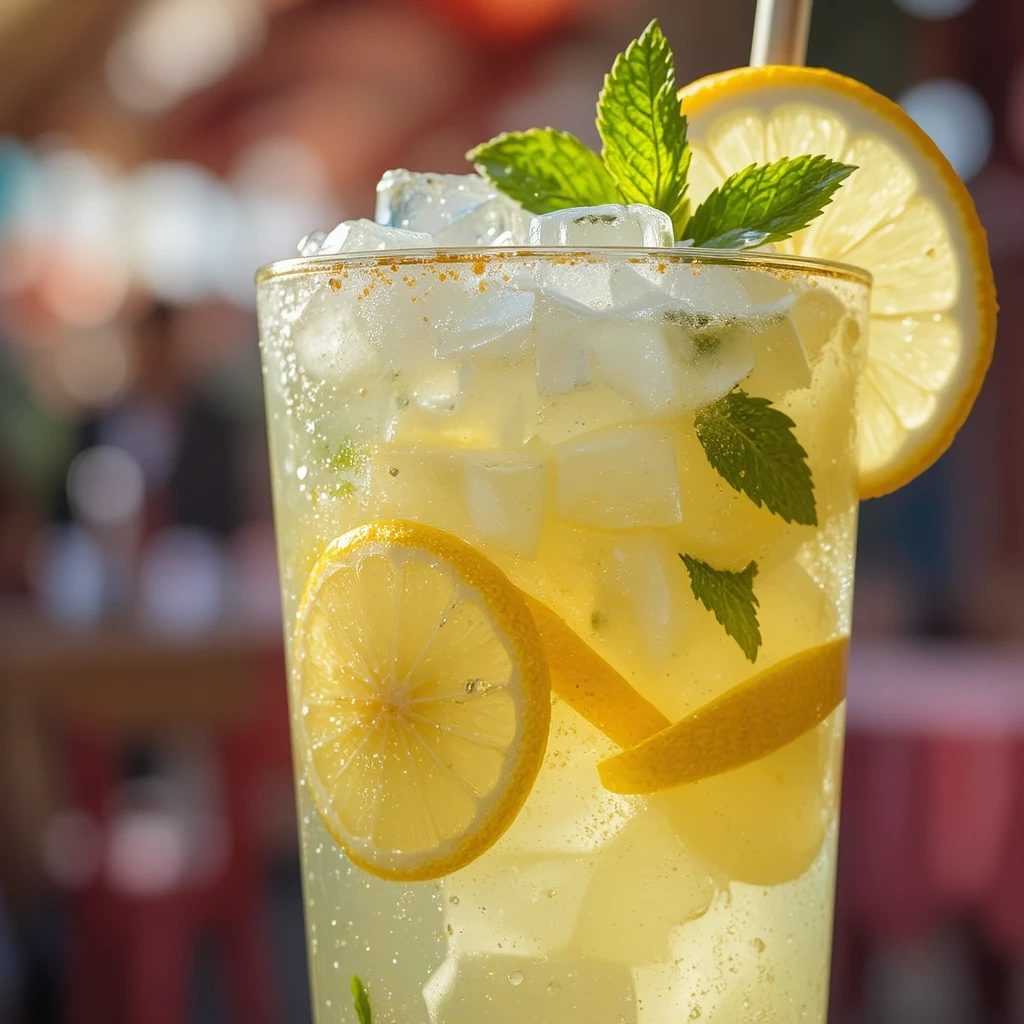
No carnival experience is complete without an ice-cold, freshly squeezed lemonade in hand. This version is the real deal — bright, tart, refreshing, and slightly sweet. It is the perfect companion for every single recipe in this post.
Why You’ll Love This Carnival Lemonade
Made with Real Lemons
Fresh-squeezed lemon juice makes all the difference in the world compared to powder or concentrate. The flavor is bright, vibrant, and absolutely refreshing.
Simple Homemade Simple Syrup
A quick simple syrup dissolves perfectly into cold lemonade, giving you consistent sweetness throughout the entire glass with no grainy sugar settling at the bottom.
Endlessly Customizable
Make it sparkling with soda water, infuse the syrup with fresh mint or ginger, or add strawberry purée for a gorgeous pink lemonade!
Quick Overview
The only technical step here is making a quick simple syrup, which takes about 5 minutes. After that, mix with fresh lemon juice and cold water for the most refreshing summer drink you have ever made.
| Detail | Info |
|---|---|
| Prep Time | 10 minutes |
| Cook Time | 5 minutes |
| Total Time | 15 minutes |
| Servings | 4–6 glasses |
Key Ingredients for Carnival Lemonade
- 1 cup freshly squeezed lemon juice (about 6–8 lemons)
- 1 cup granulated sugar
- 1 cup water (for simple syrup)
- 4 cups cold water
- Ice cubes
- Lemon slices and fresh mint for garnish
Step-by-Step Instructions
Step 1 — Make the Simple Syrup
Combine 1 cup sugar with 1 cup water in a small saucepan. Heat over medium heat, stirring until sugar completely dissolves. Do not boil. Remove from heat and let cool completely.
Step 2 — Juice the Lemons
Juice the lemons and strain out all seeds and pulp. You need about 1 cup of fresh juice.
Step 3 — Mix the Lemonade
In a large pitcher, combine the fresh lemon juice, cooled simple syrup, and 4 cups of cold water. Stir well.
Step 4 — Taste and Adjust
Taste and adjust — add more simple syrup for sweetness or more lemon juice for tartness.
Step 5 — Serve
Fill glasses with ice, pour over the lemonade, and garnish with lemon slices and fresh mint.
What to Serve This Lemonade With
This lemonade goes brilliantly with every single recipe in this roundup. It cuts through the richness of fried foods beautifully and refreshes the palate between bites.
Top Tips for Perfect Carnival Lemonade
Roll the Lemons First
Roll the lemons firmly on the counter before cutting — this releases significantly more juice from each lemon.
Make the Syrup Ahead
The simple syrup can be made in advance and stored in the fridge for up to 2 weeks — perfect for always having lemonade ready!
Try Pink Lemonade
Blend ½ cup of fresh strawberries and stir into the pitcher for a beautiful, naturally pink lemonade.
Storing Tips
Store lemonade in the refrigerator for up to 5 days. Always serve over fresh ice. The simple syrup can be made in advance and stored separately for convenience.
Nutrition Information (Per Serving)
| Nutrient | Amount |
|---|---|
| Calories | 110 kcal |
| Total Fat | 0g |
| Carbohydrates | 29g |
| Protein | 0g |
| Sugar | 27g |
| Dietary Fiber | 0g |
| Sodium | 10mg |
Recipe 10: Classic Churros with Chocolate Dipping Sauce
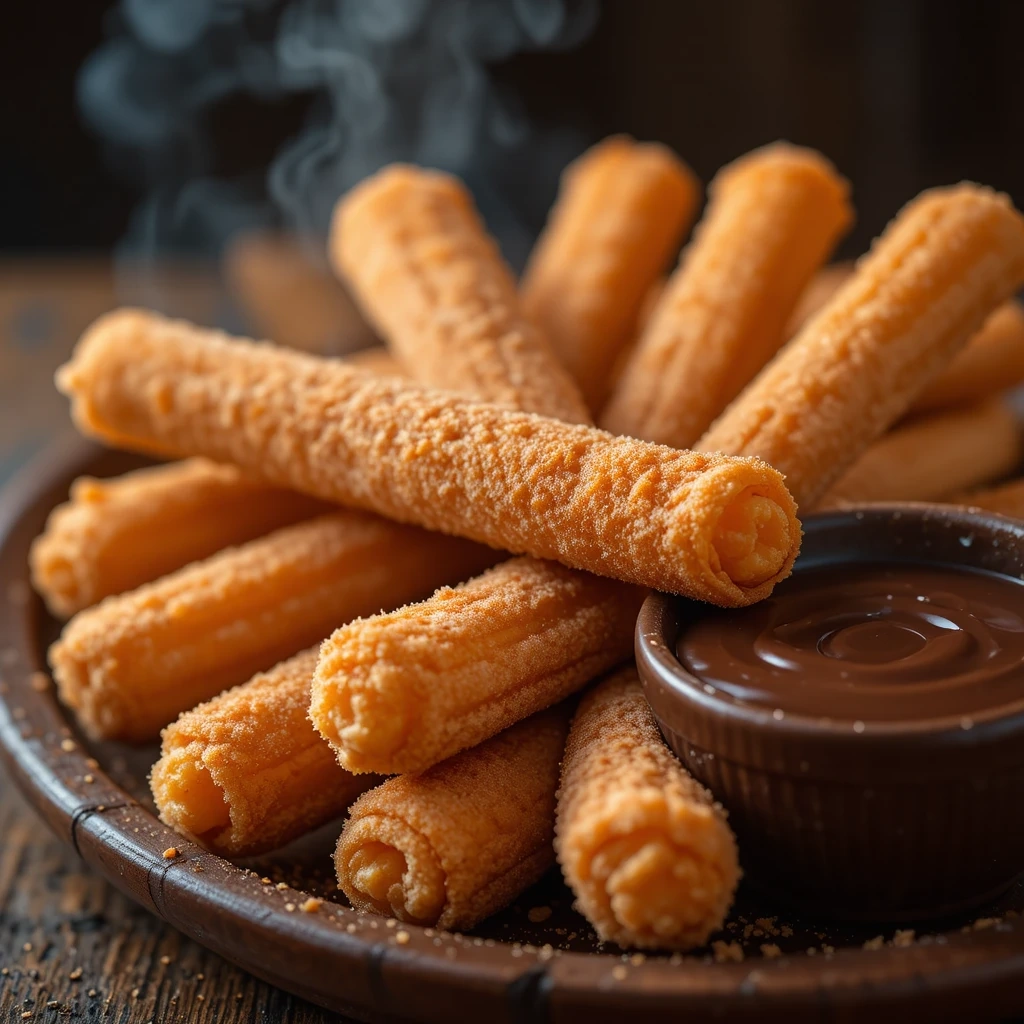
We could not do a carnival food roundup without Churros — those crispy, cinnamon-sugar-coated fried dough sticks that are absolutely magnificent. Paired with a rich, velvety chocolate dipping sauce, these are the grand finale to your carnival feast at home.
Why You’ll Love These Churros
Crispy Outside, Pillowy Inside
Churros made with a proper choux-style dough are worlds apart from any other version. The interior stays wonderfully soft while the outside crisps up into golden perfection.
The Chocolate Sauce Is Everything
This simple chocolate dipping sauce made with real chocolate and cream is smooth, rich, and absolutely perfect. It turns a great snack into a spectacular dessert.
Fun and Easy to Make with Kids
Piping the churro dough is a hands-on, fun activity for kids. Give them a piping bag and let them make different sizes and shapes!
Quick Overview
Churro dough comes together in one pot on the stovetop in about 5 minutes. Then you pipe it into hot oil for frying and toss immediately in cinnamon sugar. The chocolate sauce is made separately and takes only about 5 minutes.
| Detail | Info |
|---|---|
| Prep Time | 15 minutes |
| Cook Time | 15 minutes |
| Total Time | 30 minutes |
| Servings | 16–20 Churros |
Key Ingredients for Churros
For the Churro Dough:
- 1 cup water
- ½ cup unsalted butter
- 1 tablespoon granulated sugar
- ½ teaspoon salt
- 1 cup all-purpose flour
- 3 eggs
- Vegetable oil for frying
For the Cinnamon Sugar Coating:
- ½ cup granulated sugar
- 1 tablespoon ground cinnamon
For the Chocolate Dipping Sauce:
- 1 cup dark chocolate chips
- ½ cup heavy whipping cream
- 1 tablespoon butter
Step-by-Step Instructions
Step 1 — Boil the Base
In a medium saucepan, combine water, butter, sugar, and salt. Bring to a full boil over medium-high heat.
Step 2 — Add the Flour
Remove from heat and add all the flour at once. Stir vigorously with a wooden spoon until the mixture pulls together into a smooth ball of dough.
Step 3 — Add the Eggs
Let cool for 5 minutes, then beat in the eggs one at a time, stirring vigorously after each addition until fully incorporated. The dough should be smooth, glossy, and thick.
Step 4 — Heat the Oil and Prep the Bag
Heat oil in a deep pot to 375°F. Transfer the churro dough to a piping bag fitted with a large star tip.
Step 5 — Pipe and Fry
Pipe 4–5 inch lengths of dough directly into the hot oil, cutting with scissors. Fry 4–5 at a time for 3–4 minutes, turning once, until deeply golden.
Step 6 — Coat in Cinnamon Sugar
Remove with a slotted spoon and immediately roll in the cinnamon sugar mixture while still hot.
Step 7 — Make the Chocolate Sauce
Heat cream in a small saucepan until just simmering. Pour over chocolate chips and butter in a bowl. Let sit 2 minutes, then stir until silky smooth.
Step 8 — Serve
Serve churros warm with the chocolate dipping sauce on the side.
What to Serve Churros With
Churros are incredible with the chocolate dipping sauce, but caramel sauce and dulce de leche are equally wonderful options. Serve alongside fresh Carnival Lemonade for the perfect pairing.
Top Tips for Perfecting Churros
Let the Dough Cool Before Adding Eggs
Make sure the dough is cooled enough before adding eggs — too hot and the eggs will scramble. Wait at least 5 minutes after adding the flour.
Always Use a Star Tip
A large star tip (1M) creates those beautiful ridges that hold the cinnamon sugar beautifully. Plain round tips produce smooth churros that do not hold toppings as well.
Pipe Directly Over the Oil
Pipe directly over the oil and cut with scissors — this is safer and easier than piping onto a surface and transferring.
Coat While Hot
Roll in cinnamon sugar immediately while hot — it will not stick once they cool.
Storing and Reheating Tips
Store leftover Churros in an airtight container at room temperature for up to 2 days. Reheat in an oven or air fryer at 375°F for 5–6 minutes to restore their crispiness. The chocolate sauce can be stored in the fridge for up to 1 week and reheated gently in the microwave in 30-second intervals.
Common Mistakes to Avoid with Churros
- Adding flour gradually — always add the flour all at once; adding it slowly creates lumps.
- Skipping the cool-down — always let the dough cool before adding eggs or they will scramble.
- Using a smooth tip — always use a star tip; smooth dough does not hold the cinnamon sugar coating as well.
- Forgetting to coat while hot — cinnamon sugar only sticks to freshly fried, hot churros.
Nutrition Information (Per Serving)
| Nutrient | Amount |
|---|---|
| Calories | 220 kcal |
| Total Fat | 11g |
| Carbohydrates | 28g |
| Protein | 4g |
| Sugar | 10g |
| Dietary Fiber | 1g |
| Sodium | 120mg |
Frequently Asked Questions (FAQs)
What are the most popular carnival foods to make at home?
The most popular carnival foods to make at home include Funnel Cake, Corn Dogs, Churros, Elephant Ears, Kettle Corn, Caramel Apples, and Deep Fried Oreos. All of these are featured in this roundup and can be made with simple ingredients you likely already have.
Can I make carnival food without a deep fryer?
Absolutely! You do not need a deep fryer for any of these recipes. A deep, heavy-bottomed pot on the stovetop works perfectly. The key is using a kitchen thermometer to monitor the oil temperature — this is essential for safe, consistent frying results.
What oil is best for frying carnival food?
Vegetable oil, canola oil, or sunflower oil are all excellent choices for frying carnival food. They have high smoke points, neutral flavors, and are widely available. Avoid using olive oil as it has a lower smoke point and a strong flavor that does not suit most fried sweet foods.
Can carnival food be made ahead of time?
Most fried carnival foods are best served immediately after cooking. However, Caramel Apples and Kettle Corn can be made ahead of time. The caramel sauce for Churros and the cheese sauce for Nachos can also be prepared in advance and reheated when needed.
Are these carnival food recipes suitable for kids?
Yes! Every single recipe in this post is designed to be family-friendly and 100% halal. Many of the recipes — like Cotton Candy, Kettle Corn, Caramel Apples, and Fried Oreos — are also great for kids to help make under adult supervision.
What temperature should oil be for frying carnival food?
Most fried carnival foods fry best at 375°F (190°C). This temperature is hot enough to cook quickly and create a crispy exterior without allowing the oil to be absorbed into the food. Always use a candy or deep-fry thermometer for precision.
How do I keep fried foods crispy while serving?
Place fried foods on a wire rack over a baking sheet rather than directly on paper towels. This allows air to circulate all around the food and prevents the bottom from getting soggy. Serve as quickly as possible after frying.
Can I use an air fryer for any of these carnival recipes?
Yes! Corn Dogs, Churros, and Elephant Ears can all be adapted for the air fryer with excellent results. Preheat the air fryer to 390°F, lightly spray with oil, and cook for 8–12 minutes. The results will be slightly lighter but still very delicious.
What is the best topping for Funnel Cake?
The classic topping is powdered sugar, but fresh strawberries with whipped cream is a wonderful upgrade. You can also try Nutella, caramel sauce, fresh blueberries, or even a scoop of vanilla ice cream on top of a warm Funnel Cake for an epic dessert.
How do I make carnival food healthier?
Consider air frying instead of deep frying for a significant reduction in fat. Use whole wheat flour for added fiber in batters and doughs. Reduce sugar in recipes by 10–15% without sacrificing too much flavor. Use fresh fruit toppings instead of heavy sauces wherever possible.
Final Thoughts
There you have it — 10 incredible Carnival Food Recipes that bring the magic, nostalgia, and pure joy of the fairground right into your own kitchen. From the crispy golden crunch of a perfect Corn Dog to the fluffy, powdery delight of fresh Funnel Cake, each recipe is designed to create those special moments that families remember forever.
The best part? You know exactly what is going into your food, you control the quality, and you get to make every bite completely halal and family-friendly. Cook together, eat together, and enjoy every single messy, delicious moment.
We would absolutely love to see your carnival food creations! Share your experience in the comments below, and let us know which recipe became your family’s new favorite. Happy cooking!