
100 Days of School Food Ideas – Creative Recipes Kids Actually Want to Eat
Making school lunches day after day can feel overwhelming. You want variety, nutrition, and foods your kids will actually enjoy. These 100 days of school food ideas bring fresh inspiration to your lunch-packing routine with simple, budget-friendly recipes the whole family loves.
From colorful veggie wraps to homemade pizza pockets, you’ll discover creative ways to keep lunch boxes exciting all school year long. Similar to our popular after-school snack guide, these recipes focus on real ingredients and minimal prep time. Let’s transform lunchtime into something your children look forward to opening!
What Are 100 Days of School Food Ideas?
Ever wonder how to keep school lunches interesting for an entire school year? The 100 days of school food ideas concept gives you a rotating menu of delicious, nutritious options your kids won’t trade away. Think of it as your personal lunch box encyclopedia.
After all, they say variety is the spice of life, and nothing proves that more than a child’s excitement over discovering something new in their lunch box. Ready to become the lunch-packing champion your family deserves?
This recipe is 100% AI-generated and has not been personally cooked or tested by us. We value our community, and readers who’ve prepared other site recipes often report good results.
Why You’ll Love These 100 Days of School Food Ideas
Fresh Variety That Keeps Kids Excited
These recipes bring restaurant-quality flavors to everyday lunch boxes without the hefty price tag. Your children will feel special opening containers filled with colorful ingredients, crispy textures, and familiar favorites with fun twists. Each idea balances nutrition with kid-approved taste.
Save Money While Eating Better
Store-bought lunch kits cost several dollars each, but making these recipes at home costs pennies per serving. You control the ingredients, avoiding excess sodium and preservatives found in packaged foods. The savings add up quickly over a school year.
Simple Ingredients, Maximum Flavor
Fresh vegetables, quality proteins, whole grains, and creative seasonings transform basic ingredients into memorable meals. Crunchy vegetables stay crisp, cheese melts perfectly, and sauces add moisture without making things soggy. These combinations create balanced nutrition kids actually finish.
For more lunch inspiration, check out our kid-friendly dinner roundup that works great for leftovers in tomorrow’s lunch box. Let’s start creating lunches your children will love!
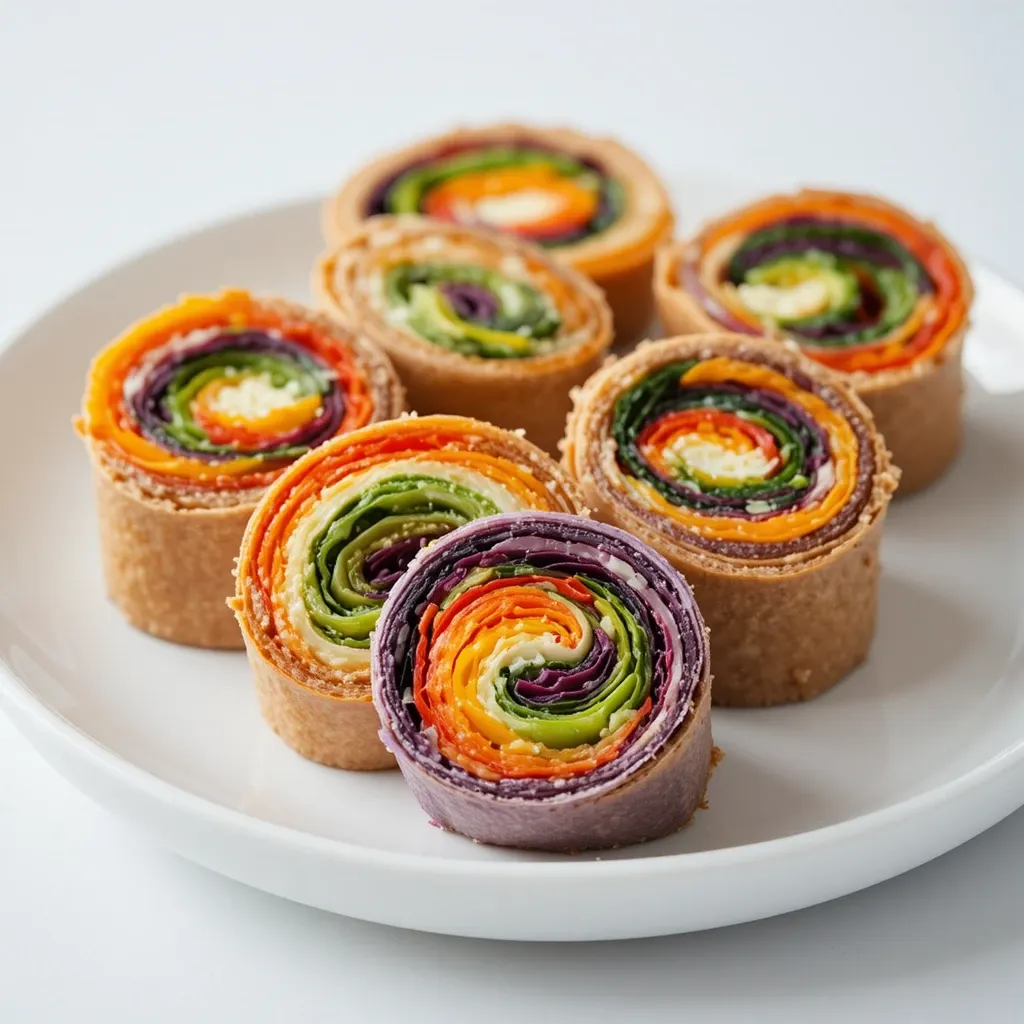
Recipe 1: Rainbow Veggie Pinwheels
Quick Overview
These colorful pinwheels make vegetables fun and exciting for kids. Soft tortillas wrap around cream cheese and crunchy rainbow vegetables, creating portable spirals that are easy to eat and beautiful to look at. The creamy texture contrasts perfectly with crisp veggies, making each bite interesting.
Prep Time: 10 minutes
Total Time: 10 minutes
Servings: 4 pinwheels (1 lunch serving)
Key Ingredients for Rainbow Veggie Pinwheels
- 1 large whole wheat tortilla (10-inch)
- 3 tablespoons cream cheese, softened
- 2 tablespoons hummus (optional)
- 1/4 cup shredded carrots
- 1/4 cup thinly sliced red bell pepper
- 1/4 cup thinly sliced cucumber
- 2-3 fresh spinach leaves
- 1/4 cup shredded purple cabbage
- Pinch of salt and pepper
Step-by-Step Instructions
Step 1: Prepare Your Workspace
Lay the tortilla flat on a clean cutting board. Make sure it’s at room temperature so it rolls easily without cracking.
Step 2: Spread the Cream Cheese
Use a butter knife to spread cream cheese evenly across the entire tortilla surface, leaving about half an inch around the edges. If using hummus, mix it with the cream cheese first for extra flavor.
Step 3: Layer the Vegetables
Arrange vegetables in colorful strips across the tortilla. Start with spinach leaves, then add carrots, bell peppers, cucumber, and purple cabbage. Keep vegetables in the center area, avoiding the edges.
Step 4: Season Lightly
Sprinkle a tiny pinch of salt and pepper over the vegetables for enhanced flavor.
Step 5: Roll Tightly
Starting from one edge, roll the tortilla tightly like a sleeping bag. Keep the filling tucked inside as you roll. Press gently to seal.
Step 6: Slice and Pack
Using a sharp knife, cut the roll into 4-5 equal pieces. Pack them cut-side up in your lunch container so kids can see the beautiful rainbow pattern.
What to Serve Rainbow Veggie Pinwheels With
Pair these pinwheels with ranch dressing or tzatziki for dipping. Add crackers, cheese cubes, fresh fruit like grapes or apple slices, and a small cookie for a complete balanced lunch. A handful of pretzels provides satisfying crunch.
Top Tips for Perfecting Rainbow Veggie Pinwheels
Choose the Right Tortilla
Use fresh, pliable tortillas that haven’t been refrigerated too long. Whole wheat or spinach tortillas add nutrition and color.
Don’t Overfill
Too many vegetables will make rolling difficult and cause the pinwheel to fall apart. Less is more for beginners.
Make Ahead Successfully
Prepare these the night before and wrap tightly in plastic wrap. They stay fresh in the refrigerator for up to 24 hours.
Customize for Preferences
Swap vegetables based on what your kids enjoy. Try shredded cheese, deli turkey, or avocado slices instead.
Storing and Reheating Tips
Store assembled pinwheels in an airtight container in the refrigerator for up to 24 hours. These are meant to be served cold, so no reheating needed. If making multiple servings, keep uncut rolls wrapped tightly and slice fresh each morning. The cream cheese acts as a barrier keeping vegetables crisp. Add an ice pack to the lunch box to maintain freshness until lunchtime.
Recipe 2: Homemade Pizza Pockets

Quick Overview
These golden, flaky pizza pockets taste like your favorite pizzeria wrapped in portable perfection. Warm dough surrounds gooey cheese and savory sauce, creating handheld comfort food that travels well. Kids love making these with you, choosing their own fillings.
Prep Time: 15 minutes
Cook Time: 15 minutes
Total Time: 30 minutes
Servings: 6 pizza pockets
Key Ingredients for Homemade Pizza Pockets
For the Dough:
- 1 can refrigerated pizza dough or crescent roll dough
- 1 tablespoon olive oil
For the Filling:
- 1/2 cup pizza sauce or marinara
- 1 1/2 cups shredded mozzarella cheese
- 1/4 cup mini pepperoni slices (optional)
- 1/4 teaspoon Italian seasoning
- 1/4 teaspoon garlic powder
For Topping:
- 1 egg, beaten (for egg wash)
- 2 tablespoons grated Parmesan cheese
Step-by-Step Instructions
Step 1: Preheat and Prepare
Preheat your oven to 375°F (190°C). Line a baking sheet with parchment paper to prevent sticking.
Step 2: Roll Out the Dough
Unroll pizza dough onto a lightly floured surface. Using a rolling pin, roll it into a rectangle about 1/4 inch thick. Cut into 6 equal rectangles.
Step 3: Add the Filling
Place one tablespoon of pizza sauce on one half of each rectangle, leaving a border around the edges. Top with shredded cheese, pepperoni if using, and a sprinkle of Italian seasoning.
Step 4: Seal the Pockets
Fold the empty half of dough over the filling, creating a pocket. Press edges firmly with a fork to seal completely. Make sure all edges are closed to prevent cheese from leaking during baking.
Step 5: Apply Egg Wash
Brush the top of each pocket with beaten egg. This creates a beautiful golden color when baked. Sprinkle with Parmesan cheese.
Step 6: Bake Until Golden
Place pockets on the prepared baking sheet, spacing them two inches apart. Bake for 12-15 minutes until golden brown and puffed. Let cool for 5 minutes before packing.
What to Serve Homemade Pizza Pockets With
These pockets pair wonderfully with baby carrots, cherry tomatoes, or cucumber slices. Add a small container of extra marinara sauce for dipping. Fresh fruit like strawberries or mandarin oranges balances the savory flavors. A granola bar makes a nice dessert addition.
Top Tips for Perfecting Homemade Pizza Pockets
Prevent Soggy Pockets
Don’t overfill with sauce, which makes dough soggy. One tablespoon per pocket is perfect. Pat pepperoni slices with paper towels to remove excess oil.
Customize Fillings
Try different combinations like ham and pineapple, chicken and ranch, or just cheese for picky eaters. Let kids create their own flavor combinations.
Freeze for Later
After baking and cooling completely, freeze pizza pockets in freezer bags for up to 3 months. Thaw overnight and pack cold, or warm briefly in the morning.
Check for Leaks
Ensure all edges are sealed tightly before baking. Any gaps will leak cheese and create a mess.
Storing and Reheating Tips
Store baked pizza pockets in an airtight container in the refrigerator for up to 4 days. They’re delicious cold or can be reheated in the microwave for 20-30 seconds. For freezing, wrap each cooled pocket individually in plastic wrap, then place all in a freezer bag. Label with the date. To serve from frozen, let thaw overnight in the refrigerator. These travel well to school and taste great at room temperature.
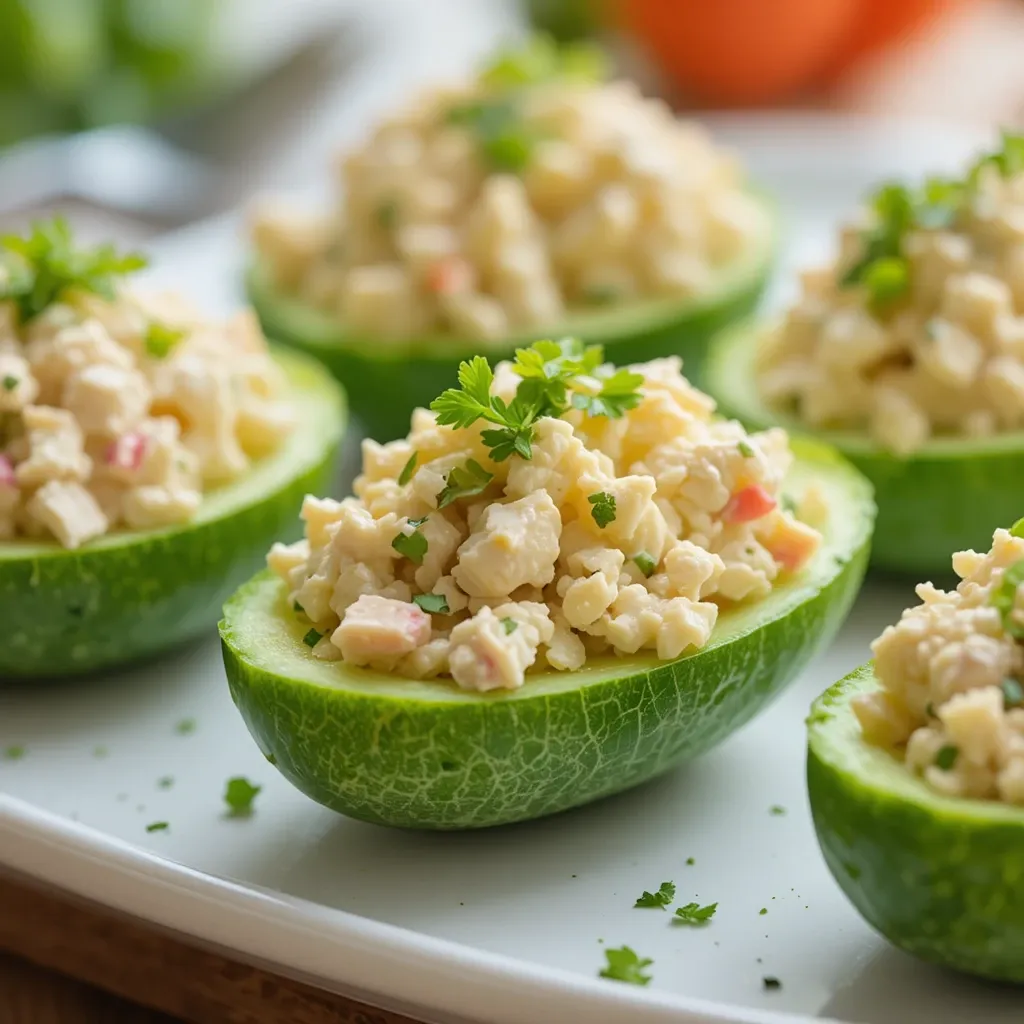
Recipe 3: Chicken Salad Cucumber Boats
Quick Overview
These refreshing cucumber boats transform classic chicken salad into a fun, crunchy vessel kids can pick up and munch. Cool cucumbers hold creamy, protein-packed chicken salad, creating a light yet filling lunch option. The contrast between crisp cucumber and smooth filling makes every bite satisfying.
Prep Time: 15 minutes
Total Time: 15 minutes
Servings: 4 cucumber boats
Key Ingredients for Chicken Salad Cucumber Boats
- 2 large cucumbers
- 1 cup cooked chicken, shredded or diced
- 3 tablespoons mayonnaise
- 1 tablespoon plain Greek yogurt
- 1/4 cup finely diced celery
- 1 tablespoon finely diced red onion (optional)
- 1/4 teaspoon garlic powder
- Salt and pepper to taste
- Fresh dill or parsley for garnish (optional)
Step-by-Step Instructions
Step 1: Prepare the Cucumbers
Wash cucumbers thoroughly. Cut each cucumber in half lengthwise. Using a small spoon, carefully scoop out the seeds and some flesh, creating a boat shape. Leave enough cucumber wall so they don’t fall apart.
Step 2: Make the Chicken Salad
In a medium bowl, combine shredded chicken, mayonnaise, Greek yogurt, diced celery, and onion if using. Mix until everything is evenly coated.
Step 3: Season Perfectly
Add garlic powder, salt, and pepper to the chicken mixture. Taste and adjust seasoning as needed. The yogurt adds tang while cutting calories from using only mayo.
Step 4: Fill the Boats
Spoon chicken salad generously into each cucumber boat. Mound it slightly above the edges for an appealing presentation.
Step 5: Garnish and Chill
Sprinkle fresh herbs on top if desired. Cover with plastic wrap and refrigerate for at least 30 minutes before packing. This helps flavors meld and keeps everything fresh.
What to Serve Chicken Salad Cucumber Boats With
Serve alongside whole grain crackers for dipping extra chicken salad. Add cherry tomatoes, baby carrots, and a small portion of grapes or berries. String cheese or cheese cubes provide additional protein. A homemade cookie or fruit leather makes a sweet finish.
Top Tips for Perfecting Chicken Salad Cucumber Boats
Choose the Right Cucumbers
Select firm, straight cucumbers without soft spots. English cucumbers work exceptionally well because they have fewer seeds and thinner skins.
Make Chicken Salad Ahead
Prepare chicken salad up to 2 days in advance and store separately. Fill cucumber boats the morning of packing to prevent them from getting watery.
Prevent Watery Filling
After scooping seeds, pat the inside of cucumber boats with paper towels to absorb excess moisture. This keeps the chicken salad from sliding around.
Add Crunch Variations
Mix in chopped pecans, walnuts, or sunflower seeds for extra texture and healthy fats. Diced apples or grapes add sweetness kids enjoy.
Storing and Reheating Tips
Store filled cucumber boats in an airtight container for up to 24 hours in the refrigerator. These are best eaten cold and should not be frozen, as cucumbers become mushy when thawed. If packing for lunch, include an ice pack to keep everything chilled. Extra chicken salad can be stored separately for up to 3 days and used for sandwiches or crackers. The cucumber boats themselves are best made fresh each day for optimal crunch.
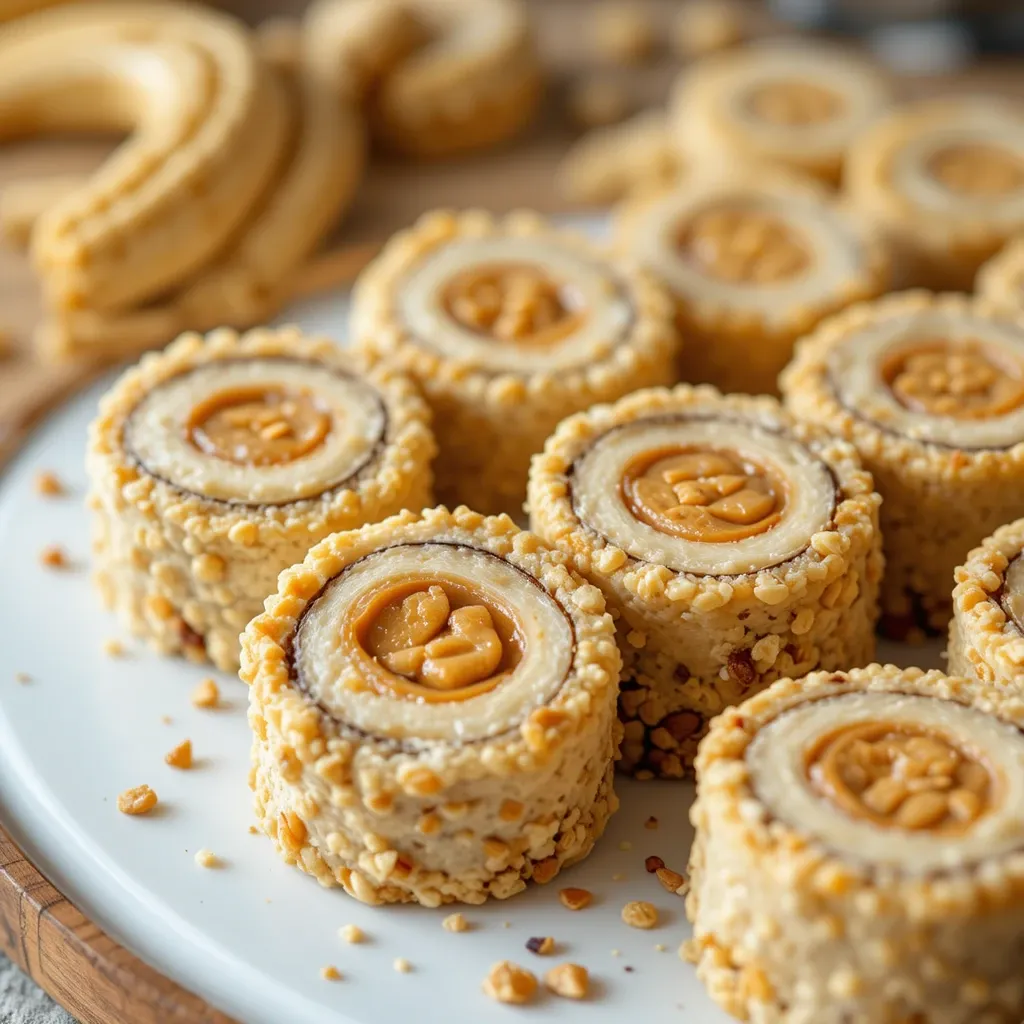
Recipe 4: Peanut Butter Banana Sushi Rolls
Quick Overview
These adorable sushi-style rolls make healthy eating fun and playful. Soft tortillas spread with creamy peanut butter and wrapped around sweet bananas create portable finger food that’s naturally sweet and satisfying. Rolling and slicing them feels like a special cooking project kids love helping with.
Prep Time: 5 minutes
Total Time: 5 minutes
Servings: 6-8 sushi pieces
Key Ingredients for Peanut Butter Banana Sushi Rolls
- 1 whole wheat tortilla (8-10 inch)
- 3 tablespoons peanut butter (or sunflower seed butter for nut-free)
- 1 medium banana
- 1 tablespoon honey (optional)
- 2 tablespoons granola or crushed cereal for coating (optional)
- Pinch of cinnamon (optional)
Step-by-Step Instructions
Step 1: Prepare the Tortilla
Lay your tortilla flat on a cutting board. Make sure it’s fresh and pliable so it rolls without cracking.
Step 2: Spread Peanut Butter
Using a butter knife, spread peanut butter evenly across the entire tortilla surface. Go all the way to the edges for complete coverage. Drizzle honey over the peanut butter if using.
Step 3: Position the Banana
Place the whole banana along one edge of the tortilla. Choose a banana that’s ripe but still firm, not mushy.
Step 4: Roll Tightly
Starting with the banana edge, roll the tortilla tightly around the banana. Keep it snug as you roll to prevent gaps. The peanut butter will help it stick together.
Step 5: Optional Coating
If desired, spread a thin layer of peanut butter on the outside of the roll and roll it in granola or crushed cereal for added crunch and visual appeal.
Step 6: Slice into Sushi
Using a sharp knife, cut the roll into 6-8 equal pieces, about one inch thick. Arrange them standing up in your container so the spiral shows.
What to Serve Peanut Butter Banana Sushi Rolls With
These sweet rolls pair well with yogurt, string cheese for protein balance, and fresh berries or apple slices. Add a small handful of pretzels or crackers for savory contrast. Carrot sticks with ranch provide vegetables. A small juice box or water bottle completes the meal.
Top Tips for Perfecting Peanut Butter Banana Sushi Rolls
Prevent Browning
Bananas brown quickly once cut. Pack these rolls just before heading to school, or brush banana lightly with lemon juice to slow browning.
Choose the Right Banana
Use bananas that are yellow with minimal brown spots. They should be sweet but firm enough to hold their shape when rolled.
Make It Nut-Free
For schools with nut allergies, substitute sunflower seed butter, which has similar taste and texture to peanut butter.
Add Nutritional Boosts
Sprinkle chia seeds or ground flaxseed on the peanut butter before rolling for extra omega-3 fatty acids and fiber.
Storing and Reheating Tips
These sushi rolls are best made fresh the morning of packing. They can be stored in the refrigerator for up to 6 hours but may become slightly soggy. Store in an airtight container to prevent drying out. Do not freeze, as the banana texture becomes unpleasant when thawed. If making slightly ahead, wait to slice until just before packing. The whole rolled tortilla keeps better than individual pieces. Pack with an ice pack if the weather is warm.
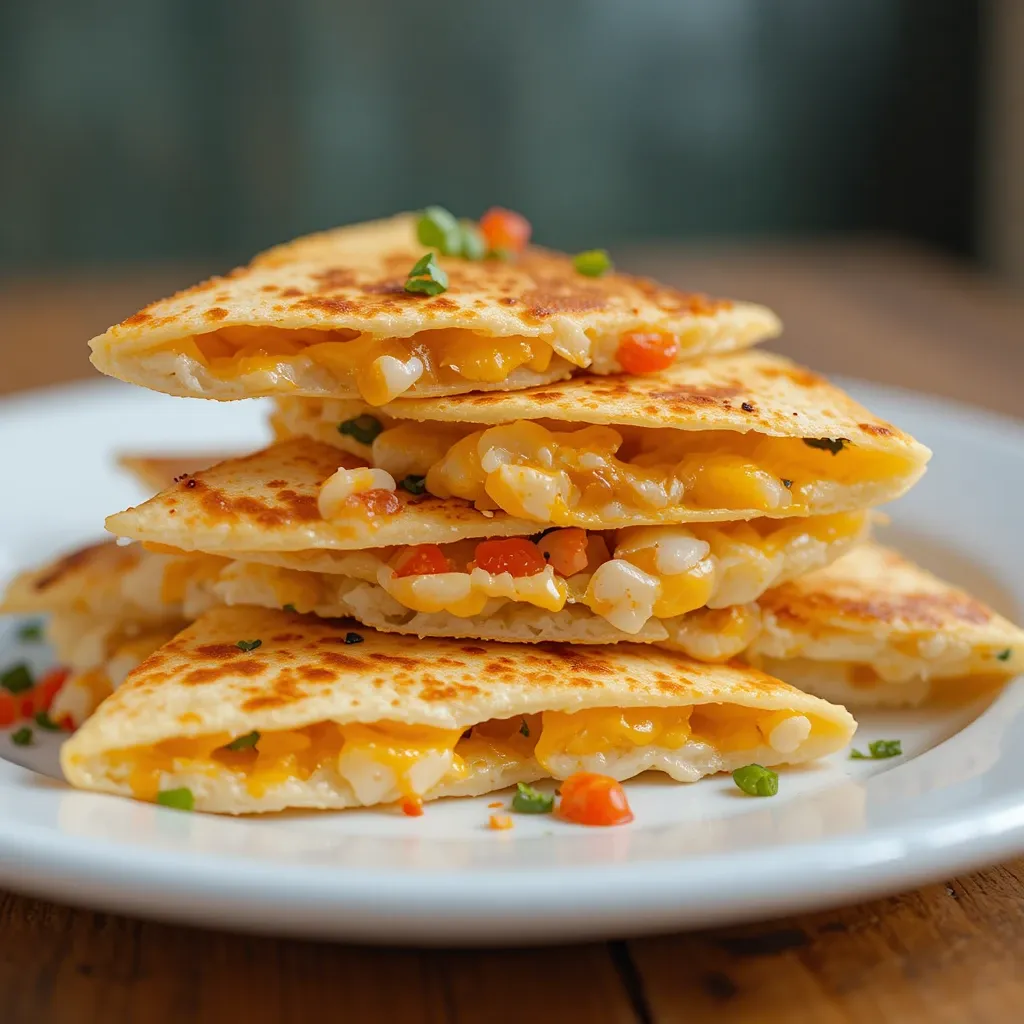
Recipe 5: Mini Cheese Quesadillas
Quick Overview
These golden, crispy quesadillas deliver melted cheese perfection in kid-sized portions. Toasted tortillas create a crunchy exterior while gooey cheese inside provides comfort food satisfaction. They’re simple enough for busy mornings yet special enough to make kids smile.
Prep Time: 5 minutes
Cook Time: 10 minutes
Total Time: 15 minutes
Servings: 8 mini quesadilla triangles
Key Ingredients for Mini Cheese Quesadillas
- 2 flour tortillas (8-inch)
- 1 cup shredded cheddar cheese
- 1/2 cup shredded mozzarella cheese
- 1 tablespoon butter
- Optional add-ins: black beans, diced cooked chicken, diced bell peppers
Step-by-Step Instructions
Step 1: Heat Your Pan
Place a large skillet over medium heat. Let it warm for about one minute before cooking.
Step 2: Prepare First Tortilla
Add half the butter to the pan, letting it melt and coat the surface. Place one tortilla in the melted butter.
Step 3: Add Cheese
Immediately sprinkle both cheddar and mozzarella cheese evenly across the entire tortilla. Add any optional ingredients now if using.
Step 4: Top and Cook
Place the second tortilla on top, pressing down gently. Cook for 2-3 minutes until the bottom is golden brown and crispy.
Step 5: Flip Carefully
Using a large spatula, carefully flip the entire quesadilla. Add remaining butter to the pan if needed. Cook another 2-3 minutes until the second side is golden and cheese is completely melted.
Step 6: Cut and Cool
Transfer to a cutting board. Let cool for 2 minutes, then cut into 8 triangular pieces using a pizza cutter or sharp knife. Pack once completely cooled.
What to Serve Mini Cheese Quesadillas With
Serve with salsa, guacamole, or sour cream in small dipping containers. Add corn chips, fresh vegetables like cherry tomatoes and cucumber slices, and fruit such as pineapple chunks or grapes. A small cookie or brownie makes a nice treat.
Top Tips for Perfecting Mini Cheese Quesadillas
Get Even Browning
Don’t cook on too high heat, which burns the outside before cheese melts. Medium heat creates perfect golden color.
Mix Cheese Types
Combining cheddar for flavor and mozzarella for meltiness creates the best texture. Try Monterey Jack or pepper jack for variety.
Prevent Sticking
Use enough butter to coat the pan. Non-stick cooking spray works well too. A well-seasoned cast iron skillet makes fantastic quesadillas.
Make Them Ahead
Cook quesadillas completely, cool, and refrigerate. They taste delicious cold or can be warmed briefly in the morning.
Storing and Reheating Tips
Store cooked quesadillas in an airtight container in the refrigerator for up to 4 days. Layer parchment paper between quesadillas to prevent sticking. They’re excellent served cold or at room temperature, making them perfect for lunch boxes. To reheat, microwave for 20-30 seconds or warm in a skillet for 1-2 minutes per side. For freezing, wrap individual pieces in plastic wrap and store in freezer bags for up to 2 months. Thaw overnight in the refrigerator before packing.
Additional Quick Lunch Ideas for 100 Days of School
Week 1-2: Sandwich Creations
- Turkey and cheese roll-ups with lettuce
- Ham and cream cheese bagel sandwiches
- Egg salad on whole wheat bread
- Tuna salad with crackers
- Chicken Caesar wraps
Week 3-4: Pasta Perfection
- Cold pasta salad with vegetables and Italian dressing
- Mac and cheese (cold or in thermos)
- Tortellini with pesto sauce
- Bowtie pasta with cherry tomatoes and mozzarella
- Spaghetti with marinara sauce
Week 5-6: Protein Power
- Hard-boiled eggs with everything bagel seasoning
- Cheese cubes and whole grain crackers
- Greek yogurt parfait with granola
- Chicken nuggets (taste great cold)
- Mini meatballs with marinara
Week 7-8: International Flavors
- Homemade sushi rolls with cream cheese and cucumber
- Mini spring rolls with peanut sauce
- Chicken fried rice
- Bean and cheese burritos
- Greek pita pockets with tzatziki
Week 9-10: Breakfast for Lunch
- Mini pancakes with syrup for dipping
- Waffle sandwiches with fruit and cream cheese
- Breakfast burrito with scrambled eggs
- French toast sticks
- Yogurt with fruit and muffin
Week 11-12: Fun Finger Foods
- Pretzel bites with cheese sauce
- Chicken tenders with honey mustard
- Mini corn dogs
- Mozzarella sticks with marinara
- Soft pretzel with mustard
Week 13-14: Healthy Bowls
- Burrito bowl with rice, beans, cheese, and salsa
- Chicken teriyaki over rice
- Mediterranean bowl with hummus, vegetables, and pita
- Taco salad in a cup
- Buddha bowl with quinoa and roasted vegetables
Week 15-16: Comfort Classics
- Grilled cheese triangles
- Tomato soup in a thermos with crackers
- Chicken noodle soup
- Chili with cornbread muffin
- Creamy potato soup
Week 17-18: Fresh and Light
- Caprese skewers with balsamic glaze
- Veggie sushi with avocado
- Garden salad with protein
- Fruit and cheese plate
- Vegetable spring rolls
Week 19-20: Leftover Magic
- Pizza slices (kids love cold pizza)
- Roasted chicken pieces
- Beef stir-fry over noodles
- Pulled pork slider
- Meatloaf slice with ketchup
Nutrition Information
| Nutrient | Rainbow Veggie Pinwheels | Pizza Pockets | Cucumber Boats | PB Banana Sushi | Mini Quesadillas |
|---|---|---|---|---|---|
| Calories | 180 | 280 | 220 | 250 | 320 |
| Protein | 6g | 12g | 18g | 8g | 14g |
| Carbs | 22g | 32g | 8g | 35g | 28g |
| Fat | 8g | 12g | 14g | 10g | 18g |
| Fiber | 4g | 2g | 2g | 4g | 2g |
| Sugar | 3g | 4g | 4g | 12g | 2g |
Nutrition values are approximate and may vary based on specific ingredients used
Frequently Asked Questions
How do I keep school lunches fresh without refrigeration?
Use insulated lunch boxes with ice packs to maintain safe temperatures. Freeze juice boxes or water bottles overnight and pack them with lunch. They’ll thaw by lunchtime while keeping everything cold. Choose foods that taste good at room temperature.
What are the best containers for packing school lunches?
Bento-style boxes with compartments keep foods separated and fresh. Look for leak-proof containers with tight-fitting lids. Stainless steel containers maintain temperature well. Silicone cups work great for dips and sauces inside larger containers.
How can I make sure my child eats their vegetables?
Cut vegetables into fun shapes using cookie cutters. Pair them with favorite dips like ranch or hummus. Include vegetables your child already enjoys. Don’t overwhelm the lunch box with too many new foods at once.
What if my child has food allergies?
Always check ingredient labels carefully. Substitute allergens with safe alternatives like sunflower seed butter for peanut allergies. Communicate with teachers about your child’s allergies. Pack safe treats your child can have if others bring birthday snacks.
How far in advance can I prep school lunches?
Many components can be prepped Sunday for the week ahead. Wash and cut vegetables, cook proteins, and portion snacks into containers. Assemble sandwiches and wraps the night before or morning of. Some items like quesadillas and pizza pockets can be made and frozen.
What do I do if my child keeps coming home with uneaten lunch?
Ask what they’d prefer and involve them in planning. Pack smaller portions of new foods alongside familiar favorites. Make food visually appealing with colorful arrangements. Sometimes kids need time to warm up to new foods.
How do I handle picky eaters?
Respect their preferences while gently introducing new foods. Keep a rotation of 3-5 lunches they reliably eat. Add one new item per week alongside favorites. Let them help choose and prepare lunches. Don’t turn lunch into a battle.
What are good protein sources for vegetarian kids?
Beans, lentils, tofu, edamame, cheese, Greek yogurt, eggs, nut butters, and quinoa all provide excellent protein. Hummus with whole grain crackers, cheese quesadillas, and yogurt parfaits work wonderfully.
How do I keep lunch interesting for 100 days?
Rotate through different food categories weekly. Use cookie cutters for fun shapes. Let kids build their own combinations like DIY lunchables. Theme days like Taco Tuesday or Pizza Friday add excitement. Small treats and notes in lunch boxes create joy.
What foods should I avoid packing in school lunches?
Skip foods that spoil quickly without refrigeration like mayo-heavy salads in warm weather. Avoid messy foods that are hard to eat without utensils. Check your school’s allergy policy about nuts. Skip items that need heating if your child won’t have access to a microwave.
Top Tips for Avoiding Common Lunch-Packing Mistakes
Don’t Pack Too Much Food
Kids have limited lunch time and small appetites. Overfilled lunch boxes lead to waste and stress. Pack reasonable portions your child can actually finish.
Avoid Last-Minute Packing Rush
Prep what you can the night before. Morning chaos leads to forgotten items and unbalanced meals. Set out lunch boxes and containers the evening prior.
Don’t Forget the Ice Pack
Food safety matters enormously. Perishable items need to stay below 40°F. Always include at least one ice pack, especially for dairy and meat.
Stop Packing Only Foods You Want Them to Eat
While nutrition matters, uneaten healthy food helps no one. Find the balance between nutritious and actually eaten. Small portions of loved foods ensure they’ll have energy.
Don’t Skip Variety
The same lunch daily gets boring fast. Rotate proteins, fruits, vegetables, and grains throughout the week. Different colors, textures, and flavors maintain interest.
Avoid Complicated Assemblies
Kids have limited time and coordination. Foods requiring multi-step assembly often don’t get eaten. Keep it simple with pre-assembled or easy-to-eat items.
Don’t Ignore Temperature Requirements
Some foods taste terrible cold while others are perfect. Quesadillas and pizza work wonderfully at room temperature. Soups need a thermos. Plan accordingly.
Stop Buying Everything Pre-Packaged
Individually wrapped items create waste and cost more. Buy in bulk and portion into reusable containers. Homemade versions taste better and save money.
Don’t Forget Hydration
Pack water bottles or include high-water-content foods like cucumbers, watermelon, and grapes. Proper hydration helps concentration and energy.
Avoid Setting Unrealistic Expectations
Not every lunch needs to be Pinterest-perfect. Simple, nutritious, and eaten beats elaborate and wasted. Give yourself grace on busy days.
Final Thoughts
These 100 days of school food ideas transform lunch-packing from stressful chore into creative opportunity. Your children deserve variety, nutrition, and foods they genuinely enjoy. Each recipe focuses on simple preparation, budget-friendly ingredients, and kid-approved flavors.
Start with the five detailed recipes provided, then branch into the quick ideas listed for weeks 1-20. Involve your children in choosing and preparing lunches. Their investment in the process increases the likelihood they’ll eat what you pack.
Remember that feeding children is about progress, not perfection. Some days will be simple crackers and cheese. Other days you’ll create beautiful bento boxes. Both are perfectly acceptable. The goal remains providing nourishment and showing love through food.
Keep an ongoing list of hits and misses. Every child has unique preferences. What works for one family might not work for yours. Adapt these ideas to fit your family’s needs, dietary restrictions, and taste preferences.
Pack lunches the night before when possible. Morning chaos makes balanced meals harder to achieve. Having components prepped and ready reduces stress for everyone.
Most importantly, enjoy this time. Those lunch boxes represent daily opportunities to nourish your children’s bodies and spirits. Little notes, fun napkins, or surprise treats show them they’re loved even when you’re apart.
Happy lunch packing, and here’s to 100 days of satisfied, well-fed students!